Friday, July 15, 2016

How to Add Subtitles to MP4 Videos Movies on PC/Mac

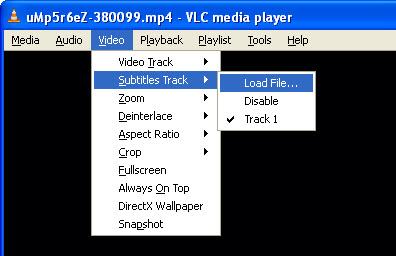
Subtitles are always shown as the text word of the dialogue or commentary in movies, TV programs, video games, music videos, etc. Most subtitles consist purely of text characters since text is surely the simplest data to be stored and compressed. If you’re going to create a slideshow or greeting card video, you’ll probably want to include captions or titles that let you comment on what the viewer is seeing, in addition to images, videos, and music. 

Here, a step-by-step guide on how to add subtitles to MP4, including two methods about get downloaded the right subtitles for your MP4 videos as well as how to add various external subtitles to MP4 like add SRT to MP4. 

Part One: Adding Subtitles to MP4 Video from eHow 

Those with MP4 files that are without subtitles may want to add them, and to do so requires following a specific process. Download MP4Box and Yamb, and extract them from their zip files onto your PC. For ease of use, make sure they're in the same folder. The links for both programs are included below in the Resources section. 

Run Yamb from its folder, and click on the Settings Icon. Double click on the "Advanced Settings for Yamb" entry. 

Type in the file path to the MP4Box program in the Location box. For example, if it was saved directly on the C drive, it would be "C:/mp4box.exe." Then click on Next. 

Click on the Creation icon from Yamb's main menu. Double click on the entry "Click to create an MP4 file." 

Click on the Add button and locate the MP4 file that you wish to subtitle. Add the file to the MP4 File Creation window. 

Click on the Add button again, and locate the SRT subtitle file that will be added to the video. 

Change the output file's name to make a separate MP4 file, unless you wish to overwrite the original MP4 video. 

Click on Next, and wait for Yamb to process the file. The time required will vary based on the video's length and file size. 

When the file finishes, click "Finish" to close Yamb, or click "Back" if you have any other videos to add subtitles to. 
Source:http://www.ehow.com/how_6867828_add-subtitles-mp4-files.html 

Part Two: Easily Add Subtitles to MP4 Videos Movies with Best MP4 Subtitle Adder 

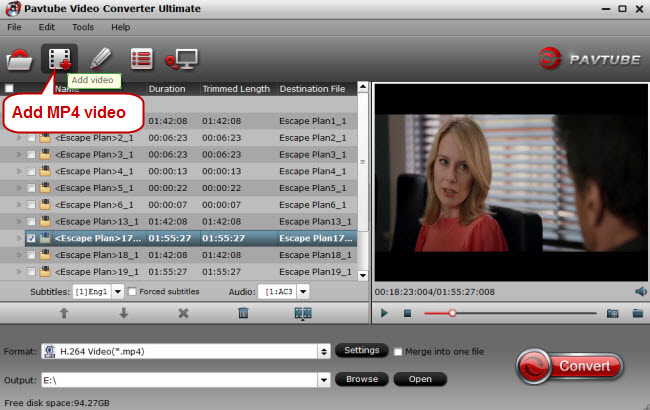
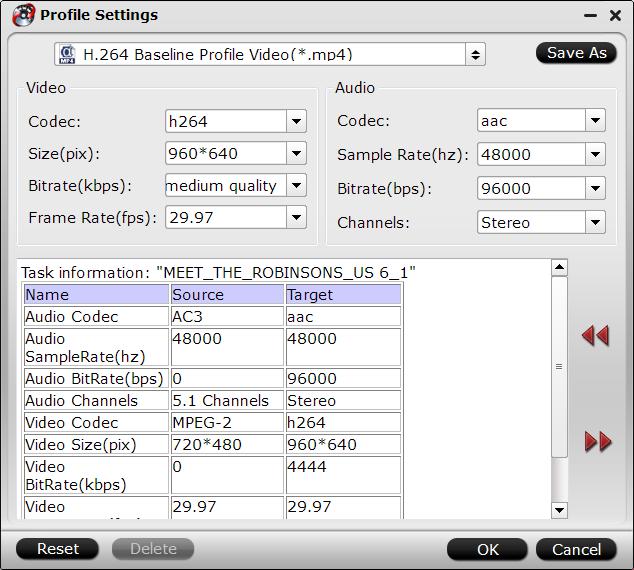
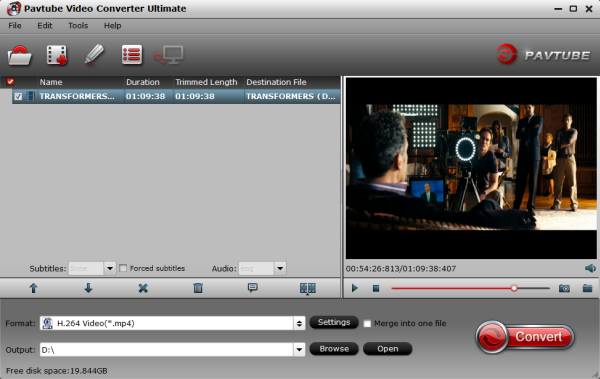
After you have downloaded the subtitles, you may wonder how to embed and attach the downloaded subtitle to MP4 movies. Not to worry! Below will describe a detailed guide on how to add subtitles to MP4. Pavtube Video Converter Ultimate is the top choice for adding subtitles to MP4 files. Before merging your preferred external subtitles to MP4 videos, we'd like to provide some basic knowledge of this powerful MP4 subtitles merger to help you learn what it can exactly do for you. Here is review

Key Features of MP4 Subtitle Adder 

* Add subtitles to MP4 like add SRT to MP4, add SSA to MP4, add SUB and IDX to MP4 and more; 
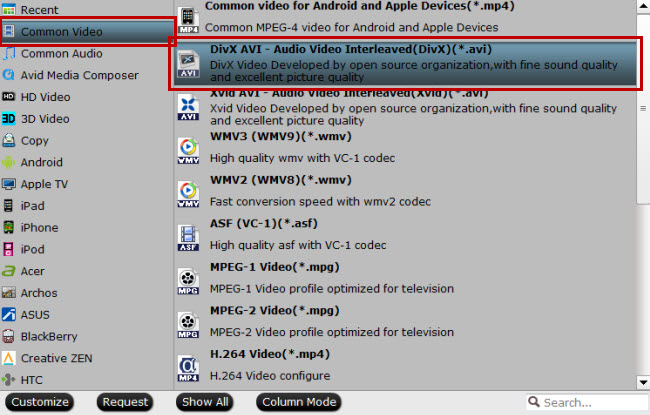
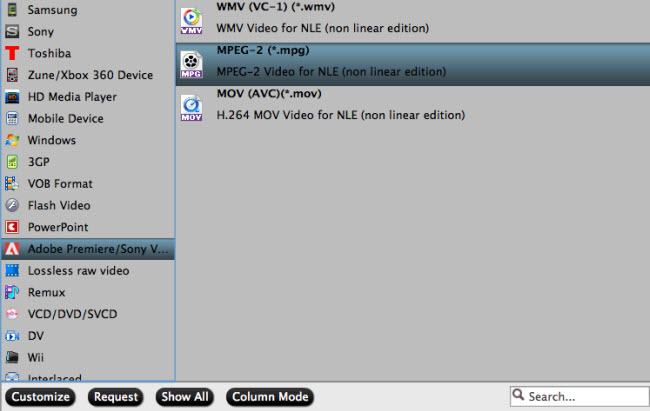
* Add subtitles to MP4 as well as keep the original video format or change MP4 to MOV, AVI, WMV, MKV, FLV, ASF, WebM, 3GP, etc; 
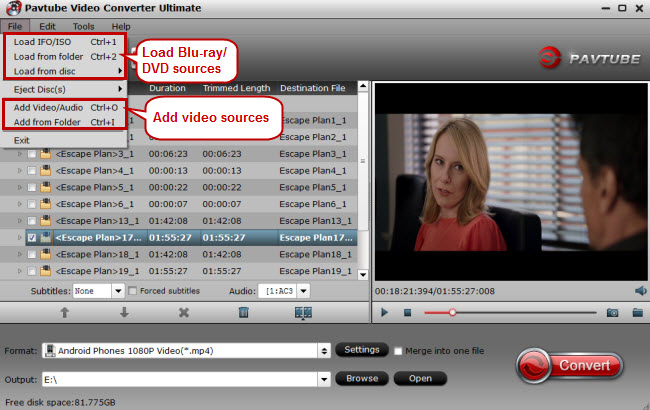
* Also can attach subtitles to almost all kinds of video clips like MOV, AVI, WMV, MKV, FLV, ASF, AVHCD, MOD, MTS, MXF, WebM, SWF and more; 
* Besides embed subtitles to MP4, it also supports editing videos in many options: trim, crop, merge, split, add effect/watermark, adjust volume/bitrate/channel, etc; 
* Add SRT to MP4 on Mac OS X v10.5 (Leopard), 10.6 (Snow Leopard),10.7 (Lion), 10.8 (Mountain Lion), 10.9 (Mavericks), 10.10 (Yosemite), 10.11 (El Capitan); 
* Add SRT to MP4 on Windows 10, Windows 8.1, Windows 8, Windows 7, Windows Vista, Windows XP, and Windows 2000. 

Free Download and trail: 


Other Download: 

- Pavtube old official address: http://www.pavtube.cn/blu-ray-video-converter-ultimate/ 
- Cnet Download: http://download.cnet.com/Pavtube-Video-Converter-Ultimate/3000-2194_4-75938564.html 

Follow the step guide on >> Add SRT/ASS/SSA Subtitles to MP4 Video

Add Subtitles to MP4 - Where to Find and Download Subtitles for the MP4 Videos/Movies 

Before adding subtitles to MP4 videos movies, we will firstly provide you some information about where and how to download wanted movies subtitles. 

Normally you have two methods to download desired subtitles: One is download movie subtitles from subtitle downloading sites which provide numerous subtitles in different languages, such as Moviesubtitles.org, OpenSubtitles.org, Subscene.com, etc; The other is to download subtitles for MP4 via a subtitle downloader app like Sublight. 

>> More about how to free download subtitles for MP4 movies. 

Read More: 

Wednesday, July 13, 2016

How to Add/Import Movie Subtitles to DVD Video

If you are seeking for a solution of how to add/import movie subtitles to DVD video or remove internal subtitles while ripping DVDs? There are many occasions when you want to add subtitles to DVD movies. Sometimes, even native speakers want to add subtitles to DVD movies or TV shows just so that they can more clearly understand what the actors are saying. Or, the DVD movie you download has a foreign language subtitle or even no subtitle. To better understand the actors, it's necessary to add some subtitles to the videos. 

What you need to add subtitles to DVD 

Generally speaking, to add subtitles to DVD movies, there are 4 steps: 

1. Copy the DVD movies to your computer's hard drive. That means if your DVD movies are copy protected, you need a DVD ripper to rip them to your computer's hard drive. 
2.Download the subtitles you need from the Internet. There are many free subtitle download sites such as Opensubtitle. You can refer to Top 5 Websites to Download Subtitles for Movies
3.Add the downloaded subtitles to DVD using some subtitle adding software. 
4. Burn the movies with subtitles to DVD disc. After adding subtitles to the movies, you can then use a DVD creator to burn the movie to DVD disc. 

Below are two easy ways to add subtitles to DVD movies or TV shows. 

Method One: Add the Subtitles During the DVD Playback 

If you just want to add subtitle during the DVD playback, subtitle players like VLC can help. It natively supports subtitle overlay. When you are watching a DVD movie or video, simply go to Video/Subtitle Track/Load File to add subtitles to DVD/video. 


Method Two: How to use Pavtube Video Converter Ultimate to add subtitles to DVD Movies 

Fortunately, you can do all with one tool - Pavtube Video Converter Ultimate, an all-in-one DVD ripper and is capable of adding subtitles to DVD movies. It can rip any DVDs to mainstream video formats (MP4, AVI, WMV, MOV, MPEG etc.) and popular devices (iPhone 6s/6s Plus, iPad Air 3/Mini 4, Samsung Note/S series, Google Nexus series, Sony PlayStation, Xbox etc.) It is leading DVD ripper enabling to with customized subtitles, including DVD video internal subtitles, forced subtitles or external SRT subtitles. Here is review

Then, let's follow the movie subtitles guide to learn how to add/import DVD Movie subtitles for enjoying foreign language movies without hassle. 

Free Download and trail: 


Other Download: 

- Pavtube old official address: http://www.pavtube.cn/blu-ray-video-converter-ultimate/ 
- Cnet Download: http://download.cnet.com/Pavtube-Video-Converter-Ultimate/3000-2194_4-75938564.html 

Step 1: Import DVD movie files to the program. 

From "File" menu drop-down option, select "Load from disc" to add DVD disc to the program. Click disc button or “Add Video” button to import the video files which you want to add subtitles to. 


Step 2: Select output file format. 

Most DVD movies are commercial with copy protection, before adding subtitles to them, you will first need to rip the DVD to a common file format. You can choose one of your desired formats from "Format" drop-down" list. 


Step 3: Add subtitles to DVD movies. 

Open "Video Editor" window, click the "Subtitle" bar and check "Enable", then you will be able to browse and add subtitles that you have saved on local computer to the DVD movies. 


Step 4: Start DVD movie subtitle adding process. 

Press the "Convert" button in the right-bottom and the conversion process will start automatically. 

When the conversion is over, click "Open output folder" to find the movies with subtitle files, if you want to burn the generated files to DVD disc, you can use our DVD Creator program. 

Note: If you are mac users, turn to iMedia Converter for Mac is much cheaper in Summer Holiday Coupon Page. It supports El Capitan system so you can add subtitle to DVD Movies on Mac OS X El Capitan without any issue. And read how to watch Blu-ray movies with subtitles via Mac

Tips: Several Kinds of DVD/Movie Subtitles 

DVD/Movie Subtitles are textual versions of the dialog or scene in DVD film videos displayed at the bottom of the screen, to have viewers understand the spoken dialogue or the signs better. 

Soft Subtitle is involved in the actually DVD video, but is independent of the movie video. When ripping a DVD, it’s usually titled “Track”. 

Hard Subtitle, contrary to soft subtitles, attaches itself into the actual video and would always come along with the video. 

Forced Subtitle appears on screen when a foreign/alien language is spoken, or showed in a sign, location, or other text, aiming to explain the meaning but can not be placed in the dubbing. When ripping a DVD, it’s directly titled “Forced Subtitle”. 

Note: Generally, only the foreign dialogues and signs that matter the movie plot are translated in the forced subtitle. 

With the forced subtitles in DVD movies, you never need to worry about the foreign and alien language any more. And when it is just English dialogue, you can enjoy full screen watching without subtitles displaying. 

Read More: 

Monday, July 11, 2016

Convert MP4 to Samsung SDD 850 Evo for Sharing

The Samsung SSD 850 Evo delivers great performance with useful features, at an affordable price. The drive is available with up to 2TB of storage space. After you got the Samsung SSD 850 Evo and have stored a lots of downloaded MP4 files in your computer or server, ever thought of streaming those MP4 files via DLNA to iOS, WD TV, PS3/PS4, etc. But you will find it is a painful try for just converting MP4 to Samsung SSD 850 Evo directly for playing on most media streamers. Have the similar trouble? Don't worry. This article aims to give you an easy way to fix the issue. 

Hot Search: Blu-ray/DVD to NetGear ReadyNAS | Blu-ray/DVD to Micca Media Player | DVD Movies to Dropbox | Play MKV Movies on Kodi 15 | iTunes Movies onto NAS 

Samsung SSD 850 Evo has some limits to play MP4 files via NAS on different platforms. Besides, the codec limitation will prevent you from uploading MP4 to NAS successfully. In fact, to stream MP4 files from Samsung SDD 850 Evo to HDTV, Xbox OnePS4VLC, or other media players is not hard work. If the NAS does DLNA, you can try a DLNA/UPNP client. There are several apps out there but none of them do a particularly good job on HD MP4s. What you can do is to convert MP4 to a compatible format and then you can share it off the Samsung SDD 850 Evo effortlessly. 

To manage your MP4 files on kinds of NAS compatible devices, you'd better convert MP4 to correct format before storing on Samsung SDD 850 Evo. Pavtube Video Converter Ultimate is a highly recommended tool to help you finish the task. It is a great MP4 converter that supports transcoding MP4 to MKV, FLV, MPG, WMV and more. Meanwhile, it also comes with useful editing functions, like video joining, video trimming, splitting, cropping, etc. Now just download the program to learn how to convert MP4 to store on Samsung SDD 850 Evo for DLNA streaming. Here is review

Free Download Top MP4 to Samsung SDD 850 Evo Converter: 


Other Download: 

- Pavtube old official address: http://www.pavtube.cn/blu-ray-video-converter-ultimate/ 
- Cnet Download: http://download.cnet.com/Pavtube-Video-Converter-Ultimate/3000-2194_4-75938564.html 

Streaming MP4 Movies to Samsung SDD 850 Evo for Share 

Step 1. Run the program 

Just drag and drop your MP4 files from the computer to the pane of this app, or click the "Add Files..." option at the top left corner of this app's pane to choose and import the files you want to convert. It supports batch conversion and joining multiple video clips into one file. 


Step 2: Set output format as MP4 

From "Format" drop-down option, choose output formats as "HD Video" > "H.264 HD Video(*.mp4)" if you want to enjoy a HD video quality. 


Tips: On the main interface, check the movie titles you want to rip, from the drop-down list of subtitles, select one of your desired language as your subtitles, if you check "Forced subtitles" option, you will see subtitles only when actors are speaking a language that are different from the subtitles that your specified before. 

Step 3: Customize output video quality 

Click "Settings" on the main interface to pop out "Profile Settings" window, adjust the codec, size, bitrate to fit with your devices. 


Step 4: Start to convert 

Clicking the “Convert” button on main interface to convert MP4 to Samsung SDD 850 Evo supported format. When the conversion is completed, feel free to transfer MP4 to Samsung SDD 850 Evo in suitable MP4 and play them on your multimedia players. 

Mac user can use Pavtube iMedia Converter for Mac to convert your MP4 to Samsung SDD 850 Evo in MP4 format. And now, this program has updated to support the newest Mac OS X El Capitan. Moreover, now you can get the app at a big discount in Pavtube Summer Holiday Coupon

Read More: 

Friday, July 8, 2016

Load 4K footage to Premiere Pro CC for Editing

The point here, you will find it a painful experience when editing 4K footage in Adobe Premiere Pro (no matter Premiere Pro CC, CS6, CS5.5, CS5 or CS4). Your computer freezes when editing the 4K video. So, what's the fluid workflow for editing 4K in Adobe Premiere smoothly? 

Q: “I'm wondering if anyone out there has experience with the 4K footage the Phantom 3 produces and how it plays with Premiere Pro CC. If so, do you have any suggested export settings to get the most resolution out of the footage - without having to buy a new server farm. Does Premiere Pro import the footage natively, or does it have to be converted first? Another (possibly dumb) question: Is it possible to configure the 4K camera to shoot in 1080P if 4K ultra resolution is not needed in a particular shoot? In other words, can you dumb it down to save disk space? Thanks. “ 

As the show above, you may have the same issues. It is officially stated that MP4 is supported by Adobe Premiere. The reason is that MP4 is a format container with different codecs. Your MP4 file codec isn't compatible with Adobe Premiere. If you don’t want to buy a new server farm, you can search a free converter to convert 4K to MPEG-2, the best format that Premiere Pro supported. 

Hot Search: MOV. files in Sony Vegas Pro | Import DVD into Windows Movie Maker | VOB to iMovie | Import a DVD to iMovie | H.265 to Premiere Pro CC 

How to import 4K Videos to Adobe Premiere with Video Converter Ultimate 

In the following article, we will show you how to downscale and convert 4K to 1080p MPEG-2 videos so that you can edit 4K footage in Adobe Premiere without bogging down your computer. The process is surprisingly easy and can be done using Pavtube Video Converter Ultimate - Here is review

Developed with the most advanced converting technology, this 4K video converter truly and fully supports input and output videos at upto 4K resolution. With it, you can effortlessly convert your 4K videos formatted in MP4, XAVC, XAVC S, MXF to advanced encoders like MPEG-2, Apple Intermediate Codec, ProRes and DNxHD, ensuring maximum editing quality and efficiency when working with Adobe Premiere, iMovieFinal Cut ProAvid Media Composer, etc. If you're facing problems when editing 4K footage, just download it to convert the 4K stuff for smoothly importing and editing in your editing systems. Below are steps on converting 4K footage for Adobe Premiere Pro. 

Note: This tutorial is based on Windows OS. If you are a Mac user, please try this MP4 to Adobe Premiere Pro for Mac - Pavtube iMedia Converter for Mac

Free Download and trail: 


Other Download: 

- Pavtube old official address: http://www.pavtube.cn/blu-ray-video-converter-ultimate/ 
- Cnet Download: http://download.cnet.com/Pavtube-Video-Converter-Ultimate/3000-2194_4-75938564.html 

Step 1. Load your 4K videos 

Launch the 4K to Adobe Premiere converter, then drag & drop the 4K files onto the main interface, or you can click the "Add Video" button to locate the videos from your local disk. Batch conversion is available here, so you are allowed to import several files at one time. 


Step 2. Choose Premiere compatible format 

To pick a proper output, you’ll need to know formats compatible with Adobe Premiere Pro CC and Adobe Premiere Elements 13 first. Convert 4K Video files to MPG, WMV or MOV - highly compatible with Adobe Premiere will be great. Here you can click the format bar to follow “Adobe Premiere/Sony V…” > “MPEG-2(*.mpg).” 


Step 3: Advanced Profile Settings 

In case the default settings do not fit your requirement, you can click “Settings” button and enter “Profile Settings” panel to adjust video size, bit rate, frame rate, sample rate and audio channels. Here personally I recommend you to set the video size as 1920*1080p for better editing. Of course, if you want to get original 4K resolution, just keep the video size as original. 

Note: The product also has more editing functions that you can click the “Edit” to do some editing incidentally, such as trim, crop and change the effect. 


Step 5: Click the “Convert” button to start transcoding MP4 files to MPEG-2. After the conversion, click the ‘Open’ button to locate the output files and transfer the convert mp4 files for editing in Pro CC on Windows. 

Finally, you can edit some 4K videos with Adobe Premiere Pro CC for uploading to web or sharing with your friends. 

Tips: 

1. You can check the "Merge into one file" box, to combine several .mp4 clips together if necessary. 
2. These are the advantages of 4K videos to Premiere Pro CC Converter, convenient, clean interface, simple operation. If you have the requirement of DVD burning or muti-track preserving, there are some bundled products to help you save more, just click here

Much wonderful software bundled with Video Converter Ultimate will provide you more amazing experience in converting videos. Go to Money Saving Software Bundles to get special offer for more software, such as ByteCopy + Video Converter Ultimate = Only $79.9, Save $27.1, Video Converter Ultimate($65) + ChewTune($29) = Only $74.9, Save $19.1 and so on. 

Read More: 

Thursday, July 7, 2016

Pavtube Upgraded to Support Blu-ray MKB61?

Hot news for Blu-ray collectors!! Are you still upset that you can't rip your new bought Spectre 007,The Martian,The Revenant cause these new Blu-rays now have been encrypted with more complex encryption mechanism MKB61? Now, you are saved by Pavtube in that Pavtube Studio has upgraded his main 3 Blu-ray ripping tools to 4.8.6.7 version to support the new Blu-ray MKB61.


Usually, you perhaps know that Blu-ray is protected by AACS, BD+,UOP,DRM, HDCP, BD-ROM, Region codes, etc. This encryption prevents people from copying, ripping and converting their legally bought Blu-rays even they just rip it for personal use. Normal Blu-ray ripping applications on the market can rip AACS, BD+ schedule but no other difficult encryption mechanism. Even powerful as MakeMKV, supports only Blu-ray encryption up to v60, not including MKB61.

This time, Pavtube upgraded his three top-ranked Blu-ray Ripper BDMagic, ByteCopy, Video Converter Ultimate to the newest 4.8.6.7 version supporting to decrypt new Blu-ray encrypted with AACS, BD+,Region codes, HDCP up to MKB61.Now, let's learn the upgrade and the main features of each Blu-ray ripping tool.

What's new?

1.support latest Blu-ray MKB61.
2.fix some bugs.

Key features of ByteCopy

- 1:1 backup BD/DVD with original video structure.
- Main title copy BD/DVD with smaller size.
- Copy BD/DVD to MKV with lossless quality.
- Convert BD/DVD to MP4/MOV/AVI with multiple subtitle/audio streaming.
More functions of ByteCopy is in the review.

Key features of BDMagic

- Full copy and directly copy Blu-ray and DVD
- Convert Blu-ray/DVD to SD/HD MP4, MKV, AVI, etc to NASExternal Hard DriveMedia Server, etc.
- Convert 4K Blu-ray to H.265/HEVC 4K MP4/MKV
- Rip Blu-ray preserving AC3, AAC, DTS audio in stereo, 5.1, 7.1 sound.
More functions of BDMagic is in the review.

Key features of Video Converter Ultimate

- Decrypt Blu-ray and DVD to virtually any SD/HD video
- Convert 4K Blu-ray to SD/HD MP4, WMV, MOV, QuickTime, ProRes for editing in NLE.
- Copy Blu-ray/DVD to M3U8 for HTTP live streaming
- Convert, shrink, compress Blu-ray, DVD to YouTube, FaceBook, Vimeo, Instagram, Google Plus, etc.
More functions of Video Converter Ultimate is in the review.

The Blu-rays you can Decrypt:


You can use Pavtube Blu-ray Ripper to decrypt some new released Blu-ray including: The RevenantThe MartianHannibal TV Series, Game of Throne (1-6), Spectre 007Zootopia, Harry Potter, Independence Day, The Divergent Series: Allegiant, The WalkAvatarHouse of Cards, Bridge of Spies, Mad Max: Fury Road, Room, Spotlight, By the Sea, The Family Fang, Absolution, Roots, Code of Honor, Now You See, The Adderall Diaries, Arch Angels, Shchedrin: The Left-Hander, Sherlock, Ghost Rider / Hellboy, The Da Vinci Code, The Da Vinci Code, Doro: Strong and Proud, etc.
What's more, Pavtube Studio is holding on Summer Vacation Promotion. Buy Blu-ray Ripper in this period, you may get some surprise:
In addition, Pavtube Studio also upgraded his Video DVD Converter Ultimate to support users to rip any new released commercial DVD discs to MP4, MOV, MKV, 3GP for using on iPad Pro, iPhone 6S, Galaxy S7/S7 Edge, HTC 10, Nexus 6p, Xperia Z6, etc.