Showing posts with label Final Cut Pro. Show all posts

Wednesday, June 1, 2016

ISO to ProRes - Import DVD ISO files to Final Cut Pro 7/X

Looking for a way to make the downloaded DVD ISO files editable in FCP? ISO images contain the binary image of the file system as well as the data present on the optical media. Both the file system and data are copied exactly as stored on the disc. As we know, it is difficult for NLEs including FCP to extract its main file for editing in that an ISO image contains all contents of the disc, such as menu navigation, the main movie, every single track and information about the structure of the disc. Simply follow this article to convert and import DVD ISO to FCP on Mac OS X (El Capitan included). 

To get the work done, you just need to convert ISO to Final Cut Pro friendly formats along with some help from third-party softwares. I mean you can achieve your goal smoothly with a professional Mac ISO to Apple ProRes Converter. Here Pavtube BDMagic for Mac is highly recommend which fully supports converting Blu-ray/DVD disc, VIDEO_TS folder and Blu-ray/DVD ISO image files. Read the review

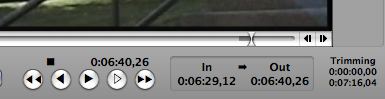
The Mac ISO to FCP conversion is accomplished with the help of a professional yet easy-to-use ISO Converter for Mac which has superb fast conversion speed as well as excellent functions. With it, you can easily transcode ISO files to ProRes 422, ProRes 422 HQ or 4444 for using in Final Cut Pro X/7/6 flawlessly. Besides ISO image, the Mac program can also convert all media formats including DVD, Blu-ray, Blu-ray and DVD ISO/ IFO to MKV, AVI, VOB, MOV, MPG etc. for smoothly importing and editing within Adobe Premiere Pro, Avid Media Composer, iMovie, Final Cut Express and more. The point is that you are allowed to edit the ISO movies by trimming, cropping, adjusting video effects, etc. to get the very wanted part and effects as you like. 

Now just download it and follow the tutorial below to convert ISO to Apple ProRes for Final Cut Pro. 

Free download ISO to FCP Converter: 


Other Download: 
- Pavtube old official address: http://www.pavtube.cn/blu-ray-ripper-mac/ 
- Cnet Download: http://download.cnet.com/Pavtube-BDMagic/3000-7970_4-76177782.html 

How to Convert DVD ISO for Editing in Final Cut Pro X/7/6 on Mac OS X (El Capitan and Yosemite Included) 

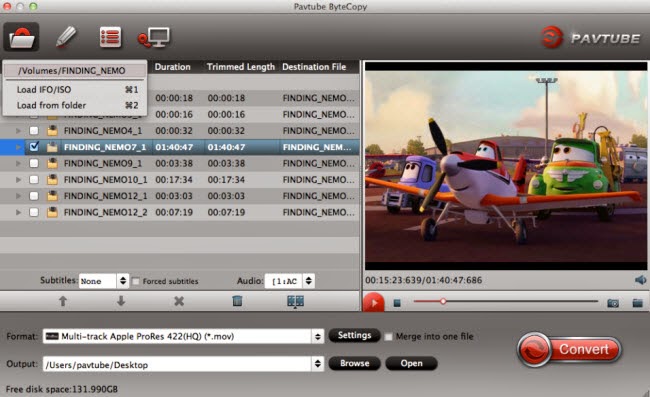
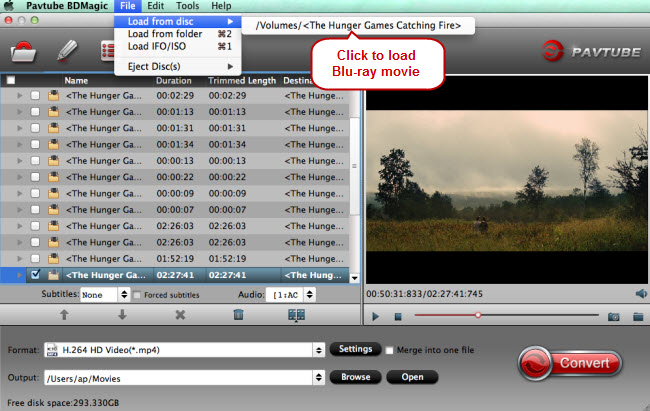
Step 1. Load ISO file 

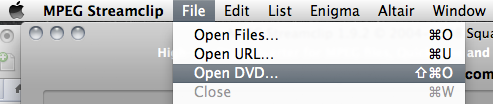
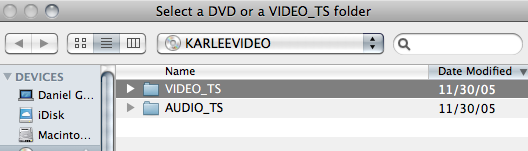
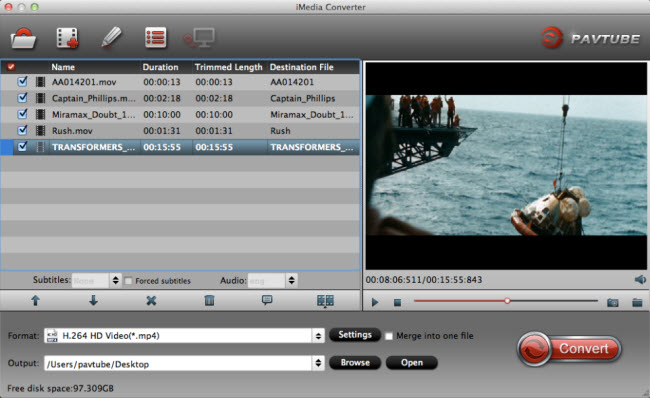
Install[and]run the Mac DVD to FCP Converter to load the original ISO image. DVD disc/DVD folder as well as IFO files are also supported here. 


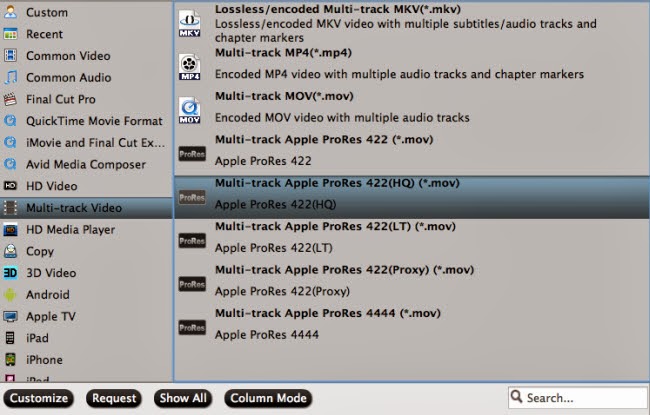
Step 2. Set output format 

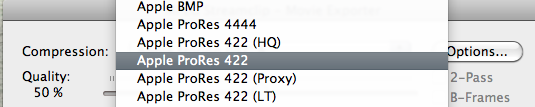
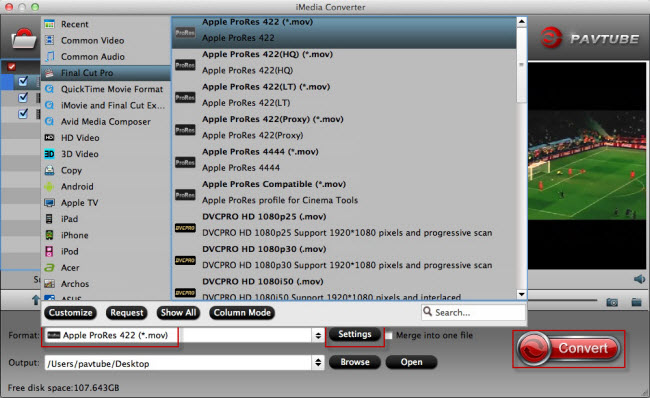
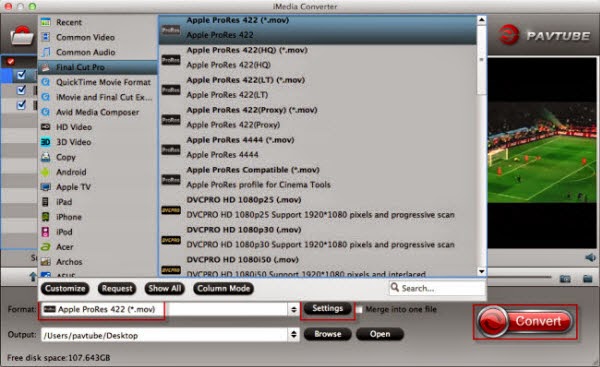
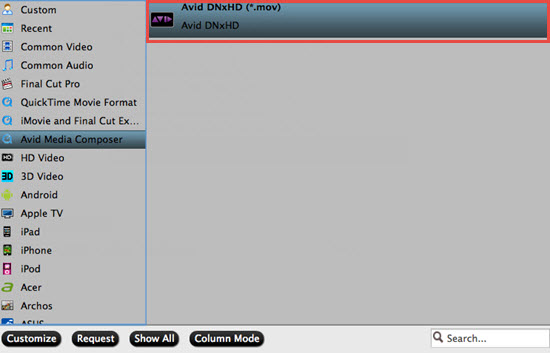
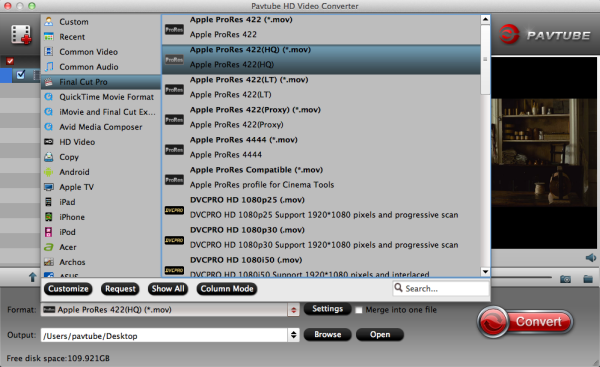
Clicking "Format" bar[and]choose Apple ProRes 422 (*.mov) as output format from the "Final Cut Pro" category which can be the most compatible video format for FCP. Learn>>Types of Apple ProRes Codecs

Tip: FCP 7[and]above user can choose ProRes 422(LT)/ProRes 444/ProRes 422(Proxy) to meet your own demands. 


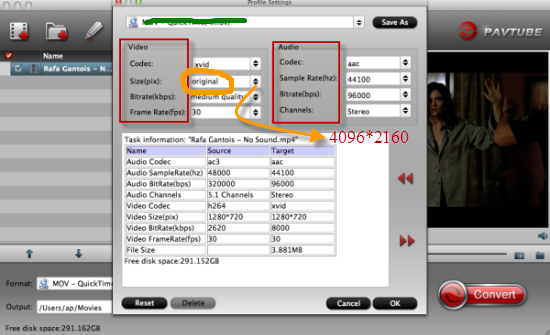
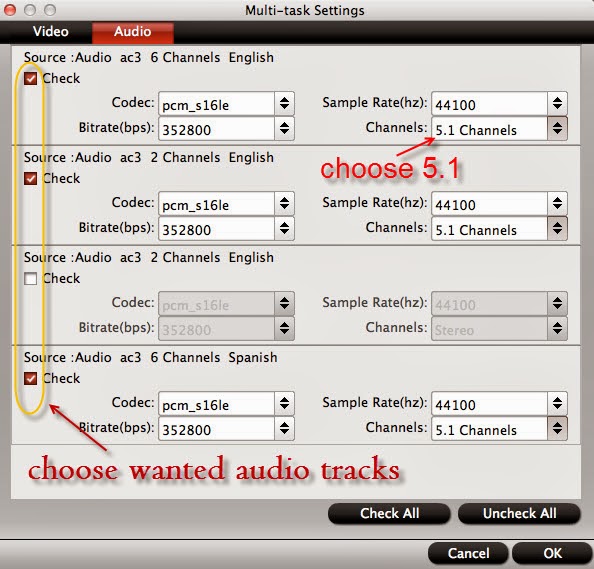
Tip: Click "settings" to customize the output parameters- adjust the video size, bitrate, frame rate, audio sample rate, audio channel, etc to get a decent video for editing in Final Cut Pro. 

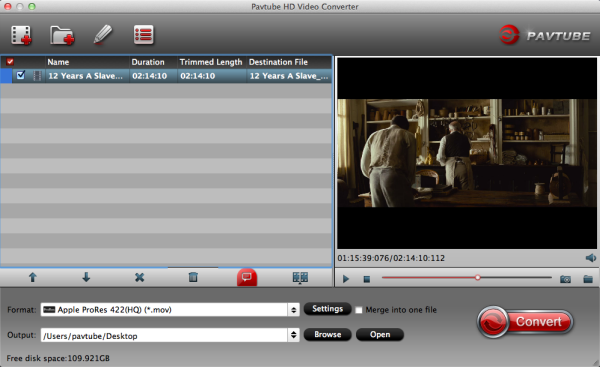
Step 3: Start Conversion 

Tap the "Convert" button to start encoding ISO to ProRes for FCP. After the conversion, you can get the encoded file via "Open" panel. Now, you are able to open the transcode ISO files in FCP for further editing without any issue.

Note: Much wonderful software bundled with BDMagic will provide you more amazing experience in converting videos. Go to Money Saving Software Bundles to get special offer for more software, such as BDMagic($49) + DVD Creator($35) = Only $49.9, Save $28.1, BDMagic($49) + ChewTune($29) = Only $49.9, Save $28.1 and so on. 

Read More: 

Tuesday, March 29, 2016

DVD to FCP X - Import Video from a DVD into Final Cut Pro X

Have some excellent DVD movies and want to import them to Final Cut Pro X to make fantastic videos? DVD videos are saved in discs with special format (VOB). And some commercial DVDs are encrypted to copy videos from. We can not import DVD to Final Cut Pro X directly. If you have DVD collection that you would like to extract any movie clips to be able to edit it in Final Cut Pro (X) on Mac OS X, it is possible to rip the DVD to a Final Cut Pro X (FCP X) friendly file that you can then import into Final Cut Pro X on Mac.

Wanna rip DVD to FCP X to Stream more easily? Here, we offer you three ways of putting DVD to FCP for editing on Mac OS X El Capitan, Juts choose the way as you like. 

Part One: Professional Way of Import DVD discs to Final Cut Pro (FCP 6/7/X) on Mac OS X

Do you have any great idea to convert your DVD video? Sure! DVD video does not natively work within FCP X. To fix this issue, DVD video fiels must be ripped off the disc and then converted. This process works to rip DVD video for use in Final Cut Pro X. To rip DVD to FCP X, you will need a DVD ripping software. The best program for converting DVD to FCP X is Pavtube BDMagic for Mac (Now 30% off discount). With it, we can effortlessly rip DVD to Apple ProRes MOV format for further editing within Final Cut Pro 6/7 and FCP X on Mac (El Capitan and Yosemite included) without quality loss. Now download this program and follow this guide below to complete your task. Read the review

Besides FCP X, This versatile DVD to FCP X Converter can also rip Blu-ray to H.264 MP4, Premiere Pro, Avid MC, iMovie, Sony vegas Pro, Premiere Elements, etc video editing programs. If you want to play Blu-ray movies on smartphone, tablet, Smart TV or other media player. Just trying our Blu-ray to Final Cut Pro Converter. This software can help you rip and convert Blu-ray to any video/audio format to fit your needs. 

Free Download top Mac DVD to FCP X Converter: 


Other Download:

- Pavtube old official address: http://www.pavtube.cn/blu-ray-ripper-mac/
- Cnet Download: http://download.cnet.com/Pavtube-BDMagic/3000-7970_4-76177782.html

Note: For people who want to edit DVD in FCP X keeping the multiple audio/video track separately as original,Pavtube ByteCopy for Mac (Now 30% off discount) is a powerful tool to transcode DVD to multi-track Apple Prores codec. Suppose you are good at both English and Francia, and want to preserve both of them from original DVD discs when converting, this app will be your best choice. (Here is a detailed guide for you). 

How to Convert DVD movies to ProRes 422 for Final Cut Pro X? 

Step 1. Load DVD movie. 

Download the best DVD to FCP X Converter for Mac, install and run the Mac app. Or you can Insert Blu-ray to disc drive, click the “Load disc” button to import source Blu-ray. 


Note: Pick one audio track and subtitles in the drop-down list of Audio and Subtitles. You are free to preview DVD movie in the right preview window to check if you get the correct audio track and subtitles. 

Step 2. Select output format. 

1)Choose the suitable output format from the “Format” menu, and here choose “Final Cut Pro > Apple ProRes 422(*.mov)” as output format for FCP X. Note: If you are a FCP X user, before you try to do the conversion, don't forget to make sure that you have installed the Apple ProRes Codec manually since the FCP X asks users to install it by themselves.


Tip: You can click settings button on the main interface of the DVD Ripper to customize the output parameters, set the resolution or bitrate as you want, you can also keep them as default. 


Step 3. Start ripping DVD movies to ProRes 422 for FCP X. 

Double check all press and hit the “Convert” button to start ripping DVD movies to Final Cut Pro X compatible Apple ProRes format on Max OS X El Capitan. Once the conversion finishes, import the ripped video files to FCP X and edit them to get your own video clip with ease. 

Additional Tips:

If you want to convert both videos files like MTS, AVI, WMV, MKV, FLV, VOB, MXF, etc. and DVD/Blu-ray to Final Cut Pro supported ProRes codec, just turn to iMedia Converter for Mac, which can convert various video formats and DVD/Blu-ray to ProRes codecs on Mac. 

Part Two: How To Bring DVD Video Into Final Cut Pro X? 

Bringing DVD footage into Final Cut Pro X is simple! Convert your DVD footage with the free application, MPEG Streamclip, by transcoding it into a format that works natively within your non-linear video editing application (Premiere, AVID, Final Cut Pro X).

Ripping media off a DVD to insert in your video project does not have to be a tricky process!  Because DVD video does not natively work within FCPX, DVD video files must be ripped off the disc and then converted.  This process works to rip DVD video for use in any editing application, but in this example we’ll optimize for Final Cut Pro X.  Follow these simple steps: 

1.  Download Squared 5′s free video conversion software, MPEG Streamclip (Streamclip is an industry favorite for converting a multitude of video formats and codecs).  Install the application on your system. 


2.  Open MPEG Streamclip and then open your DVD in the application (from the menu bar, File > Open DVD…)


3.  Select the Video_TS folder (this contains the main video).


4.  MPEG Streamclip will open up your DVD video in the application.  Just like the shortcuts for Final Cut Pro (and FCPX) you can set the in and out points of the video you’d like to export by using the shortcuts “I” and “O”.


5.  MPEG Streamclip will let you convert your DVD to a wide variety of video formats.  Choose the format that best matches your project settings (ie what your timeline is set for).  ProRes (Apple’s intermediate codec optimized for post production) is typically a good choice for converting your DVD video.


6.  Crank your quality setting up to 100%.  Although you have a multitude of options for customizing export out of MPEG Streamclip, typically all other defaults will suffice for a standard DVD conversion.


7.  Import your clips into Final Cut Pro X and get to editing!


Part Three: How to rip a DVD with HandBrake & import to FinalCut Pro

1.Insert the DVD and open Handbrake (icon looks like a Cocktail with a Pineapple).


2. Navigate to the VIDEO_TS folder in the DVD.

- Handbrake should recognize and select your DVD video contents in a Finder Window bearing your video's title. 
- The highlighted folder will have the name "VIDEO_TS". Click  in the Finder Window
- If not, click on "Source" in the HandBrake window, and choose the VIDEO_TS folder
- HandBrake will scan the folder (2-3 minutes)
- When it's done go to the Title drop-down menu and choose the file you want to convert. HandBrake will default-select the largest file.


Handbrake will auto- matically search for DVD video contents and choose larg- est file (usually the main one). If you want a section you can choose it from the Title pull-down menu.

3. Once open you can configure the settings. Destination is the path and file name it will be given.


Format allows user to choose the video format – not very important since we will need to convert it before importing anyways. More advanced options are offered for video and audio compression, quality, chapter divisions, etc. These can be left as the default. To begin ripping, click “Start”. Progress will be shown on the bottom of the window.

More on Settings

- On the right-side of the upper menu bar click the "Toggle Presets" icon 
- If you want to insert into Final Cut or playback on a computer (in a presentation, etc.) then choose "Normal" or "High Profile."
- However, if you just want to playback the video on another device choose an option under the "Device" menu.
- More advanced options are offered for video and audio compression, quality, chapter divisions, etc. These can be left as the default.

To begin ripping, click “Start”

- Progress will be shown on the bottom of the window.
- When HandBrake is done the Cocktail & Pineapple icon will appear to tell you it's done.

4. Next you need to convert the HandBrake .m4v file to a .mov using MPEG Streamclip. To do so, open up MPEG Streamclip.


- Drag the m4v video file into the MPEG Streamclip window. 
- Go to File > Export to QuickTime
- Set the Compression to "Apple ProRes422"
- Drag the quality bar to 100%
- Choose the frame size "(unscaled)"
- Click "Make Movie". Choose the path and file name and click Save.


Drag the video file into MPEG Streamclip. Click File > Export to QuickTime. Set the Compression setting to “Apple DV/DVCPRO – NTSC”. Drag the quality bar to 100%. Choose the frame size to be “320 x 240 (unscaled)”. Click “Make Movie”. Choose the path and file name and click save.

5. Import into Final Cut Pro. To do so, open Final Cut Pro. Click File > Import > Files. Locate file and click Choose. Source:here


Do you have another way you like to convert your DVD video? Let us know in the comments!
  
Read More:

Thursday, July 2, 2015

Best Workflow to Edit Nabi Square HD 4K Video in FCP

As the development of technology, there are more and more 4K support cameras come out like Nabi Square. If you want to edit 4K videos in non-linear editing programs i.e. Final Cut Pro, you might need to take time to convert before you can start post production. That’s because FCP can’t support 4K resolution video. And this article will show an easiest way. 


Fuhu Announces Nabi Square HD -- the 4K Camera Created to Capture Childhood

Nabi Square HD™, the first-ever 4K action camera for kids that is shock-proof, drop-proof and waterproof without a case, built for the rugged and extreme adventures of childhood. Unlike most high quality cameras that require protective gearing and an attentive parent, nabi Square HD was created for parents to comfortably leave the camera with their kids to capture child's most daring and precious moments -- whether biking for the very first time or child's first trip to the beach. nabi Square HD is designed to work with a child's outdoor activities such as biking, running, jumping or swimming, while capturing the most vivid and crisp still image in 8MP or video in 4K. 

Powerful and durable, nabi Square HD is a professional grade camera dedicated to capture the extremeness of childhood and family-first moments through the eyes of a child. It's also more powerful, and supports 4K video recording at 15 fps, 2.7k recording at 30 fps, 1080p at 60 fps and high-speed, 120 fps capture at 720p. 

Tips for Editing: Edit ALEXA Mini video in iMovie | H.265 to Avid Media Composer | XAVC S to Avid Media Composer |

How to Convert Nabi Square HD 4K video to ProRes for editing in Final Cut Pro

The latest version of the FCP X support import video resolution up to 5K, why FCP 7 and FCP X can’t import 4K video files? Obvious, resolution isn’t a problem, video format is a major cause. Different video format has different video and audio codec, FCP doesn’t support all formats importing. Such as FCP X and FCP 7 can’t import 4K Nabi Square HD 4K video files. If you want to have a smooth Nabi Square HD 4K video and FCP workflow, you are advised to convert 4K video to ProRes for further editing in FCP.  Learn>> FCP X video file format

At first, I introduce a powerful high-quality 4K video converter, player and editor on Mac OS X - Pavtube iMedia Converter for Mac can deliver you a whopping help. The program can effortlessly encode/re-encode 4K MP4, XAVC, XAVC S, etc footage to advanced encoders like Apple ProRes, Apple Intermediate Codec, MPEG-2, DNxHD, etc. to seamlessly fit for Final Cut Pro, iMovie/FCE, Adobe Premiere Pro, Avid Media Composer and more. Plus, this 4K Video Converter is also available to customize the output resolutions to any size like 1080p, 2K, 4K as users want. Just download it and keep reading for a brief how-to on each process. 

Read the Review: Import H.265/HEVC to FCP X | Choose Best Suitable Editing Programs

Step-by-Step Guide:

Step 1: Download and have a quick installation. 

The trial version will have a watermark on your converted files. Except for that, there are no time limitation, no virus, and no unnecessary bundle apps while downloading. After that, click “Add Video” button to load your 4K files. 


Step2: Choose ProRes MOV for output format

Clicking the Format bar, you can click “Final Cut Pro” >> “Apple ProRes Codes 422 (*.mov)” as output format from the format list. (Read difference about Types of Apple ProRes Codecs). 


Step 3: (Necessary point) How to preserve 4K resolution with output videos


In order to get the output videos with 4K resolution, we should click the ‘Settings’ and get in to set the ‘Video size’ to ‘4K’. However, there are no ‘4K’ items we need to tap the ‘4096*2160’ in the blank. That’s the necessary step we need to do here. 

Finally, when you go back to the main interface, of course we can click the “Convert” icon to make our work started. From Nabi Square HD 4K Video to FCP ProRes 4K, is that cool? Easily transfer your 4K files to FCP for professional workflow, we can enjoy ourselves then! 

Read More:

Monday, May 11, 2015

Edit Sony PXW-X70 XDCAM XAVC footage in FCP & Avid

Q: "I'm both a loyal photographer and Sony camcorder fan. I need a software which can help me convert Sony PXW-X70 4K XAVC and AVCHD footage to ProRes for editing with FCP and Avid Media Composer. Another is that I want to use MPEG streamclip wich transcode in very good quality and i wish the software had settings for settings the quality of the transcode other than lo medium and high. Any one can help me out?” 


The Sony PXW-X70 XDCAM Compact Camcorder records broadcast quality 1920 x 1080 HD video using a variety of codec, at 4:2:2 10-bit in XAVC, AVCHD and DV format. If you have the same questions and want to edit Sony PXW-X70 videos on Mac, you may find the high quality video files are not recognized by most editing software like Final Cut Pro, Avid Media Composer, etc. Read the Types of Apple ProRes Codecs. In this article, I will give you an effective way to import Sony PXW-X70 XDCAM XAVC raw footage to Avid MC/FCP flawlessly. 

No doubt we now need a professional converter for help, but not all converting tool can do this job with the high quality reserved, right? However Pavtube XAVC to FCP/Avid Converter for Mac could do this well. This is the best software which can convert XAVC files from Sony PXW-X70 to Mac fully compatible format and keep original quality at the mean while. Besides, its also exports advanced encoders like Apple Intermediate Codec, DNxHD, etc. allowing you to convert video to seamlessly fit iMovie, iDVD, Adobe Premiere, Avid Media Composer, etc.  

Download a free trial of iMedia Converter for Mac: 


Converting Sony PXW-X70 XAVC for Editing in FCP & Avid Media Composer

Step 1: Launch the XAVC to FCP/Avid Converter; click "Add Video" button from main menu to browse your computer hard drive and select the Sony PXW-X70 4K XAVC and AVCHD shottings you want to convert. Or you can easily drag-and-drop files into this application for converting.

Tip: If necessary, join videos clips via checking the "Merge into one" box. 


Step 2: Hit the Format box to select the specially designed video codec for editing in FCP: Final Cut Pro > Apple ProRes Codec 422(*.mov). Wanna output Multi-track ProRes for FCP? Here are steps.


Drop down the 'Format' list, you will see the item 'Avid Media Composer'>>'Avid DNxHD (*.mov). For another way, you can also search it in the 'search box'.


Tips: Advanced video/audio settings

If the default settings do not fit your needs, you can click “Settings” button to adjust audio and video parameters as you like.  

Step 3: Click “Convert” button and the selected XAVC files from Sony PXW-X70 will be converted to DNxHD/Apple ProRes Codec 422 encoded MOV. Once the conversion process shows in 100%, click Open to get the output videos. After conversion, click “Open” folder to find converted footage. Then, transfer the MOV files to Create a project and start editing Sony PXW-X70 XAVC video in Final Cut Pro or Avid Media Composer with light speed. 

Read More: 

Friday, January 30, 2015

Import Nikon D750 MPEG-4/H.264 videos to FCP 6/7 effortlessly

Final Cut Pro 6/7 won't import MP4 from Nikon D750 smoothly. The easy workaround is to transcode D750 MPEG-4/H.264 video to FCP "edit" friendly codec ProRes at first.

Nikon D750 is a full frame DSLR in 2014 which is possible to shoot at up to 6.5 frames per second (fps) and record Full HD video at up to 60p. It can bring outstanding videos to photographers, however it is a headache for filmmakers to edit D750 MPEG-4/H.264 video in Final Cut Pro 6/7 if they consider to splice all the material from the mov recordings to make a nice demo reel for sharing with others.

Import Nikon D750 MPEG-4/H.264 videos to FCP 6/7

Why it is a headache thing? Since H.264 codec is not a FCP native codec, you will find that you are in the rendering process forever when loading Nikon D750 mov files in FCP 6/7? Well, is there an easy way to help your out? In fact, it will not be a tricky process if you convert D750 H.264 video to FCP 6/7 editable Apple Prores Codec beforehand.

Then an easy-to-use yet efficient tool- Pavtube iMedia Converter for Mac will be a great help. With it, you can easily encode Nikon D750 MPEG-4/H.264 footage to ProRes 422, ProRes 422 HQ or 4444 for using in Final Cut Pro 7/6 and FCP X as fast and seamless as possible. Plus, the Mac video converter can also convert Nikon D750 mov to a more editing-friendly format so that iMovie, FCE, Premiere Pro, Avid Media Composer, etc can accept and afford well. What's more, it also provides simple video editing functions for you. Just download it and follow the tutorial below to convert Nikon D750 video files to Apple ProRes for FCP 6/7.

Convert and import Nikon D750 MPEG-4/H.264 video to Final Cut Pro 6/7 

Step 1: Launch the Nikon Video Converter; click "Add Video" button from main menu to browse your computer hard drive and select the Nikon D750 mov shottings you want to convert. Or you can easily drag-and-drop files into this application for converting.

Tip: If necessary, join videos clips via checking the "Merge into one" box.

Nikon Video Converter

Step 2: Click the Format bar, and move mouse cursor to "Final Cut Pro > Apple ProRes 422 (*.mov)" as output format or choose other Apple Prores options.

video codec for editing in FCP

Step 3: Click “Convert” button to start encoding Nikon D750 MPEG-4/H.264 files to ProRes MOV for Final Cut Pro X or FCP 6/7 under Mac OS X(Yosemite included).

Some more helpful features of the Nikon D750 MOV to FCP Converter:

1. Settings- click to set video resolution(1920×1080/1440×1080/1280×720/720×480), bitrate(from 1Mbps to 20Mbps), frame rate (24p/30p)

2. Editor (next to “Add Video” icon)- click to set deinterlace, trim, crop, watermark, subtitles, etc.

3. More Inputs/Outputs- this Mac video converter can also let you to convert Blu-ray, DVD and other video clips like 4K videos to FCP for editing.

Once the D750 MPEG-4/H.264 to ProRes 422 conversion is done, you can transfer your Nikon D750 footage into Final Cut Pro6/7  for editing smoothly on Mac with ease.

Read More:

Wednesday, December 31, 2014

Is it possible to edit Sony PMW-200 XDCAM footage on Mac FCP without XDCAM Transfer?

This post explains how to re wrap video files taken with a Sony PMW-200 to ProRes 422 .mov for editing in Final Cut Pro fluidly with best quality.

Sony is unveiling the newest addition to its XDCAM HD4:2:2 line – the PMW-200 camcorder. This new model boasts three 1/2 -inch Exmor CMOS sensors and full HD 4:2:2 50 Mbps recording. Is it possible to edit Sony PMW-200 XDCAM footage on Mac FCP? If you have preordered a PMW-200 Camera, you may want to know the answer to this question.

edit Sony PMW-200 XDCAM footage on Mac FCP

There're lots of headaches with workflow of Sony PMW-200 XDCAM media into Final Cut Pro even with the XDCAM Transfer Sony providing, as far as I know, the best workaround to make PMW-200 XDCAM footage well compatible with FCP 6/7 and FCP X is converting PMW-200 video files to Apple ProRes for FCP.

Software requirement – Pavtube iMedia Converter for Mac.

This program is better than Sony XDCAM Transfer. XDCAM Transfer will turn XDCAM files into QT MOV when it copies source files from the camera media to the computer. Well, this XDCAM Converter allows you to convert Sony XDCAM to Prores .mov for FCP editing with zero quality loss. Plus, it also supporting transcoding Sony XDCAM, XDCAM HD, XDCAM EX to AIC for iMovie/FCE, DNxHD for Avid Media Composer, MPEG-2 for Adobe Premiere Pro.

Wanna output Multi-track ProRes for FCP? Here are steps.

Convert and Import Sony PMW-200 XDCAM footage to FCP on Mac

Step 1: Import PMW-200 XDCAM video clips

Install and run the Sony XDCAM to FCP Converter on Mac, and then click "Add Video" icon to import your PMW-200 recordings directly from your camcorder or the copied folder on the desktop.

Sony XDCAM to FCP Converter

Step 2: Choose Final Cut Pro video format

Hit the Format box to select the specially designed video codec for editing in FCP: Final Cut Pro > Apple ProRes Codec 422(*.mov). Learn types of Apple ProRes Codecs.

video codec for editing in FCP

Step 3: Advanced video/audio settings (Optional)

Adjust the video and parameters, including the Bitrate of Video and Audio, Audio, Video Size, Sample Rate, Frame Rate, Audio Channels, etc., by clicking the Settings buttion on the main interface.

Step 4: Start Sony PMW-200 XDCAM to FCP conversion

Click the arrow button to start transcoding Sony PMW-200 XDCAM footage to Prores for FCP immediately. After the conversion finished, you can directly transfer the Prores .MOV video to FCP for further editing without any problem (Just launch Final Cut Pro, click Import File > Import > Movies to add your videos).

P.S. Besides transcoding Sony XDCAM to FCP, Pavtube iMedia Converter for Mac can also convert Sony XDCAM, XDCAM HD, XDCAM EX files (from PMW-100, PMW-EX3, PMW-EX1R, PMW-EX1, PMW-320K, PMW-200, PDW-F800… ) to iMovie, FCE, Avid Media Composer, Adobe Premiere Pro, etc NLE systems on Mac(Mavericks and Yosemite included). Choose a proper format in the second step.

Also read how to edit Sony XDCAM files in After Effects and Magix Movie Edit Pro 2015 Plus.

Wednesday, August 6, 2014

Load and edit Canon EOS C300 PL MXF files in FCP 6/7

Below article will elaborate the solution about how to transcode Canon EOS C300 PL MXF to FCP compatible Prores for working with FCP 6/7 without rendering.

The Canon EOS C300 PL camera has been designed to meet the demanding needs of cinema industry professionals, providing a modular, portable and eminently adaptable system of cameras, lenses and accessories built for moviemaking in the 21st century.

EOS C300 PL MXF to FCP

Canon EOS C300 PL shoots videos in MXF format. If you have taken vivid videos in holidays and weenkends, you may have the need to edit C300 PL MXF files in popular non-linear editing systems like Final Cut Pro 6/7, then in this case, you first need to transcode C300 PL MXF to FCP native codec Apple ProRes in advance. Meanwhile, if you care more about the video quality. Apple ProRes 422 (HQ) should be selected.

Are you looking for a program to help do the conversion? Here Pavtube HD Video Converter for Mac - which can be taken as an easy-to-use C300 PL MXF converter for Mac is your top choice. It contains almost all the best codec for editing software, like FCP, iMovie, FCE, Premiere Pro, Avid Studio, etc. and player like QuickTimeWhat's more, merging several videos into one file will bring you a different experience. Now, you may through the guide to see how to convert Canon C300 PL MXF footage to Apple ProRes 422 (HQ) for FCP 6/7 editing without rending.

1. Launch the best C300 PL MXF Converter for Mac and load original mxf files from Canon C300 PL. You are allows to input several videos and convert them at the same time. Besides, "Merge into one file" also allows merge several videos into one file. 


2. Click "Format" menu to find suitable format for FCP 6/7, Apple ProRes 422(HQ) (*.mov) is recommended and it is the best suitable format for FCP which provides high video quality. 


Tip: 
 
a. You can click "Settings" option you can change parameters to optimize output videos, such as bitrate, size, frame rate, etc.


b. In addition, you can also do simple edit to personalize output videos, such as trim, crop, effect, etc. 

3. Start converting Canon EOS C300 PL MXF to ProRes 422 HQ MOV by clicking "Convert" button and then click "Open" button to find the output file for importing to FCP 6/7. 

Now, open up Final Cut Pro, choose File > Import > Files…to select and load the generated ProRes.mov files to FCP 6/7 for editing use. 

Hope this article helps you to solve Canon EOS C300 PL MXF and FCP 6/7 importing issues, and FCP X editing problem can be also fixed by Pavtube HD Video Converter for Mac. Now you can make your Final Cut Pro editing workflow with C300 PL MXF footage effortlessly.

Wednesday, July 30, 2014

Types of Apple ProRes Codecs

Here are types of Apple ProRes Codecs: Apple ProRes 422, Apple ProRes 422 (HQ), Apple ProRes 4444, Apple ProRes 422 (LT) and Apple ProRes 422 (Proxy), and mainly tells the difference between them.

Many users know FCP(X)’s native video format is Apple ProRes, but most of them don’t know he Apple ProRes format comes in five versions: Apple ProRes 422, Apple ProRes 422 (HQ), Apple ProRes 4444, Apple ProRes 422 (LT) and Apple ProRes 422 (Proxy).


The Apple ProRes codecs provide an excellent solution for the most demanding modern post-production workflows. Many of today’s HD formats were developed under significant camcorder(Panasonic, Sony, Canon, JVC, Nikon, etc.) engineering constraints and therefore limit the full quality that can be carried in an HD signal. Other camera codecs preserve full quality but are too complex to achieve the software decoding speeds required for real-time editing. Uncompressed HD formats deliver the highest image quality, but the high-bandwidth, RAID-storage requirements of uncompressed HD video are daunting for most users’ budgets.

If you are a FCP (X) user, you’d better know about the features of each version. The following list describes the features of each version.

Apple ProRes 4444

The Apple ProRes 4444 codec offers the utmost possible quality for 4:4:4 sources and for workflows involving alpha channels. It includes the following features:
  • Full-resolution, mastering-quality 4:4:4:4 RGBA color (an online-quality codec for editing and finishing 4:4:4 material, such as that originating from Sony HDCAM SR or digital cinema cameras such as RED ONE, Thomson Viper FilmStream, and Panavision Genesis cameras). The R, G, and B channels are lightly compressed, with an emphasis on being perceptually indistinguishable from the original material.
  • Lossless alpha channel with real-time playback
  • High-quality solution for storing and exchanging motion graphics and composites
  • For 4:4:4 sources, a data rate that is roughly 50 percent higher than the data rate of Apple ProRes 422 (HQ)
  • Direct encoding of, and decoding to, RGB pixel formats
  • Support for any resolution, including SD, HD, 2K, 4K, and other resolutions
  • A Gamma Correction setting in the codec’s advanced compression settings pane, which allows you to disable the 1.8 to 2.2 gamma adjustment that can occur if RGB material at 2.2 gamma is misinterpreted as 1.8. This setting is also available with the Apple ProRes 422 codec.
Apple ProRes 422 (HQ)

The Apple ProRes 422 (HQ) codec offers the utmost possible quality for 4:2:2 or 4:2:0 sources (without an alpha channel) and provides the following:
  • Target data rate of approximately 220 Mbps (1920 x 1080 at 60i)
  • Higher quality than Apple ProRes 422
Apple ProRes 422

The Apple ProRes 422 codec provides the following:
  • Target data rate of approximately 145 Mbps (1920 x 1080 at 60i)
  • Higher quality than Apple ProRes 422 (LT)
Apple ProRes 422 (LT)

The Apple ProRes 422 (LT) codec provides the following:
  • Roughly 70 percent of the data rate of Apple ProRes 422 (thus, smaller file sizes than Apple ProRes 422)
  • Higher quality than Apple ProRes 422 (Proxy)
Apple ProRes 422 (Proxy)

The Apple ProRes 422 (Proxy) codec is intended for use in offline workflows and provides the following:
  • Roughly 30 percent of the data rate of Apple ProRes 422
  • High-quality offline editing at the original frame size, frame rate, and aspect ratio
  • High-quality edit proxy for Final Cut Server 
A new ProRes flavour – 4444 XQ:
4444 XQ is the latest ProRes codec and it is designed to be extremely efficient yet almost indistinguishable from uncompressed footage.


  • The highest-quality version of Apple ProRes for 4:4:4:4 image sources (including alpha channels), with a very high data rate to preserve the detail in high-dynamic-range imagery generated by today’s highest-quality digital image sensors. 
  • Preserves dynamic ranges several times greater than the dynamic range of Rec. 709 imagery—even against the rigors of extreme visual effects processing, in which tone-scale blacks or highlights are stretched significantly. 
  • Like standard Apple ProRes 4444, this codec supports up to 12 bits per image channel and up to 16 bits for the alpha channel. 
  • Features a target data rate of approximately 500 Mbps for 4:4:4 sources at 1920 x 1080 and 29.97 fps.   

Tips:

1. If you are a camcorder/camera lovers, You may be interested in the following pages:

Final Cut Pro - The FCP Column offers the best ways to Convert any video files (such as: MXF, MOV, AVCHD, MTS, M2TS, M2T, TS, Tivo, AVI, MKV, WMV, DVR-MS, MP4, FLV, F4V, M4V, MOD, TOD, DV, EVO, Rmvb, etc.) to Final Cut Pro (X) compatible formats – Apple ProRes codec MOV format, and then you can import and edit videos in FCP (X) smoothly.

ProRes Converter for Mac (Only $35) is what you need, it not only convert any videos to FCP (X) with presetted Final Cut Pro output profile, but also support batch import and conversion. (Supplement: I know it isn’t relevant to the topic of this article, but god, please believe me, I just want to let the purchaser know the value of this Mac app is beyond its price, such as: it support convert any (HD) videos for playing on iPad Air, Galaxy S5, Surface Pro 3, Nexus 7, etc. tablets and phones; support batch conversion; deinterlace and reduce image noise to keep better quality; convert any videos to Mac (Avid, iMovie, FCE, Premiere Pro, etc.) compatible format.

2. If you are a professional MXF videos editor, Pavtube MXF Converter for Mac is the best choice for you. It is an easy-to-use and intuitive Mac tool for camcorder users. It is good at converting MXF recordings shot by Panasonic P2 camcorders, Canon XF series camcorders and Sony XDCAM camcorders to formats compatible with your video editing software like iMovie, Final Cut Pro (X), Final Cut Express, Avid Media Composer, Adobe Premiere, and more. 

Notes:

When converting MXF footage using Final Cut Pro oriented format templates(e.g. Apple ProRes), please ensure that your computer has Final Cut Pro installed, otherwise the converted files will have audio only without image.

If you are using FCP X, please make sure you have installed ProApps QuickTime Codecs, or you may get files with sound only without video.

The FCP X does not install the ProApps QuickTime Codecs automatically, so you need download and install the codec manually from 
http://support.apple.com/kb/DL1396.

Thursday, March 20, 2014

Convert & Import Blu-ray/DVD to Final Cut Pro X with 5.1 sound on Mac Mavericks

This is a detailed guide to help you extract Blu-ray/DVD movie, convert it to ProRes 422 HQ with 5.1 surround sound in FCPX with a clean edit.  

Why I am missing 5.1 surround sound after converting Blu-ray/DVD to ProRes? Why FCP X log and transfer does not work with Blu-ray/DVD? Can I obtain all the languages without losing surround sound in my digitized Blu-ray/DVD movies?

You may have tried some blu-ray ripping tools and run into problems above. To be fair I have not tried many of them but also have problems like this. Hereby, with a successful trial, I'd like to share my experience here.


Firstly, you need a tool which is capable of rolling off Blu-ray/DVD disc protection, then convert them to multi-track ProRes 422 HQ with surround sound for editing in FCPX. On this step I recommend Pavtube ByteCopy for Mac because it’s quite easy to use and work reliably.
  
How to rip BD/DVD to ProRes 422 HQ with 5.1 sound for FCP X?

Step 1. Download and install this Pavtube ByteCopy for Mac, load disc.

Note: you need an external Blu-ray drive to make your Mac recognize Blu-rays firstly. Insert your discs, launch Pavtube and click the top left icon, you will find it detects your disc and shows the name automatically. Just click it to load.


Step 2. Choose format for editing on FCP X.

Click the “Format” icon; you may notice there’re two options of ProRes 422HQ. One is inside the “Final Cut Pro” the other is inside >Multi-track Video”. The only difference between these two presets is that the former is common one-track preset while the later could keep all your audio tracks (languages). I’d prefer the Multi-track one.

Okay choose “Multi-track Video>Multi-track Apple ProRes 422(HQ)(*.mov).


Step 3. Customize V&A settings.

Let’s move to “Settings” icon (right besides “Format”), you will find two tabs one for Video and the other for Audio. On Video tab, you can change target video quality as there are three levels for you to choose. 

In the Audio tab, we can check the audio tracks we need as below:


Just leave unwanted audio tracks unchecked, change audio channels to “5.1 Channels”. Click OK to confirm the change.

Step 4. Start conversion.

Back to main interface and hit “Convert” to start ripping Blu-ray/DVD to multi-track ProRes 422HQ. After it completed, click “Open output folder” to quick locate the converted MOV files.

Read more: