Tuesday, February 27, 2018

Compress MKV Files with No Quality Loss

Most movies or TV shows especially some high definition sources streamed over the Internet are using the MKV file extension. The problem is that MKV file is usually in large file size and take a lot of your hard drive space, then you may come the need to compress MKV files into smaller file size. Although there are many programs on the market can do the MKV file compressor job for you, however, you may find that some of them are too complicated to operate, others may won't ensure you to produce a high quality smaller video file. following part will introduce you some effective way to reduce MKV file size with our intuitive and simple to use MKV file compressor - Pavtube Video Converter Ultimate, which helps to efficiently shrink MKV file size by adjusting video container, resolution, frame rate, bit rate, frame rate, video length, etc.

Ways to compress MKV file size

Solution 1: Compress MKV to small container file format such as WMV, FLV

Both FLV and WMV files are smaller container file format for compressing files. For those people who wish to send file via email or store the files on your hard drive, WMV can be your best choice. If you have the need to share files over the popular video sharing sites such as YouTube, Vimeo, Facebook, etc, FLV will do the job best.

Solution 2: Change MKV file video resolution, bit rate, frame rate, etc

Adjust MKV file resolution: The higher resolution of a video file, the clearer effect of the video picture. However, you may also get a large file size. You can change the video resolution of a 4K video to 1080p or 720p with the resolution of 1980*1020 or 1080*720 or adjust a high definition video to small file size video with the resolution of 640x480 or 640x360, etc.

Change MKV file bit rate: Lower the MKV video video bit rate will help to decrease the video file size, therefore, always make sure to make a good balance between file size and quality.

Tweak video frame rate: You can reduce your video file size by lowering the frame rate of your video with 10-15 fps. But reducing the frame rate will also effect the smoothness of the video playback. You will need to experience to find the lowest accepted frame rate value.

Solution 3: Trim/Crop MKV file

For those people who don't want to suffer any quality loss, the best way to trim MKV file length by cutting off unwanted parts or segments and leave only your unwanted parts or crop off the unwanted black bars or size area around the video frame.

Related article: Compress Video for Email YouTube Vimeo Facebook | Compress MP4 Files Windows Mac | Top iPhone Android Video Compressor

Shrink MKV file size with Best MKV file compressor

The best MKV file compressor - Pavtube Video Converter Ultimate we mentioned above can better compress MKV files with the different solutions listed above. You can not only change the MKV container to WMV or FLV for convenient email or online sites sharing, but also lower the video resolution, bit rate, frame rate flexibly with accepted value in the program's "Profile Settings" window but also trim the video length or crop the video file size to get a smaller file size video with no quality loss.

For Mac users, you can switch to download Pavtube iMedia Converter for Mac to perform MKV file size shrinking job on macOS High Sierra, Mac OS X El Capitan, Mac OS X Yosemite, Mac OS X Mavericks, etc.

Get Pavtube Video Converter Ultimate with 20% off discount, coupon codec: 45K2D47GJH

Step by Step to Compress MKV File Size with Best Quality

Step 1: Load MKV files into the application.

Download the free trial version of the program. Launch it on your computer. Click "File" menu and select "Add Video/Audio" or click the "Add Video" button on the top tool bar to import source MKV video files into the program.
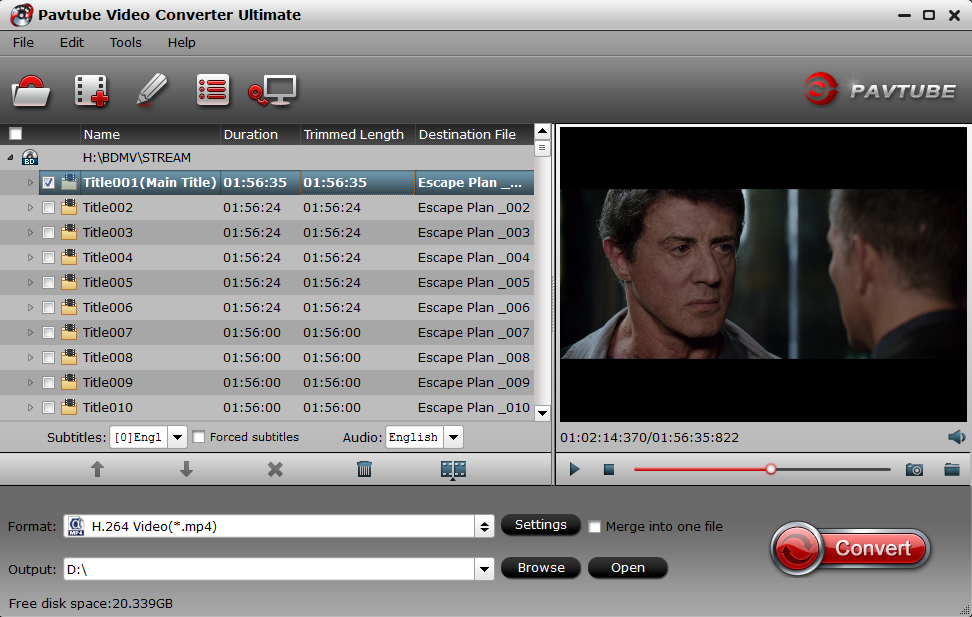
Load MKV video

Step 2: Output a file format with small file size.

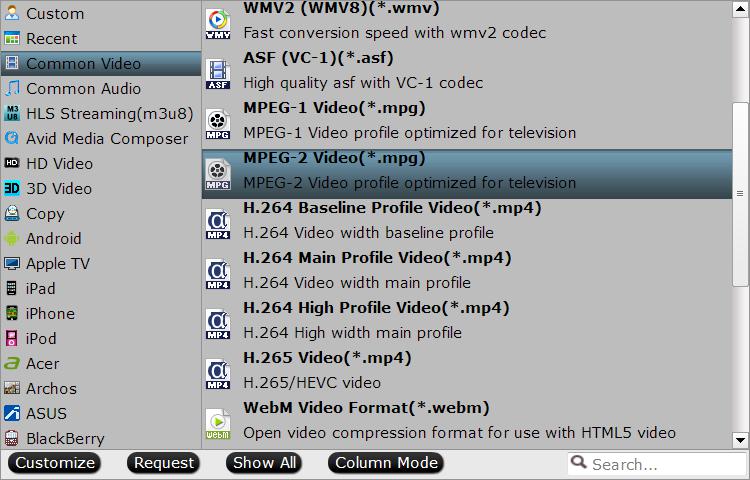
Output a smaller file size

Step 3: Adjust output profile parameters.

Change output profile parameters such as frame rate, bit rate and resolution to reduce mp4 file size. Please bear in mind, excessive reduction of the parameters will bring about quality degradation. This program can keep a good balance between the file size and image quality. You can simply leave the parameter settings unchanged after choose the output format.

Adjust output smaller file size

Step 4: Trim or crop MKV file size.

Select one item on the file list to active the pencil like "Editor" icon on the top tool bar, hit the "Edit" icon to open video editor window.

Trim: Click "Trim" button, you can drag the slider bars to include the segment you want to remain, click the left square bracket to set start point, and click the right square bracket to set end point when previewing the video or directly input specific values to "Start" and "End" box.

Trim MKV video length

Crop: Hit the "Crop" tab, drag the green dash line around the video to remove the black edges in the video frame.

Crop MP4 video file size

Step 5: Start MKV file compression process.

Specify an output folder on your computer for storing the converted files. Then hit right-bottom "Convert" button to start to compress MKV files on your computer.

When the conversion is completed, you will have no problem when do file uploading or emailing with compressed MKV file size.

Tuesday, February 20, 2018

Edit MOV Files in HitFilm Pro 2017

HitFilm Pro 2017 is a unique mix of video editing, visual effects and 3D compositing tools all in one product. It includes 3D object rendering, a powerful particle simulator, over 500 customizable visual effects and presets, professional color grading, industry - standard BorisFX titling and over 150 creative plugins for use in other video software.

Import and edit MOV files with HitFilm Pro 2017

Have some MOV files downloaded from online sites or shot with your camera, camcorder, smartphones and wish to load them into HitFilm Pro 2017. But every time when you try to import a MOV file, it just ask you to install QuickTime player, which you didn't install because I found it is just for Mac.

Related article: Import AVCHD/MTS/MXF/MKV to HitFilm | Import AVI to HitFilm

Why HitFilm Pro 2017 not import MOV files?

After searching for HitFilm supported file formats, we can see that it can native import the following file types:

Video

Audio

AVCHD (M2T, MTS, M2TS)
AVI (including 10-bit and 12-bit GoPro Cineform (Windows only)
DV & HDV
MP4 (AVC/H264 & AAC)
MPEG-1 & MPEG-2 (TS, PS, MPE, MPG, MPEG, M2V)
MXF (DVCPro HD)
QuickTime MOV (including 10-bit and 12-bit Pro-Res (requires that an up to date version of QuickTime is installed on your computer)
WMV

AAC
MP3
M4A
MPA
WAV
WMA

From above list, we can see that HitFilm Pro 2017 only supports to handle QuickTime MOV files, in addition, you will need to install the latest QuickTime player version on your computer. It also means that if you will fail to import other types of QuickTime MOV files into HitFilm Pro 2017.

Transcode unsupported MOV for HitFilm Pro 2017

To fix the format or codec incompatible issue, you can download a third-party video conversion app. If you are looking for a powerful yet simple to use application to get the job easily completed, we highly recommend Pavtube Video Converter to you. The program has full importing support for 4K/2K/HD/SD MOV files encoded with various different video and audio compression codec. Thanks to its batch conversion mode, you can load multiple MOV files into the application for conversion at one time. The tool can assist you to efficiently transcode unsupported MOV to HitFilm editable formats listed above with perfect quality and super-fast conversion speed.

Besides MOV, you can also use this application to convert other unsupported files such as MKV, H.265, XAVC, XAVC S, etc to HitFilm Pro workable editing formats listed above.

For Mac users, please go to download Pavtube Video Converter for Mac to complete the conversion on macOS High Sierra, macOS Sierra, Mac OS X El Capitan, Mac OS X Yosemite and Mac OS X Mavericks, etc.

Step by Step to Convert MOV for HitFilm 2017 Editing

Step 1: Load MOV files into the application.

Download the free trial version of the program. Launch it on your computer. Click "File" menu and select "Add Video/Audio" or click the "Add Video" button on the top tool bar to import unsupported MOV video files into the program.

Load MOV video files into the application

Step 2: Define the output format.

Clicking the Format bar, from its drop-down list, select one of HitFilm Pro 2017 editable file formats such as "Divx AVI - Audio Video Interleaved (Divx)(*.avi)" under "Common Video" main category.

Output HitFilm Pro 2017 supported editing formats

Tip: Before conversion, you can click the "Settings" icon to customize the output video/audio settings Bitrate such as video codec, bit rate, resolution and frame rate or audio codec, bit rate, sample rate and channels, etc.

Step 3: Begin the conversion process.

After all setting is completed, hit the "Convert" button at the right bottom of the main interface to begin the conversion process from MOV to HitFilm supported editing formats conversion process.

When the conversion is finished, click "Open Output Folder" icon on the main interface to open the folder with generated files. You'll then have no problem to work the converted MOV files with HitFilm 2017.

Tuesday, February 13, 2018

Edit MXF in HitFilm Pro

Have shot some MXF files with your Sony XDCAM, Panasonic P2 or Canon XF camera and wish to load them into the fastest video effects software - HitFilm Pro for some professional post editing workflow. However, although HitFilm Pro has included native import support for MXF files, however, a lot of people still complain that they encounter many problems when editing MXF file with HitFilm Pro.

"I am trying to import some video files in the .mxf format but when imported they are just showing a green screen in hitfilm. The original shots are in 180fps 1080P HD but I believe the codec is the main problem with the files (AVC/H.264)."

"I can't import MXF X-AVC recorded by Sony Z100. Same for 4k CineForm AVIs. HitFilm Pro 2017 just ignores these files when trying to import."

Why HitFilm Pro not fail to read MXF files?

From HitFilm Pro supported import formats, we can see that HitFilm Pro is only able to handle DVCPro HD MXF files. It also means that you will fail to load other MXF file types such as P2 MXF, XDCAM/XDCAM HD MXF into HitFilm Pro.

Transcode unsupported MXF for HitFilm Pro editing

To load P2 MXF or XDCAM/XDCAM MXF into HitFilm Pro for editing, you will need to perform a format transcoding process. Here, you can easily turn to our best Mac MXF Converter - Pavtube iMXF. The program has full importing support for both 4K and HD MXF files shot with Sony XDCAM/XDCAM HD, Canon XF, Panasonic P2 and also Panasonic DVCPro HD. The application can assist you to transcode MXF to HitFilm Pro supported editing formats listed below:

Video

Audio

AVCHD (M2T, MTS, M2TS)
AVI (including 10-bit and 12-bit GoPro Cineform (Windows only)
DV & HDV
MP4 (AVC/H264 & AAC)
MPEG-1 & MPEG-2 (TS, PS, MPE, MPG, MPEG, M2V)
MXF (DVCPro HD)
QuickTime MOV (including 10-bit and 12-bit Pro-Res (requires that an up to date version of QuickTime is installed on your computer)
WMV

AAC
MP3
M4A
MPA
WAV
WMA

Apart from HitFilm Pro, this beneficial application also assists you to convert MXF to other editing software such as Final Cut Pro X, iMovie, Premiere Pro CC, Avid Media Composer, Davinci Resolve, etc specially optimized editing codec such as Apple Prores, DNxHD, Apple Intermediate Codec, etc.

Related article: Edit MP4 with HitFilm Pro | Import H.265 to HitFilm Pro | Import Video to HitFilm Ultimate

For those people who wish to preserve the multiple audio tracks or channels, you can use this application to directly export MXF to multi-track MKV/MP4/MOV formats. If you try to load the MXF files to Final Cut Pro X, you can also output Multi-track Apple Prores foramt with multiple tracks and channels, etc.

For Windows users, please switch to download Pavtube MXF MultiMixer to convert MXF for HitFilm Pro 2017 editing on Windows 10/8.1/8/7.

Step by Step to Convert MXF for HitFilm Pro Editing

Step 1: Load MXF files.

Download the free trial version of the program. Launch it on your computer. Click "File"menu and select "Add Video/Audio"or click the "Add Video"button on the top tool bar to import sourceMXF video files into the program.

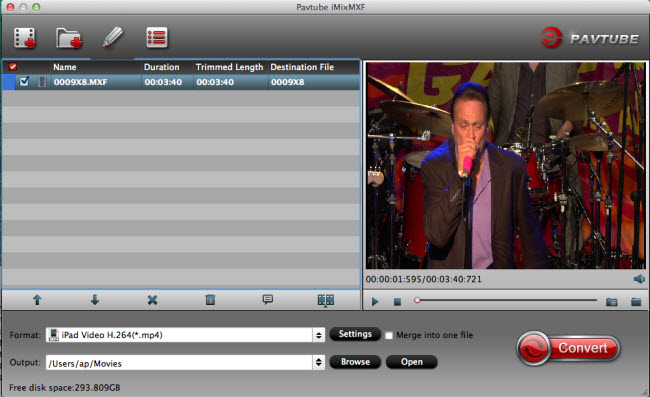
Load source MXF files

Step 2: Define output file format.

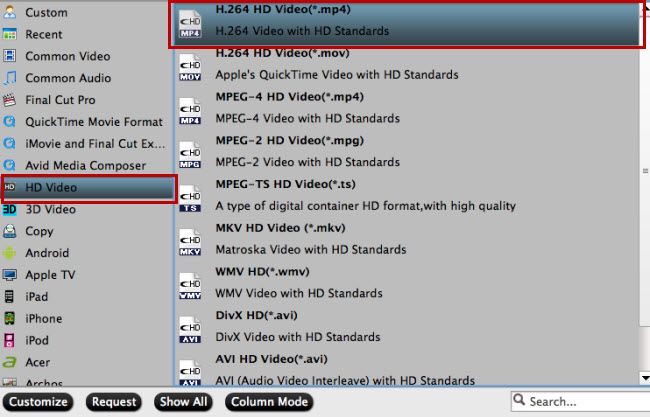
Clicking the Format bar, from its drop-down list, select one of HitFilm Pro supported editing formats "H.264 HD Video(*.mp4)" under "HD Video" main category. You can also choose other editing formats according to your own needs.

Output HitFilm Pro supported editing formats

Adjust output profile settings

In the Settings window, you can choose or specify exactly the parameters you like. And in the Task information section, you can compare information from the original video and output video.

Adjust output profile settings

Step 3: Begin the conversion process.

After all setting is completed, hit the"Convert" button at the right bottom of themain interface to begin the conversion process from MXF to HitFilm Pro supported editing formats.

When the conversion is finished, click "Open Output Folder"icon on the main interface to open the folder with generated files. Then you will have no problem to edit MXF files with HitFilm Pro.

Tuesday, February 6, 2018

Import iPhone MP4 to Premiere Pro CC 2018

The newly released Premiere Pro CC 2018 has many great new features including the new Timeline search options and changes that make it easier to upload videos to YouTube. In addition, there are also new options for customizing labels, managing multiple open projects, working with Premiere Pro in virtual reality (VR), and more.

Have shot some HD or 4K MP4/MOV video encoded with either H.264 or H.265 compression codec with your iPhone and wish to get a high quality and high performance editing workflow of iPhone MP4 video with Premiere Pro CC 2018. Although PPC 2018 has included native editing support for the HD/4K MP4/MOV H.264/H.265 video shot with iPhone, however, it is well known that both the H.264 and H.265 codec used by your iPhone are not good editing format, they are very processor intensive when playing on the timeline, in addition, they are not good for doing effects editing such as color correction.

Transcode iPhone MP4 to PPC 2018 best favorable editing codec

The good news is that with a third-party iPhone Video Converter such as Pavtube Video Converter for Mac, you can easily produce PPC most preferable editing codec with perfect quality and super fast encoding speed. If your original iPhone MP4 video is encoded with SD resolution, we highly recommend you to use our program to export Premiere Pro CC specially optimized MPEG-2 editing codec, if your original iPhone MP4 video is shot wit HD resolution or 4K resolution, then Apple Prores codec can be the best choice.

Related article: Edit XDCAM MP4 in PPC | Edit Sony PXW FS5 4K in Premiere | Edit H.265 with Premiere Pro

The application supports batch conversion mode, so that you can load multiple iPhone MP4 video into the application for conversion at one time to save your precious time. What's more, it is also accompanied by an up-to-date Windows version - Pavtube Video Converter for you to complete the conversion on Windows 10/8.1/8/7.

Step by Step to Import and Edit iPhone MP4 Video with Premiere Pro CC 2018

Step 1: Load iPhone MP4 video.

Install and run the best iPhone Video Converter, and click the "File" button to load iPhone MP4 video into the application.

Load iPhone MP4 video

Step 2. Choose output format.

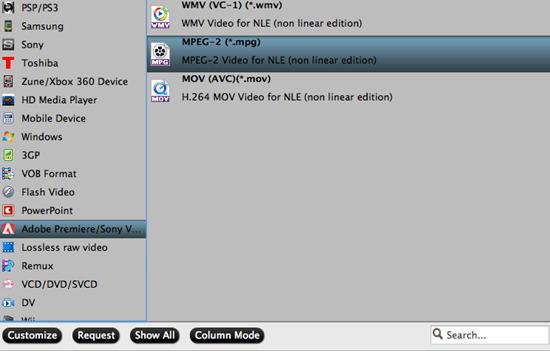
If your original iPhone MP4 video is shot with SD resolution, then just choose "Adobe Premiere/Sony Vegas > MPEG-2 (*.mpg)" as output format on the drop-down menu.

Output PPC 2018 specially optimized SD editing codec

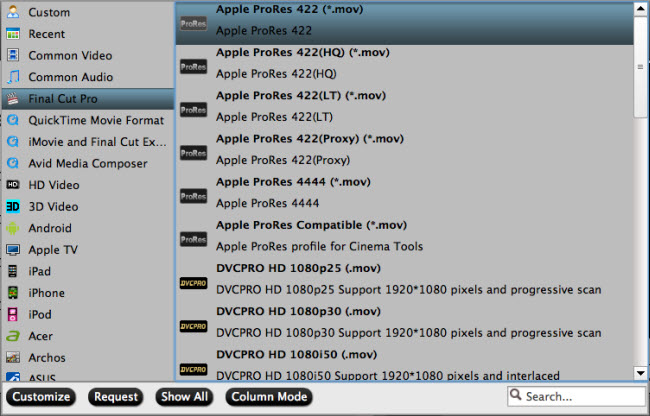
If your original iPhone MP4 video is shot with HD or 4K resolution, then just choose "Apple Prores 422(*.mov)" under "Final Cut Pro" main category.

Output PPC best compatible HD/4K editing codec

Step 3: Begin the conversion process.

After all setting is completed, hit the "Convert" button at the right bottom of the main interface to begin the conversion process from iPhone MP4 to PPC 2018 best compatible SD/HD/4K editing codec.

When the conversion is finished, click "Open Output Folder" icon on the main interface to open the folder with generated files. Then feel free to import converted files to PPC 2018 for smooth posting editing workflow.