Showing posts with label Amazon. Show all posts

Wednesday, November 19, 2014

Download digital copy movies onto Kindle Fire HDX and Fire HD 6 for viewing

Wanna download and transfer a Digital Copy movie to Kindle Fire HDX and Fire HD 6 for entertainment? Follow this simple guide to get the work done. 

Question: I just bought Perks of Being a Wallflower, and it comes with a digital copy. What are the steps I would use to do this put it on my Kindle Fire HDX and a fire hd 6 which I plan to buy for my kids?
Kindle Fire HDX and Fire HD 6

Digital Copy is a standard definition digital version of your purchased DVD/Blu-ray. These digital copies can only be transferred to iTunes or Windows Media Player, so your device has to support either Quicktime formats (.m4v, .mp4, .mov) or .wmv. Even there, they come with DRM restrictions, so it defeats the entire purpose.

In order to get Digital Copies and Kindle Fire HDX and Fire HD 6 to play nicely, you'll need to get rid of DRM from Digital Copies first. Digital Copy playback doesn't stop there, and there are many programs out there that allow you make digital copies out of DRM-protected contents. 

If you are interested in doing likewise, check out Pavtube ChewTune, a top DRM Removal and Converter for Android which can handle Digital Copy DRM-restricted movies, iTunes DRM-protected videos and Windows Media DRM contents for almost all popular Android-based Tablets and smartphones including Kindle Fire HDX and Fire HD 6. I've found the output quality to be excellent, and see no difference when compared to playing the original digital copies themselves. Below is a simple guide.

First, download the Digital Copy to Kindle Converter to your computer. For mac users, get mac version here
Ways for you to save more money:


Guide: Convert and transfer Digital Copy movies to Kindle Fire HDX and Fire HD 6 
Before conversion you need first to transfer Digital Copy to computer in Windows Media (.wmv) or iTunes video format (.m4v). Here we go with the DRM removal process: 

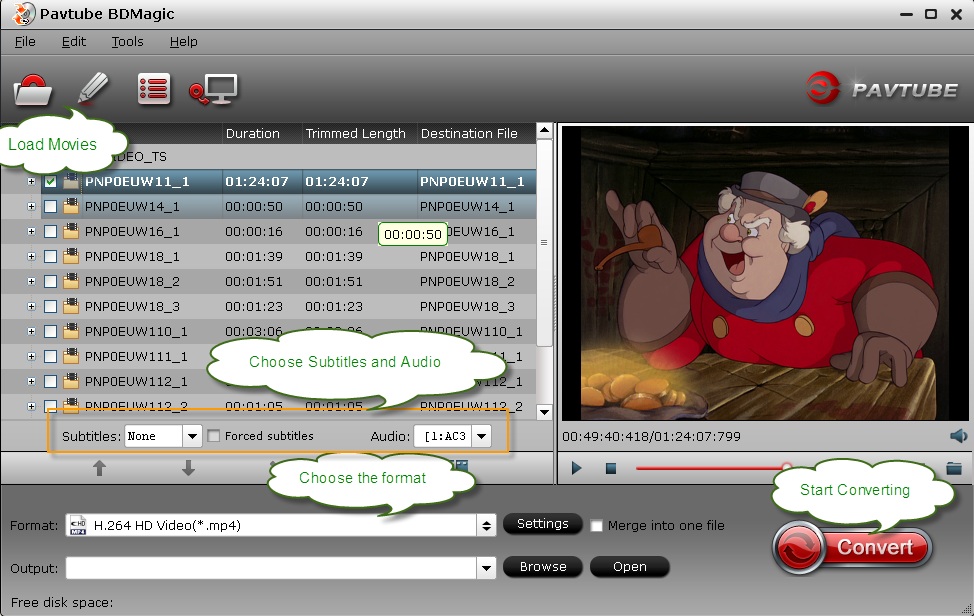
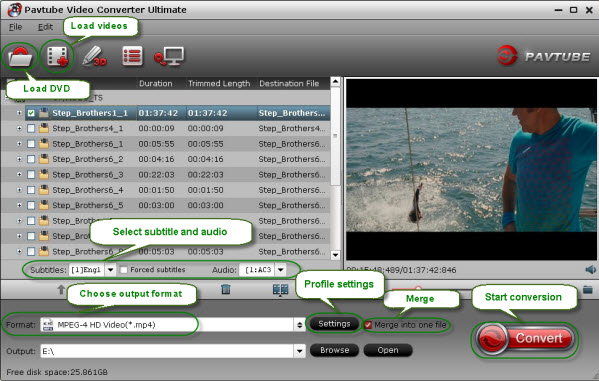
Step 1. Download and install the digital copy to Kindle converter on your PC or Mac.

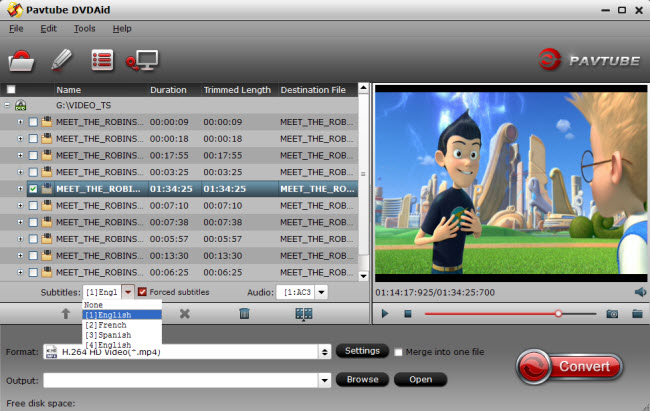
Step 2. Launch the program, drag and drop the digital copy file into it (Please make sure you have transfered the digital copy movie to your computer ).

digital copy to Kindle converter 

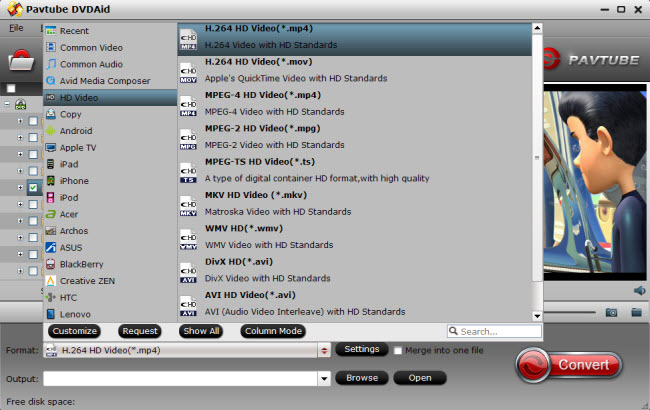
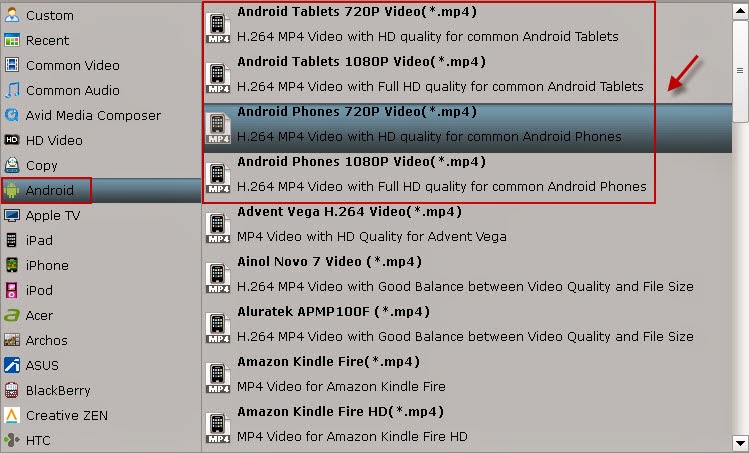
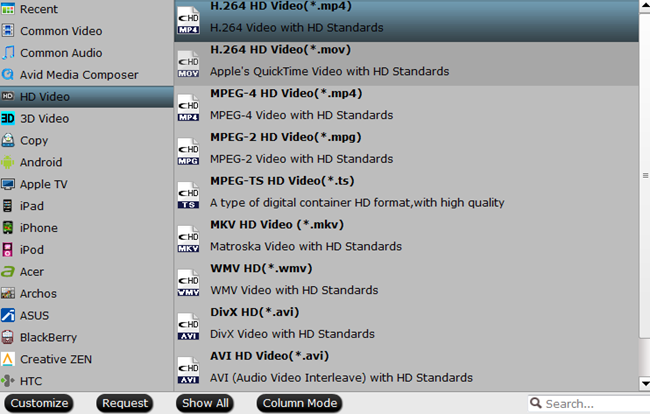
Step 3. Choose output format for Kindle Fire HDX and Fire HD 6. Click on ” Format > Android > Amazon Kindle Fire HD(*.mp4)”.
Kindle Fire HDX and Fire HD 6 Video Format 

This profile is special designed for Kindle Fire HD(including Fire HD 6), but also works well on Kindle Fire HDX. If necessary, you can also click on “Settings” button to custom the video quality by yourself.

For example, if you want to get 720p video quality, you just need to adjust the video size as “1280*720“, to get 1080p video quality, adjust the size as “1920*1080“. Or set size as "1280*800" for Fire HD and "1920*1200" for Fire HDX for full screen playback.


Fire HD Video Settings 

Step 4. Having finished the settings? OK, Finally, just click on the “Convert” button to start converting digital copy movies to Kindle Fire HDX and Fire HD 6 tablet.

When the conversion task is finished, you can click “Open” button to get the final output files for your Fire HDX/Fire HD 6 and transfer it to your tablet.

Now, you can play digital copy movies on Kindle Fire HDX and Fire HD 6 as ease. You have got it. Enjoy your time! Also learn how to play Blu-ray, DVD and DVD ISO/IFO to your Kindle tablet.

Monday, November 17, 2014

Backup/Rip How to Train Your Dragon 2 DVD to Kindle Fire HDX, Fire HD and Fire

Find it's difficult to watch "How to Train Your Dragon 2" DVD movies on Kindle Fire HDX, Fire HD and Fire? This page will focus on backing up/ripping DVD on your Kindle tablet.

The fantasy sequel to How to Train Your Dragon creates a vivid, sprawling fantasy world that makes you want to reach out, grab a controller, and explore. How to Train Your Dragon 2 takes place five years after the first film, featuring Hiccup and his friends as young adults as they meet Valka, Hiccup's long-lost mother, and Drago Bludvist, a madman who wants to conquer the world. It is released in DVD on November 11, 2014.
Rip How to Train Your Dragon 2 DVD to Kindle Fire HDX, Fire HD and Fire

Want to backup your How to Train Your Dragon 2 DVD movies and rip them for viewing on devices such as Kindle Fire HDX, Fire HD and Fire? Frankly, it's seldom you can copy a protected DVD to Kindle directly without error. You have to remove such copy protection from your DVD first. Here we go.

What we need?

To backup DVD movies on Kindle tablet, the key point is a good ripping & copying tool. After several trials, we recommend this Pavtube DVDAid which does a great job in backup the entire DVD movie without qualtiy loss. Meanwhile, it is a powerful tool to rip your DVDs to compatible format for Kindle Fire HDX, Fire HD and Fire or make the clips of your favorite scenes from a movie playable on your Kindle. You are free to try free trial version (Pavtube DVDAid for Mac is for Mac users)

Now let me show you how to backup/rip "How to Train Your Dragon 2" DVD movie to Kindle Fire HDX, Fire HD and Fire for watching.

Step 1: Load DVD to Pavtube DVDAid.

Click "Load file' icon on the top left to import the "How to Train Your Dragon 2" DVD disc.

DVD to Kindle Ripper 

Step 2: Choose output format


Under "Format' menu, there are many formats and devices for you to choose.

For ripping DVDs for playback on Kindle Fire HDX and Fire HD, choose the corresponding format, like “Amazon Kindle Fire HD(*.mp4)” from “Android” option.
Kindle Fire HDX, Fire HD and Fire supported format 

Or select "Amazon Kindle Fire(*.mp4)” from “Android” for playing on Kindle Fire. 

Step 3: Start ripping

Click big "Convert' button to start coping or ripping your "How to Train Your Dragon 2" DVD Disc. Once completed, hit "Open' button you will go to location of generated files.

Tip: Before start the conversion, you can select wanted audio track and subtitles language from "Subtitles" and "Audio" option. Interested, you can check "Only show forced subtitles" to convert DVD to Fire HD for playing with forced subtitles only.

Step 4: Transfer DVD movie files to Kindle Fire HDX, Fire HD and Fire via USB.

Once putting DVD movies to Fire HDX, Fire HD and Fire, you could get an amazing movie enjoyment on it wherever you go. Plus, Blu-ray, ISO/IFO and Tivo recordings can also be played on your Kindle.

Monday, May 5, 2014

Play TiVo recordings on Kindle Fire HDX, Kindle Fire HD and Kindle Fire

When you have captured TV shows and would like to enjoy them on your Kindle, you will find it difficult to put them to Kindle Fire HDX, Kindle Fire HD and Kindle Fire as the Tivo files are saved by digital video recorders with copyright protection. If you also have this problem to figure out how to play Tivo videos on Kindle, this article is right here to help you out.

Amazon's Jeff Bezos announced the new fall 2013 line-up of new Kindle Fires, now called the Kindle Fire HDX. The new HDX, like the previous models, will come in both 7- and 8.9-inch sizes and HD displays with resolutions of 1920 x 1200 (323ppi) and 2560 x 1600 (339ppi) respectively.


Well, anyhow this Amazon new tablet becomes much better for movie playback as the original Kindle Fire HD and Kindle Fire. If you want to freely take your favorite TV programs to Kindle Fire HDX for watching when travelling, you are suggested to transcode Tivo into MP4 format for that it’s well accepted by Kindle Fire HDX, Kindle Fire HD and Kindle Fire for steaming directly. To accomplish this, Pavtube Tivo to Kindle Converter is highly recommended for its easy interface, efficient workflow and reliable video quality.

For Mac users (include Mavericks and Mountain Lion), Mac Tivo Video Converter is recommended to you.

How to transcode Tivo files to Kindle series Tablets playable video format?

First, get it installed and let’s start to quick convert Tivo to proper video formats on PC with perfect videoaudio sync technology

Part 1: Transfer TV shows from TiVo to PC

It takes a while depending on length of TV program you are transferring. Make sure your TiVo and computer are in the same home network, and follow this guide to proceed TiVo file transfer:

1. On your PC, launch TiVo Desktop for PC (click to download), the freeware that transfers shows from your networked TiVo box to your computer.

2. Click “Pick Recordings to Transfer.” A window showing your TiVo box’s “Now Playing” or “My Shows” list appears.


3. Highlight any title in the list to see more information about the show. Check the box next to the title of the show (or shows) you want to transfer.

4. Click “Start Transfer.” Transfer times vary, but may take as long as the show’s duration to complete the transfer.


Part 2: Convert TiVo shows to Kindle Fire HDX, Kindle Fire HD and Kindle Fire friendly MP4 video

After transferring to computer the TV shows are saved as .tivo files. See below how to convert TiVo shows to Kindle playable videos.

Step 1. Open Pavtube Tivo to Kindle converter and press “Option” button. Switch to “TiVo” tab in Option window, and enter TiVo Media Access Key.

Tip: How to find your Media Access Key on TiVo: Go to “TiVo Central” menu >> “Messages and Set Up” “Account and System Information”, and your Media Access Key would be there.


Step 2. Drag and drop TiVo shows to the main interface for converting.

Step 3. Click “Format” and select an output profile for your Kindle Fire HDX, Kindle Fire HD and Kindle Fire.

Click the drop-down list on the bottom, select “Andoid” on the left, and then we will find all the presets for different models.

"Amazon Kindle Fire HD(*.mp4)" works well for Kindle Fire HDX 7-inch and 8.9-inch.

"Amazon Kindle Fire(*.mp4)" is compatible for Kindle Fire.

Or you can submit “kindle” in search box at the bottom right corner.


Optimize the settings – The default settings may not satisfy you, and you can click the settings button to change the settings by yourself. Keep in mind that the file size and conversion quality is based more on bitrate than resolution (bitrate higher results in big file size, and lower visible quality loss, and vice versa).

According to my experience, for watching videos on Kindle, 720p with 1500~2500kbps is just all right.

Step 4. If you’re happy with the output videos, just press the “Convert” button to begin encoding TiVo shows to MP4 for Kindle.

Once the encoding task completes, you can transfer the converted videos to your Kindle Fire HDX, Kindle Fire HD and Kindle Fire for viewing on the move when travelling.

If you have the intention to convert Blu-ray, DVD movies as well as your personal HD video files to Kindle playable format for playing, Pavtube Tivo to Kindle Converter can also do! It is a very affordable, fastest and most effective converter software.

Don’t know how to transfer converted video to Kindle? Read the steps below:

How to Transfer media files to Kindle?

You can transfer content files from a Windows or Mac computer to your Kindle Fire HD device, including books, music, video, photos, and documents, using the USB cable that came with your Kindle. Both Macintosh and Windows users can download and transfer compatible content files from a computer to Kindle Fire HD device using a compatible USB cable. When your Kindle Fire is plugged into your computer, it will appear as a removable mass-storage device. This method is highly recommended.

System Requirements to transfer files:
  • Windows-based: Windows Vista or later. Windows XP users may be required to update their copy of Windows Media Player. Visit the USB Transfer Tools page for details.
  • Macintosh: Mac OS X 10.5 or later. Note: Mac users need to install a free app, Android File Transfer, to complete a USB transfer. Visit android.com/filetransfer and follow the onscreen instructions.
  • USB port: An available port or an attached USB hub with an available port.

Step-by-step Instructions:

1. Connect Kindle Fire HD to your PC via USB.

2. Once you've connected your Kindle Fire HD to a computer with a USB cable (sold separately), your Kindle Fire HD will appear in the same location as external USB drives usually appear. For Windows users, this is typically in the "Computer" or "My Computer" menu.

3. Open the Kindle drive; you will see several folders inside. You may need to unlock your Kindle Fire HD before it can be opened on your computer.

4. Locate the downloaded file and drag and drop it into the applicable content folder, such as Video, Music, or Pictures.

5. Safely eject your Kindle Fire HD from your computer and unplug the USB cable.

Your content will appear within the corresponding content library on your device:
  • Books will appear in the Books library.
  • Personal documents will appear in the Docs library.
  • Music will appear in the Music library.
  • Pictures will appear in the Gallery app.
  • Videos will appear in the Gallery app. Note that videos transferred via USB will only be available in the Gallery app. Only videos from the Amazon Video store are shown in the Video library.

Now freely play your favorite TV programs on your Kindle devices when travelling.
  

Friday, April 25, 2014

How to Convert TiVo recordings to MP4 on Windows 8.1 or Mavericks?

What is Tivo?

To put it simply, TiVo is like a VCR on steroids. Also called a personal video recorder (or PVR) or digital video recorder (DVR), TiVo is a electronic filled box you connect to your cable TV. Inside is a hard drive, just like in a computer, that stores dozens or hundreds of hours of TV programming. But instead of complicated VCR programming that no one actually uses, Tivo comes with a spectacularly simple software interface you control through a handy remote control.

How to play Tivo files?

If you're frequent traveler, a question may come up like this - How can I get my TiVo shows remotely with my Android tablet or iPad? Currently there's not yet a good solution for wirelessly play TiVo shows remotely, but here's a way to transfer TiVo shows to your PC and then convert the .tivo files to MP4 video for Android Tablet or iPad viewing on the go, so that you can easily take favorite TV shows when away from home.

How to upload Tivo files?

You many want to enjoy Tivo shows at home and sharing with family or friends. But the Tivo files are saved by digital video recorders with copyright protection, so it would be difficult to playback or sharing on YouTube. In this case, you need to change tivo to mp4 format for better uploading process.

How to edit Tivo files?

My brother has a tivo 2 series and just learned to use tivo to go to move the files to his windows system. But he said he didn't know how to convert .tivo to .mp4 which is what his pinnacle software likes, so he can pull tivo the files directly. So back to the great idea —— converting .tivo to .mp4 for editing tivo files more conveniently.

How to burn Tivo files?

Or if you want to burn tivo files etc., you are also suggested to do tivo to mp4 conversion.

So to get Tivo files worked, in other words, to enjoy, play, share,edit and burn tivo freely, the only solution is to convert Tivo files to MP4, so you can deal with Tivo files in these MP4-compatible apps sucessfully.

To accomplish this, Pavtube Tivo to MP4 Converter is of great help. It supports converting any audio & video format, but mostly I use to convert TiVo video (TV shows and movies) for Personal use. The GUI was much easier to use and had more features. It works fine with reat video quality and it successfully and directly lets me convert Tivo to any popular app or device.

For Mac users, Tivo to MP4 Converter for Mac is recommended to you.

Now get it installed and let's start to quick convert Tivo to MP4 on PC with perfect videoaudio sync technology.

Step One. Transfer the Tivo files to PC.

Although the TiVo Desktop software for the Mac (supplied by TiVo) does not allow user to transfer TiVo recordings to Mac, you can transfer TiVo to Mac MacBook with specific software as long as your TiVo box is connected to your home network. Once you've recorded your favorite shows on your TiVo box, freeware like the TiVoDecode Manager can accomplish this task for you.

Step Two. Launch this Tivo Video Converter.

Click the top left icon to import your tivo files.


It will pop up a window to remind you submit the tivo key. Click Ok and enter your tivo media key.


Here is a easy way to trim out commercial ads in tivo click the pencil-like icon on the top, switch to "Trim", you will be able to set up and start and end point easily.

Step Three. Click the "Format" and choose proper presets for MP4 playbacl.

You can see profiles for iPad, iPhone, iPod, Apple TV and you can choose one according to your device model.

And there are many presets in "Andoroid" column, you can use the search box on bottom right corn and locate proper mp4 presets for your own phonetablet model.


For users who want to upload to YouTube, you are suggested to choose Common VideoMPEG-4 Movie(.mp4)

You can also click "Settings" (which is marked as "3" above) to customize video size, bitrate(quality), frame rate and other settings.


Pls note that the higher bitrate you choose, the better video quality you will get.

Step Four. Click the big red "Convert" to start converting Tivo files to MP4 that suites for playback, sharing, editing and burning. Wait for moments and click "Open" to locate the converted video.

Now connect your phonetablet to PC and enjoy the wonderful TV shows without ads or device limitation!

Learn more Tivo video related guides:

Friday, April 4, 2014

Enable kids and family members to watch DVDs on mobile devices

This article walks you through the whole process of converting DVD movies to mobile devices so that kids and family members are able to enjoy movies at home or anywhere they like. 

Kid's favorite animations like Olivia, Ice Age 4, Frozen, Big Top Scooby-Doo, Madagascar, The Jungle Book, Despicable Me 2, and more movies will release the DVD version soon. Would you like to move and watch these new movies on your iPhone 5S/5CiPad AirSamsung Galaxy TabGoogle NexusSurface tablets, Kindle Fire HDX or other portable device with your kids and family members? Without the assistance of any tool you cannot accomplish this because there is no mobile devices that are equipped with a disc driver natively.

Among all the software applications, free or paid, Pavtube DVDAid is my first choice for two reasons. One is its easy-to-use feature with user friendly interface; another is its reasonable price and lifetime support.

Anyway, I would tell you How to rip DVD movie to my iPad Air or other mobile devices and similar steps could be found from below tutorial for your mobile device as well.
Good News! Pavtube Release a New Site - multipelife.com with Product Migration and Name Change. DVD Ripper has now become DVDAid. Like us to get 40% off DVDAid on Windows/Mac platform: https://www.facebook.com/pavtubefans/app_209569249055691 
 
Step 1: Download a free copy of Pavtube DVD Ripper, install and launch it. Insert DVD disc, hit the "Load Disc" icon to browse to disc driver and load DVD movie into this app.

pavtube dvdaid  

Step 2: Choose the optimized format for output. In order to watch DVD movies on my iPad Air, I select "iPad" > "iPad Air HD Video(*.mp4)" as output format.
 
choose mp4 format 

If you have other mobile device, search for the particular profile from the "Format" drop-down list. When you cannot find your smartphone or tablet there, don't worry, use the similar format with your device or choose Android or Window profile, and then adjust profile presets to achieve the best video and audio quality for your device.


Step 3: click on the "Convert" button and start ripping DVD movie. When the conversion is done, I will find the converted MP4 movie in output folder and transfer to my iPad Air via iTunes 11. And the whole process of ripping DVD to iPad Air completes and I am ready to reach my DVD collection on iPad Air, iPhone 5S, and other mobile devices.

Read more:


Wednesday, February 19, 2014

Make digital copies of DVD/Blu-ray movies for watching on tablet

This article will give you an easy way to make digital copies of DVD and Blu-ray movies so you could watch them on your tablets.

Recently, I just bought an Asus MemoPad HD 7. The screen resolution is 1600*900 and it would be a good enjoyment to watch my DVD/Blu-ray collections on it. However, most DVD and Blu-ray movies are all protected. In order to solve the problem, the only way to make it possible is making digital copies of movies I owned so I could watch them on my tablet. 


Then I googled "blu-ray ripper" online and came across this article, Pavtube BDMagic were the top pick. After owning the program, I use it to rip movies so that I coluld watch them on my new tablet while traveling. Besides, my son has a Galaxy Tab 7. He is 11 years old and uses the Tab mostly for games, although I ripped a couple of his movies for him to watch.

Here is the easy process when I use Pavtube BDMagic to do the conversion.

Step 1. After installing the program on your computer, launch it. Click "Load File" icon to load DVD/Blu-ray movies to the program. Then choose the subtitle and audio you need on the main interface.


Tip:
The "Setting" icon beside the format bar is designed for you to adjust specific video size, bitrate, frame rate, audio bitrate, channels, etc. according you own needs.

Step 2. Click "Format" bar and choose "HD Video > H.264 HD Video (*.mp4)" as the output format. This format is suitable for the new released tablet, either my Asus MemoPad HD 7 or my son's Galaxy Tab 7.


Step 3. The last and not the least step is just start the conversion by clicking the "Convert" button on the bottom right corner. 

Everything is OK! Wait for a moment and the program will finish the conversion automatically. As my own experience, the time of converting Blu-ray movies is much longer than DVD movies. When the conversion is over, hit the "Open" icon to locate the output videos, and transfer them to your tablet via USB cable.

So easy, right? I am sure even you are a fresh man of this program; you could do the conversion at ease. If you are a Mac user, it also has Mac version. Have fun of enjoying your movies on your tablet with the help of the easy-operated software.

Friday, January 10, 2014

Watch Rental Blu-ray movie with multi-tracks on Tablet/Phone without time limitation

Do you have any rental Blu-ray movies in hand to be returned but you still have not watched yet? Do you want to watch these rental Blu-ray movies to your tablet or phone without time limitation? Read the article below can solve your problem easily.

Nowadays, there is a growing number of people prefer to watching the latest Blu-ray movies through renting instead of purchasing. Just add the Blu-ray titles you want to watch to your rental list and they will be dispatched to you when available within your monthly allocation. The convenience for people to sit back and start to enjoy the latest and greatest movies without much pay makes rental Blu-ray movies popular. However, the only disadvantage of rented movies is they have rental periods that you have to complete your watching hurrily:
“I have a Blu-ray rental plan with Netflix. Recently I rented Hunger Games and was planning to watch it for a good enjoyment. But I was very busy and had no time to watch it. Return date is coming soon. 
First question, does anyone know a way to make it possible to watch the blu-ray movie on my tablet or phone? 
I also want to keep the multi-tracks of the movies.Comments?Thanks.”
Have you meet the same problem and have the same demands with the above customer? If you got some rental Blu-ray movies, you may want to stream them to your tablets/phones for watching anywhere and anytime and no deadline should be worried about. Here this post is mainly talking about how to put and play rental blu-ray movies on tablets/phones with multi-tracks.

Required Software:
Good News! Pavtube Release a New Site - multipelife.com with Product Migration. Like us to get 30% off ByteCopy on Windows/Mac platform: https://www.facebook.com/pavtubefans/app_209569249055691

What's more, you can save up to $35.1: 

The Reason why we choose Pavtube ByteCopy?

  • Backup BD/DVD to MKV without quality loss and keep multiple audio tracks and multiple subtitles.
  • Preserve the chapter structure in a converted movie title.
  • Edit movie by trimming, cropping, merging, etc and support adding *.srt and *.ass subtitles to BD/DVD movies.

Step by step guide to convert Rental Blu-ray to Tablet/Phone support format

PS: This application can work on Windows XP/2003/Vista/Windows 7/Windows 8 or Mac OS X 10.5 or 10.5 above (including Mac OS X Leopard, Snow Leopard, Mac OS X Mountain Lion) with 1G Hz or above Intel processor.

Step 1: Install the Rental Blu-ray movies to Tablet/Phone converter, then load your rental blu-ray movies to the program.


Step 2: If you want to watch your rental blu-ray movies with multi-tracks, click the “Format” bar and choose the “Multi-track MP4(*.mp4)” format under “Multi-track Video” option which is designed for keeping multiple audio tracks.


Step 3:  Click on "Settings" to modify video codec, resolution, frame rate, sample rate etc. Of course, different settings will have different results. And you should know, the higher video quality with bigger video size, please pay attention to your storage. You can change these settings according to your own devices.

Step 4: Start ripping rental Blu-ray movies to Tablet/phone by clicking on the “Convert” button.

Once the conversion completed, transfer the result MP4 video file to your tablet/phone where you want to enjoy it.

Related articles:

Monday, January 6, 2014

Stream Blu-ray/DVD collections to Portable Devices and HDTV via Home Network

This guide introduces how to backup Blu-ray/DVD disc, folder, IFO/ISO to your locate network, so that you can stream them to portable devices and TV for playback at any time.

If you are any thoughts of home entertainment, you should not miss the idea of streaming your Blu-ray and DVD collections to portable devices and HDTV via home network. It's a good way to share movies with family members without the risk of scratching discs; everyone in your family can create and access the shared movies; isn't it fantastic?

If you already have the home network set up, then the most important thing is to backup Blu-ray/DVD to server in a most common format which could be accepted by most of your devices. After many trials, I prefer to save them into MP4 format as it's widely supported by my iPhone, iPad, Android tablet and Samsung Smart TV.

To backup Blu-ray/DVD into MP4 format with best quality, I recommend Pavtube Video Converter Ultimate as it's capable of ripping/converting just about every title that I own; it's easy of use and choices for decode/encode to all popular formats.

Review: 2014 Top 5 Video Converter Ultimate For HD Media Player, TV & Portable Device

Note: its Mac version is renamed as iMedia Converter for Mac.

How to convert Blu-ray/DVD to MP4 on home network or stream to portable device/TV for playback? 


Step 1. Launch Pavtube Video Converter Ultimate; import disc.

Inset your DVD to computer; if you want to rip Blu-rays, use an external drive to connect it to your computer. Then hit "load disc" to import the discs. You can also drag and drop Blu-ray/DVD folder, ISO/IFO files to it directly.

Note that you shall keep Internet connected during this period.


Step 2. Choose format.

Hit "Format" drop-down list and choose "HD Video> H.264 HD Video(*.mp4)" as the most widely used format for playback on smartphones, tablets and HDTV.


Step 3. Adjust output settings (Optional)

You can click "Settings" (besides "Format") to change target video size, bitrate, frame rate and other specs. Change the size to "Original" to get full size picture that can be playback on TV clearly. And the higher bitrate you choose, the better video quality will be.

Step 4. Start the Blu-ray to MP4 conversion.

Back to the main interface and hit the "Convert" to start converting Blu-ray&DVD to HD MP4 on your PC/Mac; this converter will start all the tasks in batch. Wait for a while till the conversion completed; click "Open output folder" to quick locate the converted files. Now upload the movies to your NAS.

Related articles:

Friday, December 20, 2013

Download and Sync Music, Photo and Video Files to Kindle Fire HDX with Three Ways

Have no idea about the new Kindle Fire HDX Media File Transfer? Here, you will find three ways to download & transfer media files (music, photos and videos) to Kindle Fire HDX 7/8.9 for using. Plus, you will get some small tips when synchronizing videos/movies to your new Amazon Tablets.

Kindle Fire HDX. Generation 3 tablets are here. New Kindle Fires with Collections, Downloads of Prime Instant Video, Kindle Support Co-pilot access on your tablet 24/7. 34% lighter, much faster. Scroll lyrics to songs, identify and jump to songs when watching enabled tv shows or movies. Switch between multiple apps and books. Enterprise features + new accessibility capabilities. Control TV with the tablet and sync video and X-ray features + much more. In this article, we will provide the info about "How to get music, photos and videos onto the Kindle Fire HDX". You can take this informative posting about transferring media files onto the Kindle Fire HDX 7/8.9 for reference.

(Also see Amazon's help section to get more "Kindle Fire HDX Online Help".)

Method 1: USB Transfer- Transfer Content from a Computer to Your Kindle Fire HDX

To transfer Kindle content from your computer to your Kindle Fire HDX, use the micro-USB cable that was included with your device.


Note:

EPUB eBooks and Mobipocket files with Digital Rights Management (DRM) can't be transferred to your Kindle Fire.
Personal videos transferred to your Kindle Fire will appear in the Photos content library.
Apps from the Amazon Appstore for Android and movies and TV shows from Amazon Instant Video can't be downloaded from the Manage Your Kindle page to your computer.

From your computer, locate the content you want to transfer from your computer to your Kindle Fire.

Tip: You can use Manage Your Kindle to deliver Kindle books, magazines, and newspapers to your computer. Visit Manage Your Kindle and locate your Kindle content. From the Actions drop-down, select Download&Transfer via USB. From the drop-down, select your Kindle Fire, and then clickDownload to download the content to a folder on your computer.

Connect your Kindle Fire to your computer with the micro-USB cable. If you've set a lock screen password on your Kindle Fire, you may need to unlock your device before it can be opened on your computer.

Windows: Your Kindle Fire HDX will appear in the Computer or My Computer folder.


Mac: Your Kindle Fire will appear on the desktop.


Important: If you own a Mac computer with OSX 10.5 or above or a Windows XP computer, your Kindle Fire HDX will not be detected by your computer until you download new software for your computer.

To download the software, go to http://www.kindle.com/support/downloads, and then select your country from the list.

Open the Kindle Fire folder (titled Kindle) on your computer, and then open the Internal storage folder.

Locate the downloaded file on your computer, and then drag and drop the compatible file you want to transfer into the applicable folder:
  • Audiobooks: AA, AAXBooks: AZW (.azw3), MOBI (non-DRM), KF8
  • Documents: TXT, PDF, PRC, DOC, DOCX
  • Music: MP3, non-DRM AAC (.m4a), MIDI, PCM/WAVE, OGG, WAV
  • Pictures: JPEG, GIF, PNG, BMP
  • Movies: MP4, 3GP, VP8 (.webm)
  • Disconnect your Kindle Fire from your computer.

From your Kindle Fire, tap a content library (for example, Books) in the top navigation, and then tap On Device to view your Kindle content.

Method 2: Wireless cloud service - Downloading Content from the Cloud

After you purchase Kindle content, it is saved to the Cloud. When you connect to a wireless network, you can download items from the Cloud to your Kindle Fire.

From Home, tap a Kindle content library (for example, Books) in the top navigation bar.
Tap the item to download it to your device. Items that have been downloaded to your Kindle Fire display a check mark in the lower right corner of the cover image. Items that are stored in theCloud do not display a check mark.


Tap the item to open it.

Having trouble?

Remove Content from Your Kindle Fire HDX

If you need additional device storage space, or you have content that you no longer use, you can remove items from your Kindle Fire.

Swipe down from the top of the screen to open Quick Settings, and then tap Settings.
Tap Device, and then tap Storage.
Tap any of the content categories to see the file names and sizes..
Tap the checkbox of any items you want to remove, and then tap Remove.

Tip: To permanently remove apps or games from the Cloud, go to the Apps or Games library on your device, tapCloud, and then press and hold the item you want to remove. Tap Delete from Cloud.

If you'd like to permanently remove a book, magazine, or newspaper from the Cloud, you can do so from Manage Your Kindle .

Method 3: Wireless network - Sync On Your Kindle Fire HDX

After you connect to a wireless network, you can sync your Kindle Fire HDX to receive content from the Amazon Cloud, synchronize book, audiobook, game, and video progress across devices, and download any app updates.

Swipe down from the top of the screen to open Quick Settings, and then tap Settings.
Tap Sync All Content.

Related Help Topics

Tips for synchronizing unsupported videos/movies to Kindle Fire HDX

1.  How to put copy-protected contents onto the Kindle Fire HDX Tablet? In fact, Movies purchased or downloaded from online (e.g. iTunes, BBC iPlayer, Amazon) are restricted to specific computers and devices only. Unfortunately the Android devices have not get a license to play DRM contents which means Kindle Fire HDX is not granted to play DRM-protected videos. To have the device play these DRM videos (iTunes movies, TV shows, Amzon Instant videos and Digital Copies), get yourself a DRM removal tool first.

2. If you want to copy videos to Kindle Fire HDX in other formats like MKV, WMV, AVI, FLV, MTS, M2TS, MOV, MPEG, MPG, MOD, TiVo, VOB, etc, you will need reformat these video files first. You can try this professional Kindle Fire HDX Video Converter to batch convert videos in various formats up to 1080p to the Fire HDX playable format (e.g. MP4).