Friday, January 30, 2015

Import Nikon D750 MPEG-4/H.264 videos to FCP 6/7 effortlessly

Final Cut Pro 6/7 won't import MP4 from Nikon D750 smoothly. The easy workaround is to transcode D750 MPEG-4/H.264 video to FCP "edit" friendly codec ProRes at first.

Nikon D750 is a full frame DSLR in 2014 which is possible to shoot at up to 6.5 frames per second (fps) and record Full HD video at up to 60p. It can bring outstanding videos to photographers, however it is a headache for filmmakers to edit D750 MPEG-4/H.264 video in Final Cut Pro 6/7 if they consider to splice all the material from the mov recordings to make a nice demo reel for sharing with others.

Import Nikon D750 MPEG-4/H.264 videos to FCP 6/7

Why it is a headache thing? Since H.264 codec is not a FCP native codec, you will find that you are in the rendering process forever when loading Nikon D750 mov files in FCP 6/7? Well, is there an easy way to help your out? In fact, it will not be a tricky process if you convert D750 H.264 video to FCP 6/7 editable Apple Prores Codec beforehand.

Then an easy-to-use yet efficient tool- Pavtube iMedia Converter for Mac will be a great help. With it, you can easily encode Nikon D750 MPEG-4/H.264 footage to ProRes 422, ProRes 422 HQ or 4444 for using in Final Cut Pro 7/6 and FCP X as fast and seamless as possible. Plus, the Mac video converter can also convert Nikon D750 mov to a more editing-friendly format so that iMovie, FCE, Premiere Pro, Avid Media Composer, etc can accept and afford well. What's more, it also provides simple video editing functions for you. Just download it and follow the tutorial below to convert Nikon D750 video files to Apple ProRes for FCP 6/7.

Convert and import Nikon D750 MPEG-4/H.264 video to Final Cut Pro 6/7 

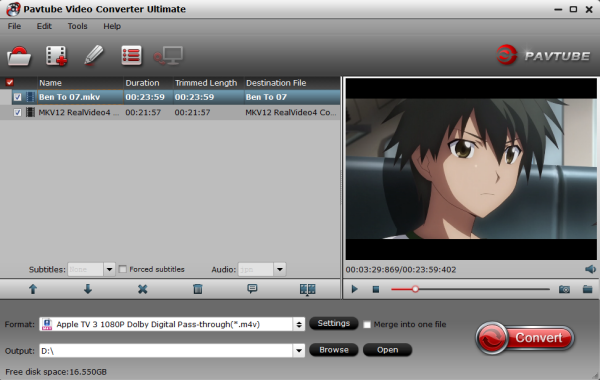
Step 1: Launch the Nikon Video Converter; click "Add Video" button from main menu to browse your computer hard drive and select the Nikon D750 mov shottings you want to convert. Or you can easily drag-and-drop files into this application for converting.

Tip: If necessary, join videos clips via checking the "Merge into one" box.

Nikon Video Converter

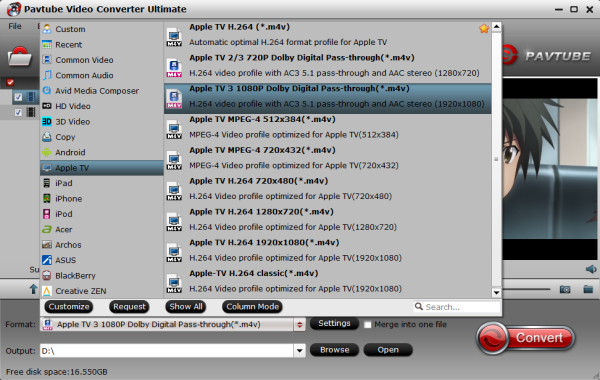
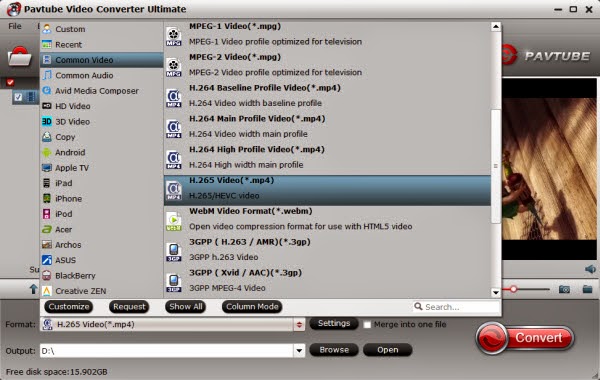
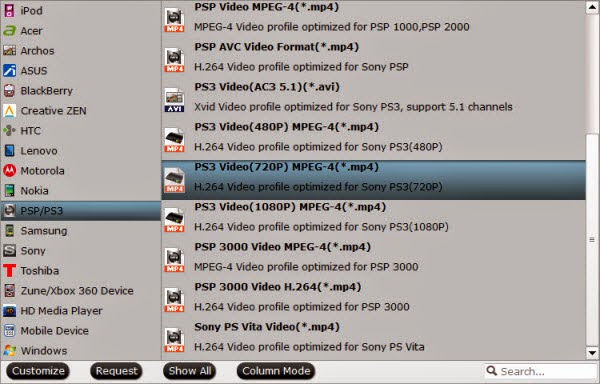
Step 2: Click the Format bar, and move mouse cursor to "Final Cut Pro > Apple ProRes 422 (*.mov)" as output format or choose other Apple Prores options.

video codec for editing in FCP

Step 3: Click “Convert” button to start encoding Nikon D750 MPEG-4/H.264 files to ProRes MOV for Final Cut Pro X or FCP 6/7 under Mac OS X(Yosemite included).

Some more helpful features of the Nikon D750 MOV to FCP Converter:

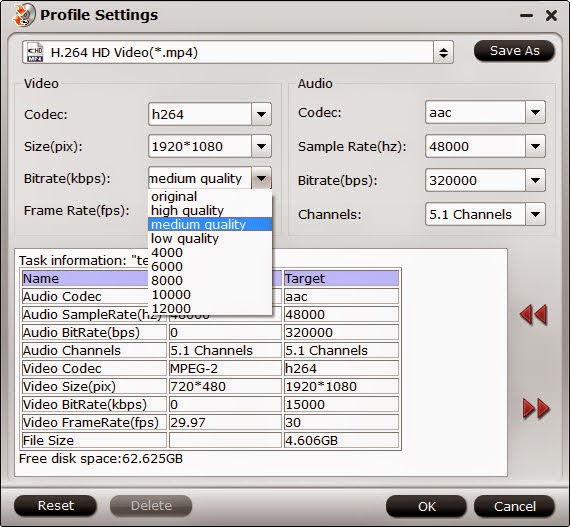
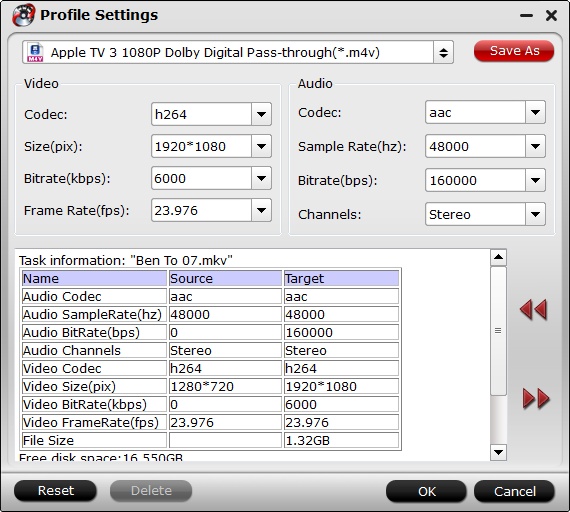
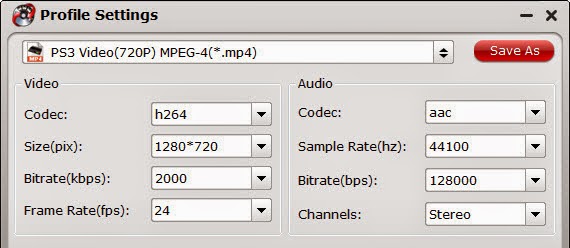
1. Settings- click to set video resolution(1920×1080/1440×1080/1280×720/720×480), bitrate(from 1Mbps to 20Mbps), frame rate (24p/30p)

2. Editor (next to “Add Video” icon)- click to set deinterlace, trim, crop, watermark, subtitles, etc.

3. More Inputs/Outputs- this Mac video converter can also let you to convert Blu-ray, DVD and other video clips like 4K videos to FCP for editing.

Once the D750 MPEG-4/H.264 to ProRes 422 conversion is done, you can transfer your Nikon D750 footage into Final Cut Pro6/7  for editing smoothly on Mac with ease.

Read More:

Wednesday, January 28, 2015

Backup Blu-ray Collection into Synology DiskStation DS215j readable video

Read this article and you will quickly learn how to backup and convert Blu-ray movies to Synology DiskStation DS215j friendly video for streaming.

As a devoted owner of a collection of Blu-ray discs, you would love to share some awesome movies with your friends or family, or watch movies in your smart phone while traveling. And of course you don’t want to break them if you use them many times. So that may be a dream to put all your Blu-ray in a NAS like Synology DiskStation DS215j with 6TB. (Have a 3TB external network drive? The Blu-ray backing up is just a piece of cake!)

Backup Blu-ray Collection to Synology DiskStation DS215j

With a Synology Ds215j, your Blu-ray movies can be accessible from any device from anywhere or displayed on TV at home via network. Then how to realize your dream?

In fact, to backup a Blu-ray disc to Synology DiskStation, a powerful third-party software for backing up Blu-ray is surely needed at first. Here Pavtube BDMagic is the best Blu-ray to NAS Ripper (Read the top Blu-ray Rippers review) that can output Synology DiskStation and multimedia players readable formats such as .mp4, .mov, .m4v, .mkv for storage from Blu-ray with ease. Meanwhile, you can freely select the desired subtitle and audio. And the most important thing is that by using NVIDIA CUDA technology or AMD APP tech, the conversion speed can be even faster than before. Mac version is here. Here are simple 3 steps  for you to do the backup.

3 Steps to Rip and Copy Blu-ray to Synology DiskStation DS215j

Step 1. Import Blu-ray files

Download Pavtube BDMagic and run it. Import a Blu-ray folder or Blu-ray ISO file you have. (Learn how to keep DVD chapter markers when copying)

Blu-ray To Synology DiskStation Converter

Step 2. Choose an output format

Move your mouse cursors down and see “Format” box. Yeah, don’t hesitate, just click it and you  can choose Synology DiskStation DS215j best supported mp4 format which is also playable on your media devices, or you can select the corresponding format for iPad, iPhone, PS3, Apple TV, etc. for easily streaming.

Synology DiskStation Supported Formats

Tip: If you want to output smaller size and save space in your DS215j, you can adjust “Bitrate”in “Settings”by choosing a smaller bitrate.


Step 3. Start to copy Blu-ray to Synology DiskStation

Press “Convert” and now it will start your Blu-ray copying with lossless quality. After you finish ripping your Blu-ray to Synology DiskStation DS215j, click “Open” button down to find your output file.

Now what you need to do is to connect the Synology DiskStation to PC and stream videos from Synology DS215j to iPad, iPhone, Apple TV, PS3, or other media players for enjoying anywhere! Note that you need to make sure the wireless network is accessible between your Synology DiskStation and the media player. So easy! Isn't it?

Monday, January 26, 2015

Stream and Play MKV video on Apple TV 1/2/3 in three ways

Is there a way of playing .mkv files on Apple TV? Actually, there are more ways than you imagined of  bringing .mkv on your Apple TV. Here introduces three effective ways.

MKV is a common file format for videos which means Matroska which is a container format (like .mp4, .m4v, .avi or .mov) that can hold video, audio and subtitle streams, then you may ask does Apple TV support MKV videos?

Stream and Play MKV video on Apple TV 1/2/3

It's a pity that  Apple TV has no sight for providing support for this container format, so if you have some MKV files (for instance on your NAS, USB stick or external Hard drive), you need to find a “workaround” to watch them on your TV. Here offers three ways for you.

Solution 1: Free Convert MKV to MP4 Video for Apple TV

If you get a couple of MKV files and want to watch them on Apple TV, you have to convert them to Apple TV friendly formats first. An open source software for re-encoding is Handbrake. Open the file, select an Apple TV preset and let Handbrake create an new video file.

Note: HandBrake works well at converting MKV to Apple TV, but it is not guaranteed. Worse still, it is slow in conversion, and often has some HandBrake MKV problems, like crashing before MKV to Apple TV conversion finishes.

Solution 2: Stream (AirPlay) MKV to Apple TV
A nice and easy way, if you have a modern Mac, is AirPlay Mirroring. Basically, this means that you play the video with your Mac (for instance with VLC) and just mirror your display to the Apple TV.

The big advantage is that you can instantly start watching your video. But you need to either Jailbreak or video conversion.

Solution 3 - The Best Way: Convert MKV to Apple TV 1/2/3 with Presets

As shown above, Handbrake has its drawbacks, so you need an effective HandBrake Alternative for video conversion, here Pavtube Video Converter Ultimate - a simple and user-friendly tool Video Converter is highly recommended. It features ultra fast speed and 1:1 quality ratio output when handing MKV to Apple TV conversion. Furthermore, it provides an optimized preset to fit Apple TV. Mac version is here. Follow the guide below and complete the MKV to Apple TV conversion in Windows quickly and easily.


Guide: Convert MKV video to Apple TV supported format

Step 1: Import mkv video files to the Video Converter for Apple TV.

Launch the best Video Converter for Apple TV. Click the button “File” to add MKV video files to it. If it is necessary, you can double click the each file to have a preview. Even Blu-ray and DVD are supported.


Tip: If you have several video files and wanna combine/merge several video files for the Apple TV, you just need to tick off the “Merge into one” box.

Step 2: Select an output format for the Apple TV and set the output folder.

Click on the dropdown menu of “Format” and then choose the format from the “Apple TV” sublist, which are all compatible for the Apple TV 1/2/3. Then you can set the output folder by clicking “Browse” icon as you need.


Step 3: Click “Settings” icon to adjust audio and video parameters.

Click the “Settings” icon and you will go into a new interface named “Profile Settings”. You can adjust codec, aspect ratio, bit rate, frame rate, sample rate and audio channel in the interface to optimize the output file quality. Read the solution when you find no 5.1 Surround Sound from Apple TV.


Step 4: Start converting your MKV ideo files to MP4 for Apple TV.

Click the “Convert” button; it will convert video to MP4 for Apple TV immediately with NVIDIA CUDA technology support. You can find the process in the “Conversion” interface.

After the short conversion, you will be able to get the output files for the Apple TV via clicking on “Open” button effortlessly. Now you can sync/copy MKV videos to Apple TV 1/2/3 for playback via iTunes easily. Find more solutions at Apple TV column.

Read More:

Friday, January 23, 2015

Cinemartin Cinec Alternative: Encode H.265/HEVC on Windows 8.1/8/7/XP

Cinec can't help you encode H.265/HEVC on Windows 8.1/8/7/XP smoothly? This article gives you the best alternative to Cinemartin Cinec. Check it.

Cinemartin Cinec is a multi video encoder transcoder, a video converter for windows. Have you ever touched the newest codec H.265/HEVC which is now becoming more and more popular? Encoding videos to HEVC h.265 with Cinec is just as easy as load a file, choose a preset for the output, and click encode. And encoding is fast and exports high quality. (Read Cinemartin Hoid review)

Encoding videos to HEVC h.265 with Cinec

However, you may still have troubles below:


  • Poorest Pre sale Support
  • Cant try H265 in trial version
  • No refund in even in case of non performance as per the developer's claim. Pay and forget.Its your luck if it version 3.0 work or not
  • Contrary to what the description says here, this free version does not recognize MXF files.
  • Attempting to open one results in the app crashing with an unhandled error.

If you've tried different ways but still not work, you'd better find a powerful alternative tool to Cinemartin Cinec. Here Pavtube Video Converter Ultimate just suitable to your needs, it is upgraded now to be an all-in-one H.265 Video encoder, decoder, player and editor

1. Acting as the H.265 Encoder, it enables to encode all variety of video files including MP4, MOV, AVI, WMV, etc. to H.265(HEVC) format.


2. Acting as the H.265 Decoder, it supports decoding H.265 to other video format like H.264 MP4, H.265 MP4, AVI, WMV, or directly convert H.265 video to audio format like MP3, WAV, AAC, etc.

3. Acting as the H.265 Player, it can directly play H.265 video files without format conversion in the preview window after loaded in.

4. Acting as the H.265 Editor, it allows you to trim clips, crop videos, add effects, insert subtitles, etc and adjust the H.265 parameter like bitrates, frame rate, aspect ratio, audio volume and etc.

Use Cinemartin Cinec Alternative to encode H.265/HEVC on Windows 8.1/8/7/XP

STEP 1. Import videos to the Cinemartin Cinec equivalent

Launch Pavtube Video Converter Ultimate. Directly drag & drop your video files to this program. Also, click Add button on the main interface to let you import your wanted media files.

H.265 Encoder

STEP 2. Select H.265 MP4 format

Here, you can choose "Common Video -> H.265 Video(*.mp4)" as the target format.


STEP 3. Start Video to H.265 conversion on

Finally hit the “Convert” button. Now, you’ve launched this smart Cinemartin Cinec replacement to convert video files.

After conversion, you just play the converted files with your H.265 player.

In conclusion,you’ll be surprised to find this Cinemartin Cinec Alternative can perfectly convert any SD/HD video to H.265 MP4 on Windows 8.1/8/7/XP. You can also read this top 6 H.265-HEVC Video Converters Review to get more alternative tools to Cinemartin Cinec.

Wednesday, January 21, 2015

How to Convert and Add Blu-ray/DVD ISO files to iTunes library

iTunes does not support ISO files from as source media. If you want to sync ISO to iTunes for playback on iPhone/iPad/iPod, try to convert ISO to an iTunes video first.

If you’ve already backed up lots of ISO from Blu-ray or DVD discs, you may wanna watch your favorite ISO movies on iDevices, like iPhone, iPad, iPod, etc. in iTunes on Mac. While, it’s a pity for iTunes users-  iTunes won't recognize those ISO files and doesn't allow you to load them.
sync ISO to iTunes

Why that happens? Well, that's because iTunes doesn't support the Blu-ray/DVD ISO files (it only supports MP4, MOV and M4V). In order to add ISO files to iTunes, you need to first convert  ISO to iTunes supported formats. And your primary concern may be how to keep the best compromise between high visual quality and less take-up of storage during conversion.

Here Pavtube BDMagic for Mac can fulfill your needs and provides perfect solutions for all the Mac users. Overall, it is a professional Blu-ray handling tool which convert ISO image to iTunes playable files with fast speed and high quality. Apart from BD/DVD ISO, you can also use it to convert Blu-ray, DVD to iTunes video and other regular video and audio formats like MP4, M4V, MOV, AVI, WMV, FLV, MKV etc.

What's more, if you want to play ISO video on your iPad, iPhone, iPod, you can directly select the device preset as the output format. Here is windows version. Just download it and follow the guide how to convert ISO to iTunes compatible MP4 video.

How to Rip ISO files for playback on Apple devices via iTunes on Mac

Step 1. Download, install and launch the top ISO to iTunes Converter on your Mac.

Step 2. Cick "Load IFO/ISO" icon to import the Blu-ray/DVD ISO on your computer. When the files are loaded, you can select the subtitle and audio track as you like.

ISO to iTunes Converter

Step 3. Select and custom output format. Click "Common Video" > "Common Video - H.264 Video(*.mp4)" to get the optimized output file for ISO to iTunes conversion.

iTunes video format

Tip: If you like, you can click “Settings" to change the video encoder, resolution, frame rate, etc. Remember bitrate higher results in big file size, and lower visible quality loss. If you want to keep 1080p Full HD resolution, set the video size as 1080*1920.

Step 4. When everything is OK, press the big "Convert" button to start ISO to iTunes MP4 conversion on Mac OS X.

After the conversion, get the output files by clicking the Open button and you are ready to import them into iTunes and if necessary, sync with your Apple device without hassle.

Tip: To import videos to iTunes, open iTunes and go to File > Add to Library or directly drag and drop the converted video to iTunes. And then find the video in the Movies category.

Now you are able to organize VOB in iTunes and even transfer to iOS devices like iPhone, iPad, iPod etc. for killing time on the move. In addition, MKV and FLV can be also converted for adding to iTunes.

Friday, January 16, 2015

Backup and Convert DVD/Blu-ray to Camping Car TV for playback

This article centers on the simplest way to rip DVD/Blu-ray to Camping Car TV for Unlimited Playback with crisp and lossless quality using a Blu-ray Ripper.
 
It is super comfortable for watching Blu-ray and DVD on Camping Car TV when you are away from home with a Blu-ray/DVD player. But as we know, discs are subject to scratch and damage easily due to time-to-time putting in and worse yet the Blu-ray/DVD protection prevent you from playing them on Camping Car TV smoothly as you expected. Then for some disc collectors, it is not a thing bringing owls to Athens if you want to rip your Blu-ray and DVD to Camping Car TV for playback.

watching Blu-ray and DVD on Camping Car TV

Do you also have such a demand? Wonderful! Here, this article just shares you the simplest way to convert Blu-ray and DVD to Camping Car TV recognized format like MPEG-4 with the help of a professional Blu-ray Ripper.

With numerous Blu-ray rippers flocking on the market, finding the most suitable one seems like looking for a needle in the hay stack. To save you from the awkward situation, Pavtube BDMagic comes to give you a hand. I heard it on the Web and then tried it to help me backup my purchased Blu-ray/DVD and convert them to use on devices(House TV, iPad, Camping Car TV). Read reviews here.

What's the results? I found this program is an elite Blu-ray to Camping Car TV ripper that can rip Blu-ray and DVD to Camping Car TV with fast speed and high quality. More stunningly, this Blu-ray Ripper has the mighty power to disable any copy protection measure put on Blu-ray and DVDs in a walk, so that you can convert any copy-protected discs, like Despicable Me 2 and Fast and Furious,etc. to Camping Car TV without a hitch.

Rip Blu-ray and DVD to Camping Car TV Fast and Losslessly

1. Install and launch the best Camping Car TV Blu-ray converter. Mac version is BDMagic for Mac.

Note: An external Blu-ray drive is required for ripping Blu-ray disc.

Camping Car TV Blu-ray converter

2. Click Disc icon to load movies from your Blu-ray/DVD and then tap the Format icon to choose the Common Video > MPEG-4 Movie(*.mp4) as the export format.

Camping Car TV playback video format

3. Hit the Settings button to see detail information of the format, and you can change the profile parameters as you need.

Tips: 

a. For Blu-ray movies, you can customize the video size as 1280*720 to get a 720p video.

b. For DVD movies, set the video size as 720*480 is enough due to DVD’s original resolution.


MPEG-4 video settings

4. Click the Convert button to start to convert Blu-ray/DVD to MPEG-4 video for Camping Car TV.

After the conversion, you can copy the resulted .mp4 videos to Camping Car TV effortlessly for freely watching when you are away from home.

Additionally, Pavtube BDMagic not only offers you the easiest solution to rip Blu-ray/DVD to Camping Car TV one but also enables you to rip any Blu-ray and DVD to AVI, MKV, MOV, etc or convert them for playback on Xbox 360, Roku 3 and external network drive with crisp quality and lossless quality.

Wednesday, January 14, 2015

Stream all your Video from PC to Xbox One

How to stream video to Xbox One? This article teaches the way streaming all videos from PC to your game console Xbox One with ease.

If you’ve got a Xbox One, you’re in luck, because that’s our today’s lesson. It must be a huge waste to just play HD games on your Xbox One, you can also regard it as a media player. And in this Video to Xbox One guide, I will teach you how to stream any video from PC to Xbox One.

Stream all your Video from PC to Xbox One

Part 1: Stream Xbox One Supported Video Formats

Xbox One is capable of receiving and displaying video streams from Windows Media Center 7 and Windows 8.1 PCs. So long as the PC and Xbox One reside on the same network, the streaming process is fairly simple.

1. Make sure you have the video application open on your Xbox One.

video application on Xbox

2. Check your PC network settings and ensure that the Xbox One is visible on the network. If it is not, make sure both devices are properly connected and configured to see one another.

preference

3. Check your Xbox One Preferences under Settings and make sure “Play To” support is enabled.

Xbox One play to

4. Select a locally-stored video file on your PC. Most popular video file formats should work.

5. Right click the file or files you wish to play.

6. Select the “Play To” option.

7. A drop down menu should appear listing all compatible decides detected on your home network. You should see your Xbox One listed among them.

8. Select your Xbox One. The stream will load and then begin playing.

The Xbox One’s video controls will then take over, allowing you to pause and play the stream without touching your PC again.
Part 2: Stream all your Video from PC to Xbox One

Note: There is still one important matter we should mention that the copied video files should be compatible with Xbox One or the Xbox cannot read the video files at all. If you don’t have a Xbox One compatible-video file, you should convert the video files to Xbox One playable format first.

To get the work done, Pavtube Video Converter Ultimate is the highly recommended tool for you. (Read review) With the professional Xbox One Video Converter, you can convert your un-compatible video files to Xbox One MP4 video easily and quickly. That is to say all kinds of video formats could be played on Xbox One by converting. Moreover, you can freely edit your videos like trimming, cropping, adding watermark, adjusting the effect. Now just download the free trail and follow the steps below to see how it works.

Step 1: Import video/movie files.

Launch the best Xbox One Video Converter(Mac version is here). Click “Add video” to import videos from PC.

Xbox One Video Converter

Step 2: Select an output format for Xbox One and set the output folder as you need.

Click on the dropdown menu of “Format” and then move your pointer to “Common Video”. From the sublist, the “Xbox 360 Video - Windows Media Video(*.wmv)”, “Xbox 360 Video (640*480)(*.wmv)”, “Xbox 360 HD Video (*.wmv)” are all the friendly formats for you to copy videos/movies to Xbox One for enjoyment. It is also possible to convert your videos to PS3.

Xbox One WMV format

Step 3: Trim the videos/movies for Xbox One.

Click the Edit function and you will go into the “Video Editor” windows. In the interface, click the “Trim” icon, and then trim your videos/movies. Usually, you can trim your videos/movies into two parts.

Step 4: Start converting your videos/movies to Xbox One.

Click the “Convert” button; it will convert videos/movies to Xbox One immediately. You can find the process in the “Conversion” interface. After the conversion, you will be able to get the first movie/video part for Xbox One via clicking on “Open” button effortlessly.

Now you can copy/tranfer videos/movies to Xbox One without any video size restriction. Also learn how to rip Blu-ray, DVD or ISO files for Xbox One.

Monday, January 12, 2015

Stream videos from my DSLR on NAS to PS3 for playback

Is it possible to access my own DSLR files on NAS to PS3? Now follow this article to play high-bitrate DSLR videos on PlayStation 3 smoothly effortlessly!

Question: I mainly store photos and videos from my DSLR on my NAS. I want to review high-bitrate footage on an HDTV (PlayStation 3) and stream it to my iPad when I'm not home. But it is really a huge conflict between DSLR videos on NAS and PS3 Media Player. What should I do? 
 Stream videos from my DSLR on NAS to PS3

PS3 tends to serve as the all-in-on hub for your home entertainment. However, PS3 supported video formats are quite limited as below:
VIDEO: MPEG-1, MPEG-2 (PS,TS), H.264/MEPG-4 AVC, MPEG-4 SP
MUSIC: ATRAC (.oma .msa .aa3), AAC (.3gp .mp4), MP3 (.mp3), WAV (.wav)
IMAGES: JPEG, GIF, PNG, TIFF


To watch DSLR video files on PS3, the movie file needs to be converted to H.264 video, with the file extension like .mp4 or .avi. Therefore, if you want to stream videos from my DSLR on NAS to PS3 for playback, an PS3 Video Converter is needed.

And according to the PS3 users' feedback, Pavtube Video Converter Ultimate/iMedia Converter for Mac is supposed to be the right choice. It's offers a hassle-free solution to seamlessly make any file fully compatible with the PS3. With it, you can fast change MXF, MTS, MOV, MP4 DSLR movie files on NAS to PS3 compatible formats while keeping the orginal video quality. (Take a look at the review to learn more) Just download the program and follow the tips below to easily make PS3 play your DSLR videos.

How to convert videos from my DSLR on NAS to PS3 supported file format

1. Load DSLR vides to the converter

Download and install Video Converter for PS3 on your computer. Run it and directly drag and drop the recordings that you want into the main window of this converter. You can also add your video clips by clicking the “Add Video” button on the left bottom. This Ultimate Converter can also rip your Blu-ray, DVD and YouTube video to play on PS3.

Video Converter for PS3

2. Select format for PS3

After the files are added, click Format > PSP/PS3 and set output video format as PS3 Video(720P) MPEG-4(*.mp4) which the compatible MP4 preset for streaming via PS3 with best video quality.


Note: PS3 just plays the MP4 files with H.264 video codec and AAC audio. Click the Settings icon to set the correct video, audio codecs.


3. Begin the conversion

Hit the Convert button to start converting DSLR video from NAS to PS3 for playback.

4. Import Video To PS3 And Enjoy On Bigger Screen

After conversion, you could find converted video in the output folder. Copy them to your memory card, external drive or even an iPod, and then plug the storage media into your PlayStation 3 through USB.

plug the storage media into your PlayStation 3 through USB

You see, there is flashing indicating USB device (storage device) inserted. Click it and select the video that you want to import. Pressing the triangle button gives you several options -- navigate to "copy"or "move"(find the difference here).

Once your transferring is done, your imported video will end up in your PS3 video playlist. And now, you could enjoy your videos from my DSLR on NAS on PS3 system. It is easy right? And are you ready to try it by yourself?

Friday, January 9, 2015

High Quality Video Compression: Integrating an H.265/HEVC Solution for Android Platforms

This article introduces Strongene's H.265/HEVC solution on Intel Atom processor-based Android tablet. If you have any H.265 playback problem on Android or wanna an alternative, please refer.

For the HD videos are very popular today, most of us must have some HEVC files in Android Platforms. Here offers you some effective H.265/HEVC Solutions, we will provide you with information on products and services that we consider useful and of value to developers.


Abstract

According to the International Data Corporation, the total amount of global data for 2012 reached 2.7 zettabytes, an increase of 48% from 2011. Ninety percent of the global data was videos. Video apps consumed 66% of the total Internet data flow, and that number continues to increase rapidly. End users want to watch high quality videos but, for online video providers, costs of purchasing the network bandwidth and the storage devices grow increasingly expensive every year. How can video content providers meet the challenge of large data sources and their increasing storage requirements? Is it possible to achieve high quality videos with smaller bandwidth? The solution to these challenges is found in utilizing a video core compression technique known as High Efficiency Video Coding (H.265/HEVC).

Some open source communities such as FFmpeg are developing an H.265/HEVC decoder, but the performance has not yet reached commercial use capability. Strongene Ltd., a producer of video codec core technology, has developed advanced H.265/HEVC encoder/decoder solutions, including optimized H.265/HEVC encoder/decoder libraries and demonstration codes for Intel® Atom™ processor-based Android platforms. This article introduces Strongene's H.265/HEVC solution on Intel Atom processor-based Android tablet (condenamed Bay Trail).

Strongene's H.265/HEVC Solution

To evaluate a good video standard, we generally use efficiency and compatibility standards. The video standard evolution over the past 20 years is shown in the following graph:


video standard evolution

Figure1. Video standard history

H.265/HEVC is the successor codec to H.264/AVC (Advanced Video Coding), both were developed jointly by the ISO/IEC Moving Picture Experts Group and ITU-T Video Coding Experts Group (VCEG). The primary goal of the new codec is to provide 50% better compression efficiency than H.264 and support resolutions up to 8192 x 4320.

As shown in Figure 1, it took 9 years to evolve from MPEG-2 to H.264/AVC, so more challenges are expected to be encountered in moving from the H.264/AVC standard to the H.265/HEVC standard. Gaps between the technical concept and the actual quality of the product still exist for H.265/HEVC. However, H.265/HEVC does a good job of balancing the efficiency and compatibility requirements, which make up the next level of video standards.

Strongene's H.265/HEVC solutions were optimized using YASM assembler compiler, Intel® C++ Compiler, Intel® Streaming SIMD Extensions (Intel® SSE), and Intel® Threading Building Blocks (Intel® TBB), with OpenGL* used for rendering. By directly uploading the decoded YUV420 data to the GPU, it finishes the transcoding of YUV data to RGB data and renders the RGB data to LCD. This reduces the CPU's workload and improves performance. The data stream is shown in the following diagram:
CPU's workload

Figure2. Render method comparison

On an Intel Atom processor-based tablet (codenamed Bay Trail), after having been tested by Intel® Graphics Performance Analyzers (Intel® GPA) tool, the optimized H.265/HEVC decoder refresh rate can reach 90 FPS (frames per second) when playing a 1080p HEVC video. If we set the refresh rate to 24 FPS on the Bay Trail tablet when playing the 1080p video, the CPU workload is less than 25%. Thus, Strongene's H.265/HEVC solution achieves commercial use capability.

Analysis of the APIs of Strongene's H.265/HEVC Solution

The APIs of Strongene's H.265/HEVC solution are easily used directly with or integrated into FFmpeg open source. Strongene defined five functions and one structure for the H.265/HEVC decoder, as listed below:

Structure:

lenthevcdec_ctx;

Description: It is the context of decoder for identifying different decoders.

Functions:

1. Unit32_t lenthevcdec_version(void);

Description: For getting API version of current library.

2. lenthevcdec_ctx lenthevcdec_create(int threads, int comoatibility, void* reserved);

Description: Create decoder with specified parameters.

Example: 

int32_t got_frame, width, height, stride[3], ret, i;
uint8_t* pixels[3];
int64_tpts, got_pts;
for ( i = 0; i <au_count; i++ ) {
pts = i * 40;
got_frame = 0;
ret = lenthevcdec_decode_frame(ctx, au_buf + au_pos[i], au_pos[i + 1] -
au_pos[i], pts,&got_frame, &width, &height, stride, (void**)pixels,
&got_pts);
if ( ret < 0 ) {
fprintf(stderr, 
"calllenthevcdec_decode_frame failed! ret=%dn", ret);
exit(1);
}
if ( got_frame> 0 ) {
printf("decode frame, %dx%d, pts is %" PRId64 "n", 
width, height, got_pts);
/* got frame, do something ... */
}


How to Integrate Strongene's H.265/HEVC Solution

Developers can easily integrate these five functions when developing HEVC video players. The documentation and sample code are available from Strongene's download web site.

Developers can directly call the Strongene's H.265/HEVC APIs to develop their video players, or they can merge Strongene's H.265/HEVC patch for FFmpeg, and then use the merged FFmpeg APIs to develop their video players. The following paragraph introduces the two methods separately.

Directly Use Strongene's APIs to Develop Video Players
On Strongene's web site, developers can download the:
  • sample code testdec.c/lenthevcdec.h 
  • decoder: liblenthevcdec.so 
  • documents: lenthevcdec_en.pdf, the Makefile 

Copy the sample code to Ubuntu* build machine into separate folders: 

wangsy@ubuntu:~/Desktop cp testdec.c Makefille ~/hevc/src
wangsy@ubuntu:~/Desktop cp lenthevcdec.h  ~/hevc/include
wangsy@ubuntu:~/Desktop cp liblenthevcdec.so ~/hevc/lib/Android_x86 

Set up ANDROID_NDK_HOME environment with the "export" command:

export ANDROID_NDK_HOME= $ ANDROID_NDK_HOME :/~/android-ndk-r9c 

Then you can run the demo on the Android devices directly.

Use the H.265/HEVC Patch for FFmpeg to Develop the Video Players
In fact, most developers will use the open source FFmpeg to develop their video players. Strongene's web site also provides the patch for FFmpeg, which can be downloaded from:lentoid_ffmpeg2.0_patch_2014_01_23_new_encoder_interface.patch

To merge this patch, you should also download and decompress the FFmpeg 2.0.4 version. Then add the patch:

wangsy@ubuntu:~/ffmpeg-2.0.4
patch &ndash;p1 < ./lentoid_ffmpeg2.0_patch_2014_01_23_new_encoder_interface.patch

Copy the downloaded headfile and the libs code to ~/ffmpeg-2.0.4/thirdparty 

cp lenthevcdec.h lenthevcenc.h liblenthevcdec.so liblenthevcenc.so ~/ffmpeg-2.0.4/thirdparty 

Copy the following configure file to ~/ffmpeg-2.0.4 and add the "run" permissions: 

wangsy@ubuntu: cp build_x86.sh ~/ffmpeg-2.0.4
wangsy@ubuntu: sudo chmod a+x ~/ffmpeg-2.0.4/build_x86.sh 

Download build_x86.txt

Run the configure file "build_x86.sh" (embedded above), then run the "make" and "make install" commands. The merged FFmpeg with Strongene's H.265/HEVC patch should now be built successfully. The output libs will be under ~/FFmpeg2.0.4/android/x86/lib. You can use these output libs in your video players.

Summary

The H.265/HEVC standard is becoming more and more popular in the mobile market. Online video providers, mobile Internet users, and broadcast/TV operators are the beneficiaries of this new video revolution, along with users. To produce the results described in this article, Strongene's H.265/HEVC solutions were fully optimized for Intel® Atom™ processor-based Android platforms, so don't hesitate to adopt their solutions to develop HEVC players. 

via codeproject.com 

Editor's Note:

Didn't understand? Never mind! Due to the complex process, you may meet unexpected problems. Please comment below.

If you need an easy-to-use yet powerful H.265 encoder, decoder and converter, the upgraded Pavtube Video Converter Ultimate will be the perfect solution. It is clean and safe to install and use. With it, you can not only effortlessly transcode Blu-ray, DVD and non-H.265 video to H.265/HEVC MP4 for Android, but also decode H.265 video to any video format for playback on media player, Android devices and game consoles without problems. It works well and converts flawlessly. 

Tuesday, January 6, 2015

Convert FLV MKV MTS MP4 WMV AVI to Blackberry Z10/Z30 in a Simplest Way

This tutorial shares best Blackberry Video Converter and guide on how to convert video to Blackberry Z10/Z30 for you to play whatever video freely.

Blackberry delivers an incredible multimedia experience on the go, so I am thinking of buying the new Blackberry Z10 or Z30 for movie enjoyment. I have never bought any Blackberry product before. Can someone tell me if I can play videos on Blackberry Z10/Z30 directly or if not? Any restrictions? Is there any neat Blackberry Z10/Z30 video converter to help with this?
Convert FLV MKV MTS MP4 WMV AVI to Blackberry Z10/Z30

In this article, we will bring an easy solution to convert FLV MKV MTS MP4 WMV AVI videos to Blackberry Z10/Z30 with a reliable Blackberry video converter.

Supported Video Formats for Blackberry Z10/Z30

Before you transfer movies onto BlackBerry Z10 or Z30 you need to know BlackBerry supported format and best compatible format below:

Video codec support

Blackberry Z10/Z30 Video codec support

Audio codec support

Blackberry Z10/Z30 Audio codec support

Best Video Converter for Blackberry Z10/Z30

The above Blackberry Z10/Z30 video formats are obviously not sufficient to cover all the videos as they exist in hundreds of different formats like MKV, AVI, MTS etc and various codecs turn that number into the thousands.

Feel confused? Don't worry, there is a professional Blackberry Video Converter named Pavtube Video Converter Ultimate, which is specially designed for BlackBerry users (including BlackBerry Tour, BlackBerry Storm, BlackBerry Bold, BlackBerry Curve, BlackBerry Pearl, and so on.) to convert WMV, FLV, VOB, MTS, MPEG, AVI to Blackberry Z10/Z30 playable format. It is known as best Xilisoft Video Converter Ultimate Alternative and top Ultimate Converter.

How to Convert FLV MKV MTS MP4 WMV AVI to Blackberry Z10/Z30 

Step 1. Download and install Pavtube Video Converter Ultimate, then lanuch it.

Step 2. Import video files.

Load your video files like MKV, AVI, VOB, Tivo, WMV, MTS, MXF, MOV, TOD, MOD, 3GP, FLV, F4V, M4V, etc. to this Blackberry Video Converter by clicking the second icon “Add video”.

Blackberry Video Converter

Step 3. Choose output format.

MP4 format is the best format for BlackBerry Z10/Z30. Click "Format" menu and go through the dropdown list, you are recommended to choose the "H.264 Video(*.mp4)" under "Common Video" which fits for BlackBerry Z10/Z30.

best format for BlackBerry Z10/Z30

Tips: Click "Settings" button to adjust video and audio parameters like bitrate, size, audio channels, etc to meet your requirement.

Step 4. Convert Various Videos to BlackBerry Z10/Z30.

Hit the big "Convert" button to start converting videos for BlackBerry phone and if you do not remember the location of generated files, click "Open" button to find it quickly. Now start transferring converted video to BlackBerry Z10/Z30 for playback. 

With this powerful Blackberry video converter, all movies including Blu-rayDVD and videos downloaded from the Internet, shot with digital cameras, camcorders, cell phones, tablets, and output from screen recording program, video editing software etc can be easily converted to Blackberry Z10/Z30 with faster speed and no quality loss. Take action to have a try!

Also you can use 
Skype app or play top 5+ Free BlackBerry 10 games on your Blackberry Z10.