Tuesday, January 31, 2017

Import all MXF videos to Premiere Pro CC 2017 on Mac for editing

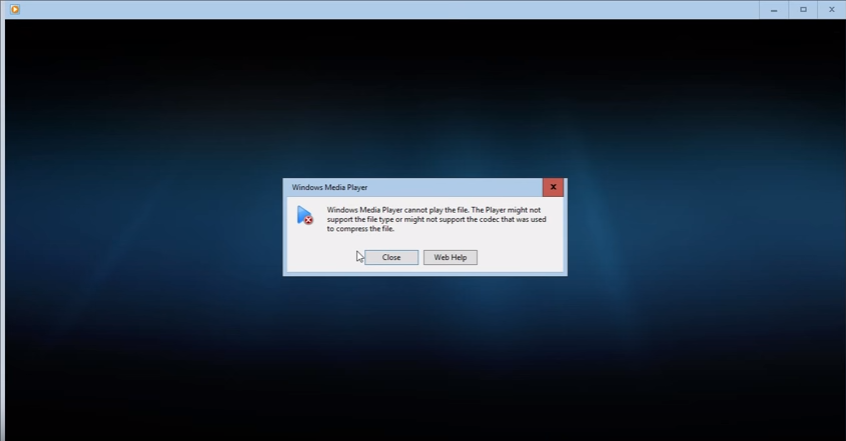
Adobe Premiere Pro CC 2017 makes sense for the application to come ready for a broad range of cameras that consist of many brands that are leading in the market such as Sony, Canon, Nikon, etc. to import video with an equirectangular projection, and allow you to stitch and edit it in a very professional approach, so that You can publish video directly to the web from Premiere Pro to sites such as YouTube or Facebook or Instagram. However, we found some users found some MXF videos like Canon C500 MXF video cannot be imported and edited smoothly:

“I've seen the Red Frame "Read Error" for MXF files in the past.  previously updates seem to have resolved.  HOWEVER I just installed CC 2017.0.1 and...

Yep, Getting the MXF read error in...

I have literally thousands of MXF files that I need to begin editing (whole year worth of footage).  It really is NOT practical to re-render or convert EVERY file. There has got to be an easier fix. Anyone else seeing this happen? Any suggestions are extremely appreciated.

Thanks”

This problem may causes of the Premiere limitation of video formats, resolution etc. Now worry, here we mainly discuss how to import MXF video files into Adobe Premiere Pro CC 2017.

To use MXF video in Adobe Premiere Pro CC 2017 smoothly, a good suggestion is to either change the MXF clips to something Adobe Premiere Pro CC 2017 could natively handle, and a mpeg2 codec was usually ideal.

Hot search: MOV to Premiere Pro CC 2017 ǀ MP4 to Premiere Pro CC 2017 ǀ iPhone video to Premiere Pro CC 2017

Luckily a powerful third party tool- Pavtube MXF Video Converter for Mac is able to do both of the above conversion: convert MXF into MPEG-2 or MP4 file type for Premiere Pro CC on Mac (macOS Sierra included) maintaining whole audio & video information. Besides, this software can help you turn more videos like MKV, AVI, MP4, FLV, VOB, MTS into other NLEs with professional codecs, like Apple ProRes for FCP, DNxHD for Avid, AIC for iMovie and more. Just download it and follow the tutorial below to convert MXF into MPEG-2 for working in Premiere Pro CC 2017.(Read Review)

Free Download or purchase Pavtube MXF Video Converter for Mac:

Step-step-guide to Convert MXF to Adobe Premiere Pro CC 2017 editable format

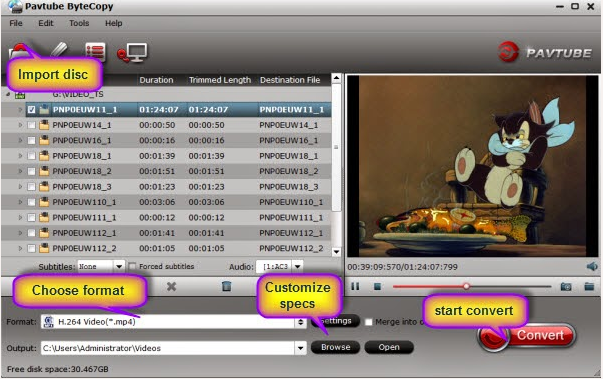
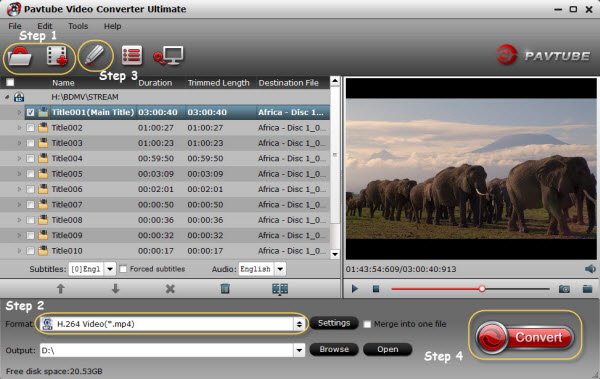
Step 1. After downloading, install and run this Mac MXF to Premiere Pro CC 2017 Converter, just import the MXF files to the software for converting.

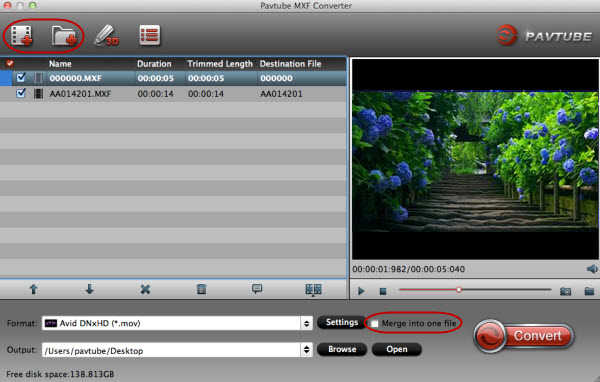
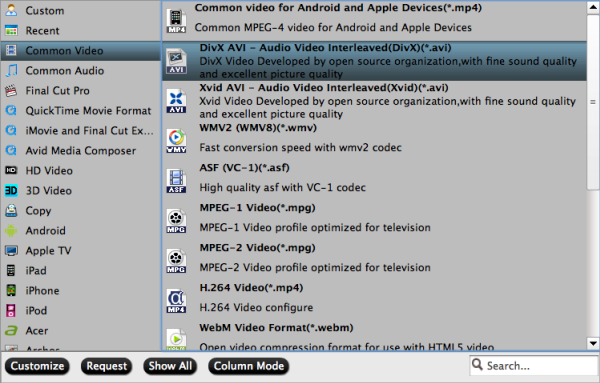
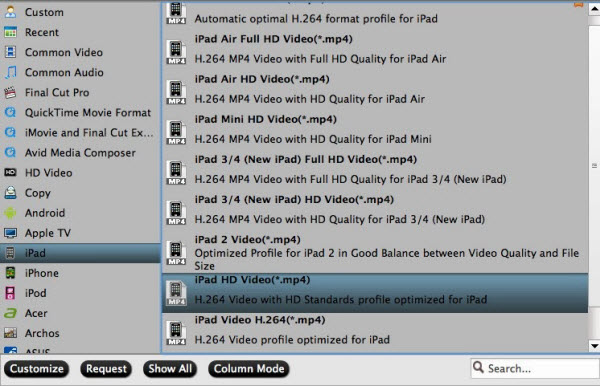
Step 2. Click "Format" bar to choose the output format. Click and choose "Adobe Premiere/Sony Vegas" > "MEPG-2(*.mpg)". The setting seamlessly fits Premiere Pro CC 2017, CC 2015.3 and CS4/CS5/CS3/CS6.

Step 3. Finally, hit the "Convert" button at the bottom right corner and the conversion from MXF to Adobe Premiere Pro CC 2017 will begin immediately on your Mac.

Tips & Tricks:

1. Adjust audio and video settings (optional)

The Mac MXF converter for Adobe Premiere enables users to adjust audio and video settings before transcoding MXF files to MPEG-2. Click "Settings" button, then you will enter the following interface, on which you are allowed to customize size, bit rate, frame rate, sample rate, and audio channel to your required ones.

2. Basic video editing (optional)

This Mac video converter has some simple edit functions like cropping, splitting, adding effects etc. so you can touch up the video with basic video editing functions.

After the conversion is complete, get the resulted files via clicking the Open button and then you can import converted MXF files to Adobe Premiere Pro CS4/CS5/CS3/CS6/CC 2017 in Mac for further editing without any hassle. Wait no more, just have a try!

Related Posts:

Source: http://mediaconverting.blogspot.com/2017/01/premiere-pro-cc-2017-mxf-solution.html

Friday, January 27, 2017

Solve Can't Play MP4 on Blu-ray Player

Have you tried to make a Blu-ray copy of MP4 but failed to play on Blu-ray player after finishing a short film, or recording an unforgettable parties video to share with your family or friends on TV? However, it is really a embarrassed thing when you tried to play common video formats like MP4 on Blu-ray player, only to find your Blu-ray can't read the MP4 file. What’s the matter? How to solve “can’t play MP4 on Blu-ray player”? Read on to get the solution.

In fact, MP4/MPEG-4/H.265 MP4 is not coded in many Blu-ray players including Samsung Blu-ray player, Sony Blu-ray Player etc including some of its successors like HD Blu-ray players, Blu-ray disc players and HD/3D DVD players. So to make Blu-ray Player support MP4 format, On this situation, converting your MP4 to Blu-ray Player natively supported MP4 format is the fastest solution.

Try the MP4 to Blu-ray Player Video Converter

So make your MP4 files read by Blu-ray player without hassles, Pavtube Video Converter is highly recommended to help you convert all videos from MP4, VOB, FLV, MKV, MOV, FLV, and 150 more formats into all sorts of other regular Blu-ray-compatible video formats. Besides, this all-in-one video converter can also help you convert MP4 to any decent format you want. And it offers fast conversion speed like a breeze without any quality loss. So what exactly is Pavtube Video Converter?

As the name suggests, it is a program that lets you convert videos into different formats. But that is just the tip of an iceberg.Pavtube Video Converter lets you do a lot more than that. With the software, apart from converting various video formats into dozens of other formats, you can also convert audio files and online videos on Windows (10, 8.1, 8, 7, XP, etc). Moreover, the software allows you to edit videos with beasic editing functions.

Pavtube Video Converter also can help you

MP4 to DVD Player
MKV to Blu-ray Player
MP4 to LG TV
MP4 to Samsung TV
MP4 to Sony TV
MP4 to Panasonic Viera


For Mac users, please turn to Pavtube Video Converter for Mac. It is compatible with macOS Sierra, Mac OS X 10.11 El Capitan, 10.10 Yosemite, 10.9 Mavericks, 10.8, 10.7, 10.6, 10.5.

Now free download the MP4 to Blu-ray Converter

Other Download:
- Pavtube old official address: http://www.pavtube.com/video_converter/
- Cnet Download: http://download.cnet.com/Pavtube-Video-Converter/3000-2194_4-75734821.html
- Softonic Download: http://pavtube-video-converter.en.softonic.com/

Now follow guide to directly convert MP4 to Blu-ray player supported format for smooth playing

Step 1. Add MP4 files

Click "File" button to import MP4 videos which you want to play on Blu-ray player, or you could just dragging files into the main interface of this tool.

Step 2. Select Blu-ray player compatible format

Click "Format" and set "AVI" or "MPEG-2" as the output format from "Common Video" drop-down menu, if you want to play HD MP4 on Blu-ray disc or DVD Player, choose "HD AVI" from the "HD Video" menu. From "Setting" on the right-bottom of the window, it can allow you to customize output video parameters and the file size such as video resolution to 720*400, video bitrate, audio channels and so on depending on your needs.

Note: If you want to edit your MP4 video files before watching it on Blu-ray player, just click on the "Edit" button. you can trim or crop the unwanted parts and then merge them into the new one, transform video effects and add watermarks. And more, you can also set the aspect ratio at 16:9 or 4:3 as per your video needs to avoid any black bar.

Step 3 Convert MP4 to Blu-ray supported DivX or MPEG-2

Click "Convert" to convert MP4 file to AVI or MPEG-2 the compatible file format to Blu-ray player. Then click "Open Folder" button to locate the converted MP4 files when your conversion is done,

Read More:

Source: http://mp4gear.over-blog.com/2017/01/play-mp4-on-blu-ray-player.html

Tuesday, January 24, 2017

3 Ways to Watch MKV on Windows Media Player (12)

Can Windows Media Player Play MKV files?

Since MKV becomes a popular video format, many people have been wondering "Windows Media Player 11 won't play files with mkv extension even when the appropriate codec is installed??"

According to Microsoft support website, Windows Media Player still won't support MKV files. Though we can make WMP play MKV video by install some codec, sometime we still encounter can't play MKV in Windows Media Player issue. MKV is a container format which may contain multiple video and audio streams. And the video and audio stream can be encoded any of several ways. If the MKV video or audio codec is not WMP installed codec supported one, Windows Media Player won't play MKV video of this kind.

Here we recommend you 3 ways to play all MKV on Windows media Player

Method 1: Install Windows Media Player codec package

Just try to install the Combined Community Codec Pack (short for CCCP). The CCCP is a a codec pack specifically developed for playing videos including MKV. When you've installed it, you can smoothly play MKV files with Windows Media Player or Media Classic Player.

Method 2: Try another media player

If you don't like installing codecs for Windows Media Player, or the codec doesn't work for some unknown reasons, you can try to use another media player. You may know of VLC player. Yeah, VLC is a great open-source cross-platform multimedia player. And it can play most multimedia file formats like MKV, AVI, MP4, FLV, WMV, etc, as well as discs.

Method 3: Converting MKV to Windows Media Player playable format for smooth playing

Serving as a high-class MKV to Windows Media Player Converter, Pavtube Video Converter can batch convert MKV to Windows Media Player recognizable formats like WMV, AVI, ASF, etc to solve "Windows Media Player won't play MKV files". Furthermore, Pavtube Video Converter does support converting nearly all video formats like MP4, AVI, H.265, MOV, MTS, WTV, MPEG, FLV, 3GP, WebM, MXF, XAVC, RMVB, etc to WMP compatible formats to play MOV, WTV, MKV, FLV, 3GP, etc in Windows Media Player.

Even more amazing, this MKV to Windows Media Player Converter has the feature of converting almost all video formats to Windows Media Player supported audio formats like WMA, MP3, WAV, AU, and AIFF so that you can only enjoy audio in WMP if you don't like the image of the video.

Besides, it is not only a video to WMP Converter but also an audio to WMP Converter. By using it, you can fast convert various kinds of audio formats like FLAC, APE, 3GA, M4A, VOC, M4R, OGG, DTS, RA, etc to Windows Media Player popular audio formats in order to play these audio in WMP.

Free download the Video Converter for converting MKV to Windows Media Player

Other Download:
- Pavtube old official address: http://www.pavtube.com/video_converter/
- Cnet Download: http://download.cnet.com/Pavtube-Video-Converter/3000-2194_4-75734821.html
- Softonic Download: http://pavtube-video-converter.en.softonic.com/

Transcode MKV to Windows Media Player Compatible format for playing

Step 1. Click the "File" button to import the MKV files to this MKV WMP Converter. Or simply drag and drop the MKV video to the main window of this program.

Step 2. Click the “Format” bar to get the drop-down menu and you can get “Common Video -> WMV3 (WMV9) (*.wmv)” or go to “HD Video” > “HD WMV” as the best output format for playing in Windows Media Player (12).

Step 3. The built-in editing function provided by MKV Video Converter is something worth trying. To trim the video, add artistic effects, adjust audio, add watermark, customize video parameters and so on. You can get the work done splendidly. Of course, if you don’t think it’s a necessary to do, you can skip it and move onto the next step directly.

Step 4. Press the “Convert” button on the bottom-right corner of this MKV Video Converter to start doing video conversion. The larger the MKV files are, the more conversion time should be taken.

Play MKV in Windows Media Player

Playing MKV in Windows Media Player will become a piece of cake with the help of the ideal MKV to Windows Media Player Converter and the above step by step guide. Then never worry about the following Windows Media Player won't play MP4 files troubleshooting:

  • When I try to play MKV in Windows Media Player, it won't play my .mkv files -- no video, just sound, and Media Player will hang trying to exit.
  • I downloaded a video of the MKV format from keepvid and when it went to Windows Media Player it did not work since and could not play and I got a message saying that windows media player cannot play mkv files.
  • My Windows Media Player 11 won't play files with .mkv extension even when the appropriate codec is installed: my windows media player just won't play anything that has an .mp4 extension; it keeps saying "Windows Media Player cannot play the file. The Player might not support the file type or might not support the codec that was used to compress the file."
  • When try to add the MKV to Windows Media Player 12 for playing, the MKV file type isn't recognized by the Media Player and therefore isn't added to the Media Library.
  • Some of my MP4 video can play in WMP, while other of my MP4 won't play in Windows Media Player 12.

Read More:

Source:http://pc-mac-compatibility-issues.blogspot.com/2017/01/play-mkv-on-windows-media-player.html

Monday, January 16, 2017

Play DJI Inspire 2 4K videos on iPad series

DJI has reduced the top speed of its new Inspire 2 drone due to concerns about the quality of the video captured by the aircraft. In a notice posted on its website, DJI said that when the drone was launched, the Inspire 2 drone was expected to accelerate to 50 mph in 4 seconds and reach a top speed of 67 mph. The Inspire 2 takes everything that was good about the Inspire 1 and improves it. An all-new image processing system records at up to 5.2K in CinemaDNG RAW, Apple ProRes and 4K video in H.265 and H.264 codec.

DJI Inspire 2 Recording Video Format

From some forums, we found some users have the troubles playing DJI Inspire 2 4K videos on iPad series like iPad Pro, iPad Mini 4 etc. How to play all DJI Inspire 2 4K Apple ProRes, 4K H.265, 4K H.264 videos on iPad? We suggest you converting DJI Inspire 2 4K video to iPad supported playing-format for better playing due to DJI Inspire 2 4K Apple ProRes, 4K H.265, 4K H.264 videos iPad Incompatibility issues.

Best DJI Inspire 2 4K Video Converter for iPad

Pavtube Video Converter for Mac is the best video converter for iPad to have. In addition, you are able to convert unsupported DJI Inspire 2 4K Apple ProRes, 4K H.265 video to iPad supported formats. It also can convert DJI Inspire 2 4K video to any formats for editor, player, devices, TV, PS3/PS4, Projector etc for editing/playing/sharing. (Read review)

Highlights of Pavtube Video Converter for Mac
  • Support 300+ different video & audio formats to iPad.
  • Do 4K to iPad conversion on the fly to make DJI Inspire 2 4K playable on iPad immediately.
  • Support iPad-Out. This feature lets users convert video & music to iPad without worrying about the correct format settings.
  • Support macOS Sierra, Mac OS X 10.11 El Capitan, 10.10 Yosemite, 10.9 Mavericks, 10.8, 10.7, 10.6, 10.5.

Now it's time to download Pavtube Video Converter for Mac& install it. Keep your iPad and computer in the same network beforehand. (Windows user can get Pavtube Video Converter)

Other Download:

- Pavtube old official address: http://www.pavtube.com/video-converter-mac/
- Cnet Download: http://download.cnet.com/Pavtube-Video-Converter/3000-2194_4-76179460.html
- Top4download.com: http://www.top4download.com/pavtube-video-converter-for-mac/iujpttsg.html

Easy solution to Convert DJI Inspire 2 4K video to a suitable format for iPad

Step 1: Click "File" button to add your DJI Inspire 2 4K video files to the program. Or directly drag the video you want to convert to the left item bar.

Step 2: Choose MP4, MOV, M4V format video from “Common Video” or “HD Video”. Or you can select the optimized preset for iPad Pro/iPad Mini/iPad Air from “iPad” profile. You can choose iPad HD video as the target format which is supported also by iPad all deries.

Tips: The default settings may not satisfy you, and you can click the "Settings" button to change the settings by yourself including video resolution, bit rate, audio sample rate, audio channel etc. for full screen playback smoothly. Or keep no changes, which is also a good choice. You can choose 1920*1080 for better playing, editing....

Step 3. Click the "Convert" button on the main interface and the software will start to convert DJI Inspire 2 4K video to iPad friendly video formats immediately. When the conversion finishes, click "Open" to find the converted video files. Then you can effortless transfer the DJI Inspire 2 4K video files to iPad for playback on the go.

Read More:

Sunday, January 15, 2017

How to Play DVD on Windows Media Player (12)?

Why cannot I open DVD files on Windows Media Player (12)?

I installed a Windows Media Player recently. After inserting his two pieces DVD, right click mouse, choose “Play with Media Player 10”, about DVD A, Media Player just play the DVD A for few seconds or minutes. About DVD B , Media Player that says "compatible DVD decoder not installed on your computer." Many people will meet the same problems with me. The warning means you are missing a decoder.Windows Media Player have been installed successfully, why cannot open DVD files on Windows Media Player? All kinds of reasons can cause this issue. Following will analyze the reasons and provide the relevant methods.
Why Too Short?

Why Nothing?

Reason 1: About the problem DVD cannot open the complete DVD, maybe you inserted DVD to your computer, just play 2 minutes short video, it’s not the result you want. I’ve tried to open Windows Media Player, and then, in the “Player Library” select the disc name in the navigation pane. However I tried again and again, and also search some other ways to do, it doesn’t work. There is some wrong in the DVD files, about this side, best choice is to rip the DVD to WMV which is the best video format that Windows Media Player support.
Reason 2: DVD is Digital Versatile Disc. A DVDs stores its audio and video in MPEG-2 format. Other DVD codecs include: MP3, WMV, DivX, Xvid, etc. Windows Media Player support main video format is WMV/AVI/MP3, so DVD MPEG-2 format doesn’t match with it. You need a decoder to solve their difference between video formats.
Reason 3: DVD is protected or because of its region codes or on Windows without requiring additional DVD codes. You can download a software which can rip DVD. You can read this to know the DVD region codes.
Reason 4: Windows Media Player version doesn’t support to play DVD. Following is the Windows Media Player support video format for your reference. From the list, we can know different Windows Media Player versions support different video formats.

Sine we have find these reasons that caused DVD files cannot open on Windows Media Player, at the same time, we also can find some ways to reply them. I summarize 3 popular ways for your reference and hope to help you.

Option A: Decode DVD online

You can search online to find many online DVD decoder, you just follow its hints and to do step by step, finally, you will get your new DVD format. Before using online DVD decoder, you should know these main points.
Point 1: Do you make sure that your network speed is enough, if the speed is too low or often occur interrupt phenomenon, you will wait for a long time.
Point 2: You want to decode 3 pieces DVD or more than 10 pieces. I’m regretful to tell you that you may spend one day or even more time in waiting the results which are based on the fast and stable network speed.
Point 3: Online DVD decoder cannot provide the reliable after-sale service. If DVD  inside files are damaged during the decode or are attacked by Trojan virus or infected with other problems that cause your DVD cannot open any more. Who will be responsible for that? Answer is nobody.

Option B: Install A Third Media Player

Install a Third Media Player that can play your disks is also a good choice. Such as Media Player Classic/VLC Media Player/K-Lite Codec Pack etc. You can choose any one to installed on your computer and play your DVD. For example, VLC Media Player, when you insert your DVD to your computer, then open VLC Media Player, click ”Playback”, choose ”Chapter”, you can choose the chapter 1 or other chapter you want to watch.

Option C: Install A Decode Software.
If you are reluctant to change your favorite Windows Media Player, nor to take the risk to decode a DVD online, what can you do? a DVD ripping program is your best choice. By a DVD ripper, you can convert a DVD to hard drive and play it back by any multimedia windows player you like. You can download Pavtube ByteCopy software that contains all the Windows Media Player codecs. You can rip DVD to any format that can play on Windows Media Player.
This software can solve any question you can meet when you play DVD on Windows Media Player. Are you worried about the ripping speed? no problem. ByteCopy provide a fast speed, you can watch your DVD at the first time. Are you worried about the video quality? no problem. ByteCopy can rip and decode any protection DVD with 100% audio and video quality. And also you can rip abundant DVD at the same time. Are you worried about after-sale service? no problem. There is any question, you can contact official staff or you can review here to know this software, you can also go to its website to find more information.  
It’s time for you to enjoy the ByteCopy, here I will introduce to rip and convert DVD to WMV for playing on Windows Media Player.
Free download or Buy Pavtube ByteCop
Steps on Playing DVD on Windows Media Player WMV Format
Step 1: Import your DVD files 
Insert DVD to drive. Open the software. Click “File” to load the DVD movies to the program.
Tips: This converter can automatically detect the main title of the DVD. And before the conversion, you can choose desired subtitle and forced subtitle.

Step 2: Choose the output format and location
Click “Format” to choose video format: WMV, then click “Browse” to choose save location.

Tips : the “Setting” button, you can open it and set the video parameters by yourself.
Such as: Bit Rate(bitrate), Frame Rate, Size(pix), Sample Rate etc and if you don’t know how to set them for the beat quality output, following will show you the relationship among them.
No 1: Audio Bit Rate and Video Bit Rate
Audio Bit Rate and Video Bit Rate is inter-limitation, it means if the Audio Bit Rate is too high, the video Bit Rate cannot be too small.
No 2: Audio Bit Rate and Audio Sample Rate
Audio Bit Rate and Audio Sample Rate is inter-limitation, it means if the Audio Bit Rate is too high, the Audio Sample Rate cannot be too small.
No 3: Video Bit Rate and Video Frame Rate
Video Bit Rate and Video Frame Rate is inter-limitation, it means if the Video Bit Rate is too high, the Video Frame Rate cannot be too small.
No 4: Video Bit Rate and Size(pix)
Video Bit Rate and Video Frame Rate is a proportional relation, it means if the Video Bit Rate is high, the Size(pix) is high. If the Video Bit Rate is low, the Size(pix) is low.  
 
Step 3: Start converting
Click the ’Convert’ button to start converting. Just a moment, you will succeed.
Conclusion: There is too many ways to solve the problem that DVD cannot play on Windows Media Player, the best way is to own a complete ByteCopy. You can rip DVD to play on Windows Media Player or convert DVD to any video format : HD AVI, MP4, MKV, H.265 etc that you want to play on any portable device. Popular windows media players, VR, TVs etc.
Further guides about Windows Media Player:
Open Blue-ray on Windows Media Player
Windows Media Player to play H.265 files
Windows Media Player to play TiVo Recording
 

Wednesday, January 11, 2017

Transcode Samsung NX500 4K video to H.264 MP4 Video

Samsung NX500 can record true 4K UHD video and details of Full HD in MP4 wrapper employing HEVC compression method. Being a quite new video codec, currently the HEVC is not widely supported by most major software media players, hardware players and nonlinear editing programs. In order to edit and play Samsung NX500 H.265 videos with no difficulties, a wise choice is to convert Samsung NX500 4K H.265 to H.264 MP4.

Best Samsung NX500 4K H.265 Video Converter:

There are many programes for converting Samsung NX500 4K H.265 Video Converter. But here we only recommend you the best one - Pavtube Video Converter Ultimate. It can easily convert Samsung NX500 4K H.265 to any popular formats like H.264 MP4, MOV, WMV, MPEG-2 etc for better playing or editing.

With it, you not only can convert Samsung NX500 HEVC (H.265) videos to MP4, AVI, WMV, MOV, FLV for easily playing, but also can convert HEVC (H.265) files to the editing tools with professional codec, like MPEG-2 for Adobe Premiere Pro/Sony Vegas, DNxHD for Avid Media Composer, .etc. Besides, the built-in video editor allows you to modify your videos by trimming, cropping, adjusting video effects and more. By the way, this H.265 converting application also enables you to convert videos from almost any SD/HD input(M2TS, MTS, MKV, H.264, MP4, AVI, WMV, MOV, MXF, MPEG, etc.) to H.265 HEVC codec up to 4K. Download this software and start H.265 to H.264 MP4 conversion now.

News!! Pavtube Studio is wowing holiday shoppers with spectacular gifts: 20% off digital coupons for Pavtube Video Converter Ultimate supporting lifetime free upgrade have been dished out. The mega discount starting today will expire on Feb 6, 2017.

The 20% purchase button are below:

Start to Convert Samsung NX500 4K video to 1080p H.264 MP4 Video

Step 1. Add Samsung NX500 4K videos

Install and run the Video to Samsung NX500 4K Converter on your computer, then click “Add Video” button to browse and load your rvideos which you’ve transferred to your Windows PC.

load 4K video

Step 2. Choose H.264 MP4 as output format

Click Format bar and choose H.264 High Profile Video(*.mp4), H.264 Main Profile Video(*.mp4), or H.264 Baseline Profile Video(*.mp4) from "Common Video" as the target format. Or you can go to HD Video> H.264 HD Video(*.mp4), which will reduce the quality drop of your raw H.265 files to the least.

hd h.264 format How to Transcode Samsung NX500 4K H.265 footage to MOV, MP4, AVI, WMV etc

Tips:

A. The default settings may not satisfy you, and you can click the “Settings” button to change the settings by yourself including video resolution, bit rate, audio sample rate, audio channel etc. for full screen playback smoothly. Or keep no changes, which is also a good choice.

B. By clicking “Edit selected task” button, you can trim, crop the video, or add watermark, adjust effect, attaching subtitles for pre-editing your video files so that you can simplify your Samsung NX500 videos.

Step 3. Click the “Convert” button on the main interface and the software will start to convert Samsung NX500 4K H.265 video to H.264 MP4 or any video formats immediately. When the conversion finishes, click “Open” to find the converted video files.

Once the conversion finished, click Open button to get output H.264 MP4 files. Afterwards, you can handle the converted Samsung NX500 H.265(HEVC) videos easily for playing, editing or sharing.

Src: http://samsung-galaxy-video-converter.blogspot.com/2017/01/convert-samsung-nx500-4k-video-to-h264-mp4.html

Related Articles:

Monday, January 9, 2017

Import Canon EOS M5 H.264 MOV video to Windows Movie Maker for editing

Canon launched the EOS M5 just a few days before 2016’s Photokina.The new flagship model features the same sensor as the EOS 80D DSLR - a 24.2-megapixel number. Other interesting features include Dual Pixel CMOS autofocus, a Digic 7 processor, an ISO range of up to 25,600, an electronic eye viewfinder, 7fps shooting and Full HD video recording. While, there are a few issues when editing the gorgeous-looking Canon EOS M5 1080p video recordings in NLE like Windows Movie Maker:

Question: How to Convert Canon EOS M5 H.264 MOV QuickTime to Movie Maker?

I don't know how to convert my Canon EOS M5 QuickTime (MOV) videos to Windows Movie Maker. Windows Movie Maker can't recognize them. I want a QuickTime to Movie Maker converter that can easily change a video from QuickTime to something compatible with Windows Movie Maker. If you could give me a website, that would be amazing. Thank you so much!

How to get EOS M5 vide to WMM smoothly? A better solution to work with Canon EOS M5 videos is to transcode Canon EOS M5 video to WMM format. Here I would like to share the solution for you. Since H.264 is a delivery codec rather than editing code, you need to transcode H.264 MOV footage from Canon EOS M5 to an editable format for importing to Windows Movie Maker directly. To get the job done, you need a video converter hooked to your Windows.

Choose Best Canon EOS M5 Video Converter for Windows Movie Maker

If you looking for a solution for this problem likewise, I recommend you try Pavtube Video Converter. It can convert Canon EOS M5 H.264 MOV video to Windows Movie Maker friendly format. And it also can convert more videos like MP4, MKV, H.265, MOV, MXF, FLV, XAVC, AVI etc to Windows Movie Maker and other editors supported format for your nice editing. What's more, it also provides hundreds of output format presets for 4K videos, such as Apple ProRes 422, Apple ProRes 4444 for Final Cut Pro, MPEG-2 for Premiere Pro, DNxHD for Avid Media Composer, etc to meet your needs.

Free download and install Pavtube Video Converter

Other Download:
- Pavtube old official address: http://www.pavtube.com/video_converter/
- Cnet Download: http://download.cnet.com/Pavtube-Video-Converter/3000-2194_4-75734821.html
- Softonic Download: http://pavtube-video-converter.en.softonic.com/

Transcode Canon EOS M5 video to Windows Movie Maker supported formats

Step 1. Load Canon EOS M5 Video

Launch the Canon EOS M5 Video Converter; click "File" and load your Canon EOS M5 H.264 MOV files from Canon EOS M5 copied on your hard drive.

Load MP4 files into the program

Step 2. Choose Format

Select right output WMV for Windows Movie Maker. Next, follow my steps to get into the output list. In order to find the right item, of course you can tap it in the searching box or drop down the list, ‘HD Video>>’WMV HD (*.wmv)’ is offered for you.

Step 3. Start Canon EOS M5 to WMM Conversion

Hit "Convert" button to let the Canon EOS M5 to WMM conversion on Windows (10) begin. When the conversion finished, check the generated WMV video, you will certainly be satisfied with its final video quality. Just enjoy!

Read More:

Wednesday, January 4, 2017

Play Canon 5D Mark IV 4K video on QuickTime smoothly

The Canon EOS 5D Mark IV boasts a huge array of high end features, including a 30 megapixel full frame CMOS imaging sensor and Canon's latest AF system, for a significantly lower price than Canon's current 1-Series model. This value and versatility, as with all EOS 5-Series models before it, launched the Canon EOS 5D Mark IV to great fanfare and a strong demand. It can record 4k 30fps video with 8.8 mp still frame grab, Full 1080p HD 60 fps, HD 720p mode at 120 fps.

Canon 5D Mark IV Record Video Formats
 
MOV files

4,096 × 2,160 (Digital Cinema Initiative 4K) at 29.97, 24.00 or 23.976 FPS. These 4,096-wide images are ideal for 'scope (2:40:1) shooting.

1,920 × 1,080 at 59.94, 29.97, 24.00 or 23.976 FPS.

1,280 × 720 at 119.88 FPS.

Motion JPEG (4K) or MPEG-4 AVC/H.264 (HD) video.

Linear PCM audio.

MP4 files

1,920 × 1,080 at 59.94, 29.97, 24.00 or 23.976 FPS.

MPEG-4 AVC/H.264 video.

AAC audio.

If you have a lot of Canon 5D Mark IV 4K MOV files and want to play them on QuickTime, you’d better convert Canon 5D Mark IV 4K to QuickTime compatible format - MOV format. Due to QuickTime does not support all MOV video and 4K resolution is not friendly with it. Natively, it supports only a few video formats: 3G2, 3GP, DV, MOV, and various MPEG options, including MP4. So how to play Canon 5D Mark IV 4K in QuickTime player?

You just need one 4K video converter for QuickTime. There are many kinds of 4K Video Converter software in the market. The output video quality and the converting speed must be the key factors that you should be looking out for. Pavtube Video Converter for Mac provides the easiest and smartest way to convert Canon 5D Mark IV 4K video to QuickTime MOV and play Canon 5D Mark IV 4K files on QuickTime, iPhone (7/7 plus), iPad (Pro), iPad Mini (5), Apple TV (4) as well as other all MOV-compatible applications. (Read Review)

Hot search:

Free download the professional 4K to QuickTime Converter on your Windows, install and run it, the following will show the steps.

How to Convert Canon 5D Mark IV 4K video to QuickTime?

Step 1. Import Canon 5D Mark IV 4K to the program

After launching the program, open the local folder where you’ve saved the Canon 5D Mark IV 4K file, then drag and drop it to the main interface of the program. The file will be imported immediately. Alternatively, you can go to the “File” button to import your Canon 5D Mark IV 4K files.

Step 2: Specify output file format.

Click "Format" bar, from its drop-down list, define "MOV - QuickTime (*.mov)" as the output profile format.

Tips: Before conversion, you can use of the built-in editor to adjust the volume, brightness, contrast, saturation or inserts of subtitle to your Canon 5D Mark IV 4K file.

Step 3. Start the Canon 5D Mark IV 4K conversion

Just perform video conversion by pressing “Convert” button in the bottom right hand corner of the current user interface. When all of these tasks are finished, there will be a note popping up and prompting you.

Quickly find these converted files by pressing the “Open Folder” button at the bottom of the current interface, and then drag the converted Canon 5D Mark IV 4K into QuickTime player to play. You’ll find these files can be played without quality loss.

Read More: