Showing posts with label iMovie. Show all posts

Monday, December 1, 2014

How to: Rip a Blu-ray Disc to iMovie for editing on Mac

What is the Best Way to import or edit Blu-ray in iMovie? Get the solid answer to help you easily import Blu-ray to iMovie to create your own videos freely.
 
After collecting some Blu-rays like Edge of Tomorrow, X-Men: Days of Future Past, How to Train Your Dragon 2, etc. you probably would like to make some Blu-ray HD contents into your own film. To get the work done, you may want to import Blu-ray to iMovie for editing. However, the video formats accepted by iMovie are limited, like supports MPEG-2 and AVCHD, DV-Standard and HDV (High Definition Video), QuickTime Movie, MEPG-4.


import or edit Blu-ray in iMovie

So it does seem that you can not import Blu-ray to iMovie to edit directly. Importing Blu-ray to iMovie becomes a problem to be solved. This article focuses on how to import Blu-ray to iMovie on Mac OS X and edit Blu-ray in iMovie to create your own videos.

In order to import Blu-ray to iMovie for editing, you need to convert Blu-ray to iMovie compatible format first, and then import into iMovie to edit. Here Pavtube BDMagic for Mac is a professional yet easy-to-us Blu-ray to iMove converting software for Mac that can import Blu-ray to iMovie native AIC mov format with fast ripping speed and high output video quality. Now download this program and follow the guide below to complete you task.

How to convert Blu-ray(Edge of Tomorrow, X-Men: Days of Future Past, How to Train Your Dragon 2) to iMovie for freely editing on Mac

Note: For Ripping Blu-ray to iMovie on Mac, a Mac compatible BD driver is needed.

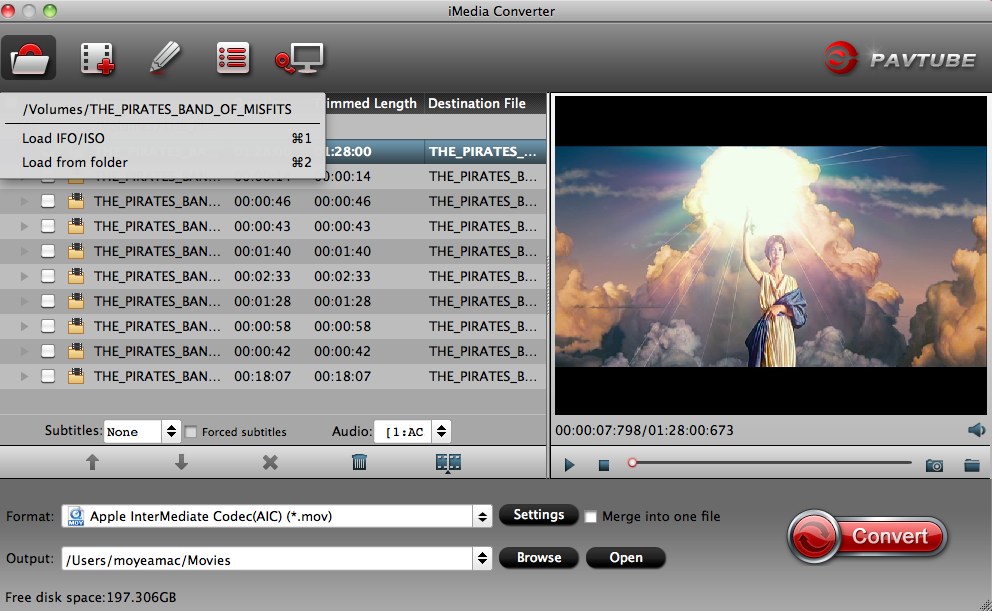
1. Once successfully installed the best Blu-ray to iMovie Converter, run the program. Insert Blu-ray to disc drive, click the “Load disc” button to import source Blu-ray.

best Blu-ray to iMovie Converter

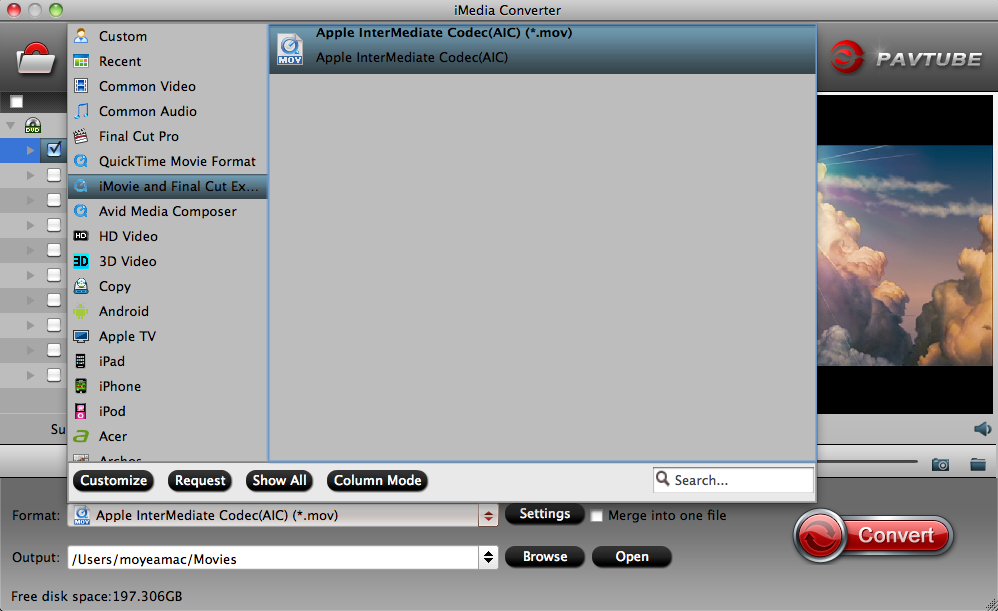
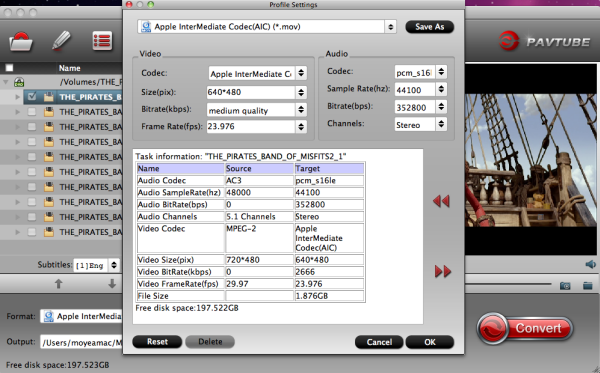
2. Choose output format. This Blu-ray converter offers optimized format preset for Final Cut Pro. Just click “Format” menu firstly and then follow "iMovie and Final Cut Express > Apple Intermediate Codec(AIC) (*.mov)" as output format.


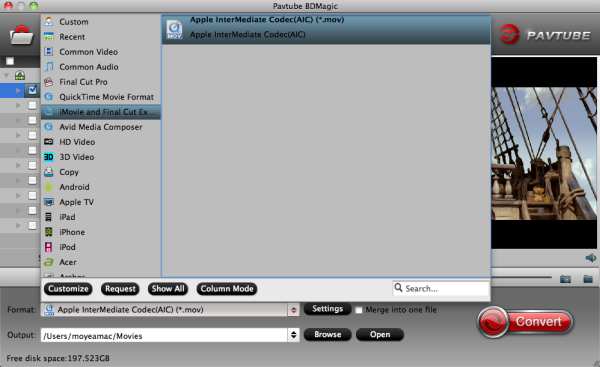
Tip: If the default settings do not fit you requirement, you can click “Settings” icon to and enter “Profile Settings” panel to adjust video size, bit rate, frame rate, sample rate and audio channels.


3. Click “Convert” button to start encoding Blu-ray to AIC .mov for iMovie on Mac OS X.


When the BD to iMovie conversion task is finished, click “Open” button to get the exported files for transferring to iMovie with easy playback or editing.

Additional Tips:

1. This Blu-ray to iMovie Converter not only can help you convert Blu-ray to iMovie, but also enables anyone with Blu-ray files to use in any non-linear editor like Adobe Premiere Pro, FCP, FCE, Avid Media Composer, etc as long as rip Blu-ray to a recognizable format.

2. Want to import Blu-ray/DVD to Final Cut Pro X with 5.1 sound on MacByteCopy for Mac is you best choice.

3. Even 4k videos, m4v files can be imported to FCP for smooth editing without any trouble.

4. Or check out the solutions for ripping Blu-ray/DVD to QuickTime MOV for playback.

Friday, January 24, 2014

Convert GoPro Hero 3 footage to iMovie on iPhone for editing and upload to Instagram

This is a brief guide of how to convert your GoPro Hero 3 footage to iPhone, so that you can edit these video in iMovie and share it to friends on Instagram.

GoPro's lineup of mount-anywhere cameras have been dazzling extreme sports enthusiasts for years. With the GoPro 3, you can easily shoot footages with your hands free – that’s pretty convenient yet safe when you are surfing, skating, snowboarding or traveling.

I’m rather fond of taking this little magic box out on vacation with great fun. However, unlike professional cameras, I always need to edit some of them. As I just got a new iPhone 5S, iMovie should be a good choice which is free to IOS 7 users.

Convert GoPro Hero 3 footage to iMovie

With the help of Pavtube iMedia Converter for Mac, I am able to import GoPro Hero 3 footage to iMovie on iPhone and post it on Instagram.

Pavtube HD Video Converter for Mac is a professional Mac GoPro to iMovie Converter; it’s very easy-to-use and totally painless during the whole conversion from GoPro MP4 to Apple Intermediate Codec.

How to convert GoPro Hero 3 MP4 video to iMovie on iPhone?

Step 1. Load files to the GoPro to iMovie Converter for Mac.

Launch the GoPro MP4 to iMovie Converter for Mac and add footage files to it. Keep your GoPro Hero 3 on and connect it to Mac; click “Add video” to load video clips or “Add from folder” to load the entire folder. Then you can preview the whole videos in the preview window on the right area.


Step 2. Choose AIC MOV format for iMovie.

Click “Format” drop-down list and choose “iMovie and Final Cut Express>Apple InterMediate Codec (AIC) (*.mov)” as the most compatible format for iMovie.


Notes: If the default settings do not fit your needs, you can click “Settings” button to customize output video bitrate, channels, frame rate, etc. In general, the higher video bit rate you choose, the larger output file size will it be; and vice versa.

Step 3. start conversion.

Now hit the big “Convert” button to start converting GoPro Hero 3 MP4 to AIC MOV for iMovie. After it completed, hit “Open” button to find the generated.

Now transfer the converted video to iPhone via iTunes and open it in iMovie for iPhone app. Edit it and upload to Instagram; just have a try. (See also: How to transfer video to iPhone/iPad via iTunes 11?)

Related Posts:

Thursday, January 2, 2014

Edit JVC GY-HM650U ProHD MXF files with iMovie on Mac 10.9 Mavericks

Summary: This guide will show you how to easily convert and import JVC GY-HM650U ProHD MXF footage into iMovie for further editing on Mac (OS X 10.9 Mavericks included).

"I have a JVC GY-HM650U ProHD camcorder that records .MXF video format, now I would like to import these projects to iMovie for editing. What I want is to edit MXF files smoothly without codec problems, what video codec should I use? Can you recommend some software which can help me import and convert JVC MXF to iMovie smoothly?"

Everything goes perfect until you try to edit JVC GY-HM650U .mxf file in iMovie. Fail in import the MXF file into iMovie as iMovie can't recognize this file. Why does it happen? The answer is MXF file format incompatibility with iMovie (even iMovie'11).

As far as I know, in order to edit JVC GY-HM650U ProHD MXF files in iMovie flawlessly, the best method is to convert JVC MXF to Apple InterMediate Codec (AIC) which is a best editing codec for iMovie.

At first, you need 3rd-party tool - Pavtube MXF Converter for Mac

It is a professional MXF to iMovie Converter which can not only convert JVC GY-HM650U ProHD recorded MXF files to AIC for iMovie editing on Mac OS X Mavericks, but also provide simple video editing functions for you. This Mac MXF Converteris especially designed for converting Panasonic P2 MXF, Sony XDCAM MXF, http://www.pavtube.com/canon-camera-file-transcode.html]Canon XF MXF files for editing in Final Cut Pro, Final Cut Pro X, Final Cut Express, iMovie, Avid, Adobe Premiere etc. Below is how. (Learn more about MXF: MXF Column)

Guide - Encode JVC GY-HM650U ProHD MXF to AIC for iMovie editing on Mavericks

Step 1. Import MXF files from JVC GY-HM650U to the top MXF to iMovie Converter for Mac.

(Note: Before conversion, you need to transfer MXF files from your JVC GY-HM650U to Mac Hard Drive, then click the "add" button to browse to import MXF videos. This MXF Converter for Mac support batch conversion)


Step 2. Click the Format bar, and move mouse cursor to "iMovie and Final Cut Express -> Apple InterMediate Codec (AIC) (*.mov)", it's the best format for editing in iMovie.

convert mxf to aic mov for imovie

Step 3. Click "Convert" button to start transcoding JVC GY-HM650U ProHD MXF files to AIC Codec for iMovie under Mac OS X 10.9 Mavericks.

iMovie Importing: How to import video files or projects to iMovie?

Some more helpful features of the app:

1. Settings- click to set video resolution(1920×1080/1440×1080/1280×720/720×480), bitrate(from 1Mbps to 20Mbps), frame rate (24p/30p)

2. Editor (next to "Add" icon)- click to set deinterlace, denoise, mute, volume up, trim, crop, etc.

So there you have it. Pretty simple. After the workflow, you can go to the output folder to find the converted video files. Now you are free to start importing/editing JVC GY-HM650U ProHD MXF files in iMovie under Maveircks without problems.

Monday, December 16, 2013

Quick Convert Sony NEX-5T MTS to iMovie and FCE compatible format on Mac 10.9 Mavericks

Summary: This article teaches you how to easily convert and import Sony Alpha NEX-5T MTS footage into iMovie or Final Cut Express for further editing on Mac (OS X 10.9 Mavericks included).

Sony brought its NEX mirrorless camera series into the hybrid autofocus age, with the debut of the NEX-5R. Just ten months later, that camera gets a more modest refresh, with the arrival of the Sony NEX-5T.


Sony Alpha NEX-5T can record Full HD (1920 x 1080 pixel; 1080p/1080i) movies at a rate of either 60 frames per second, 24 frames per second, or 60 interlaced fields per second. (In some markets, the 60p/60i rates are replaced with 50p/50i rates, and the 24p rate with 25p.) You can also opt for lower-res 1440 x 1080 and 640 x 480 movies, with a fixed rate of 30p (25p on overseas models).

At the maximum resolution, movies are saved using AVCHD version 2.0 (MPEG-4 AVC / H.264) compression with AC-3 stereo Dolby Digital audio. At lower resolutions, movies are saved with MP4 compression and MPEG-4 AAC-LC stereo audio. Most users would like to make some editing with MTS footage from Sony Alpha NEX-5T, but problems came up as AVCHD is not a friendly format for editing in iMovie and FCE.

To solve the problem, you'd better transcode Sony NEX-5T AVCHD mts footages to AIC MOV for iMovie and FCE first. And here you need some third-party program to help. Pavtube MTS/M2TS Converter for Mac is an ideal choice for me. It works very well in the past months and also you can choose to output the video as 1080p or other size. It can convert Sony NEX-5T AVCHD MTS video to AIC codec .mov format, and then you can edit Sony Alpha NEX-5T MTS files natively in iMovie and FCE on Mac (OS X 10.9 Mavericks included).

Breaking news: Pavtube has started the 2014 Summer Holiday Special offer, if you buy MTS/M2TS for Mac, you can free get MKV Converter for Mac or FLV/F4V Converter for Mac which can help you convert mkv or flash video on Mac with ease. In addition, you can also get more Discount at this promotion page. Take a look now and grasp this opportunity!

Step 1. Free Download the Converter, install and run. And then import Sony NEX-5T recorded mts videos to the MTS to AIC converter.


PS: It's an excellent Sony AVCHD Converter for Mac which can also transcode MTS to an editable format like ProRes for FCP, AIC for iMovie/FCE, MPEG-2 for Adobe; to a playable format for putting on portable devices or uploading to YouTube.

Step 2. Click the format bar, and move mouse cursor to "iMovie and Final Cut Express > Apple Intermediate Codec(AIC) (*.mov)" as output format.


Step 3. Click convert button in the main interface to start transcoding Sony Alpha NEX-5T mts files to AIC fro editing in iMovie and FCE on mac.

Some more helpful features of the Sony MTS to AIC Converter:

1. Settings- click to set video resolution(1920×1080/1440×1080/1280×720/720×480), bitrate(from 1Mbps to 20Mbps), frame rate (24p/30p)

2. Editor (next to "Add" icon)- click to set deinterlace, denoise, mute, volume up, trim, crop, etc.

After the workflow, you can go to the output folder to find the converted video files. Now you are free to import/edit Sony Alpha NEX-5T AVCHD files in iMovie and FCE under Mac (OS X 10.9 Mavericks included) without problems.

Good News!

Summer Holiday Sales 2014 page, you can get 20% off on any Pavtube products, it will be expired on July. 15, 2014. Never miss!!!

Friday, August 23, 2013

Convert QuickTime .mov to iMovie on Mac OS X Mavericks/Mountain Lion

This guide introduces the best workflow to import QuickTime mov to iMovie on Mac OS X 10.9 Mavericks or Mountain Lion for smoothly editing.
Q: “I have some standard MOV files and enjoys playing back them smoothly in QuickTime Player. But when I import them to iMovie and want to edit, now the videos seem to randomly switch frame rates during playback. Did you do anything wrong?”
A: iMovie is really picky on video formats as well as video codecs. For example, normal mov files are not supported natively so that you cannot playback smoothly your quicktime mov in iMovie. The best compatible codec for iMovie is Apple InterMediate Codec(AIC); in this case, you are suggested to use Pavtube HD Video Converter for Mavericks to convert QuickTime MOV to AIC MOV for editing in iMovie.

convert quicktime mov to imovie


How to transcode Quicktime MOV files for editing in iMovie?

The above introduced Pavtube HD Video Converter for Mac program, which is not only able to convert various HD videos (including Quicktime mov, MKV, MTS, MXF, AVI, VOB, MPG, 3GP, Flash videos etc.) to AIC, but also convert them to Apple ProRes for FCP, DNxHD mov for Avid Media Composer/Xpress Pro, convert to MPG/AVI/MOV for Premiere Pro, convert to various video formats for editing, playback, sharing, storing and burning, etc.

First download a free trial version and install it on your Mac(including 10.9 Mavericks and Mountain Lion 10.8).

Let’s start to quick convert QuickTime MOV to iMovie compatible codec on Mac.

1. Load .mov files.

Run Pavtube HD Video Converter for Mac, then click the top left two icons to load individual mov videos, or import the entire folder.

pavtube quicktime mov to imovie converter

2. Choose the proper format for iMovie.

Click the drop-down list besides “Format” and choose “iMovie and Final Cut Express > Apple InterMediate Codec (AIC) (*.mov)” as the best format for editing in iMovie. Click “Browse” to choose output path.

convert quicktime mov to aic mov  

Tips: Click the Pencil-like icon on the top to trim, crop, edit audio, add 3D effect and subtitles.

3. Custom video/audio settings for iMovie.

Click the “Settings” and customize output video size, bitrate (decide video quality and size), frame rate and other specs. You’d better set the video frame rate as 30fps, video size as 1920*1080 to keep the best quality for editing in iMovie. 

4. Start Quicktime mov to AIC mov conversion.

Click the “Convert” button to start converting Quicktime mov to AIC mov for iMovie. Wait for moments and you will get the best video. Click the “Open” button to locate the converted video and then import them to iMovie for editing on Mac Mountain Lion and Mavericks.

5. Import video files to iMovie.

Launch iMovie, choose “File” > “Import” > “Movies…” and choose the path above:
import converted mov to imovie 


Related Tips: