Question:
“I want to make video clips using my personal DVD then upload to Youtube. But when I imported DVD to Windows Movie Maker, Movie Maker didn't recognize the DVD. Any idea?”
Best Solution
Windows Movie Maker is software that comes with the Windows operating system which allows users to make their own movies and burn them on DVDs. Sometimes users may run into issues where the DVDs created through Windows Movie Maker cannot be played on a regular DVD player. To rectify this problem, the user must ensure they choose the right DVD ripping tool - Pavtube DVDAid is the highly recommended tool and this guide will help you rectify your “DVD to Windows Movie Maker” problems.
Supported audio/video/picture formats supported by Windows Movie Maker:
To do that, you have to convert DVD to Windows Movie Maker compatible format like WMV before importing. Have a try of the best DVD to Windows Movie Maker converter - an easy-to-use yet professional utility. It supports creating high quality WMV video from DVD files for your Windows Movie Maker. Besides, it comes with all regular video editing tools like Trim, Crop, Effect, Subtitle, Watermark. For basic video editing tasks, you can even replace your Windows Movie Maker with it. Read the review.
The process of DVD to Windows Movie Maker conversion is straightforward. Pop in your disc, choose WMV as the output format, and click Convert to start the conversion. Below is the detailed guide on converting DVD to WMV for Windows Movie Maker.
Free Download this Top DVD to Windows Movie Maker Ripper:


Other Download:
- Pavtube old official address: http://www.pavtube.cn/dvd_ripper/
- Cnet Download: http://download.cnet.com/Pavtube-DVDAid/3000-7970_4-76158510.html
Best Workaround- Please follow the steps as below.
Step 1. Load DVD movie
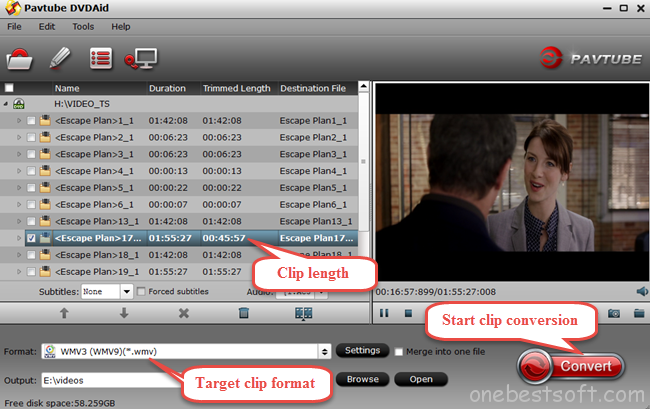
After running Pavtube DVDAid, click “File” > “Load from disc” to import your DVD movie. DVD folders/IFO files/ISO Image files stored on our computer’s hard disc drive are also allowed as converted objects.
Step 2. Trim DVD movie clips
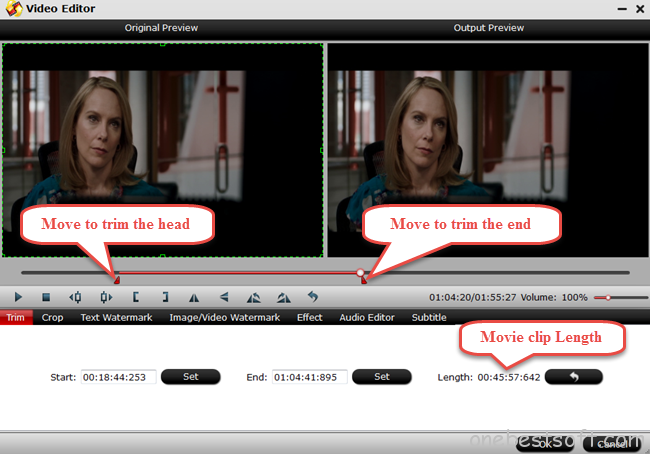
Click the Pencil icon on top of the main interface to switch to the editing interface where you’re allowed to trim DVD movies clips. Under the trimming menu bar, you’re allowed to set the start time and end time for your favorite movie clip. There are 2 red movable triangles right located at the movie head and end respectively below the original preview and output preview window. You can move the triangle at the movie head to your target point as the start of your clip and move the triangle at the movie end to your target point as the end of you movie clip.
In addition to trimming, Pavtube DVDAid also supports other editing functions such as cropping black bars, adding text/image/video watermark, editing movie audio and embedding subtitles, etc.
Step 3. Choose output movie clip format
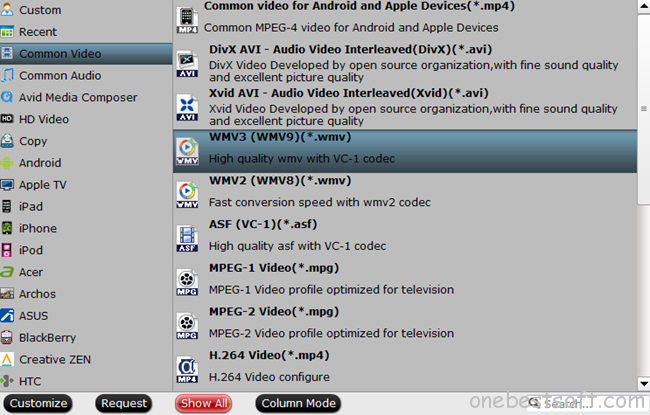
After getting your favorite DVD movie clip trimmed, go back to the main interface to choose the output video format compatible with Windows Movie Maker. Here we need to click the format bar to choose “common video” > “WMV3(WMV9) (*.wmv)” as your target clip format. If you want your movie clips played on your other devices, have a try of other formats for Partube DVDAid possesses a library of various possible formats.
Step 4. Start DVD clip to WMV conversion
Click the big red button “Convert” after finishing trimming your DVD movie clip and selecting its proper output format.
Step 5. Import DVD movie clip to Windows Movie Maker
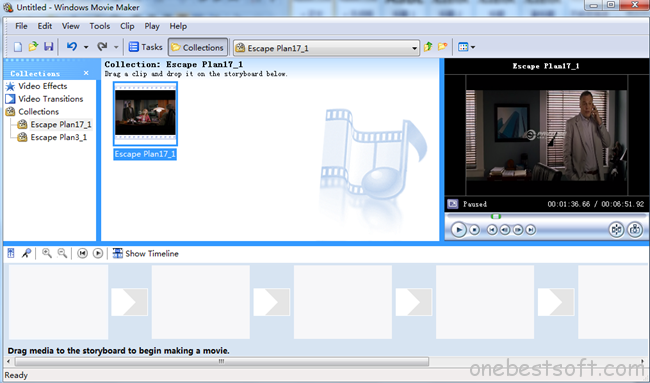
After getting your DVD movie clip trimmed and converted, run Windows Movie Maker, and click “Import video” to import your movie clip to Windows Movie Maker where you can make your personal movie by adding videos, photos, audio or music.
Never had a director dream come true? With Pavtube DVDAid performing its format converting and clip trimming function, and Windows Movie Maker performing its combining and editing function, what are you afraid of? It’s no wonder that there will be a new movie studio rising in the near future.
Wanna make your career brighter? Here I want to deliver my humble advice that you can burn your video clip combinations to DVDs to expand your business. Hope this will help you. And you can get Pavtube DVDAid and DVD Creator with almost half price! Please go to www.multipelife.com/special-offer to find your favorite promotion information.
Read More:
“I want to make video clips using my personal DVD then upload to Youtube. But when I imported DVD to Windows Movie Maker, Movie Maker didn't recognize the DVD. Any idea?”
Best Solution
Windows Movie Maker is software that comes with the Windows operating system which allows users to make their own movies and burn them on DVDs. Sometimes users may run into issues where the DVDs created through Windows Movie Maker cannot be played on a regular DVD player. To rectify this problem, the user must ensure they choose the right DVD ripping tool - Pavtube DVDAid is the highly recommended tool and this guide will help you rectify your “DVD to Windows Movie Maker” problems.
Supported audio/video/picture formats supported by Windows Movie Maker:
- Supported audio format: *.wav, *.snd, *.au, *.aif, *.aifc, *.aiff
- Supported video format: *.asf, *.avi, *.wmv
- Supported picture format: *.jpg, *.bmp, *.gif, etc.
To do that, you have to convert DVD to Windows Movie Maker compatible format like WMV before importing. Have a try of the best DVD to Windows Movie Maker converter - an easy-to-use yet professional utility. It supports creating high quality WMV video from DVD files for your Windows Movie Maker. Besides, it comes with all regular video editing tools like Trim, Crop, Effect, Subtitle, Watermark. For basic video editing tasks, you can even replace your Windows Movie Maker with it. Read the review.
The process of DVD to Windows Movie Maker conversion is straightforward. Pop in your disc, choose WMV as the output format, and click Convert to start the conversion. Below is the detailed guide on converting DVD to WMV for Windows Movie Maker.
Free Download this Top DVD to Windows Movie Maker Ripper:
Other Download:
- Pavtube old official address: http://www.pavtube.cn/dvd_ripper/
- Cnet Download: http://download.cnet.com/Pavtube-DVDAid/3000-7970_4-76158510.html
Best Workaround- Please follow the steps as below.
Step 1. Load DVD movie
After running Pavtube DVDAid, click “File” > “Load from disc” to import your DVD movie. DVD folders/IFO files/ISO Image files stored on our computer’s hard disc drive are also allowed as converted objects.
Step 2. Trim DVD movie clips
Click the Pencil icon on top of the main interface to switch to the editing interface where you’re allowed to trim DVD movies clips. Under the trimming menu bar, you’re allowed to set the start time and end time for your favorite movie clip. There are 2 red movable triangles right located at the movie head and end respectively below the original preview and output preview window. You can move the triangle at the movie head to your target point as the start of your clip and move the triangle at the movie end to your target point as the end of you movie clip.
In addition to trimming, Pavtube DVDAid also supports other editing functions such as cropping black bars, adding text/image/video watermark, editing movie audio and embedding subtitles, etc.
Step 3. Choose output movie clip format
After getting your favorite DVD movie clip trimmed, go back to the main interface to choose the output video format compatible with Windows Movie Maker. Here we need to click the format bar to choose “common video” > “WMV3(WMV9) (*.wmv)” as your target clip format. If you want your movie clips played on your other devices, have a try of other formats for Partube DVDAid possesses a library of various possible formats.
Step 4. Start DVD clip to WMV conversion
Click the big red button “Convert” after finishing trimming your DVD movie clip and selecting its proper output format.
Step 5. Import DVD movie clip to Windows Movie Maker
After getting your DVD movie clip trimmed and converted, run Windows Movie Maker, and click “Import video” to import your movie clip to Windows Movie Maker where you can make your personal movie by adding videos, photos, audio or music.
Never had a director dream come true? With Pavtube DVDAid performing its format converting and clip trimming function, and Windows Movie Maker performing its combining and editing function, what are you afraid of? It’s no wonder that there will be a new movie studio rising in the near future.
Wanna make your career brighter? Here I want to deliver my humble advice that you can burn your video clip combinations to DVDs to expand your business. Hope this will help you. And you can get Pavtube DVDAid and DVD Creator with almost half price! Please go to www.multipelife.com/special-offer to find your favorite promotion information.
Read More: