This article is a Review of the Top DRM Video Recorder, we will cover its conversion theory, main features, compatible OS, supported input and output formats, pros and cons, etc. with the intent to help you find the best DRM Video Recorder Guide to get all your iTunes/Digital Copy/Amazon/BBC iPlayer etc. videos DRM free.
What is DRM?
Digital rights management (DRM) is a class of controversial technologies that are used by hardware manufacturers, publishers, copyright holders, and individuals with the intent to control the use of digital content and devices after sale. And basically there are two kinds of DRM files: iTunes M4V and Digital Copy.
Apple uses M4V encode video files, such as TV episodes, movies, and music videos, in its iTunes Store to protect its copyright. To play a protected M4V file, the computer needs to be authorized (using iTunes) with the account that was used to purchase the video.
As Digital Copy, it is an extra copy of the movie you bought on Blu-ray/DVD disc that enables you to download or stream your movie to a computer, mobile device, or Internet-connected TV, Blu-ray player or set top box. If your Blu-ray Disc or DVD has the "Digital Copy" logo on the back it will have either a Digital Copy disc inside of the box or a link to a Digital Copy web site. Follow the instructions on the insert inside of your box to redeem your Digital Copy using the disc or the web site.
Why need strip off DRM protection?
It’s probably that you have downloaded a few purchases from iTunes, Windows Media Center, Zune Marketplace, BBC iPlayer, Amazon Video on Demand, CinemaNow, Blockbuster, Napster, Pandora, Spiralfrog, Bearshare, iMesh, iMeeM, etc, or get some free digital copies of movies with the Blu-rays that you purchased so that you could watch them freely on your smartphone, tablet or computer that is not authorized. But the problem is neither iTunes M4V videos nor Digital Copy movies can be watched on portable devices or other unauthorized computer. You need a Top DRM Removal Tool to free your iTunes M4V videos and Digital Copy movies from DRM protection and you can freely play them anywhere you like.
Why choose Pavtube DRM Video Recorder – ChewTune?
Step 1: Authorize your computer
Authorize computer for iTunes M4V files:
1. Open iTunes on your computer, click the Store menu, and then select Authorize This Computer.
2. A window will pop up and prompt you for your Apple ID and password. Fill in the appropriate information, and then click Authorize.
3. After your submission, the whole authorization process completes and now your computer will be authorized for playback. If you have reached your 5 computers limits, you can deauthorize another machine.
Authorize and transfer Blu-ray Digital Copy to computer hard drive
1. Insert the Digital Copy disc into your computer’s DVD drive.
2. Wait for the DVD icon to appear on your computer. Do double-click and it will take you to the digital copy interface.
3. Decide whether to transfer Digital Copy to iTunes or Windows Media Player. Note that it requires iTunes 9 or Windows Media Player 11 and later version to download digital copy movies to PC. Here I choose Windows Media Player.
4. Put in the unique Digital Copy redemption/registration code, which you will find on an insert inside of your Blu-ray/DVD packaging. The computer must be connected to the Internet in order for the Digital Copy code to be verified.
5. Choose source movie and target folder to transfer Digital Copy to. Then start syncing movies from Digital Copy to computer.
It usually takes less than 5 minutes to download a Digital Copy movie to hard drive.
After Digital Copy transfer completed, the movie can be played instantly with Windows Media Player.
Step 2: Load the DRM video
Run Pavtube DRM Video Recorder, drag and drop the source DRM video from local computer to ChewTune. Or hit the “Add Video” button to import your iTunes, Amazon, or Digital Copy, etc.
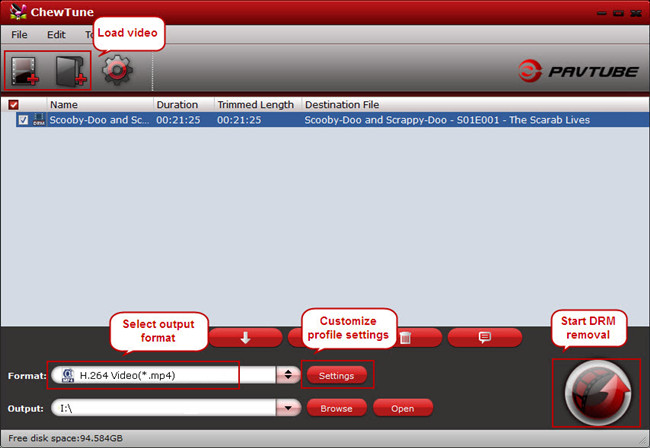
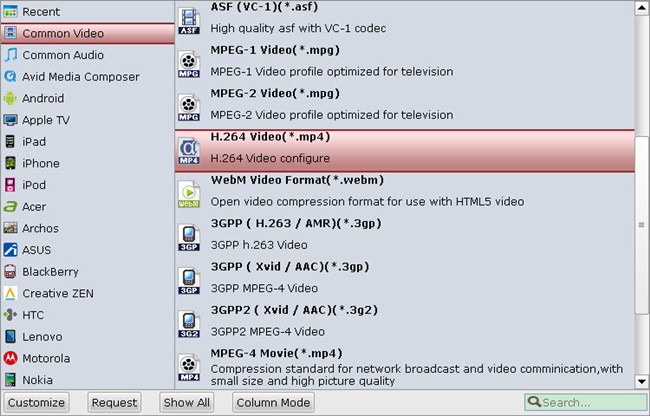
Step 3: Select output format
Pavtube ChewTune includes various profiles under “Format” list and you could always find the optimized one for your need.
Meanwhile, you can enter “Settings” option to adjust profile parameters, such as video codec, bitrate, frame rate, size, etc to get better video and audio quality.
Step 4: Start DRM-free recording process
Click the “Convert” button on software main UI to start recording DRM video. When it completes, click the “Open” icon to locate the DRM-free movie, and transfer it from PC to anywhere you like for playback.
Tips:
1. To ensure the stability of Pavtube ChewTune trial version, make sure you have turned off iTunes before running this app.
2. Because of 1:1 video recording, it takes as long as the source movie length to finish the whole ChewTune DRM-free process, it’s better to select a small sample video for testing.
3. Since Pavtube ChewTune supports batch processing facility, you could import more than one DRM videos and run overnight, and you would get all videos recorded the next morning. Don’t forget to set up Windows power options to never turn off monitor or never let the computer system standby.
Related Articles:
What is DRM?
Digital rights management (DRM) is a class of controversial technologies that are used by hardware manufacturers, publishers, copyright holders, and individuals with the intent to control the use of digital content and devices after sale. And basically there are two kinds of DRM files: iTunes M4V and Digital Copy.
Apple uses M4V encode video files, such as TV episodes, movies, and music videos, in its iTunes Store to protect its copyright. To play a protected M4V file, the computer needs to be authorized (using iTunes) with the account that was used to purchase the video.
As Digital Copy, it is an extra copy of the movie you bought on Blu-ray/DVD disc that enables you to download or stream your movie to a computer, mobile device, or Internet-connected TV, Blu-ray player or set top box. If your Blu-ray Disc or DVD has the "Digital Copy" logo on the back it will have either a Digital Copy disc inside of the box or a link to a Digital Copy web site. Follow the instructions on the insert inside of your box to redeem your Digital Copy using the disc or the web site.
Why need strip off DRM protection?
It’s probably that you have downloaded a few purchases from iTunes, Windows Media Center, Zune Marketplace, BBC iPlayer, Amazon Video on Demand, CinemaNow, Blockbuster, Napster, Pandora, Spiralfrog, Bearshare, iMesh, iMeeM, etc, or get some free digital copies of movies with the Blu-rays that you purchased so that you could watch them freely on your smartphone, tablet or computer that is not authorized. But the problem is neither iTunes M4V videos nor Digital Copy movies can be watched on portable devices or other unauthorized computer. You need a Top DRM Removal Tool to free your iTunes M4V videos and Digital Copy movies from DRM protection and you can freely play them anywhere you like.
Why choose Pavtube DRM Video Recorder – ChewTune?
Pavtube ChewTune is an easy-to-use DRM removal tool that can legally produce DRM-free videos from M4V/WMV. Besides bypassing DRM protection, this DRM Media Converter tool is also good at recording your authorized videos or movies downloaded from a Digital Copy, iTunes, Amazon Instant Video, WB Digital Copy, BBC iPlayer, etc. to many other commonly used audio and video formats, so that you can use the DRM-free copies on practically any compatible electronic device, such as Samsung Galaxy Note 3, Galaxy Tab 3 10.1/8.0, Apple iPhone 5S/5C, Sony Xperia Z1, Xperia Z Ultra, LG G-Pad, Motorola DROID Mini, Moto X, Droid MAXX, Asus MeMO Pad HD 7, Fonepad 7, MeMO Pad Smart 10, Acer Liquid S2, and more.
Pros:
- Move iTunes Videos to NAS for Sharing
- Stream iTunes TV show to PS Vita
- Play iTunes Movies on Home Theater System
- Enjoy iTunes Music Video in Windows Media Player
Pros:
- Instead of transcode/encode/decrypt DRM files, Pavtube ChewTune records your source DRM files to any video and audio format you like for multiple portable devices.
- Latest ChewTune abandons the old way to encode DRM videos; instead, it is a DRM Removal Recorder now.
- Since ChewTune records DRM videos to strip off DRM protection, it performs in a much stable way so that each recorded iTunes video or Digital Copy movie is available and valid for your computer hard drive and portable device.
- The recorded movies using ChewTune are included with better video quality than any other DRM Converter since it legally frees DRM files with 1:1 video and audio quality of the originals.
- A given audio driver has to be installed to enable ChewTune remove DRM protection, which may sound a little complicated and troublesome.
- A complete DRM free file will not be created unless you do not abort during ChewTune whole DRM recording process, otherwise no file will be generated.
- When DRM removal process starts, a window will pop up and play the source DRM file. This window would be persistently exist and show at the left right corner of your computer desktop the whole recording time, which cannot be minimized or closed; meanwhile, your computer would be muted till ChewTune finishes the work.
- When converting iTunes DRM files, you can minimize the iTunes window, but cannot move or close it.
Step 1: Authorize your computer
Authorize computer for iTunes M4V files:
1. Open iTunes on your computer, click the Store menu, and then select Authorize This Computer.
2. A window will pop up and prompt you for your Apple ID and password. Fill in the appropriate information, and then click Authorize.
3. After your submission, the whole authorization process completes and now your computer will be authorized for playback. If you have reached your 5 computers limits, you can deauthorize another machine.
Authorize and transfer Blu-ray Digital Copy to computer hard drive
1. Insert the Digital Copy disc into your computer’s DVD drive.
2. Wait for the DVD icon to appear on your computer. Do double-click and it will take you to the digital copy interface.
3. Decide whether to transfer Digital Copy to iTunes or Windows Media Player. Note that it requires iTunes 9 or Windows Media Player 11 and later version to download digital copy movies to PC. Here I choose Windows Media Player.
4. Put in the unique Digital Copy redemption/registration code, which you will find on an insert inside of your Blu-ray/DVD packaging. The computer must be connected to the Internet in order for the Digital Copy code to be verified.
5. Choose source movie and target folder to transfer Digital Copy to. Then start syncing movies from Digital Copy to computer.
It usually takes less than 5 minutes to download a Digital Copy movie to hard drive.
After Digital Copy transfer completed, the movie can be played instantly with Windows Media Player.
Step 2: Load the DRM video
Run Pavtube DRM Video Recorder, drag and drop the source DRM video from local computer to ChewTune. Or hit the “Add Video” button to import your iTunes, Amazon, or Digital Copy, etc.
Pavtube ChewTune includes various profiles under “Format” list and you could always find the optimized one for your need.
Meanwhile, you can enter “Settings” option to adjust profile parameters, such as video codec, bitrate, frame rate, size, etc to get better video and audio quality.
Step 4: Start DRM-free recording process
Click the “Convert” button on software main UI to start recording DRM video. When it completes, click the “Open” icon to locate the DRM-free movie, and transfer it from PC to anywhere you like for playback.
Tips:
1. To ensure the stability of Pavtube ChewTune trial version, make sure you have turned off iTunes before running this app.
2. Because of 1:1 video recording, it takes as long as the source movie length to finish the whole ChewTune DRM-free process, it’s better to select a small sample video for testing.
3. Since Pavtube ChewTune supports batch processing facility, you could import more than one DRM videos and run overnight, and you would get all videos recorded the next morning. Don’t forget to set up Windows power options to never turn off monitor or never let the computer system standby.
Related Articles:
- Top 3 macOS Sierra AVI to MP4 Converter
- Best 5 HQ Video Converter for MacOS Sierra in 2017
- Top Best H.265 Decoders and Encoders So Far
- Top 5 VR Video Converter for PC
- 2017 Top 10 HD Video Converters for Mac (macOS Sierra)