Showing posts with label DRM Video Recorder. Show all posts

Thursday, April 23, 2015

Play Amazon Instant Video on Surface 3 without any issue

Not long ago Microsoft released the Surface 3 tablet, since it released it has attracted great attention, because it is powerful. it features 10.8, ClearType Full HD Plus Display, the resolution is 1920*1280, which is great for you to browse websites or watch movies. Have you ever think about playing Amazon Instant Videos on Surface 3 for Windows 10? Here in this article, we'll focus on how to get the Amazon Instant Video playback on Surface 3 tablet for Sharing. 


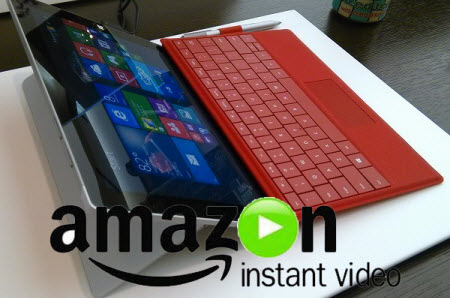
As is known to everybody, the WMV videos purchased from Amazon store, including music, videos, movies, and TV show etc. are usually format type unsupported by the Microsoft Surface 3. The problem is, those WMV videos you downloaded from Amazon are protected (by DRM), and can't be played on any Android/Windows tablet except for the Amazon Kindle Fire (HDX). So if you would like to transfer Amazon WMV videos to Note Surface 3 for playback, you have to remove DRM from Amazon Instant Video and convert/record it to Surface 3 compatible formats. 
   
No worries, it couldn't be simpler only if you find this professional and top DRM removal program: Pavtube ChewTune- a Amazon WMV to Surface recorder! Actually, it is nearly able to unlock all the DRM videos as long as your video is authorized and it's able to playback on this computer. 

This little application is specially designed to remove DRM from videos/audios purchased or rented from not only Amazon Instant Videos, but also iTunes Store, Zune Marketplace, BBC iPlayer, DVD/BD digital copies, or any other protected sources. This DRM Media Converter attains the goal of DRM removal through re-encoding the original, protected video and audio files. After that, you can play your Amazon Instant Video(WMV) on Surface 3 and Surface series smoothly. The Mac version is ChewTune for Mac.  
  
Simple steps to strip DRM restrictions from Amazon video and convert WMV to Surface 3 

Step 1. Download Pavtube ChewTune as the Best DRM removal software.

   (Click here for Mac OS X 10.5) 

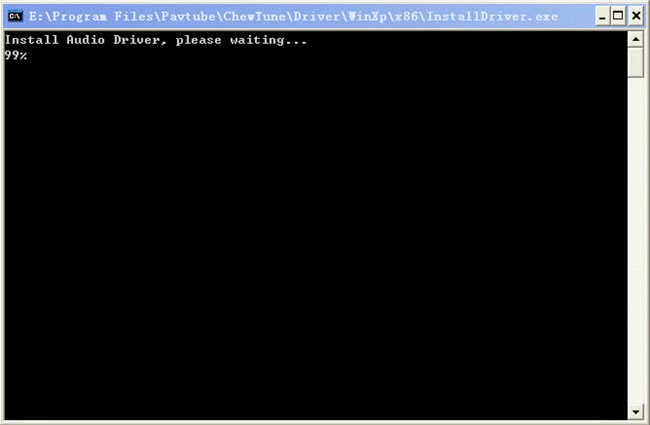
There would be a command window pop up during the installation to install specific soundcard drive for DRM Removal, please do not shut down it and let it running until the installation completed. 


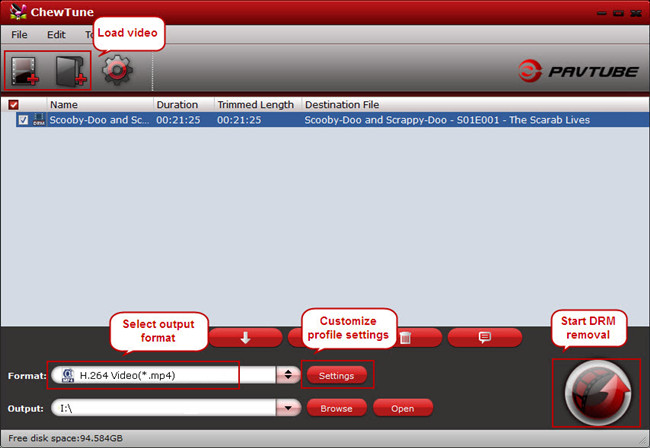
Step 2. Add video and choose target format.

Drag and drop your videos to it directly, or you can click icon to import them as below. 


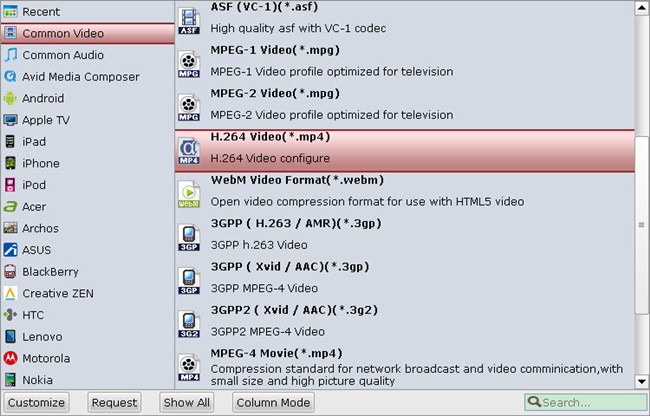
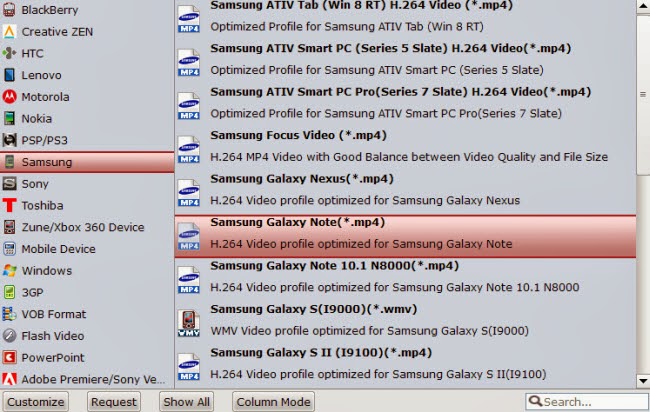
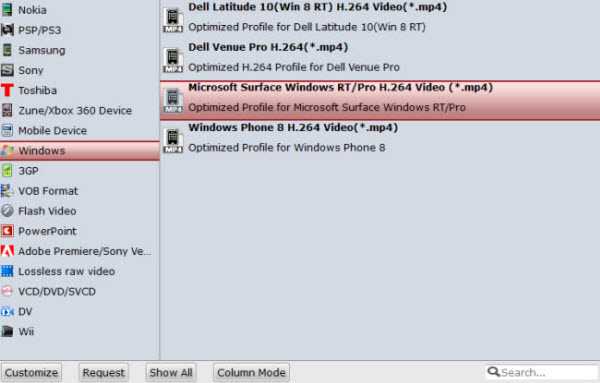
Let's click the drop-down-list besides "Format" and choose "Windows -> Microsoft Surface Windows RT/Pro H.264 Video(*.mp4)". (Read Surface tablets supported format


Step 3. Customize target video specs. (Optional)

Click "Settings" to enter Profile Settings window, you can find settings for video size, codec, bitrate and frame rate. Change them according to your own needs.

Step 4. Start conversion.

Now click the big red icon to start converting DRM protected Amazon WMV videos to Surface 3 in batch; this converter will activate your media player automatically and start to play this video (let's keep it running). The player windows cannot be removed or closed.

In the meanwhile, it will start to record this video in MP4 real-time. After the conversion, click "Open output folder" to quick locate the converted video for copying to Surface 3 for playback. The conversion time is equal to the video length itself; you can do other tasks during the converting the process. 

Now, you can view the Amazon Instant Video on Surface 3 tablet for sharing with friends. 

Read More: 

Sunday, October 6, 2013

Top DRM Video Recorder Review + Guide: Record purchased and rental DRM-protected M4V/WMV video

This article is a Review of the Top DRM Video Recorder, we will cover its conversion theory, main features, compatible OS, supported input and output formats, pros and cons, etc. with the intent to help you find the best DRM Video Recorder Guide to get all your iTunes/Digital Copy/Amazon/BBC iPlayer etc. videos DRM free.

What is DRM?

Digital rights management (DRM) is a class of controversial technologies that are used by hardware manufacturers, publishers, copyright holders, and individuals with the intent to control the use of digital content and devices after sale. And basically there are two kinds of DRM files: iTunes M4V and Digital Copy. 

Apple uses M4V encode video files, such as TV episodes, movies, and music videos, in its iTunes Store to protect its copyright. To play a protected M4V file, the computer needs to be authorized (using iTunes) with the account that was used to purchase the video.

As Digital Copy, it is an extra copy of the movie you bought on Blu-ray/DVD disc that enables you to download or stream your movie to a computer, mobile device, or Internet-connected TV, Blu-ray player or set top box. If your Blu-ray Disc or DVD has the "Digital Copy" logo on the back it will have either a Digital Copy disc inside of the box or a link to a Digital Copy web site. Follow the instructions on the insert inside of your box to redeem your Digital Copy using the disc or the web site.

Why need strip off DRM protection?

It’s probably that you have downloaded a few purchases from iTunes, Windows Media Center, Zune Marketplace, BBC iPlayer, Amazon Video on Demand, CinemaNow, Blockbuster, Napster, Pandora, Spiralfrog, Bearshare, iMesh, iMeeM, etc, or get some free digital copies of movies with the Blu-rays that you purchased so that you could watch them freely on your smartphone, tablet or computer that is not authorized. But the problem is neither iTunes M4V videos nor Digital Copy movies can be watched on portable devices or other unauthorized computer. You need a Top DRM Removal Tool to free your iTunes M4V videos and Digital Copy movies from DRM protection and you can freely play them anywhere you like.
Why choose Pavtube DRM Video Recorder – ChewTune?

Pavtube ChewTune is an easy-to-use DRM removal tool that can legally produce DRM-free videos from M4V/WMV. Besides bypassing DRM protection, this DRM Media Converter tool is also good at recording your authorized videos or movies downloaded from a Digital Copy, iTunes, Amazon Instant Video, WB Digital Copy, BBC iPlayer, etc. to many other commonly used audio and video formats, so that you can use the DRM-free copies on practically any compatible electronic device, such as Samsung Galaxy Note 3, Galaxy Tab 3 10.1/8.0, Apple iPhone 5S/5C, Sony Xperia Z1, Xperia Z Ultra, LG G-Pad, Motorola DROID Mini, Moto X, Droid MAXX, Asus MeMO Pad HD 7, Fonepad 7, MeMO Pad Smart 10, Acer Liquid S2, and more.


Pros:
  1. Instead of transcode/encode/decrypt DRM files, Pavtube ChewTune records your source DRM files to any video and audio format you like for multiple portable devices.
  2. Latest ChewTune abandons the old way to encode DRM videos; instead, it is a DRM Removal Recorder now.
  3. Since ChewTune records DRM videos to strip off DRM protection, it performs in a much stable way so that each recorded iTunes video or Digital Copy movie is available and valid for your computer hard drive and portable device.
  4. The recorded movies using ChewTune are included with better video quality than any other DRM Converter since it legally frees DRM files with 1:1 video and audio quality of the originals.
Cons:
  1. A given audio driver has to be installed to enable ChewTune remove DRM protection, which may sound a little complicated and troublesome.
  2. A complete DRM free file will not be created unless you do not abort during ChewTune whole DRM recording process, otherwise no file will be generated.
  3. When DRM removal process starts, a window will pop up and play the source DRM file. This window would be persistently exist and show at the left right corner of your computer desktop the whole recording time, which cannot be minimized or closed; meanwhile, your computer would be muted till ChewTune finishes the work.
  4. When converting iTunes DRM files, you can minimize the iTunes window, but cannot move or close it.
How to free from DRM protection with Pavtube ChewTune?

Step 1: Authorize your computer

Authorize computer for iTunes M4V files:

1. Open iTunes on your computer, click the Store menu, and then select Authorize This Computer.

2. A window will pop up and prompt you for your Apple ID and password. Fill in the appropriate information, and then click Authorize.
  
3. After your submission, the whole authorization process completes and now your computer will be authorized for playback. If you have reached your 5 computers limits, you can deauthorize another machine.

Authorize and transfer Blu-ray Digital Copy to computer hard drive 

1. Insert the Digital Copy disc into your computer’s DVD drive.
2. Wait for the DVD icon to appear on your computer. Do double-click and it will take you to the digital copy interface.
3. Decide whether to transfer Digital Copy to iTunes or Windows Media Player. Note that it requires iTunes 9 or Windows Media Player 11 and later version to download digital copy movies to PC. Here I choose Windows Media Player.
4. Put in the unique Digital Copy redemption/registration code, which you will find on an insert inside of your Blu-ray/DVD packaging. The computer must be connected to the Internet in order for the Digital Copy code to be verified.
5. Choose source movie and target folder to transfer Digital Copy to. Then start syncing movies from Digital Copy to computer.
It usually takes less than 5 minutes to download a Digital Copy movie to hard drive.
After Digital Copy transfer completed, the movie can be played instantly with Windows Media Player.

Step 2: Load the DRM video

Run Pavtube DRM Video Recorder, drag and drop the source DRM video from local computer to ChewTune. Or hit the “Add Video” button to import your iTunes, Amazon, or Digital Copy, etc.


Step 3: Select output format

Pavtube ChewTune includes various profiles under “Format” list and you could always find the optimized one for your need.


Meanwhile, you can enter “Settings” option to adjust profile parameters, such as video codec, bitrate, frame rate, size, etc to get better video and audio quality.

Step 4: Start DRM-free recording process

Click the “Convert” button on software main UI to start recording DRM video. When it completes, click the “Open” icon to locate the DRM-free movie, and transfer it from PC to anywhere you like for playback.
  
Tips:

1. To ensure the stability of Pavtube ChewTune trial version, make sure you have turned off iTunes before running this app.

2. Because of 1:1 video recording, it takes as long as the source movie length to finish the whole ChewTune DRM-free process, it’s better to select a small sample video for testing.

3. Since Pavtube ChewTune supports batch processing facility, you could import more than one DRM videos and run overnight, and you would get all videos recorded the next morning. Don’t forget to set up Windows power options to never turn off monitor or never let the computer system standby.

Related Articles:

Monday, September 30, 2013

Transfer iTunes, Digital Copy, Amazon Videos to Galaxy Note 3

In below article you can learn about how to legally get rid of DRM copy protection from iTunes M4V, Amazon WMV and Digital Copy to freely play them anywhere you like.

As Samsung has unveiled the Galaxy Note 3, the second sequel in a series of supersized stylus-smitten smartphones, which is even taller, narrower and thinner than the first two of its kind, more and more people tend to own this new handset with 5.7-inch, 1920x1080 Full HD display screen and Android 4.3 Jelly Bean OS. Though this mobile phone has improved itself by adding a bevy of hardware and software updates, it is still not compatible with DRM copy protected iTunes M4V, Amazon WMV and Digital Copy due to the restrictive DRM technology. To watch DRM videos on your Samsung Galaxy Note 3, you’ll have to remove the DRM protection first.

Pavtube DRM Video Removal Tool can strip DRM protection from iTunes purchased M4V movies, Amazon Instant WMV videos, and Digital copies, convert them to Samsung Galaxy Note 3 supported MP4 or WMV format and freely transfer converted DRM videos to Galaxy Note 3.


Few tips before starting the whole DRM video to Galaxy Note 3 conversion:

1. Make sure that your computer is authorized for source videos, that is to say you can play the source iTunes movies in iTunes, play Amazon and digital copy using Windows Media Player.

2. Allow the audio driver installed during the Pavtube ChewTune installation.


3. Close iTunes before running the Pavtube DRM Removal Converter when converting iTunes M4V movies.

4. It would take as long as the source movie length for the whole DRM video to Galaxy Note 3 conversion process since Pavtube ChewTune records source DRM videos in 1:1 video and audio quality.

How to Remove DRM-protection and transfer DRM M4V/WMV Videos to Galaxy Note 3?

Step 1. Run Pavtube DRM Media Removal tool, drag and drop the source DRM video from local computer to ChewTune. Or hit the “Add Video” button to import your iTunes, Amazon, or Digital Copy.


Step 2. From “Format” drop-down list, choose “Samsung > Samsung Galaxy Note(*.mp4)” as the output format.


Step 3. If you like, you can enter “Settings” option to adjust profile parameters, such as video codec, bitrate, frame rate, size, etc to get better video and audio quality on Galaxy Note 3.


Step 4. Click the big “Convert” button on software main UI to start DRM video to Galaxy Note 3 conversion. When conversion completes, click the “Open” icon to locate the DRM-free movies, and transfer movies from PC to Samsung Galaxy Note 3. You are ready to watch DRM videos on Samsung Galaxy Note 3 the nest time you wait for a bus, travel, or go camping trip.

Related Articles:
               

Friday, September 27, 2013

DRM Video Recorder: Import iTunes M4V file to Premiere Pro with best video/audio quality

A step-by-step guide to walk you through removing DRM protection from iTunes M4V and converting iTunes M4V to Premiere Pro on Windows/Mac with best video quality and perfect video/audio sync so that you can edit iTune M4V videos in Adobe Premiere Pro.

Do you have some M4V files that downloaded from iTunes Store and wonder how to import M4V files to Premiere Pro for editing or transfer them to your Tablet/Phone? Maybe you are emailed with a video that right in M4V format but you don’t know what to do to do with it? 

Not only video players, but also editing programs do not appreciate this format. M4V is not supported natively on both Windows and Mac as well as NLEs, for instance, Adobe Premiere Pro. 

What is M4V file?

M4V is the most common format used in iTunes videos for watching on Apple TV. However, videos purchased from iTunes store is protected by DRM so that you cannot playback them on any devices other than iDevices, nor edit in NLEs.
  
Moreover, M4V is also not a proper format for playback on tablets/phones like Galaxy Tab 3, Galaxy Note 3, Surface RT/Pro, Kindle Fire HD, Nexus 7(2013), Moto X, Sony Xperia Z1, HTC One, watch on PC or do precise editing in programs like Adobe Premiere Pro, FCP, iMovie, Avid Media Composer, Pinnacle, etc.; for that M4V files are highly compressed in MPEG-4 with not good video quality.

To remove DRM protection from iTunes M4V videos, or get better video quality and edit in Premiere Pro, the recommended solution is to remove DRM protection and then convert M4V to MPG/MOV/AVI/WMV that works with your Adobe Premiere Pro or devices (like: Blackberry, Nokia, HTC, and Palm Pre, etc.).

Here we would like to introduce this professional DRM Removal software or Mac DRM Removal software, a powerful iTunes M4V converter software on both Windows and Mac. With it, you can easily remove DRM protection from iTunes video and encode them to various formats including AVI/MOV/WMV/MP4/MKV/MPG/FLV/F4V, etc.
You can choose to download a free trial version of the DRM removal tool:

How to remove iTunes DRM and convert iTunes video to Adobe Premiere Pro

Step 1. Load M4V files to the DRM Removal Tool.

Get this DRM Removal Tool installed, drag and drop your iTunes M4V files to it directly.
  
Step 2. Choose output file format for editing or playing.

Adobe Premiere Pro supports FLV, F4V, MPEG-2, QuickTime, AVI file formats, Just click the drop-down list besides “Format” and choose “Adobe Premiere/Sony Vegas” -> “MPEG-2 (*.mpg)”, “MOV (AVC)(*.mov)” or “WMV (VC-1) (*.wmv)”; You can also key in AVI in the search box to quick locate this profile.

pavtube drm media removal tool

And “Settings” button provides you more customize options like video size, bitrate, frame rate, sample rate(Hz) etc. for output files.

Step 3. Strat removing DRM protection from iTuens M4V.

Now you can click “Convert” button to start removeing DRM protection and converting iTunes M4V for editing or playing smoothly. Wait for moments, then click “Open” to locate the converted video.

Here are several tips during the conversion:

a). Please don't use iTunes during converting, or an error may occur.
b). It's highly recommended to use iTunes V10.5.0 or higher. 
c). This product cannot convert unplayable iTunes files (damaged, unauthorized, etc).
d). The DRM removing process may mislead your anti-virus software to falsely report virus/worm. Please ignore the report to keep on ripping.

Now, you can follow this page to learn the Adobe Premiere Pro workflow: How to import media files to Premiere Pro?.

FYI: if you just want to convert unprotected M4V to MOV/WMV/MP4/MKV/MPG/FLV/F4V, Pavtube Video Converter Ultimate is high recommended for good video quality and reliable workflow.

You may be interested in some Money-Saving Tips:

Read More: