Description: Having problems playing videos on TV? Now check out the solution on how to play different movies (Blu-ray, DVD, ISO, iTunes, Video) on TV.
Once you've purchased or rented a movie or TV show, you can sit down with a bucket of popcorn, put your feet up, and start watching them on big screen TV. What if you downloaded or recorded some video files and need to watching them on your Samsung/LG/Sony/Panasonic TV? TV is slightly picky about file formats, which means that not all your videos can be playable on TV. Then it's necessary to see the following solutions for Playing Movies on Samsung/LG/Sony/Panasonic TV.
 We talk about TV supported video file formats here – something that, obviously, a dedicated circle of customers will be deeply concerned about, because in most cases, people, who want to play Blu-ray, DVD, ISO, downloaded/recorded video, in any formats except for supported ones like MP4, MKV, etc on Samsung/LG/Sony/Panasonic TV, would run into TV video format compatibility troubles.
Related: HDTV Format | 4K TV Format | Vizio TV Format | Sony TV Format | Apple TV Format | Samsung TV Format
Whole Solutions for Playing Movies on TV
Blu-ray to TV: Blu-ray to TV | Blu-ray to Samsung 4K TV | 3D Blu-ray to Samsung 3D TV | 2D Blu-ray to LG TV | Blu-ray to Sony TV | Blu-ray to Panasonic TV | Blu-ray to Google TV
DVD to TV: DVD to Samsung TV | DVD to Panasonic TV | DVD to TV Ripper Review | DVD to Android TV | DVD to 4K TV | DVD to LG TV
ISO to TV: ISO to TV | ISO to Samsung TV | ISO to Sony TV | ISO to Panasonic TV | 3D ISO to 3D TV
Video to TV: BDMV to Samsung TV | 4K to Samsung 4K TV | AVI to TV | AVI to Panasonic TV | AVI to Samsung TV | AVI to Sharp TV | MKV to Samsung TV | MKV to Vizio TV | MKV to Sony TV | MP4 to Samsung TV |MTS to TV | H.265 to 4K TV
iTunes to TV: iTuness to Samsung TV | iTunes to Sony TV | iTunes to Panasonic TV | iTunes to TV | iTunes to Vizio TV
Ultimate Gudie for Movie Entertainment (Blu-ray, DVD, ISO, iTunes, Video) on TV
Here we have a tutorial for converting any videos to TV supported video formats.
To get videos compatible with Samsung/LG/Sony/Panasonic TV, you need to:
1. Check out our TV supported video formats listed above.
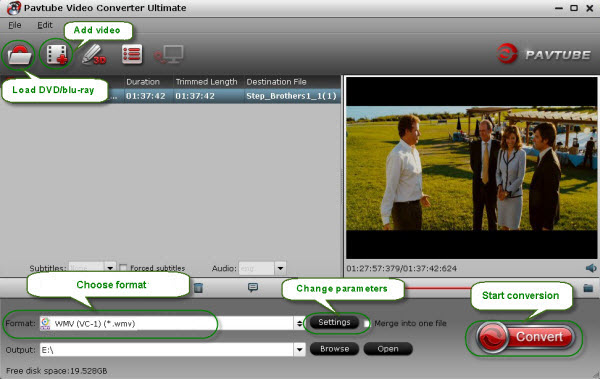
2. Get a video converter for new TV, like Pavtube Video Converter Ultimate.
3. Convert video to TV video formats supported (Load files > Choose Format > Start conversion) and that's all.
Four Ways to Stream converted video Files to TV
First Way: Stream video to TV via USB
There is always a USB port on your TV. All you have to do is to insert the USB in the right port and then play the converted format video on your TV.
Second Way: Stream video to TV via Audio-Visual (AV) Cables
We talk about TV supported video file formats here – something that, obviously, a dedicated circle of customers will be deeply concerned about, because in most cases, people, who want to play Blu-ray, DVD, ISO, downloaded/recorded video, in any formats except for supported ones like MP4, MKV, etc on Samsung/LG/Sony/Panasonic TV, would run into TV video format compatibility troubles.
Related: HDTV Format | 4K TV Format | Vizio TV Format | Sony TV Format | Apple TV Format | Samsung TV Format
Whole Solutions for Playing Movies on TV
Blu-ray to TV: Blu-ray to TV | Blu-ray to Samsung 4K TV | 3D Blu-ray to Samsung 3D TV | 2D Blu-ray to LG TV | Blu-ray to Sony TV | Blu-ray to Panasonic TV | Blu-ray to Google TV
DVD to TV: DVD to Samsung TV | DVD to Panasonic TV | DVD to TV Ripper Review | DVD to Android TV | DVD to 4K TV | DVD to LG TV
ISO to TV: ISO to TV | ISO to Samsung TV | ISO to Sony TV | ISO to Panasonic TV | 3D ISO to 3D TV
Video to TV: BDMV to Samsung TV | 4K to Samsung 4K TV | AVI to TV | AVI to Panasonic TV | AVI to Samsung TV | AVI to Sharp TV | MKV to Samsung TV | MKV to Vizio TV | MKV to Sony TV | MP4 to Samsung TV |MTS to TV | H.265 to 4K TV
iTunes to TV: iTuness to Samsung TV | iTunes to Sony TV | iTunes to Panasonic TV | iTunes to TV | iTunes to Vizio TV
Ultimate Gudie for Movie Entertainment (Blu-ray, DVD, ISO, iTunes, Video) on TV
Here we have a tutorial for converting any videos to TV supported video formats.
To get videos compatible with Samsung/LG/Sony/Panasonic TV, you need to:
1. Check out our TV supported video formats listed above.
2. Get a video converter for new TV, like Pavtube Video Converter Ultimate.
3. Convert video to TV video formats supported (Load files > Choose Format > Start conversion) and that's all.
Four Ways to Stream converted video Files to TV
First Way: Stream video to TV via USB
There is always a USB port on your TV. All you have to do is to insert the USB in the right port and then play the converted format video on your TV.
Second Way: Stream video to TV via Audio-Visual (AV) Cables
There are several cables that can be used for this purpose such as VGA, HDMI, S-Video and DVI. Your TV has got the compatible ports. Plug those in your TV and PC and play your converted video.
[b]Third Way: Stream video to TV Wireless
Connect your Wi-Fi to your PC and then with the TV without the use of cables. A wireless PC to TV conversion box would be needed to do that. It will help the content from the internet to the PC.
Fourth Way: Play video to TV over DLNA
If you have DLNA server like Plex, Serviio, Twonky, and etc, you can stream media files from PC to TV over DLNA, please check whether your TV is DLNA certified and supported first. (Check and find DLNA-certified products)
Run Windows Media Player on Windows PC and click "Stream" > "Turn on home media streaming". On the "Media streaming options" page, click "Turn on media streaming". If an administrator password or confirmation is required here, please type the administrator password or provide the confirmation. Then Click the video you want to stream to the DLNA-compatible TV, and right-click the selected video to point to "Play to" option for streaming.
Related Software:
BDMagic for Windwos/Mac - The best Blu-ray solution to rip and backup any commercial and region-locked Blu-ray to Samsung/LG/Sony/Panasonic TV.
DVDAid for Windows/Mac - Capacity of ripping copy-protected and homemade DVD to TV for playback with suitable format.
ByteCopy for Windows/Mac - It can rip Blu-ray/DVD to lossless MKV keeping multi-track subtile/audio and all chapter markers.
Pavtube Video Converter Ultimate for Windows/Mac - Function of converting Blu-ray/DVD, 4K/SD/HD video in any format to play on Samsung/LG/Sony/Panasonic TV.
Pavtube ChewTunes- Record, convert both DRM-ed and non-DRM video and music to all popular video/audio formats in order to ensure free playback on TV for better viewing experience.
More Money-saving Tips:
ByteCopy($42) + Video Converter Ultimate($65) = Only $79.9, Save $27.1
Video Converter Ultimate($65) + ChewTune($29) = Only $74.9, Save $19.1
BDMagic($49) + ChewTune($29) = Only $49.9, Save $28.1
……
Hope above solutions can help you. So if you have any troubles in importing, streaming, playing videos and movies on Samsung/LG/Sony/Panasonic TV or portable devices (iPhone/Galaxy/iPad/Android/Galaxy Tab/Surface Pro) orgame consoles (PS3/PSP/Xbox 360/Xbox One) or VR headeset or NAS, even editing videos with NLEs etc, please feel free to contact us by Windows Email/Mac Email)>> or leave a message at Facebook. Wish you a nice day!
Source:http://video-tips.jimdo.com/2016/05/27/play-movies-on-tv/
This article shows you how to convert AVI video files to QuickTime MOV, so that you can play, share, or upload all kinds of AVI files to QuickTime on Mac El Capitan without limitations.Why We often Encounter Problem in Importing AVI to QuickTime?As we all know, AVI (Audio Video Interleaved) is common video file format which might be one of the most used file formats for saving video files online and offline. AVI format has better compatibility with Windows OS X. It can be easily playable on Windows Media Player or Movie Maker. However, to Mac user, AVI file format is their nightmare, only audio exists or even worse, QT just crashes. It is because of their variant codecs.So if your source AVI files can't be accepted by QuickTime Player, it is necessary to convert AVI to QuickTime supported mov format. This article is specially written down to assist you to do the AVI to QuickTime MOV conversion on Mac OS X El Capitan step by step.I know a program that named iMedia converter for Mac, is just the ideal AVI to mov conversion software. It can easily transcode any kind of AVI video to mov for adding AVI to QuickTime for playing. Here is how it works. Here is the review. Preparation: Run Pavtube AVI to QuickTime Converter for Mac El CapitanFree Download and trail: 
 Other Download:- Pavtube old official address: http://www.pavtube.cn/imedia-converter-mac/- Cnet Download: http://download.cnet.com/Pavtube-iMedia-Converter/3000-2194_4-76177788.htmlGood News! To thanks for your continuous support, Pavtube Official Website and Pavtube Facebook are now holding the biggest sale for this Thanksgiving Day, Black Friday Holiday Cyber Monday Crazy Promotion with fantastic 50% off discounts and giveaway. Pay less to get powerful Blu-ray/DVD/Video Converter to build your own home media center on your becoming Christmas!Step 1. Run the program and load your AVI video files into it.
 Step 2. Choose MOV- QuickTime(*.mov) as output. You can easily find it in "Common Video" category.
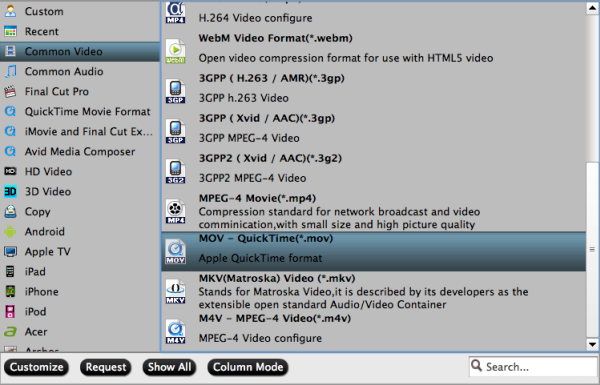 Step 3. Start transcoding AVI to QuickTime mov by clicking on "Convert" button.Of course, the process will take some time, please wait patiently. When it's finished, you can easily import the converted media file into QuickTime for playing.Except help you handling AVI video files, this iMedia converter for Mac can convert Blu-ray, DVD and a wide range of video formats for your tablets or smartphones with optimized presets. Overall, it's really a good helper that worth having.Read More:
Outline: Can't render iPad video in Sony Vegas Pro 13/12/11? Trouble using iPad footage in Vegas Pro? Simply follow this article to find the easy solution.
Sony Vegas Pro makes it easy to import and edit movies, images and music for creating your next video or audio masterpiece. However, it will be a frustrating thing if you have problems of importing video files to Sony Vegas, especially the video files are the so common MP4 files. Many people love to use their iPad (iPad Pro, iPad Mini, iPad Air, iPad 4, etc.) to shoot videos. Before uploading to YouTube or posting them on Facebook, many people like to edit them. But, the audio doesn't import, the video is clunky and choppy. Have the same problems when importing iPad videos to Sony Vegas Pro 10/11/12/13 for editing?
Got some tech support online, I got know, iPad records .MOV videos in H.264 codec. While, Sony Vegas Pro is pretty picky with the codecs of what it'll accept; it doesn't like H.264. To solve the issue, a common practical way is to convert iPad video to Sony Vegas most compatible video like MPEG-2. Follow this simple tutorial to find the reason and the solution to fix the problem.
To make iPad videos compatible with Sony Vegas Pro, here we need a workable video conversion program to convert iPad video files to Sony Vegas Pro edit-friendly formats. Pavtube Video Converter Ultimate is highly recommended to help you achieve your goal smoothly. The program offers an optimized preset for Sony Vegas (Vegas Pro 13 included). You can convert any video to Vegas edit-friendly format while keeping the original video quality. Here is review.
With it, you can convert any video files including MOV, MP4, VOB, AVI, MPG, MPEG, etc. to seamlessly fit Sony Vegas, Windows Movie Maker, Adobe Premiere Pro, Avid Media Composer and more. See below how to do the basic conversion task.
How to convert iPad Video to edit in Sony Vegas Pro 11/12/13
Free download the iPad Video to Sony Vegas Converter:

 Other Download:
- Pavtube old official address: http://www.pavtube.cn/blu-ray-video-converter-ultimate/
- Cnet Download: http://download.cnet.com/Pavtube-Video-Converter-Ultimate/3000-2194_4-75938564.html
Step 1: Load iPad Video files.
Launch the MOV to Sony Vegas Converter, and you may either click "Add Video" button to import iPad .mov files, or directly drag and drop the files into this program.
Note:For Mac users, you can turn to iMedia Converter for Mac, You can convert iPad videos to Sony Vegas Pro 10/11/12/13 on Mac OS X El Capitan.
Other Download:
- Pavtube old official address: http://www.pavtube.cn/blu-ray-video-converter-ultimate/
- Cnet Download: http://download.cnet.com/Pavtube-Video-Converter-Ultimate/3000-2194_4-75938564.html
Step 1: Load iPad Video files.
Launch the MOV to Sony Vegas Converter, and you may either click "Add Video" button to import iPad .mov files, or directly drag and drop the files into this program.
Note:For Mac users, you can turn to iMedia Converter for Mac, You can convert iPad videos to Sony Vegas Pro 10/11/12/13 on Mac OS X El Capitan.
 Step 2: Select Sony Vegas 11/12/13 compatible format
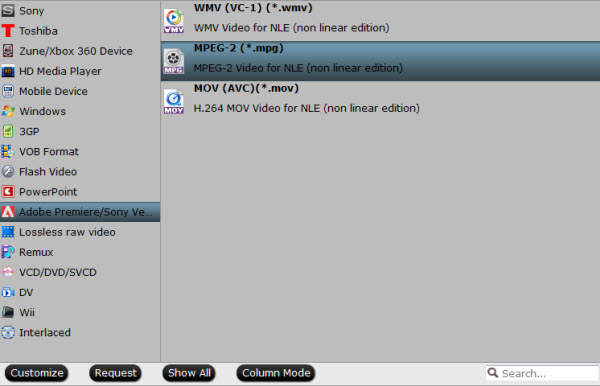
Get the dropdown menu of "Format" and then move your pointer to "Adobe Premiere Pro/Sony Vegas to choose "MPEG-2 (*.mpg) as the output format from the profile list which is the Sony Vegas Pro compatible video format.
Step 2: Select Sony Vegas 11/12/13 compatible format
Get the dropdown menu of "Format" and then move your pointer to "Adobe Premiere Pro/Sony Vegas to choose "MPEG-2 (*.mpg) as the output format from the profile list which is the Sony Vegas Pro compatible video format.
 Tip:You can adjust the video and audio parameters, including the Bitrate of Video & Audio, Video Size, Frame Rate, Audio Channels, etc., by clicking the Settings button on the main interface.
Step 3: Start conversion
Click "Convert" button to convert iPad video to Sony Vegas Pro friendly format, after the conversion is finished, you can access converted files by click "Open".
You're done! Now you can easily open and edit iPad videos in Vegas Pro 13/12/11/10 without problems.
Read More:
Tip:You can adjust the video and audio parameters, including the Bitrate of Video & Audio, Video Size, Frame Rate, Audio Channels, etc., by clicking the Settings button on the main interface.
Step 3: Start conversion
Click "Convert" button to convert iPad video to Sony Vegas Pro friendly format, after the conversion is finished, you can access converted files by click "Open".
You're done! Now you can easily open and edit iPad videos in Vegas Pro 13/12/11/10 without problems.
Read More:
Question:
“I want to make video clips using my personal DVD then upload to Youtube. But when I imported DVD to Windows Movie Maker, Movie Maker didn't recognize the DVD. Any idea?”
Best Solution
Windows Movie Maker is software that comes with the Windows operating system which allows users to make their own movies and burn them on DVDs. Sometimes users may run into issues where the DVDs created through Windows Movie Maker cannot be played on a regular DVD player. To rectify this problem, the user must ensure they choose the right DVD ripping tool - Pavtube DVDAid is the highly recommended tool and this guide will help you rectify your “DVD to Windows Movie Maker” problems.
Supported audio/video/picture formats supported by Windows Movie Maker:
- Supported audio format: *.wav, *.snd, *.au, *.aif, *.aifc, *.aiff
- Supported video format: *.asf, *.avi, *.wmv
- Supported picture format: *.jpg, *.bmp, *.gif, etc.
To do that, you have to convert DVD to Windows Movie Maker compatible format like WMV before importing. Have a try of the best DVD to Windows Movie Maker converter - an easy-to-use yet professional utility. It supports creating high quality WMV video from DVD files for your Windows Movie Maker. Besides, it comes with all regular video editing tools like Trim, Crop, Effect, Subtitle, Watermark. For basic video editing tasks, you can even replace your Windows Movie Maker with it. Read the review.
The process of DVD to Windows Movie Maker conversion is straightforward. Pop in your disc, choose WMV as the output format, and click Convert to start the conversion. Below is the detailed guide on converting DVD to WMV for Windows Movie Maker.
Free Download this Top DVD to Windows Movie Maker Ripper:
Other Download:
- Pavtube old official address: http://www.pavtube.cn/dvd_ripper/
- Cnet Download: http://download.cnet.com/Pavtube-DVDAid/3000-7970_4-76158510.html
Best Workaround- Please follow the steps as below.
Step 1. Load DVD movie
After running Pavtube DVDAid, click “File” > “Load from disc” to import your DVD movie. DVD folders/IFO files/ISO Image files stored on our computer’s hard disc drive are also allowed as converted objects.
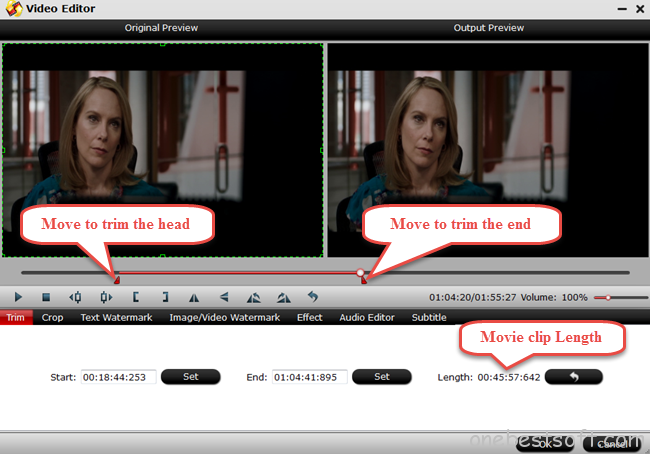
 Step 2. Trim DVD movie clips
Click the Pencil icon on top of the main interface to switch to the editing interface where you’re allowed to trim DVD movies clips. Under the trimming menu bar, you’re allowed to set the start time and end time for your favorite movie clip. There are 2 red movable triangles right located at the movie head and end respectively below the original preview and output preview window. You can move the triangle at the movie head to your target point as the start of your clip and move the triangle at the movie end to your target point as the end of you movie clip.
In addition to trimming, Pavtube DVDAid also supports other editing functions such as cropping black bars, adding text/image/video watermark, editing movie audio and embedding subtitles, etc.
Step 2. Trim DVD movie clips
Click the Pencil icon on top of the main interface to switch to the editing interface where you’re allowed to trim DVD movies clips. Under the trimming menu bar, you’re allowed to set the start time and end time for your favorite movie clip. There are 2 red movable triangles right located at the movie head and end respectively below the original preview and output preview window. You can move the triangle at the movie head to your target point as the start of your clip and move the triangle at the movie end to your target point as the end of you movie clip.
In addition to trimming, Pavtube DVDAid also supports other editing functions such as cropping black bars, adding text/image/video watermark, editing movie audio and embedding subtitles, etc.
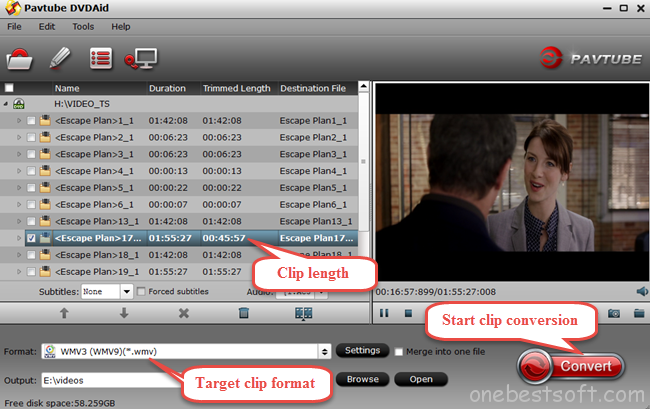
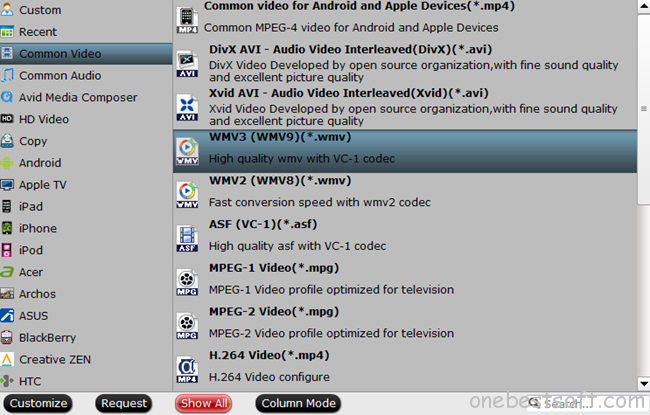
 Step 3. Choose output movie clip format
After getting your favorite DVD movie clip trimmed, go back to the main interface to choose the output video format compatible with Windows Movie Maker. Here we need to click the format bar to choose “common video” > “WMV3(WMV9) (*.wmv)” as your target clip format. If you want your movie clips played on your other devices, have a try of other formats for Partube DVDAid possesses a library of various possible formats.
Step 3. Choose output movie clip format
After getting your favorite DVD movie clip trimmed, go back to the main interface to choose the output video format compatible with Windows Movie Maker. Here we need to click the format bar to choose “common video” > “WMV3(WMV9) (*.wmv)” as your target clip format. If you want your movie clips played on your other devices, have a try of other formats for Partube DVDAid possesses a library of various possible formats.
 Step 4. Start DVD clip to WMV conversion
Click the big red button “Convert” after finishing trimming your DVD movie clip and selecting its proper output format.
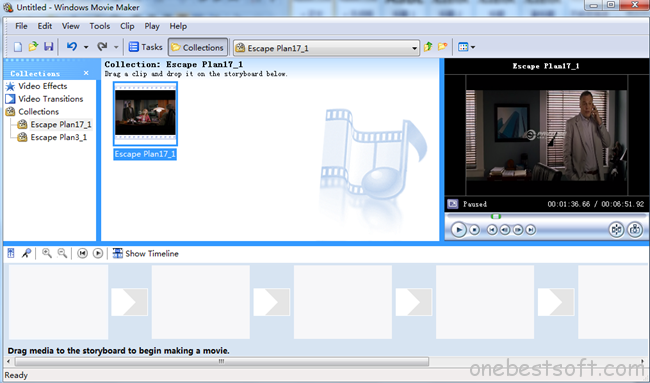
Step 5. Import DVD movie clip to Windows Movie Maker
After getting your DVD movie clip trimmed and converted, run Windows Movie Maker, and click “Import video” to import your movie clip to Windows Movie Maker where you can make your personal movie by adding videos, photos, audio or music.
Step 4. Start DVD clip to WMV conversion
Click the big red button “Convert” after finishing trimming your DVD movie clip and selecting its proper output format.
Step 5. Import DVD movie clip to Windows Movie Maker
After getting your DVD movie clip trimmed and converted, run Windows Movie Maker, and click “Import video” to import your movie clip to Windows Movie Maker where you can make your personal movie by adding videos, photos, audio or music.
 Never had a director dream come true? With Pavtube DVDAid performing its format converting and clip trimming function, and Windows Movie Maker performing its combining and editing function, what are you afraid of? It’s no wonder that there will be a new movie studio rising in the near future.
Wanna make your career brighter? Here I want to deliver my humble advice that you can burn your video clip combinations to DVDs to expand your business. Hope this will help you. And you can get Pavtube DVDAid and DVD Creator with almost half price! Please go to www.multipelife.com/special-offer to find your favorite promotion information.
Read More:
Never had a director dream come true? With Pavtube DVDAid performing its format converting and clip trimming function, and Windows Movie Maker performing its combining and editing function, what are you afraid of? It’s no wonder that there will be a new movie studio rising in the near future.
Wanna make your career brighter? Here I want to deliver my humble advice that you can burn your video clip combinations to DVDs to expand your business. Hope this will help you. And you can get Pavtube DVDAid and DVD Creator with almost half price! Please go to www.multipelife.com/special-offer to find your favorite promotion information.
Read More:
If you have many gorgeous Blu-rays and want to watch them on HDTV, Xbox One or PS4, etc., easily and conveniently, you might be eager to convert Blu-ray to MPEG files and import them to these devices for enjoyment.Look for a solution to convert Blu-ray to MPEG for free? Pavtube Blu-ray to MPEG Converter assists you freely rip and convert any Blu-ray includes copy protected Blu-ray movies to MPEG format. Video Tips about MPEG: MPG/MPEG to Surface | MPEG-4 to Prores 422 | DVD to MPEG Converter Review | VIDEO_TS to MPEG | About MPEG Converter FAQDo you have some movies & Blu-ray Discs that you want to:a. Rip Blu-ray to MPEG files so you can edit DVD with Windows Movie Maker?b. Convert Blu-ray to MPEG 2 videos that have no copy protection on them?c. Encode Blu-ray to MPEG 4 to watch movie on your mp4 players like iPod, iPhone, PSP, etc?If you want to convert a Blu-ray movie into a MPEG format file, you need some preparation work:1. A Blu-ray drive, internal or external. Blu-ray discs are different from traditional DVD discs and can't be read by DVD drive, so you have to check your computer drive first.2. Anywhere from 30 to 60 GB of hard disk space, depending on what you're ripping. Blu-Rays are big, and we're going to rip the whole thing to our drive first, so depending on the movie you're ripping and the quality you want in your final movie file, you'll need a good amount of space. An external hard drive will work just fine if you have one and don't have the space on your PC.Blu-ray ripping software for Windows 10. We combed through the options to pull together the simplest, working method using the best program- Pavtube BDMagic. In fact, it's easy to convert Blu-ray files to MPEG as long as you got a Blu-ray Ripper in hand. As one of the best Blu-ray ripping programs, Overall, it can help you remove Blu ray AACS encryption, region codes and BD+ copy protection, and convert Blu-ray to any format you want. So with the Blu-ray to MPEG converter, you can convert Blu-ray to MPEG (MPEG-1, MPEG-2 and MPEG-4) easily on Windows 10 with high quality. Plus, this program also allows you convert or rip Blu-ray to other popular video formats such as MP4, MKV, MOV, VOB, AVI, FLV, XviD, etc to meet your needs. Read the review. What's more, this Blu-ray ripping tool also enables you to adjust the final output image size, select desired language from the source Blu-ray disc, select their needed titles and so on. If you are running on Mac OS X El Capitan, please turn to its equivalent Mac version Blu-ray to MPEG Converter Mac.Free Download this Top Blu-ray to MPEG Converter: Other Download:- Pavtube old official address: http://www.pavtube.cn/blu-ray-ripper/- Cnet Download: http://download.cnet.com/Pavtube-BDMagic/3000-7970_4-75922877.htmlHow to convert Blu-ray to MPEG-1/MPEG-2/MPEG-4 videos With Zero Quality LossStep 1: Load Blu-ray Movies Insert your Blu-ray disc to the Blu-ray Disc drive, then launch the recommended software and click the “Load Disc” button to have the Blu-ray content imported. It can also support DVD importing. 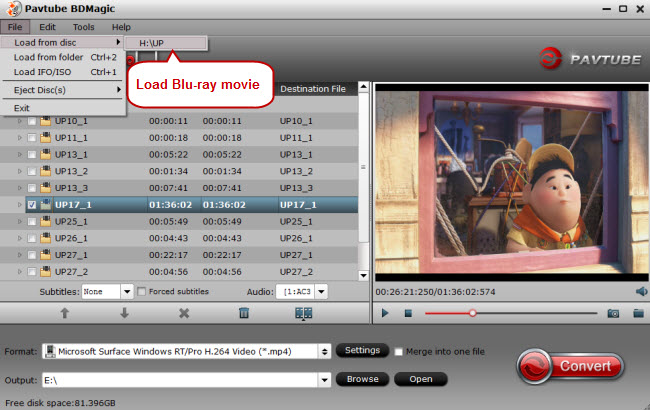 Tip: You can choose disc or file source and ripped files destination. On the right box, you can preview the movie you load. You are also allowed to choose preferred subtitles and audio track.Step 2. Choose output formatTo convert Blu-ray to MPEG-2, choose the MPEG as output format. Click Format bar and MPEG-1, MPEG-2, MPEG-4 are provided for you in Common Video profile list.
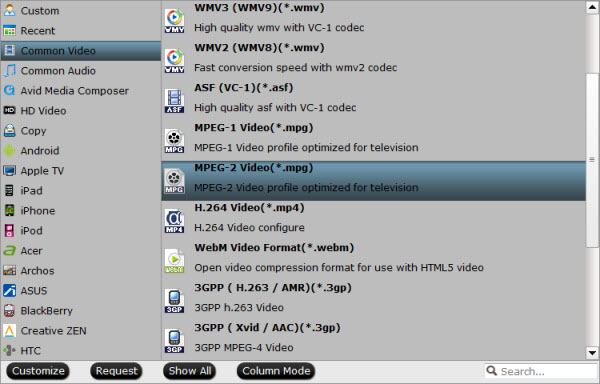 Tip: After selecting output format, click the Settings button to adjust video codec, audio codec, bitrate, video size, frame rate, audio channel, and other parameters if needed.
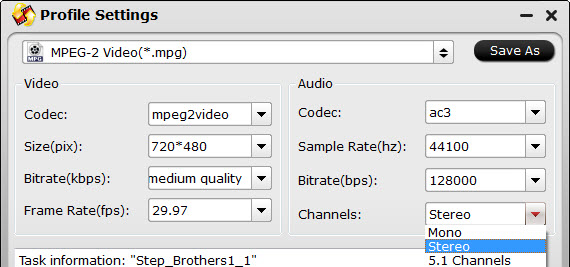 Step 3. Start Blu-ray to MPEG conversionAfter all settings, click on "Convert" button and the Blu-Ray to MPEG Converter will start ripping Blu-ray to MPEG on Windows 10. The conversion process will take a while, and you'll see an encoding progress bar.After the conversion, get the MPEG outputs to play on your PC or stream to kinds of media devices for playback at ease. Read More:
TiVos are great for time-shifting TV shows, but can place-shift them as well! Sometimes you may want to transfer the TiVo recordings to computer, send them to your iPod, PSP, iPad or archive them to DVD, build up your video library. Let's say you've recorded many TV shows with TiVo and want to convert them to AVI format for uploading to PSP, BlackBerry or embedding in PowerPoint. This article will quickly walk you through how to convert TV shows off TiVo and converting them to AVI videos without audio/video sync issues when playing them on my devices. Hot Search: Blu-ray to TiVo | TiVo Files to WMP | TiVo to Android | H.265 to TiVoAs we know, TiVo is a popular home setup box for recording favorite TV drama programs and movies for later playback. And you can transfer the TV recordings to your personal computer by using the TiVo Desktop Software application. To use TiVo recordings anywhere you like, it’s necessary to change TiVo files to a more common video like AVI. Pavtube Customer review: “I found a reference to Pavtube on the Tivo forums. I ordered Pavtube to convert Tivo files to Avi. Files converted by the Tivo desktop application were having audio/video sync issues when playing them on my devices. Pavtube avi files do not have this problem. What’s more? I use Pavtube converted videos on my Samsung Galaxy Note 4. Sometimes on my Samsung Galaxy Note 10.1 tablet.” Learn >> Why Choose Pavtube. Here, the TiVo to AVI Converter from Pavtube Studio is a trustworthy program to fulfill this conversion. With it, you can easily convert TiVo to any format like MKV, AVI, WMV, MOV, MPG, M4V, MP4, etc with least quality loss. Besides TiVo, this video convert program can also help to convert between any popular video and audio formats as you need. You could get wonderful output files and never worry about out of audio/video sync. Plus, with the built-in video editing feature of the program, you can trim, crop, add watermark and more to your video files. If you are running on Mac, please turn to its equivalent Mac version TiVo to AVI Video Converter Mac. Part 1: Transfer TV shows from TiVo to PC Launch TiVo Desktop software on your PC. Connect TiVo to your home network, and then the TiVo Desktop will provide you with a list of shows for transferring to your PC. Then please transfer the TiVo TV shows you want to PC. Once all the shows you selected have been downloaded from your TiVo, they will appear in the Now Playing list in TiVo Desktop. Part 2: Only 3 Clicks - How to encode TiVo files to AVI without losing qualityFree Download this top Tivo Video Converter for Windows or Mac:

 Step 1: Add TiVo files to the program. Launch the Top Tivo Video Converter, click on the 'Option' button on the main interface, input your 'Tivo Media Access Key' to let your files in.
  Tip: How to find your Tivo Media Access key? Just go to the 'Tivo Cetral 'menu>>'Message and Set up' Account and system information', your Media Access Key would be there.
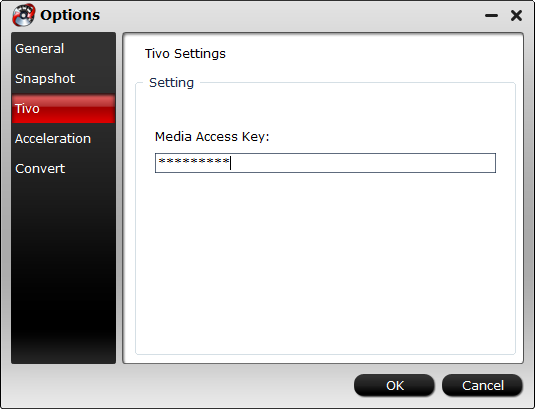 Step 2. Click the Format option. Choose AVI from the Video format list. If you prefer high definition video, you can choose HD AVI from the HD video format list.
 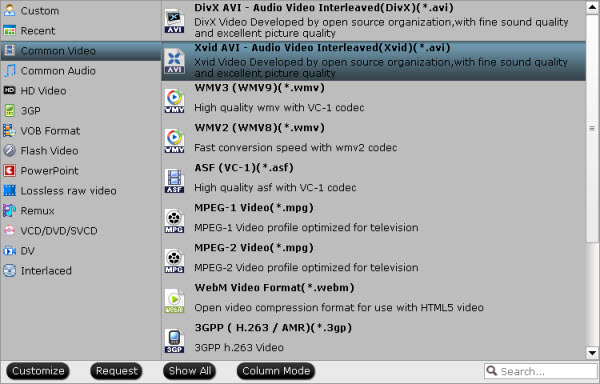 Step 3. You can also click "Settings" to customize video size, bitrate(quality), frame rate and other settings. While my original .TiVo files are 1920x1080, I convert them to 1280x720 to save room. Pls note that the higher bitrate you choose, the better video quality you will get. Step 4. Click the big red "Convert" to start converting Tivo files to AVI on Windows. After the Tivo to AVI conversion, click "Open" to locate the converted video and start enjoying the downloaded wonderful TV shows without ads or device limitation or uploading the AVI file to Android, instead of Tivo DeskTop or Any Portable device for watching! Read More: