Tuesday, July 19, 2016

Convert MKV to 3D MP4 for Playing on HTC Vive

HTC Vive offers a flat-out amazing virtual reality experience with sharp visuals, great motion controls and full-room sensing to walk around in virtual space. Vive hardware can help indicate where your walls are, and an in-helmet camera can be used to see your space with the headset on. A design decision that instantly makes it feel more immersive. It creates a Star Trek holodeck-like space in your room to virtually walk around in. The headset itself packs in a pair of OLED displays with 2,160 x 1,200 pixels of total resolution. 

If you are going for a mobile based VR headset I would suggest HTC Vive. It’s cheaper,but its optics are definitely better. However, if you have other videos like MKV, is it possible to put them into Android/iPhone handsets to watch MKV files on HTC Vive? 

Actually, on HTC Vive related forums many users have need to backup MKV Movies to computer and then watch 3D Movies with HTC Vive through your devices. So, you can’t deny that there is a possibility that your MKV movies are not supported by HTC Vive. And in view of the course of 3D effect, what you need is to take advantage of a third-party program to help you convert MKV to 3D SBS MOV/MP4 videos, so that you can smoothly play them on HTC Vive through your iPhone/Android handsets. 

Editor Notes: “ In fact, I've used Handbrake to convert the MKV files I have that do not work. It will repackage them in MKVs using different codecs for HTC Vive playback. Handbrake supports encoding of several audio tracks, and the audio quality is also quite favorable. But sometimes the output audio maybe a little bit low and it is uncomfortable when you on trip or in crowding space without sound amplifier built in. Worse still, it only supports converting MKV to MP4 or M4V, not into 3D format. In this case, a Handbrake alternative for Windows users is needed. “ 

Here Pavtube Video Converter Ultimate is the best one I've found ever, this app not only can convert MKV to 3D MP4/MOV for HTC Vive, but also enables you to adjust video resolution to 720p which is best for watching in HTC Vive. Meanwhile, the video converter also allows you to convert MKV to a decent 2D format for playback on Apple TV 4, PS4, Xbox 360, Xbox One, Android, iPhone, etc. as you want. What's more, with the built-in editor, you can trim, crop, adjust special effect to your mkv video, so that you get the very part and effects at your will. If you are Mac users, you can turn to mac version. Here is the review

Top 3D MKV Video Converter for HTC Vive- What to Look For 

* A professional 3D video converter can helps you re-encode any 2D/3D movie files to HTC Vive or other VR Headsets (VR Box included) more compatible 3D formats without additional codec installed. It should be a powerful FLV, MKV, AVI, MP4, VOB, M2TS, MTS, WMV, MPEG, 3D YouTube, 3D YIFY, 3D Netflix, ISO, 2D/3D Blu-ray, DVD to HTC Vive converter. 

* The best 3D Video Converter software allows you to make video files accepted by HTC Vive or other any VR Headsets like Gear VRZeiss VR OneOculus RiftANTVR Kit VR Headset etc. with ease. 

* The outstanding 3D Video Converter app enables you to adjust video resolution to 720p and even control the depth of 3D which is best for watching in HTC Vive. 

* Meanwhile, multifunctional program can offer you the output video format with the optimized presetting for your phones and tablets like Android, iPhone, Samsung, Lenovo, Sony, Nexus etc. as you want. 

* Apart from 3D video conversion, it can owns some small video editing features like trimming video to several video segments, cropping unwanted areas, merging multiple videos into a new one, adding watermark/subtitles to 2D/3D video sources and more. 

Free Download Top 3D Video Converter for HTC Vive: 


Other Download: 

– Pavtube old official address: http://www.pavtube.cn/blu-ray-video-converter-ultimate/ 
– Cnet Download: http://download.cnet.com/Pavtube-Video-Converter-Ultimate/3000-2194_4-75938564.html 

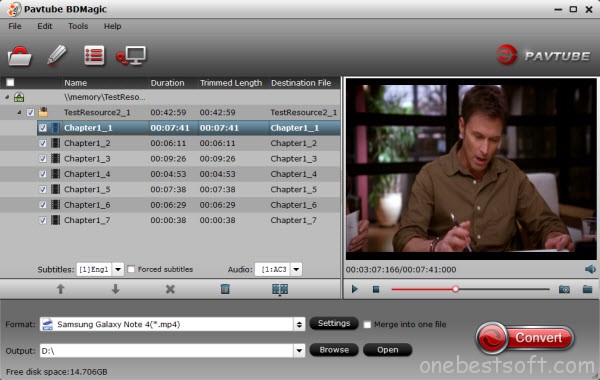
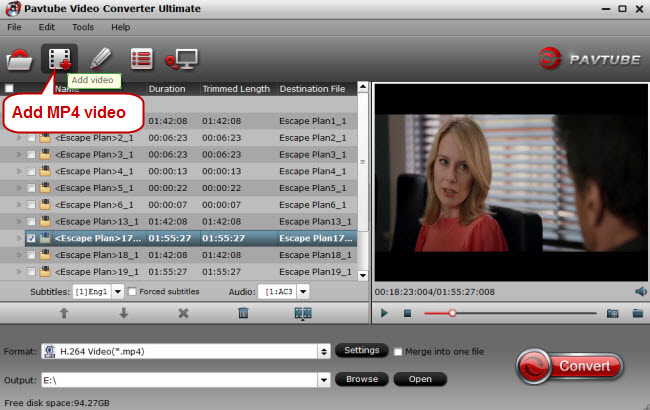
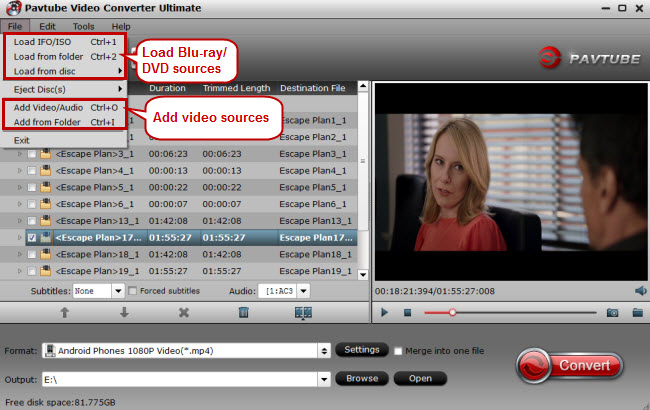
Step 1: Add MKV movies 

Launch the video converter for HTC Vive, and click "Add video" button to import your source materials MKV files. Batch conversion is supported so that you can add multiple files for conversion at a time. 


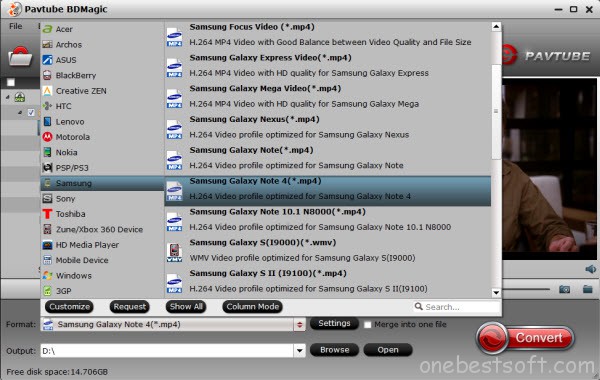
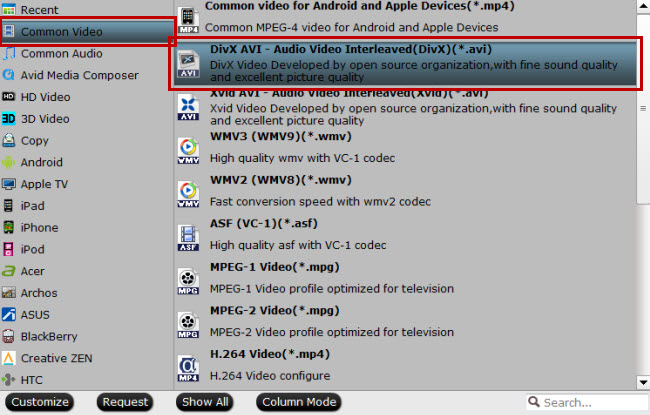
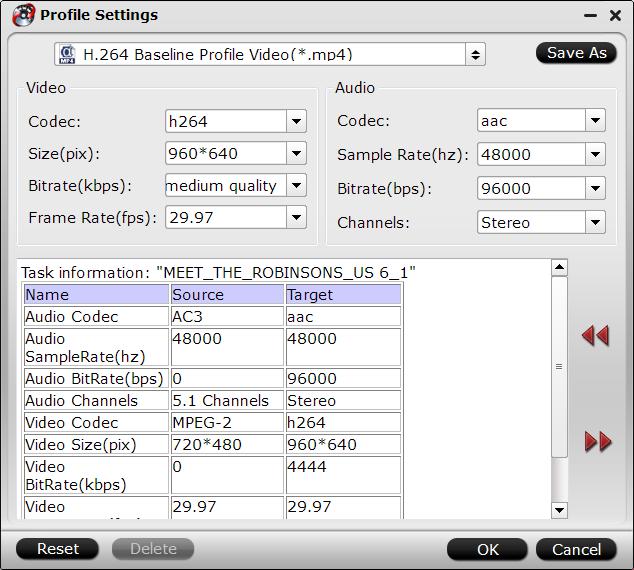
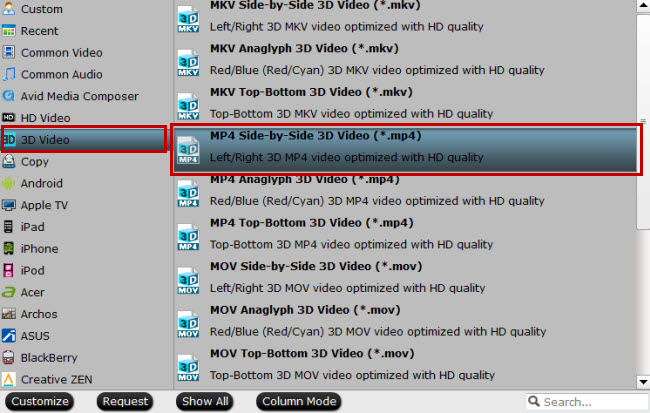
Step 2. Select output profile format. 

Tap on Format bane and open profile list. Find and choose the optimized video format for HTC Vive. 


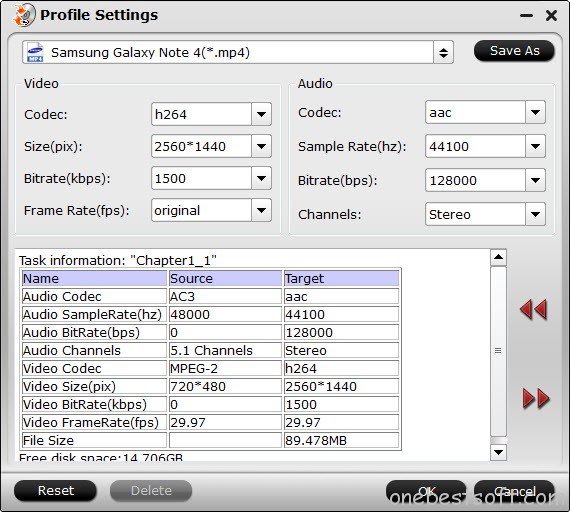
Note: Although there is a profile created by the application, we can always change some parameters of resolution, compression, audio, etc. An important issue that you must consider that in Samsung Gear VR resolution for each eye is not FullHD but half the QHD screen. So you can free change your target video size, bitrate, frame rate and 3D depth in “Settings”. If you want to get best video quality, pls switch them to “original”. 3D movies should be encoded “full side-by-side” with a 1:1 pixel aspect ratio. Content mastered at 1920X1080 compressed side–by–side 3D should be resampled to 1920X540 resolution full side–by–side resolution (Learn more) The developer edition has a stated resolution of 1080x1200px, split across both eyes. It’s also sporting a 90Hz refresh rate. Both specs are generally on par which what we’d expect at this stage in the device’s development>. 

Step 3. Start conversion. 

Click “Convert” button and start 3D movie compatible MP4/MKV format video conversion. After conversion, you can get the converted files by clicking “Open” button. Then you can watching them by HTC Vive. 

Much wonderful software bundled with Video Converter Ultimate will provide you more amazing experience in converting videos. Go to Money Saving Software Bundles to get special offer for more software, such as ByteCopy + Video Converter Ultimate = Only $79.9, Save $27.1, Video Converter Ultimate($65) + ChewTune($29) = Only $74.9, Save $19.1 and so on. 

Read More: 

Monday, July 18, 2016

Rip Blu-ray/DVD to Galaxy Note 7 for Viewing

Specifications about Samsung Galaxy Note 7 

Samsung has already confirmed the Galaxy Note 7 release date for August 2. The phone’s specs are still up for debate, but some of the more likely features include: a 5.7-inch QHD Super AMOLED display, 64GB storage, a 12-megapixel DualPixel camera, and a waterproof body. If you have one of this great smartphone, you may want to make full use of Samsung devices to watching Blu-ray and DVD movies for HD Enjoyment experience. Now, we will guide you to convert Blu-ray/DVD to Galaxy Note 7 friendly video formats within a few clicks. 

Wanna Play Blu-ray/DVD Movies on Galaxy Note 7? 

However, the problems is that Can Galaxy Note 7 play Blu-ray and DVD movies for watching on the go? As we know, most latest Blu-ray/DVD movies that we purchased are all copy protected, so, we cannot copy movies from Blu-ray disc to Galaxy Note 7 directly,and we can get higher quality/definition movies from Blu-ray/DVD disc, in this case more and more people buy Blu-ray/DVD discs for playing, if we can transfer movies from Blu-ray/DVD to Galaxy Note 7, we can enjoy high quality Blu-ray/DVD movies on Galaxy Note 7, on the Galaxy Note 7 related forums there are a few of users have this kind of need, but it is not so easy to get Blu-ray/DVD to Galaxy Note 7. 

Best Blu-ray/DVD ripper software for Galaxy Note 7 

How can we get Blu-ray to Galaxy Note 7 and play freely? What we need is Blu-ray ripper software. Here, Pavtube BDMagic brings a perfect solution to rip and convert any blockbusters on Blu-ray/DVD: Batman v Superman: Dawn of Justice DVD, Person of Interest: The Complete Fifth Season DVD, Underdogs DVD, A Perfect Day DVD, etc. to Galaxy Note 7 playable formats with original quality kept in a few clicks. The sticking point is that this tool allows Samsung followers to rip Blu-ray/DVD to Galaxy Note 7/6/5/4/3, convert Blu-ray/DVD to Galaxy S7/S6 Edge+/S6 Edge/S6/S5 and other Samsung gadgets Including, but not limited to Samsung Galaxy TabNote, S-series. effortlessly with intact quality. This program is especially designed for Windows users (Windows 10 and 8.1/8 included). 

Note: If you're a Mac user, pls get Pavtube BDMagic for Mac. Then follow the steps below to rip Blu-ray/DVD to Galaxy Note 7 playable videos in a few clicks! The below guide takes Pavtube BDMagic for Windows screenshots for example. 

Doubtful? You will not if you check this tip out: 

NOTE: you need to get an external Blu-ray drive to make your Windows/Mac recognize Blu-rays.Best solution of ripping and transferring Blu-ray/DVD movies to play on Galaxy Note 7 when travelling: 

1 -> Download and install Blu-ray/DVD to Galaxy Note 7 Converter; Load disc to it; 


Other Download: 

- Pavtube old official address: http://www.pavtube.cn/blu-ray-ripper/ 

- Cnet Download: http://download.cnet.com/Pavtube-BDMagic/3000-7970_4-75922877.html 

Click the disc and folder icon to import your Blu-ray/DVD files. Pavtube BDMagic, as the Blu-ray/DVD to Galaxy Note 7 Converter, will detect the real main title and check it by efault.You can select a subtitle language and then check Forced subtitles to output a video with only subtitles in the foreign language part. 


2 -> Choose MP4 as target format; 

Click on “Format” to open the profile list, and then choose “Samsung -> Samsung Galaxy Note 4(*.mp4)” as the output format. 


Note: For Galaxy Note 7, you’ll be working with the ability to play many types of video: MP4/DivX/XviD/WMV/H.264. You’ll be able to play many types of audio: MP3/WAV/eAAC+/AC3/FLAC. 

Tip: You can customize video settings by clicking “Settings” to enter the Profile Settings window, and free choose bitrate, frame rate and sample rate here all at your needs. 


3 -> Start ripping Blu-ray/DVD to Galaxy Note 7 MP4. 

Click the big red “Convert” icon to start converting your Blu-ray/DVD to H.264 MP4 for watching on Galaxy Note 7. After the conversion, click “Open output folder” to quick locate the converted videos. 

How to transfer movie files to Galaxy Note 7? 

If you have no idea about Galaxy Note 7 file transfer, you can check out the post multiple ways transferring videos to Galaxy Note 7 for reference. 

In this way, you can enjoy your precious Blu-ray/DVD movies on Samsung Galaxy Note 6 when travelling. What’s more, if you have DVD ISO/IFO movies, you can also get them playable on your Galaxy Note 7. 

Not a Galaxy Note 7 user? This Blu-ray/DVD ripping tool can also convert Blu-ray/DVD to various popular video formats like AVI, MP4, WMV, MPEG, MOV, FLV, MKV, 3GP, etc. as well as rip Blu-ray/DVD to optimized video for playback on iPad Mini 4/3, iPad Air 3, iPod touch 6, iPhone 6S/6S Plus, Nexus 5X/6P, Amazon Kindle Fires, Galaxy S7/S7 Edge, Galaxy S6/S6 Edge/S6 Edge +, Microsoft Surface Pro 4/3, Surface Hub, Xbox One, Roku and other devices. 


2016 Top 4 Blu-ray to Samsung Galaxy Converter Comparison


Software Compare


Pavtube ByteCopy (Win/Mac)


Pavtube BDMagic (Win/Mac)


Leawo Blu-ray Ripper (Win/Mac)


4Videosoft Blu-ray Ripper (Win/Mac)


Supported Source


Blu-ray Discs


Blu-ray Folder


Blu-ray ISO Image File


Output Formats


SD MP4/MOV/M4V


HD MP4/MOV/M4V


Galaxy Optimized Preset


Lossless MKV


-


-


-


Encode MP4/MOV: with multi-audio track


-


-


-
MP3, AAC, FLAC,OGG


WAV, M4A, DTS,


Other Functions


Bypass Copy Encryption


-


Add SRT subtitle.


Adjust Aspect Ratio


Adjust Frame Rate


Adjust Resolution


Adjust Bitrate


Merge & Split Video


Trim & Crop Video


Add Watermark


Extract SRT Subtitle


-


-


-

Enter Blu-ray to Samsung Galaxy converter software. These applications scan your Blu-ray movies, rip their contents from the disc and convert them into a format that can be played on Samsung Galaxy 3/2/1. The best converter software also prepares files that are playable on your other devices such as iPad Air 3, iPad Pro 9.7/12.9, PS3, PS4, Xbox One, Xbox 360, FCP X/6/7, iMovie and more. 

We’ve rated and ranked all of the best Blu-ray to Samsung Galaxy converter software available on the market today. At the end of our analysis Pavtube ByteCopy and Pavtube BDMagic claimed the top spots on our side-by-side comparison chart. We’ve also created informative article about 2016 Top 5 DVD to Cell Phone Converter Reviews for your perusal. 


Read More: 

Friday, July 15, 2016

How to Add Subtitles to MP4 Videos Movies on PC/Mac

Subtitles are always shown as the text word of the dialogue or commentary in movies, TV programs, video games, music videos, etc. Most subtitles consist purely of text characters since text is surely the simplest data to be stored and compressed. If you’re going to create a slideshow or greeting card video, you’ll probably want to include captions or titles that let you comment on what the viewer is seeing, in addition to images, videos, and music. 

Here, a step-by-step guide on how to add subtitles to MP4, including two methods about get downloaded the right subtitles for your MP4 videos as well as how to add various external subtitles to MP4 like add SRT to MP4. 

Part One: Adding Subtitles to MP4 Video from eHow 

Those with MP4 files that are without subtitles may want to add them, and to do so requires following a specific process. Download MP4Box and Yamb, and extract them from their zip files onto your PC. For ease of use, make sure they're in the same folder. The links for both programs are included below in the Resources section. 

Run Yamb from its folder, and click on the Settings Icon. Double click on the "Advanced Settings for Yamb" entry. 

Type in the file path to the MP4Box program in the Location box. For example, if it was saved directly on the C drive, it would be "C:/mp4box.exe." Then click on Next. 

Click on the Creation icon from Yamb's main menu. Double click on the entry "Click to create an MP4 file." 

Click on the Add button and locate the MP4 file that you wish to subtitle. Add the file to the MP4 File Creation window. 

Click on the Add button again, and locate the SRT subtitle file that will be added to the video. 

Change the output file's name to make a separate MP4 file, unless you wish to overwrite the original MP4 video. 

Click on Next, and wait for Yamb to process the file. The time required will vary based on the video's length and file size. 

When the file finishes, click "Finish" to close Yamb, or click "Back" if you have any other videos to add subtitles to. 
Source:http://www.ehow.com/how_6867828_add-subtitles-mp4-files.html 

Part Two: Easily Add Subtitles to MP4 Videos Movies with Best MP4 Subtitle Adder 

After you have downloaded the subtitles, you may wonder how to embed and attach the downloaded subtitle to MP4 movies. Not to worry! Below will describe a detailed guide on how to add subtitles to MP4. Pavtube Video Converter Ultimate is the top choice for adding subtitles to MP4 files. Before merging your preferred external subtitles to MP4 videos, we'd like to provide some basic knowledge of this powerful MP4 subtitles merger to help you learn what it can exactly do for you. Here is review

Key Features of MP4 Subtitle Adder 

* Add subtitles to MP4 like add SRT to MP4, add SSA to MP4, add SUB and IDX to MP4 and more; 
* Add subtitles to MP4 as well as keep the original video format or change MP4 to MOV, AVI, WMV, MKV, FLV, ASF, WebM, 3GP, etc; 
* Also can attach subtitles to almost all kinds of video clips like MOV, AVI, WMV, MKV, FLV, ASF, AVHCD, MOD, MTS, MXF, WebM, SWF and more; 
* Besides embed subtitles to MP4, it also supports editing videos in many options: trim, crop, merge, split, add effect/watermark, adjust volume/bitrate/channel, etc; 
* Add SRT to MP4 on Mac OS X v10.5 (Leopard), 10.6 (Snow Leopard),10.7 (Lion), 10.8 (Mountain Lion), 10.9 (Mavericks), 10.10 (Yosemite), 10.11 (El Capitan); 
* Add SRT to MP4 on Windows 10, Windows 8.1, Windows 8, Windows 7, Windows Vista, Windows XP, and Windows 2000. 

Free Download and trail: 


Other Download: 

- Pavtube old official address: http://www.pavtube.cn/blu-ray-video-converter-ultimate/ 
- Cnet Download: http://download.cnet.com/Pavtube-Video-Converter-Ultimate/3000-2194_4-75938564.html 

Follow the step guide on >> Add SRT/ASS/SSA Subtitles to MP4 Video

Add Subtitles to MP4 - Where to Find and Download Subtitles for the MP4 Videos/Movies 

Before adding subtitles to MP4 videos movies, we will firstly provide you some information about where and how to download wanted movies subtitles. 

Normally you have two methods to download desired subtitles: One is download movie subtitles from subtitle downloading sites which provide numerous subtitles in different languages, such as Moviesubtitles.org, OpenSubtitles.org, Subscene.com, etc; The other is to download subtitles for MP4 via a subtitle downloader app like Sublight. 

>> More about how to free download subtitles for MP4 movies. 

Read More: 

Wednesday, July 13, 2016

How to Add/Import Movie Subtitles to DVD Video

If you are seeking for a solution of how to add/import movie subtitles to DVD video or remove internal subtitles while ripping DVDs? There are many occasions when you want to add subtitles to DVD movies. Sometimes, even native speakers want to add subtitles to DVD movies or TV shows just so that they can more clearly understand what the actors are saying. Or, the DVD movie you download has a foreign language subtitle or even no subtitle. To better understand the actors, it's necessary to add some subtitles to the videos. 

What you need to add subtitles to DVD 

Generally speaking, to add subtitles to DVD movies, there are 4 steps: 

1. Copy the DVD movies to your computer's hard drive. That means if your DVD movies are copy protected, you need a DVD ripper to rip them to your computer's hard drive. 
2.Download the subtitles you need from the Internet. There are many free subtitle download sites such as Opensubtitle. You can refer to Top 5 Websites to Download Subtitles for Movies
3.Add the downloaded subtitles to DVD using some subtitle adding software. 
4. Burn the movies with subtitles to DVD disc. After adding subtitles to the movies, you can then use a DVD creator to burn the movie to DVD disc. 

Below are two easy ways to add subtitles to DVD movies or TV shows. 

Method One: Add the Subtitles During the DVD Playback 

If you just want to add subtitle during the DVD playback, subtitle players like VLC can help. It natively supports subtitle overlay. When you are watching a DVD movie or video, simply go to Video/Subtitle Track/Load File to add subtitles to DVD/video. 


Method Two: How to use Pavtube Video Converter Ultimate to add subtitles to DVD Movies 

Fortunately, you can do all with one tool - Pavtube Video Converter Ultimate, an all-in-one DVD ripper and is capable of adding subtitles to DVD movies. It can rip any DVDs to mainstream video formats (MP4, AVI, WMV, MOV, MPEG etc.) and popular devices (iPhone 6s/6s Plus, iPad Air 3/Mini 4, Samsung Note/S series, Google Nexus series, Sony PlayStation, Xbox etc.) It is leading DVD ripper enabling to with customized subtitles, including DVD video internal subtitles, forced subtitles or external SRT subtitles. Here is review

Then, let's follow the movie subtitles guide to learn how to add/import DVD Movie subtitles for enjoying foreign language movies without hassle. 

Free Download and trail: 


Other Download: 

- Pavtube old official address: http://www.pavtube.cn/blu-ray-video-converter-ultimate/ 
- Cnet Download: http://download.cnet.com/Pavtube-Video-Converter-Ultimate/3000-2194_4-75938564.html 

Step 1: Import DVD movie files to the program. 

From "File" menu drop-down option, select "Load from disc" to add DVD disc to the program. Click disc button or “Add Video” button to import the video files which you want to add subtitles to. 


Step 2: Select output file format. 

Most DVD movies are commercial with copy protection, before adding subtitles to them, you will first need to rip the DVD to a common file format. You can choose one of your desired formats from "Format" drop-down" list. 


Step 3: Add subtitles to DVD movies. 

Open "Video Editor" window, click the "Subtitle" bar and check "Enable", then you will be able to browse and add subtitles that you have saved on local computer to the DVD movies. 


Step 4: Start DVD movie subtitle adding process. 

Press the "Convert" button in the right-bottom and the conversion process will start automatically. 

When the conversion is over, click "Open output folder" to find the movies with subtitle files, if you want to burn the generated files to DVD disc, you can use our DVD Creator program. 

Note: If you are mac users, turn to iMedia Converter for Mac is much cheaper in Summer Holiday Coupon Page. It supports El Capitan system so you can add subtitle to DVD Movies on Mac OS X El Capitan without any issue. And read how to watch Blu-ray movies with subtitles via Mac

Tips: Several Kinds of DVD/Movie Subtitles 

DVD/Movie Subtitles are textual versions of the dialog or scene in DVD film videos displayed at the bottom of the screen, to have viewers understand the spoken dialogue or the signs better. 

Soft Subtitle is involved in the actually DVD video, but is independent of the movie video. When ripping a DVD, it’s usually titled “Track”. 

Hard Subtitle, contrary to soft subtitles, attaches itself into the actual video and would always come along with the video. 

Forced Subtitle appears on screen when a foreign/alien language is spoken, or showed in a sign, location, or other text, aiming to explain the meaning but can not be placed in the dubbing. When ripping a DVD, it’s directly titled “Forced Subtitle”. 

Note: Generally, only the foreign dialogues and signs that matter the movie plot are translated in the forced subtitle. 

With the forced subtitles in DVD movies, you never need to worry about the foreign and alien language any more. And when it is just English dialogue, you can enjoy full screen watching without subtitles displaying. 

Read More: 

Monday, July 11, 2016

Convert MP4 to Samsung SDD 850 Evo for Sharing

The Samsung SSD 850 Evo delivers great performance with useful features, at an affordable price. The drive is available with up to 2TB of storage space. After you got the Samsung SSD 850 Evo and have stored a lots of downloaded MP4 files in your computer or server, ever thought of streaming those MP4 files via DLNA to iOS, WD TV, PS3/PS4, etc. But you will find it is a painful try for just converting MP4 to Samsung SSD 850 Evo directly for playing on most media streamers. Have the similar trouble? Don't worry. This article aims to give you an easy way to fix the issue. 

Hot Search: Blu-ray/DVD to NetGear ReadyNAS | Blu-ray/DVD to Micca Media Player | DVD Movies to Dropbox | Play MKV Movies on Kodi 15 | iTunes Movies onto NAS 

Samsung SSD 850 Evo has some limits to play MP4 files via NAS on different platforms. Besides, the codec limitation will prevent you from uploading MP4 to NAS successfully. In fact, to stream MP4 files from Samsung SDD 850 Evo to HDTV, Xbox OnePS4VLC, or other media players is not hard work. If the NAS does DLNA, you can try a DLNA/UPNP client. There are several apps out there but none of them do a particularly good job on HD MP4s. What you can do is to convert MP4 to a compatible format and then you can share it off the Samsung SDD 850 Evo effortlessly. 

To manage your MP4 files on kinds of NAS compatible devices, you'd better convert MP4 to correct format before storing on Samsung SDD 850 Evo. Pavtube Video Converter Ultimate is a highly recommended tool to help you finish the task. It is a great MP4 converter that supports transcoding MP4 to MKV, FLV, MPG, WMV and more. Meanwhile, it also comes with useful editing functions, like video joining, video trimming, splitting, cropping, etc. Now just download the program to learn how to convert MP4 to store on Samsung SDD 850 Evo for DLNA streaming. Here is review

Free Download Top MP4 to Samsung SDD 850 Evo Converter: 


Other Download: 

- Pavtube old official address: http://www.pavtube.cn/blu-ray-video-converter-ultimate/ 
- Cnet Download: http://download.cnet.com/Pavtube-Video-Converter-Ultimate/3000-2194_4-75938564.html 

Streaming MP4 Movies to Samsung SDD 850 Evo for Share 

Step 1. Run the program 

Just drag and drop your MP4 files from the computer to the pane of this app, or click the "Add Files..." option at the top left corner of this app's pane to choose and import the files you want to convert. It supports batch conversion and joining multiple video clips into one file. 


Step 2: Set output format as MP4 

From "Format" drop-down option, choose output formats as "HD Video" > "H.264 HD Video(*.mp4)" if you want to enjoy a HD video quality. 


Tips: On the main interface, check the movie titles you want to rip, from the drop-down list of subtitles, select one of your desired language as your subtitles, if you check "Forced subtitles" option, you will see subtitles only when actors are speaking a language that are different from the subtitles that your specified before. 

Step 3: Customize output video quality 

Click "Settings" on the main interface to pop out "Profile Settings" window, adjust the codec, size, bitrate to fit with your devices. 


Step 4: Start to convert 

Clicking the “Convert” button on main interface to convert MP4 to Samsung SDD 850 Evo supported format. When the conversion is completed, feel free to transfer MP4 to Samsung SDD 850 Evo in suitable MP4 and play them on your multimedia players. 

Mac user can use Pavtube iMedia Converter for Mac to convert your MP4 to Samsung SDD 850 Evo in MP4 format. And now, this program has updated to support the newest Mac OS X El Capitan. Moreover, now you can get the app at a big discount in Pavtube Summer Holiday Coupon

Read More: