Tuesday, July 23, 2013

DVD to Galaxy Tab 2 10.1 - Make Galaxy Tab 2 10.1 Smoothly Play DVD movies

Most users may describe the Samsung Galaxy Tab 2 10.1 as the main competitor to iPad 3. As a result, Samsung continually released new members of Galaxy series. Galaxy Tab 2 10.1 ships a stunning 1280 x 800 resolution which is perfect for video playing with high quality. It is a good choice to enjoy HD Movies on Samsung Galaxy Tab 2 (10.1). You may want to enjoy DVD movie on Galaxy Tab 2 10.1, but it has the same problem with the iPad 3 that there is no built-in DVD-ROM or DVD player in it.

It does not mean that you can not play DVD movie on Galaxy Tab 2. You can convert DVD to Galaxy Tab 2 compatible formats. The only tool you need is a useful DVD to Galaxy Tab ConverterPavtube provides you best DVD Ripping tool which allows you rip DVD to Galaxy Tab 2 embedded *.srt/*.ass subtitle for playing. Besides, Pavtube DVD Ripper also support direct copy main title from DVD, support TrueHD 6.1 and TrueHD 7.1 decoding. What's more, you can adjust the video and audio parameters for playing on Galaxy Tab 2 with best settings.

(If you want to copy 1080p Blu-ray movies to Galaxy Tab 2 10.1 for playing, get BDMagic and here is a guide of Blu-ray to Galaxy Tab 2 conversion).    

     
Requirements:
  1. Of course your Samsung Galaxy Tab 2 10.1. While you don't need it for the actual process, of course if you want to watch a DVD movie on the Galaxy Tab 2 10.1, you need it to be able to put the movie onto it.
  2. The connection cable for your Galaxy Tab 2 10.1.
  3. Windows-based PC in order to be able to run Pavtube DVD Ripper. It works on Windows 2003, Windows XP, Windows Vista, Windows 7 and Windows 8, on 32bit as well as 64bit systems.
  4. Conversion software. There is a large variety of different tools available for this. You can do it the free way, with applications such as Handbrake (How to free convert DVD to Galaxy Tab for smoothly playing), or with one of the many overpriced applications that are found all over the internet, but for this guide I am using Pavtube DVD Ripper, one of the most popular conversion applications for phones and tablets due to its ease of use, the support provided when needed, and of course the very affordable price. (You can get a Mac DVD to Galaxy Tab 2 Converter if you are running a Mac (Mac OS X 10.9 Mavericks).)
  5. DVD drive for if you want to convert DVDs to the proper format for your Samsung Galaxy Tab 2 10.1.
  6. 6. DVD Movies. Of course you need DVD movies that you want to watch on your Samsung Galaxy Tab 2 10.1.
OK, are you ready? Let's go!
     
Quick Guide:

First, Download and install the DVD to Galaxy Tab 2 Converter on your computer.


Step 1: Load DVD resource to the program.

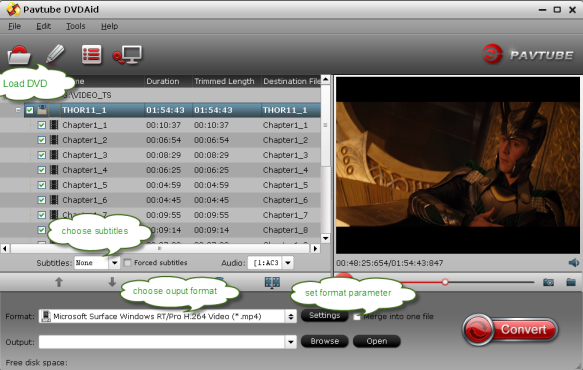
Insert your DVD. Run Best DVD Ripper and click "Import DVD from DVD-ROM" button to load DVD disc, DVD folder or load ISO/IFO files respectively. Then choose the main title of DVD movie for converting or backing up.


Tips: 
  • Select the movie title you want to convert, and preview the file you just selected from the DVD movie in the preview window if you want. 
  • Select wanted subtitles and audio track if necessary. 
 
Step 2: Choose output format.

To convert DVD to Galaxy Tab 2 10.1, you need choose an output format for Samsung Galaxy Tab 2 10.1. The program offers many choices with different qualities and parameters. Just click the "Format" bar and choose "Samsung -> Samsung Galaxy Tab 10.1(*.mp4)". 


Step 3. Start conversion from DVD to Galaxy Tab 2 MP4 video.

Finally you need hit the "Convert" button to start converting DVD movie to Galaxy Tab 2 10.1 MP4 format. After the conversion, you need connect the Galaxy Tab 2 10.1 to your PC and transfer the converted movies to Galaxy Tab 2 10.1 for smoothly playing with high quality.

How to transfer the converted DVD movies from PC to Galaxy Tab 2 10.1?

After get the output movies for Galaxy Tab 2 10.1, you will need to transfer them to Tab 2 10.1 for enjoyment on the go. You can refer to the below instruction.

1. Connect one end of the USB cable to your Galaxy Tab 2 10.1 and other end to the USB 2.0 port present on your PC or laptop.

2. As soon as you computer recognizes the connection, it will search and install the drivers automatically.

3. When the connection drivers are installed, your device would be ready to be used on to your PC.

4. On the other side you should have the latest version of Kies installed on your PC and as soon as the KIES is up and running, the device would be automatically shown in the "Connected devices" tab on the left of the Kies interface.

5. Now, transfer your DVD movies to Galaxy Tab 2 10.1 from PC.

 
Here are some little features that may not be noticed by you but could embody the humanized design of this best Pavtube DVD Ripper for Galaxy Tab 2 10.1.

1. Output Settings: You can control and adjust the resolutions related to Audio Format, customize Audio Quality and Audio Sample Rate to get your desired video quality and file size;


2. Edit the Videos: If you are not pleased with the default effect, simply click the "Edit" button and then it will show you some options:
  • Trim - It has got the most powerful function, you could edit the start/end time of the video during the time you like.
  • Crop - cut off the DVD clips' black edges and unwanted area easily.
  • Watermark - Add different watermark like text, image (including GIF), and video watermark. Its video watermark function will add a picture-in-picture effect to your video.
  • Effect - You possibly can adjust the "3D", "Deinterlacing", "brightness", "contrast" and "saturation".  As an example, you can put your own icon or picture in the video or press any words on it.
  • Subtitle - You can download free *.srt, *.ass and *.ssa subtitle and embed in your video.


3. Choosing the output folder: During the operation on the UI, you can also define where to place the output converter movie video for your convenience and preference.

Summary:

It looks like we did a lot so far, but actually we only did a few steps:
  1. Download the Pavtube DVD Ripper installer from the pavtube.com website.
  2. Install Pavtube DVD Ripper on the computer.
  3. Starte Pavtube DVD Ripper.
  4. Put a DVD in the DVD drive.
  5. Selecte the Samsung Galaxy Tab 2 10.1 profile.
  6. Tap Convert to start the conversion.
  7. Wait for the conversion to complete
  8. Copy the output movies to Samsung Galaxy Tab 2 10.1.
 
Now with the setup all done, all your future conversions are even easier.

That"s all! Now, you can watch DVD movies on Galaxy Tab 2 10.1 in whole display anytime and wherever.

Additional knowledge:

Apple iPad 3 vs Samsung Galaxy Tab 2


Related Articles:

Thursday, July 18, 2013

Transcode/Copy M2TS from Blu-ray to MP4 Preserving Multiple audio and subtitle track

Description: If you want to transcode/copy M2TS files from Blu-ray to MP4, and retain Multiple audio and subtitle tracks at the same time, you've come to the right place. The following article will show you how to transcode Blu-ray M2TS to MP4 with multiple audio and subtitle tracks. 

In this day and age, portable device like iPhone, iPad, Samsung Galaxy S3/S4, Galaxy Note 2, Galaxy Tab 2/Tab 3, Google Nexus 4, Nexus 7, Nexus 10, Kindle Fire HD, HTC One, Surface RT and Pro etc. has become a necessary part of life because it brings you the convenience for having entertainment wherever you are. Blu-ray fans may have a headache problem that they cannot play their favorite blu-ray movies on it. So you may want to convert Blu-ray M2TS to MP4 because it is known that MP4 is compatible to iPad, iPhone, PSP, PS3, Xbox, Apple TV etc. Now you need a software to get it done. Much software can work for you, such as Free Blu-ray RipperVideo Converter Ultimate

But what I want to recommend is Pavtube ByteCopy, because it is not only capable of helping you to transcode Blu-ray discs to various output formats, but also it can transcode Blu-ray to MP4 with multiple audio and subtitle tracks. Suppose you are good at both English and Francia, and want to preserve both of them from original Blu-ray discs when converting, that is what Pavtube ByteCoy can do for you. And you can select the audio you want when enjoying movies. 


Now let's download and install the software and follow the guide to see how it convert M2TS from BD to MP4 with multiple audio and subtitle tracks. Just refer to below details.

Step 1. Launch it and click "" to load Blu-ray discs.


Step 2. Click "Format" to find "Multi-track Video" catalogue, select "Multi-track MP4 (*.mp4)" as output format.


With output default "Settings" you can get all audio tracks preserved. In addition, if you want more customization, you can also uncheck the audio tracks you do not need to output. Just find "Audio" under "Settings" button, then uncheck the undesired audio.


Step 3. Click "Convert" to start conversion, when completed, click "Open" to find the generated MP4 files.

Obviously, it is easy to use software without any audio and video out of sync issue. You may wonder what else this software can do for you. Of course, it combines all features in Blu-ray/DVD Ripper, including various output formats selection, editing options support. Worthy to point out that it also supports lossless quality output. Please see following introductions:

1. Directly Copy supports lossless blu-ray M2TS backup from original BD with multiple audio tracks preserved. If you want to backup main movies of your BD for further playback or editing, Directly Copy fits you best.


2. Another way to to save lossless files: go to "Multi-track Video" catalogue to find "Lossless/encoded Multi-track MKV(*.mkv)", which support saving lossless MKV files with all multiple audio and subtitle tracks. Go to learn more about complete lossless Blu-ray to MKV backup and retain Multiple audio tracks and subtitle streams.


3. You can choose ByteCopy if you wanna add *.srt, *.ass and *.ssa subtitle in video by clicking "Edit" button.


Related article:

Wednesday, July 17, 2013

Rip Blu-ray/DVD to QuickTime MOV for playback on Mac OS X Lion

QuickTime is an extensible proprietary multimedia framework developed by Apple Inc., capable of handling various formats of digital video. However, Blu-ray (.m2ts) and DVD (.vob) are out of the range of QuickTime audio or video formats. That doesn't means you are totally banned to watch Blu-ray and DVD movies in QuickTime Player. Actually, an available Blu-ray and DVD Ripper for Mac will definitely do you a favor to remove copy protections, and rip the movies to a Mac QuickTime Player compatible format. Here it mainly tells a step-by-step tutorial about how to convert Blu-ray and DVD movies to Mac QuickTime Player supported format.

The decryption software we recommended is Pavtube Blu-Ray Ripper for Mac - A powerful Blu-ray to QuickTime MOV Converter tool designed for Mac users. It is capable of converting Blu-ray movies to MOV/HD MOV format, so that you can enjoy HD Blu-ray movies with QuickTime Player, or edit them in Final Cut Pro/Express on your Mac conveniently without any trouble.


More than that, with full supports for retail BD movies, the Blu-ray to MOV Converter for Mac is good at decrypting almost all latest BD copy protections, including AACS and BD+, so you can rip the latest released Blu-ray movies to QuickTime MOV at will. See the detailed tutorial as below.

Step 1. Load Blu-ray.

Put the Blu-ray disc into the BD drive and then click the import from BD ROM button after launching the program.


Step 2. Choose QuickTime compatible formats.

Click on the dropdown menu of "Format", and then follow "Common Video > MOV – QuickTime (*.mov)" for ripping movies from Blu-ray Disc to QuickTime MOV.


Optional - Adjust video and audio settings

The Mac Blu-ray to QuickTime Ripper allows users adjusting video and audio parameters before converting bluray to mov. Click "Settings" button, then you will be able to adjust video and audio settings in the following popup window, including codec name, aspect ratio, bit rate, frame rate, sample rate and audio channel.


Step 3: After everything is done, click "Convert" button to start ripping Blu-ray to QuickTime MOV for playback on Mac.

The program for Mac OS adopts advanced audio and video in sync technology, which will guarantee you perfect audio and video synchronization. Once the conversion is done, you can click "Open" button to get the final output QuickTime files with ease.

So there you have it. Pretty simple. Now just enjoy/play 1080p Blu-ray/DVD movies with QuickTime Player on your Mac as you like.

Tips:
  1. Let's back to Step 2: You can also click on "Format" bar to determine the output format. Select HD Video and choose an acceptable format from the list (H.264 MP4 as shows above). Click on "Settings" and you could further customize video and audio parameters, for example, 1280 by 720 pixels (adaptable with 16:9 wide screen) at 29.97 fps, AAC audio at 160 Kbps, 6 Channels (Dolby 5.1 channels). Click on "OK" to confirm your settings. In Export to box you could specify destination for the ripped file.
  2. In "Subtitle" tab on "Editor" Window, you are able to add *.srt and *.ass subtitles you get from internet or other places to the BD/DVD movies.
  3. Support Direct copy titles from BD and DVD in Original Format.
  4. Support TrueHD 6.1 and TrueHD 7.1 decoding.
 
Pavtube Blu-ray Ripper for Mac is the best choice if you want to play Blu-rays/DVDs on Mac with QuickTime, Apple TV, iPad, iPhone, Android/Windows 8 tablet/phone and other devices with high quality. It enables you to transcode Blu-ray/DVD to FCP, FCE/iMovie, Avid, Adobe Premiere Pro, Apple Aperture 3, Kdenlive, Avid Xpress Pro, Adobe Creative Suite 6, Adobe After Effects CS6 and DaVinci Resolve etc. It is also possible to backup Blu-rays to hard drive or NAS with original structure. With Pavtube Blu-ray Ripper for Mac, you can easily and quickly rip Blu-ray/DVD discs and make a backup, conversion, compression of your Blu-ray/DVD for any use.
   
Read More:

Thursday, July 11, 2013

Mac OS X Mavericks: Top 5 Enhancements That Speed Up Macs Faster And Improve Battery Life


Apple unveiled the developer preview of OS X Mavericks -- the tenth major release of its Mac operating system at the WWDC 2013 on Monday -- which the company claims has more than 200 new features, including Finder tags and tabs, multiple displays tagging, a new version of Safari and more.


In addition, Apple emphasized on a set of new technologies incorporated into Mavericks, which are expected to contribute toward "breakthrough power efficiency and performance" of Macs by increasing their battery life and making them run faster.

According to Apple, every level of the OS was looked at by the developers - "from the foundation up to the apps themselves" - to save more power and boost responsiveness.


OS X Mavericks is claimed to have more than 200 new features, including Finder tags and tabs, multiple displays tagging, a new version of Safari and more.

"The power technologies in OS X Mavericks were built with the capabilities of modern processors and the demands of modern apps in mind. The new power technologies work together to achieve substantial power savings, while maintaining—and in some cases even improving—the responsiveness and performance of your Mac," Apple said in an official document.

Let's have a look at 5 new enhancements to the OS X Mavericks that will make Macs go faster and last longer on a single charge:

1. Timer Coalescing: "Timer Coalescing" minimizes the amount of system maintenance and background work that is performed while the Mac is running on battery power. The new technology assembles low-level operations and creates small periods of inactive moments that allow the CPU to enter a low-power state more frequently. It helps reduce CPU activity by 72 percent, resulting in less energy consumption and increased battery life.

2. App Nap: "App Nap" helps save power when a user works with multiple apps simultaneously. The technology puts unused apps into a low-power state that slow them down and helps conserve valuable battery life. However, whenever the user starts an unused app, it quickly shifts back to full speed. App Nap does the same trick with Safari tabs, meaning that only the visible tab runs at full speed. Apple claims that App Nap can reduce CPU energy by up to 23 percent.

3. Safari Power Saver: With "Safari Power Saver," Apple has made the browser clever. Whenever a user visits a website to view a particular video, Safari Power Saver recognizes automatically what is necessary and pauses all other videos and animations that are off in the margins. On the other hand, the content located front and center plays as usual. Other animations won't play until the user clicks on them. Apple claims that with Safari Power Saver, browsing websites with plug-in content will consume up to 35 percent less CPU power.

4. iTunes HD Playback Efficiency: Apple claims that OS X Mavericks improves the energy efficiency of iTunes HD video playback. The video playback engine takes greater advantage of the efficient graphics hardware in the Mac and reduces the frequency of disk access. Apple said that together with more energy-efficient audio playback, the CPU will use up to 35 percent less energy while playing videos.

5. Compressed Memory: In OS X Mavericks, "Compressed Memory" frees up memory to make the Mac faster and more responsive. When the Mac reaches maximum memory capacity, the new technology automatically compresses the least used items in recent memory, compacting them by more than 50 percent. Compressed Memory also improves total system bandwidth and responsiveness, Apple says, allowing the Mac to handle large amounts of data more efficiently.

Apple conducted tests for all the aforesaid enhancements by using 1.8GHz Intel Core i5-based 13-inch MacBook Air systems with 4GB of RAM and pre-release versions of OS X v10.9 (Mavericks) and OS X v10.8.4. For the testing of "Compressed Memory," Apple also used MacBook Air systems with 256GB of flash storage.

Take a look at the Mac models that are compatible with the new OS X Mavericks:
  • iMac (Mid-2007 or later)
  • MacBook (13-inch Aluminum, Late 2008), (13-inch, Early 2009 or later)
  • MacBook Pro (13-inch, Mid-2009 or later), (15-inch, Mid/Late 2007 or later), (17-inch, Late 2007 or later)
  • MacBook Air (Late 2008 or later)
  • Mac Mini (Early 2009 or later)
  • Mac Pro (Early 2008 or later)
  • Xserve (Early 2009)
 
From Ibtimes

Wednesday, July 10, 2013

Convert Blu-ray, DVD, MKV/AVI/VOB/Tivo/Flash to Surface RT/Pro for watching

Description: If you wanna take any Blu-ray, DVD, MKV, AVI, VOB, Tivo, MPG, WMV, MTS, MXF, WebM, Flash video with for entertainment during your traveling, pavtube will give you the solution. The following article will show you how to convert all HD Videos and Movies onto Surface RT/Pro.

With the arrival of summer vacation, more people go traveling in this time. Surface RT/Pro, a laptop in tablet form, becomes a necessary companion for killing the boring time on railway. You could use them to watch movies for entertainment. But you cannot take lots of DVDS and blu-ray disks in your package, because it will increase the extra burden. Or you cannot enjoy many MKV, AVI, VOB, Tivo and Flash videos on Surface RT/Pro as they cannot be played directly on Surface RT/Pro.

However, Pavtube Blu-ray Video Converter Ultimate can provide you a solution to watch them on Surface RT/Pro. It is a integrated program bundled of BDMagicDVDAidVideo Converter. And it will help you to convert Blu-ray, DVD, MKV, AVI, VOB, Tivo, MPG, WMV, MTS, MXF, WebM, Flash video to video/audio in any formats you wanna enjoy on your portable device. Besides you will enjoy converted movies without any audio and video out of synchronism issue and a faster conversion speed with CUDA Acceleration.

Do not hesitate. We have 2013 Summer Holiday Sales and you can get 20% off for this Video Converter Ultimate. What's more, another extra 5% off discount can be got by face book, which means you will get 25% off. Now just go to download and install the Pavtube Video Converter Ultimate to enjoy it. The following guide will show you how to convert Blu-ray, DVD, MKV, AVI, VOB, Tivo, Flash onto Surface RT/Pro.

1. When launched it, let's load the original files (Blu-ray, DVD, MKV, AVI, VOB, Tivo, Flash videos, etc)


2. Having loaded original files, you are allowed to select Subtitles, Forced subtitles and Audio according to your own requirements. However, If original video has no subtitles and you cannot read it exactly, "Subtitle" option under "Video Editor" menu allows you to add download subtitle files (*.srt, *.ass,*.ssa) to converted videos.

3. Click "Format" menu to choose the output video format for Surface RT/Pro. Let's click "Windows" option to find "Microsoft Surface Windows RT/Pro H.264 Video (*.mp4)"


4. Click "Settings" button, which allows adjusting parameters for output video and audio, such as codec, bitrate, size (pix) and so on. Besides, keeping the original default setting can provide you a high-quality output video too.

5. Just click "Convert" button to start conversion. After completed, click "Open" button to find the converted files.

How to transfer converted video in PC to Surface RT/Pro, pls refer to Full Guide