Q: I am new to Plex and I've started to figure out how everything works. When I access files from my NAS, MP4-files play nicely on the Apple TV 4. However, it seems that it cannot play my MKV-files. It loads them up just fine with meta-info and all, but when I hit "Play", it just loads for a while before returning to the main screen for the movie. What am I missing here? The files play just fine in the browser on my MacBook. Any suggestions? Thanks in advance.
As more and more users get the Apple TV 4, there are many Apple TV 4 about Plex related questions asked on the forums and websites, one of the hot topics is the MKV playback on Apple TV 4 via Plex. A lot of users have MKV videos and movies stored on computer, and now they want to play MKV on Apple TV 4 so that they can enjoy the videos and movies on big HDTV. But when they tried to play MKV on Apple TV 4 they get failure, the Apple TV 4 can’t play MKV videos, what’s the reason?
The MKV to Apple TV 4 playback issue is caused by the video format limitation of Apple TV 4/Plex. If you check Apple TV 4 user manual or its product page you will learn that Apple TV 4 supported video formats are limited, it can only play H.264/MPEG-4 MOV, MP4 and M4V files, for other video formats like MKV, AVI, WMV, etc. Apple TV 4 is not able to play them, so you can’t play MKV on Apple TV 4/Plex direct.
Okay, for all users, if you want to stream MKV files to the new Apple TV, Apple TV 3/2 for playback, you'll need to convert your MKV files to Apple friendly format (e.g. m4v). Along with some help from third-party software. WithPavtube iMedia Converter for Mac, a great Mac MKV Converter for Apple TV 4, you can easily achieve your goal smoothly. In addition to converting MKV to the new Apple TV, it also can MP4, H.265, Tivo, AVCHD, VOB, MPEG-2, MXF, WMV, AVI, DivX, Xvid, Flash format, WebM, and etc to Apple TV 4 video format.
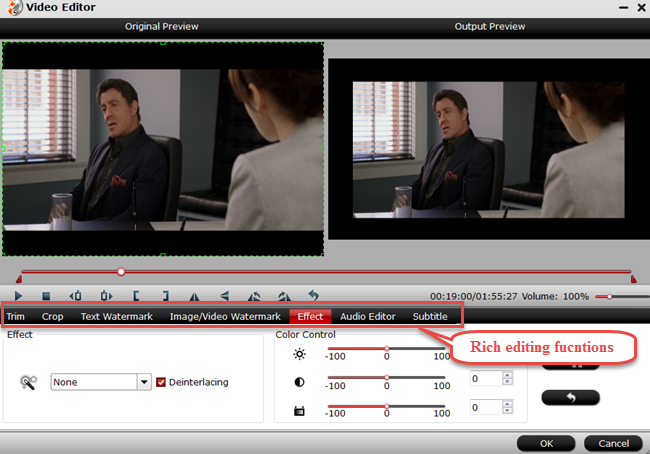
Overall, this all-in-one Video Converting tool can help you to rip Blu-ray, DVD and various video files to your Apple TV 4 for watching. Furthermore, it is also equipped with advanced editing function like add subtitles, effect, text or picture watermark to MKV files, crop MKV black bars, trim or merge MKV files, compress output file size and etc. (Learn more functions in this review).


Other Download:
- Pavtube old official address: http://www.pavtube.cn/imedia-converter-mac/
- Cnet Download: http://download.cnet.com/Pavtube-iMedia-Converter/3000-2194_4-76177788.html
The following guide shares with you how to encode 1080p/720p MKV to Apple TV 4 for playback on Mac step-by-step.
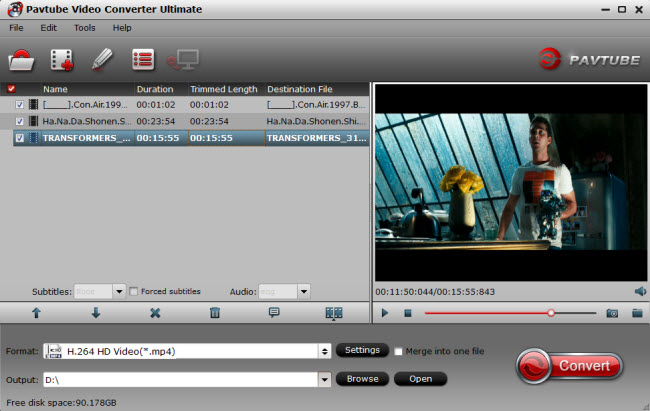
Step 1. Install and launch the MKV Converter for Apple TV 4, and click "Add file" or "Add from folder" button to load your MKV files. The software supports batch conversion so that you can add several MKV files to convert at one time. You can also load Internet torrents movies.
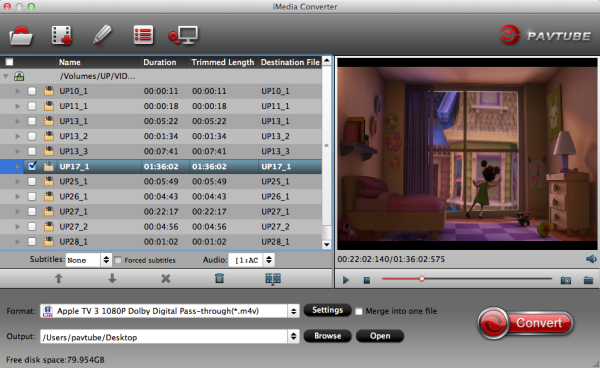
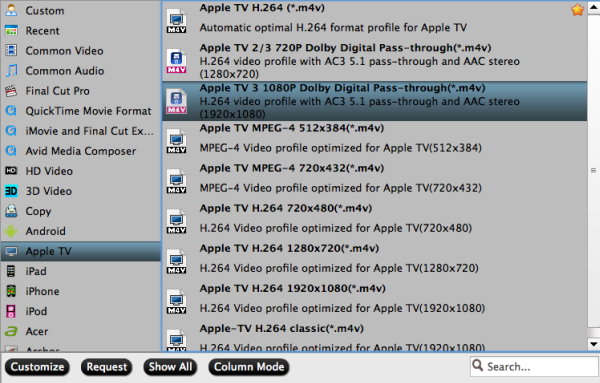
Step 2. Click on "Format" boarder to set output format.
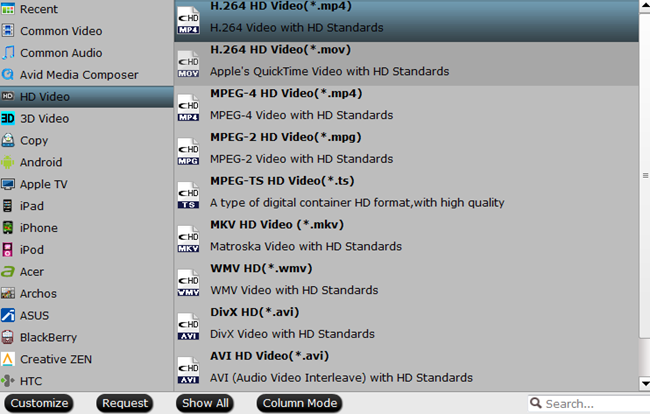
Click on the dropdown menu of “Format” and then move your pointer to “Apple TV 3 1080P Dolby Digital Pass-through(*.m4v)” from “Apple TV” which is the compatible format for Apple TV 4. Then you can set the output folder by clicking “Browse” icon as you need.
Step 3: Adjust audio and video parameters.
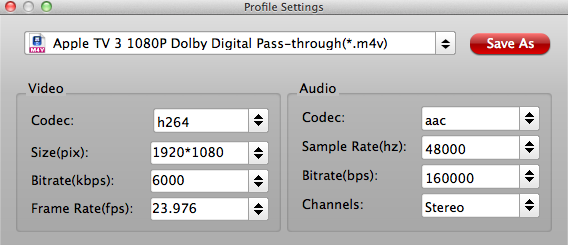
Click the “Settings” icon and you will go into a new interface named “Profile Settings”. You can adjust codec, aspect ratio, bit rate, frame rate, sample rate and audio channel in the interface according to your needs and optimize the output file quality. To get AC3 5.1 auido files, you can set audio codec to AC3 and change audio channels to 5.1 Channels. Learn>> how to set up Apple TV 4.
Step 3. Finally click on "Convert" button to start converting MKV to 1080p HD M4V for Apple TV 4 on Mac.
After conversion, get converted video files for transferring to ATV 4 via Plex from Mac. In this way, you can get MKV files playable on Apple TV 4 with Mac OS X without problems. We hope this short article will bring some new multimedia life to your Apple TV 4.
Note: If you have some issues about Plex Playback, you can read : use Plex with QNAP NAS | Plex FAQ | Add Movies to Plex | Best Video Settings for Plex |
Stream MKV to Apple TV 4 via AirPlay or iTunes
Via AirPlay: Firstly, to use AirPlay, you need to prepare one of the following devices: iPhone 4 (or later), iPad, iPad mini, or iPod touch (4th generation or later). Add the converted MKV movies to iTunes and sync to your iOS device.
Secondly, be sure iOS device and Apple TV are in the same Wi-Fi network; start play the video on your device, and then swipe up from the bottom of your device screen to access Control Center and tap AirPlay; finally, tap the name of the device you want to AirPlay to.
Via iTunes: Firstly, add the converted MKV videos to iTunes. Then, go to iTunes > Preferences, choose Apple TV, and make sure "Look for Apple TVs" is selected.
Secondly, on your Apple TV 4, choose Settings > Computers > "Connect to iTunes," and note the passcode displayed; in iTunes, select the Apple TV 4 (below Devices), and enter the passcode.
Thirdly, click the Summary button and select one of "Automatic Sync" and "Custom Sync".
Now, all content are streamed to Apple TV via Plex for enjoyment. Could you image an easier way to do this than Pavtube MKV to Apple TV 4 Converter?
See Also:
As more and more users get the Apple TV 4, there are many Apple TV 4 about Plex related questions asked on the forums and websites, one of the hot topics is the MKV playback on Apple TV 4 via Plex. A lot of users have MKV videos and movies stored on computer, and now they want to play MKV on Apple TV 4 so that they can enjoy the videos and movies on big HDTV. But when they tried to play MKV on Apple TV 4 they get failure, the Apple TV 4 can’t play MKV videos, what’s the reason?
The MKV to Apple TV 4 playback issue is caused by the video format limitation of Apple TV 4/Plex. If you check Apple TV 4 user manual or its product page you will learn that Apple TV 4 supported video formats are limited, it can only play H.264/MPEG-4 MOV, MP4 and M4V files, for other video formats like MKV, AVI, WMV, etc. Apple TV 4 is not able to play them, so you can’t play MKV on Apple TV 4/Plex direct.
Okay, for all users, if you want to stream MKV files to the new Apple TV, Apple TV 3/2 for playback, you'll need to convert your MKV files to Apple friendly format (e.g. m4v). Along with some help from third-party software. WithPavtube iMedia Converter for Mac, a great Mac MKV Converter for Apple TV 4, you can easily achieve your goal smoothly. In addition to converting MKV to the new Apple TV, it also can MP4, H.265, Tivo, AVCHD, VOB, MPEG-2, MXF, WMV, AVI, DivX, Xvid, Flash format, WebM, and etc to Apple TV 4 video format.
Overall, this all-in-one Video Converting tool can help you to rip Blu-ray, DVD and various video files to your Apple TV 4 for watching. Furthermore, it is also equipped with advanced editing function like add subtitles, effect, text or picture watermark to MKV files, crop MKV black bars, trim or merge MKV files, compress output file size and etc. (Learn more functions in this review).
Other Download:
- Pavtube old official address: http://www.pavtube.cn/imedia-converter-mac/
- Cnet Download: http://download.cnet.com/Pavtube-iMedia-Converter/3000-2194_4-76177788.html
The following guide shares with you how to encode 1080p/720p MKV to Apple TV 4 for playback on Mac step-by-step.
Step 1. Install and launch the MKV Converter for Apple TV 4, and click "Add file" or "Add from folder" button to load your MKV files. The software supports batch conversion so that you can add several MKV files to convert at one time. You can also load Internet torrents movies.
Step 2. Click on "Format" boarder to set output format.
Click on the dropdown menu of “Format” and then move your pointer to “Apple TV 3 1080P Dolby Digital Pass-through(*.m4v)” from “Apple TV” which is the compatible format for Apple TV 4. Then you can set the output folder by clicking “Browse” icon as you need.
Step 3: Adjust audio and video parameters.
Click the “Settings” icon and you will go into a new interface named “Profile Settings”. You can adjust codec, aspect ratio, bit rate, frame rate, sample rate and audio channel in the interface according to your needs and optimize the output file quality. To get AC3 5.1 auido files, you can set audio codec to AC3 and change audio channels to 5.1 Channels. Learn>> how to set up Apple TV 4.
Step 3. Finally click on "Convert" button to start converting MKV to 1080p HD M4V for Apple TV 4 on Mac.
After conversion, get converted video files for transferring to ATV 4 via Plex from Mac. In this way, you can get MKV files playable on Apple TV 4 with Mac OS X without problems. We hope this short article will bring some new multimedia life to your Apple TV 4.
Note: If you have some issues about Plex Playback, you can read : use Plex with QNAP NAS | Plex FAQ | Add Movies to Plex | Best Video Settings for Plex |
Stream MKV to Apple TV 4 via AirPlay or iTunes
Via AirPlay: Firstly, to use AirPlay, you need to prepare one of the following devices: iPhone 4 (or later), iPad, iPad mini, or iPod touch (4th generation or later). Add the converted MKV movies to iTunes and sync to your iOS device.
Secondly, be sure iOS device and Apple TV are in the same Wi-Fi network; start play the video on your device, and then swipe up from the bottom of your device screen to access Control Center and tap AirPlay; finally, tap the name of the device you want to AirPlay to.
Via iTunes: Firstly, add the converted MKV videos to iTunes. Then, go to iTunes > Preferences, choose Apple TV, and make sure "Look for Apple TVs" is selected.
Secondly, on your Apple TV 4, choose Settings > Computers > "Connect to iTunes," and note the passcode displayed; in iTunes, select the Apple TV 4 (below Devices), and enter the passcode.
Thirdly, click the Summary button and select one of "Automatic Sync" and "Custom Sync".
Now, all content are streamed to Apple TV via Plex for enjoyment. Could you image an easier way to do this than Pavtube MKV to Apple TV 4 Converter?
See Also:
- Stream Video from iPhone/iPad/iPod to Apple TV
- Watch 3D Blu-ray Monsters vs. Aliens on Apple TV 3
- AVI to DLNA - Fix AVI and DLNA Incompatible Issues
- Backup Blu-ray to U Disc for MP018 Full HD Media Player
- 3D Blu-ray to ATV 4 - Stream 3D Blu-ray to Apple TV 4
- Play movies using Apple TV 4 on 1080p TV with 5.1 Audio
- Stream Blu-ray Movies via Emby
- Emby Not Play MP4/H.264 Files
- Plex Not Play Specific MP4 Files from Tivo
- Stream ISO Files to Plex Media Server