Saturday, December 6, 2014

Moving from Blu-Ray ISO to MKV - What to expect?

Looking for a quick and easy way to convert your Blu-ray ISOs to MKV files? Here I will provide the best solution to get the job done very well.

Hi,
 
In an earlier conversation today in a different thread it was suggested that having Blu-ray rips stored as MKV rather than ISO would provide better functionality with MB. I can for sure see that it is easier, no mounting and no external player, but I was wondering what else I would run into or have to configure if I chose to go that route.
 
In my current setup I rip my Blu-rays with DVDFab and keep only the main movie, high definition audio, and the English subs and write them to the ISO format. I know I can use MakeMKV to rip the Blu-ray and select out what I want, but when it comes to playback, is there anything else, like further configuration of LAV, that will have to be done.
 
Also, is there anything to deal with 3D Blu-ray ripping where I do not have to change the 3D format? (Does it even matter if you do?)
 
I have in general been happy with the ISO rips, but if it can be better/easier I would love to learn and go that route.
 
Thanks for any info
 
Cheers 
Moving from Blu-Ray ISO to MKV

Wanna rip your backed up or downloaded Blu-ray ISO files to MKV videos so that you can easily share the movies or play the movies on some media players? Then you have to consider which is the Blu-ray ISO to lossless MKV ripper with provide fast ripping speed and high video quality.

Take Blu-ray ISO to MKV Ripper Best Suiting for Your Computer 

You may pull your hair out and feel at a loss when facing so many similar programs in the market. Never mind, this page will introduce you an intuitive tool- Pavtube ByteCopy, which is highly recommended among for its simplicity, fast ripping speed and high video quality.

Money-saving Trip:

Overall, this Blu-ray ISO to MKV converter software is special designed for lossless conversion (DVD-R and Blu-Ray capability in one program) to rip Blu-ray/DVD movies and ISO/IFO files with multiple audio tracks and subtitles keeping. Moreover, it's also a professional Blu-ray ripper, allows you to rip and convert Blu-ray/DVD movies to any video format you like. The output video can be played by KMPlayer, VLC, MPlayer, DAPlayer, KDLINKS Media PlayerWindows Media Player and many other media players, which will give you best video quality. With this program, you can kill two birds with one stone. Why not go ahead with it?

Guide: Four Steps to Move
 from Blu-Ray ISO to MKV with multiple audio tracks and subtitles 

Step 1. Free download and install the Best Blu-ray/DVD Copying & Ripping tool on your PC. If you use Mac OS X computer, you need to use Bytecopy for Mac.

Step 2. Launch it and click the "Load IFO/ISO" button to import Blu-ray ISO files. Or drag and drop the BD ISO files directly to the app. 

Best Blu-ray/DVD Copying & Ripping tool

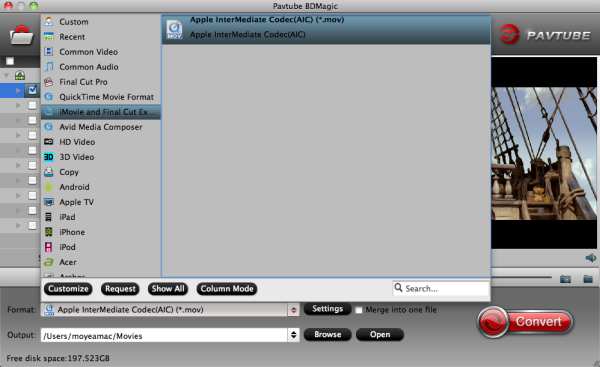
Step 3. Choose MKV format as output, here "Format > Multi-track Video > Lossless/encoded Multi-track MKV (*.mkv)" is recomended for you. Of course, you can choose multi-track mp4 or multi-track mov as you wish.

lossless mkv format 

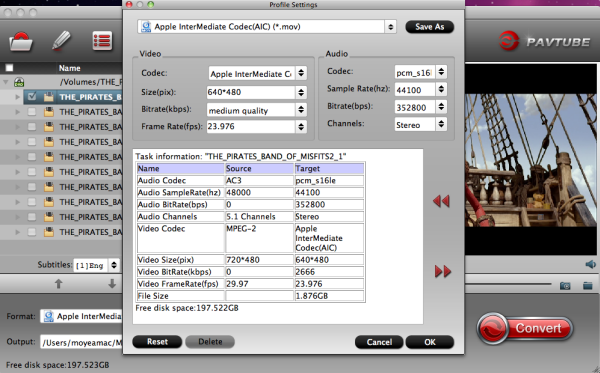
Note: There is a "Settings" option, which allows you to make adjustments on your audio, video, subtitles. It's worth mentioning that, by default, all audio & subtitles tracks in a source file are checked to be saved in the MKV container, if there are some tracks you don't like, you can click Settings button and go to Multi-task Settings window to uncheck and remove them under Audio tab and Subtitle tab. 

multi-track settings

Step 4.
Click on "Convert" to start ripping Blu-ray iso to MKV with multiple tracks.

The conversion only take a few minutes, after it's done. Click "Open" button, you will get the converted movie file. Mow you can add and play the BD ISO contents with your media player on PC/Mac in multiple audio tracks and subtitles at ease.

What's more, here is a complete DVD and Blu-ray ripping guide for you to refer to.

Monday, December 1, 2014

How to: Rip a Blu-ray Disc to iMovie for editing on Mac

What is the Best Way to import or edit Blu-ray in iMovie? Get the solid answer to help you easily import Blu-ray to iMovie to create your own videos freely.
 
After collecting some Blu-rays like Edge of Tomorrow, X-Men: Days of Future Past, How to Train Your Dragon 2, etc. you probably would like to make some Blu-ray HD contents into your own film. To get the work done, you may want to import Blu-ray to iMovie for editing. However, the video formats accepted by iMovie are limited, like supports MPEG-2 and AVCHD, DV-Standard and HDV (High Definition Video), QuickTime Movie, MEPG-4.


import or edit Blu-ray in iMovie

So it does seem that you can not import Blu-ray to iMovie to edit directly. Importing Blu-ray to iMovie becomes a problem to be solved. This article focuses on how to import Blu-ray to iMovie on Mac OS X and edit Blu-ray in iMovie to create your own videos.

In order to import Blu-ray to iMovie for editing, you need to convert Blu-ray to iMovie compatible format first, and then import into iMovie to edit. Here Pavtube BDMagic for Mac is a professional yet easy-to-us Blu-ray to iMove converting software for Mac that can import Blu-ray to iMovie native AIC mov format with fast ripping speed and high output video quality. Now download this program and follow the guide below to complete you task.

How to convert Blu-ray(Edge of Tomorrow, X-Men: Days of Future Past, How to Train Your Dragon 2) to iMovie for freely editing on Mac

Note: For Ripping Blu-ray to iMovie on Mac, a Mac compatible BD driver is needed.

1. Once successfully installed the best Blu-ray to iMovie Converter, run the program. Insert Blu-ray to disc drive, click the “Load disc” button to import source Blu-ray.

best Blu-ray to iMovie Converter

2. Choose output format. This Blu-ray converter offers optimized format preset for Final Cut Pro. Just click “Format” menu firstly and then follow "iMovie and Final Cut Express > Apple Intermediate Codec(AIC) (*.mov)" as output format.


Tip: If the default settings do not fit you requirement, you can click “Settings” icon to and enter “Profile Settings” panel to adjust video size, bit rate, frame rate, sample rate and audio channels.


3. Click “Convert” button to start encoding Blu-ray to AIC .mov for iMovie on Mac OS X.


When the BD to iMovie conversion task is finished, click “Open” button to get the exported files for transferring to iMovie with easy playback or editing.

Additional Tips:

1. This Blu-ray to iMovie Converter not only can help you convert Blu-ray to iMovie, but also enables anyone with Blu-ray files to use in any non-linear editor like Adobe Premiere Pro, FCP, FCE, Avid Media Composer, etc as long as rip Blu-ray to a recognizable format.

2. Want to import Blu-ray/DVD to Final Cut Pro X with 5.1 sound on MacByteCopy for Mac is you best choice.

3. Even 4k videos, m4v files can be imported to FCP for smooth editing without any trouble.

4. Or check out the solutions for ripping Blu-ray/DVD to QuickTime MOV for playback.

Friday, November 28, 2014

Backup BD/DVD movie directory to a 3TB external network drive for use when traveling

The article mainly tells you how to backup and rip Blu-ray and DVD to a 3TB external network drive in MP4 format for watching anytime while traveling.

As a disc collection owner, you will choose to rip your Blu-ray/DVD movies for backing up or more convenient playback while traveling. And if you have a external network drive, you probably would like to copy your Blu-ray/DVD collection like Avatar, Million Dollar Baby, Serenity, The Last Samurai, The Lost Room, etc. to your external drive to allow you to view via media player like VLC or mobile devices like Asus laptop.

backup blu-ray dvd on external travel drive
And now I will show best way to take the Blu-ray/DVD and put the disc movie library on a 3TV external network drive drive for playing.

Well, to backup dozens of BD/DVD movies to external network drive, you need to get the content off the disc as a protection-free and easily readable element for your external drive. In this case, powerful a third-party software for backup Blu-ray or DVD to external network drive is what you need.

Here, Pavtube BDMagic can do you a favor. It is capable of ripping Blu-ray/DVD to MP4, AVI, MKV for external network drive streaming with no quality loss; it also enables you to copy BD/DVD main movies for backup onto external network drive in .m2ts/.vob format. If you are running on Mac OS X, turn to BDMagic for Mac. Now let's learn how to do it.

How to rip and copy Blu-ray or DVD to a 3TB external network drive

Step 1: Load Blu-ray/DVD movies

Install and launch the best Blu-ray Backup & Ripper, and then click the disc icon to import your source movies to this program. Set your wanted subtitles and audio track from the drop-down box of "Subtitles" and "Audio" tab.

best Blu-ray Backup & Ripper

Step 2: Select an output format

To convert Blu-ray/DVD for external network drive storing and syncing, just click on the drop-down menu of "Format", here I prefer "Common Video > H.264 Video(*.mp4)" for output since it produces an acceptable quality and is supported by most media players.

If you want to keep 1080p resolution as source movie, you can choose HD Video > H.264 HD Video(*.mp4) as output format.

Is there a way to lossless backup Blu-ray/DVD to MKV file for playback on PC and HD Media Players? Here it is!

external travel drive video format

Tip: If you like, you can click "Settings" to change the video encoder, resolution, frame rate, etc. as you wish. Keep in mind the file size and video quality is based more on bitrate than resolution which means bitrate higher results in big file size, and lower visible quality loss, and vice versa.

MP4 video settings

Step 3. Rip BD/DVD movies to external network drive

Click the "Convert" button under the preview window, and the Blu-ray ripper will start the conversion from Blu-ray movies to MP4 for your external network drive. After the conversion, you can hit "Open" to quick locate the converted video。

Now you can get your movie directory for wide use on Asus laptop via USB or TV with a HDMI and USB port using a Microsoft wireless display when traveling. When watching movies in public, such as on a plane, you can even use a Skullcandy wireless headset for sound. So wonderful!

What's more, you can also stream BD/DVD via Home Network or copy DVD to QNAP TS-469L NAS.  

Tuesday, November 25, 2014

With Plex Movie Trailers- Get Closer to The Cinema Experience

The cross-platform media server Plex supports movie trailers and extras now. Here shows you how to add local clips to your movie library for enjoyment.

Plex, the official app of the popular media server on most platforms, has just been updated with a couple of much-requested features, including movie trailers and extras, which can cover anything you'd usually find on a DVD or Blu-Ray disk, including interviews, deleted scenes and behind-the-scenes content. It brings functionality a lot of users have been waiting for.
Plex

Are you enjoying Plex Movie Trailers yet? Learn tips and tricks below to add and load local Extras to get closer To The Cinema Experience. Plex Pass users (Plex’ premium subscription service) can get more impressive features.

Trailers and Extras

Trailer and extras support is currently found in Plex Home Theater, the web app, Android and iOS applications. Other platforms should follow shortly. Local extras are detected by the media server and will be shown in the movie library by supported client applications.

plex web trailer

Plex Pass users get a very juicy bonus feature. When Plex adds a new movie to the library and is searching for metadata, high quality trailers and extras will automatically be pulled in from a third-party provider. This content remains in the Cloud, so Plex Pass users need not worry about incurring needless downloads.

plex pass extras

For avid cinema fans, Plex has added the ability to queue a number of cinema trailers when you start watching a new movie (it’s called Home Theater for a reason). To do this, Plex can pull trailers for the unwatched movies in the movie library. In addition, Plex Pass users can opt for trailers of upcoming Blu-Ray and theatre releases.

Getting Started

To get your trailer party started, you’ll need to make sure your Plex installations are up to date and properly configured.
Update Your Server & Client Applications

Both your Plex Media Server and Plex Home Theater installations will need to be up to date to process and access extras. Plex Home Theater may update automatically but, depending on your setup, Plex Media Server might not. Make sure you’re up to date in either case.

You can manually update Plex Home Theater by navigating to Preferences > System > Software Update in the application. To update Plex Media Server, just download the most recent installer from Plex Downloads and run the installation file.
Adding Local Extras

You can manually add trailers to your library that you’ve ripped from DVD or Blu-ray, or scraped from the Internet with Media Companion. For Plex Media Server to pick them up, the extras need to be added to the relevant movie’s folder in your library and follow Plex’ naming guidelines.

In a gist, this means that extras need to have a descriptive name suffixed with the type of extra. e.g.

Movie_Folder/Descriptive Name-ExtraType.ext

Currently, you can choose from six different ExtraType specifiers:

-behindthescenes
-deleted
-interview
-sample
-scene
-trailer

An example of a good name might be Avatar-trailer.mp4 or Theatrical Trailer II-trailer.mp4. The descriptive part of the name will determine how the content is shown in your Plex client.

plex extras naming scheme

If you’ve organised your library in a more hierarchical structure, with different subfolders for external subtitle files and metadata, you can also organise extra content with different subdirectories for each type of extra. Refer to the naming guidelines for more information.

plex update library

If you want Plex to spot these new files, make sure to update your library afterwards.
Automatically Load Extras (Plex Pass Feature)

Plex will automatically try to grab extras for Plex Pass users. This usually happens when Plex is processing movies that are newly added to your library. It’s important to note that these extras will not be downloaded to your computer; links to the extras are simply added to the movie metadata. In other words, if you’re a Plex Pass user, there’s really nothing to lose here!

plex settings freebase agent

To verify your media server configuration, open your Plex Media Server settings (you can also access these from the Plex/Web app if you’ve configured Plex for remote access) and browse to Agents > Movies. Make sure the Freebase agent is enabled in both the Freebase and The Movie Database tabs. It doesn’t need to be at the top of the list.


freebase settings

Open the preferences of the Freebase agent and make sure that the Find trailers and extras automatically option is enabled. Here you can also choose whether to download (more explicit) red band trailers and include extras with subtitles.

plex force refresh

You’ll probably also want to grab extras for the movies that are already in your library. To achieve this, you’ll need to do a Force Refresh of your movie library. This forces Plex to run all movies by the metadata agents again to check for new content, so this will take some time to complete.

Are movie trailers something you love, or try to avoid? Share your thoughts in the comments below!

More related news:
Source: makeuseof.com 

Monday, November 24, 2014

How to: DVD and Blu-ray ripping

Learn how to get a Blu-ray/DVD onto your hard drive by ripping them with Handbrake or find its alternative tool.

Blu-ray and DVD offer a handy way to get high-quality video into your lounge room, but discs are less convenient once you want to stream those movies around your home or slip them in your pocket as you walk out the front door.

DVD and Blu-ray ripping

This guide explains how to rip your Blu-ray and DVD and copy them to your computer’s hard drive so you can enjoy them without ever having to get up off your couch to drop a disc in the DVD player.

Unfortunately Australia’s copyright rules don’t permit ripping your DVD and Blu-ray movies to your computer. The recent copyright law review is unlikely to change this, although it’s worth remembering that we were ripping our music CDs for many years before Australian law caught up with the times. You’ll need to draw your own moral line in the sand when it comes to copying content which you’ve legally purchased on disc. These days some discs come with a digital download, but it might not be in a format which suits you.

THE RIGHT TOOLS FOR THE JOB 

There are several applications designed specifically for ripping movies, but let’s stick with the highly-respected HandBrake video transcoder. It’s available for Windows, Mac and Ubuntu, and because it’s open source, it’s completely free.

HandBrake removed its DVD decoding features several years ago, but you can get around this by installing the VLC media player.

Together these two free applications should happily convert your DVD library to MP4 video files which will play on a wide range of gadgets. You can also opt for MKV, but HandBrake ditched support for DivX and XviD several years ago.

Nothing separates MP4 and MKV in terms of picture quality, because technically they’re only container files. By default, HandBrake uses the H.264 video format inside both MP4 and MKV files. MKV is a little more flexible but, when in doubt, stick with MP4 because it’s compatible with a much wider range of devices. If you’re catering to Apple gadgets then definitely stick with MP4, ensuring you use the .M4V file extension so files play nicely with iTunes.

Pavtube ByteCopy can make a bit-perfect copy of your movies and save them on your computer as hefty VOB or M2TS files. Occasionally you’ll run into a particularly stubborn disc which these applications can’t rip due to damage or aggressive copyright protection. However, ByteCopy can deal with all kinds of Blu-ray and DVD discs.

THINK ABOUT THE BIG PICTURE 

Before you rip anything, consider how you’ll watch your movie files.

You need to cater to the fussiest devices in your ecosystem, which will most likely be Apple gadgets, Smart TVs or perhaps games consoles. Also consider how you’ll deliver files – perhaps you’ll copy them to the internal drive or a USB stick, perhaps you’ll stream them over your home network or the internet. Try to keep transcoding to a minimum.

In a perfect world the idea is to rip once, store in a central location and watch everywhere. This means finding resolutions and quality rates which look good on your large screens but don’t create files too large for your portable devices. Create test files before you go on a ripping frenzy.

LET IT RIP 

Ripping DVDs with HandBrake and VLC is very straightforward but it’s best to master the basics of converting DVDs before tackling your Blu-ray collection.

Click HandBrake’s Source button and point it at the DVD in the optical drive. It takes a minute to examine the disc and identify its list of titles. Even if you’ve got VLC installed, HandBrake might ask for the libdvdcss file in order to handle the encryption – although you should be presented a link for downloading it.

HandBrake selects the largest title and assumes it is the main movie. If the disc contains several TV episodes HandBrake will only choose one, but make sure it’s an individual episode rather than the Play All playlist. Sometimes you’ll see more than one title which looks like it could be the main movie. Some movie houses make life difficult by creating 99 titles, most of them dummies.

HandBrake has a knack for choosing the right title, but to be sure you can play the DVD in VLC. Go to the disc’s main menu and press Play on the movie or episode you want to rip. Don’t press Play All. Once it’s playing, click the Playback dropdown menu and look under Title to see which title number you’re watching.

HandBrake might take forever or even crash when scanning the disc. Or it might not see the title number you need. Once you know the title number, click Source, Title Specific Scan, Open Folder and then select the VIDEO_TS folder on the disc. Enter the title number and press Open Title. If you’re still stuck, try ripping the disc as an ISO first. Just having AnyDVD HD running in the background might be enough for HandBrake to read the disc correctly.

At this point you can keep things simple by choosing a device preset from the list on the right, such as iPhone, Apple TV or Android tablet. Now go to the destination bar, click browse and specify a folder along with a file name. Press Start and go make yourself a coffee. If there’s a string of TV episodes on the disc you should enable the auto-naming option in the preferences. Press Add to Queue and repeat for each title before you click Start and rip them as a batch.

GET CRACKING 

It’s a simple enough process, but you may want to dip into HandBrake’s Video settings to tweak the file size and picture quality. It’s a good idea to rip a few minutes of your movie as a test. Look for a scene with fast-moving action, dark shadows, skin tones and panning shots so you can watch for blur, pixelation and jitter when testing the different video quality settings on your devices.

For a quick settings check use the Preview button to generate a 30-second clip (although it can be flaky at times). When you’re ready to test on your various devices, choose a title but only scan chapters 1 through 1. Play this short test clip on every server and device you’re trying to cater for. Some devices can be very fussy even with files that they’re supposedly compatible with.

If the result looks terribly distorted and blocky then the DVD’s copyright protection probably hasn’t been bypassed. It’s also possible that VLC isn’t supplying the correct version of libdvdcss.dll and you’ll then need to download it.

Go to download.videolan.org/pub/libdvdcss/1.2.12 and grab the 32 or 64-bit version of libdvdcss-2.dll (if you’re running a 64-bit version of Windows then make sure you’re also running a 64-bit version of HandBrake). Now rename it libdvdcss.dll and move it into the HandBrake folder inside the Program Files folder.

EDITOR'S NOTE

But as for encrypted Blu-ray and DVD conversions, HandBrake's ability does not equal to its ambition any more. At Times you need HandBrake Alternative software to achieve better Blu-ray/DVD conversion, and Pavtube ByteCopy is the best recommended HandBrake Alternative. More details can be found on its official website:

http://www.multipelife.com/bytecopy

There are plenty of reasons that make ByteCopy surpass other competitive HandBrake Alternatives, even go beyond HandBrake itself, here lists some main advantages:

  • Do not need to worry about which OS your computer running on
  • Seldom crashes when dealing with encrypted Blu-rays and DVDs
  • Run more stable and convert Blu-ray/DVD movies faster
  • More specified profile setting for Galaxy Note 4, iPhone 6, iPhone 6 Plus
  • Perfect BD/DVD backup solution
  • Lossless Blu-ray/DVD copying
  • Multi-track preservation
  • Various video editing functions
  • 3D video output
  • Export single SRT subtitle file 
More related info: