Friday, April 4, 2014

Enable kids and family members to watch DVDs on mobile devices

This article walks you through the whole process of converting DVD movies to mobile devices so that kids and family members are able to enjoy movies at home or anywhere they like. 

Kid's favorite animations like Olivia, Ice Age 4, Frozen, Big Top Scooby-Doo, Madagascar, The Jungle Book, Despicable Me 2, and more movies will release the DVD version soon. Would you like to move and watch these new movies on your iPhone 5S/5CiPad AirSamsung Galaxy TabGoogle NexusSurface tablets, Kindle Fire HDX or other portable device with your kids and family members? Without the assistance of any tool you cannot accomplish this because there is no mobile devices that are equipped with a disc driver natively.

Among all the software applications, free or paid, Pavtube DVDAid is my first choice for two reasons. One is its easy-to-use feature with user friendly interface; another is its reasonable price and lifetime support.

Anyway, I would tell you How to rip DVD movie to my iPad Air or other mobile devices and similar steps could be found from below tutorial for your mobile device as well.
Good News! Pavtube Release a New Site - multipelife.com with Product Migration and Name Change. DVD Ripper has now become DVDAid. Like us to get 40% off DVDAid on Windows/Mac platform: https://www.facebook.com/pavtubefans/app_209569249055691 
 
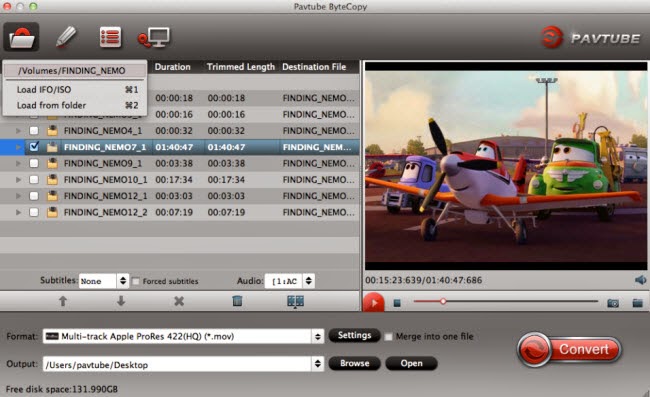
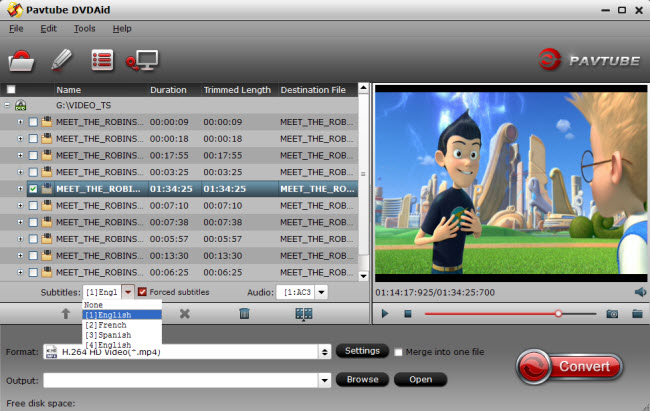
Step 1: Download a free copy of Pavtube DVD Ripper, install and launch it. Insert DVD disc, hit the "Load Disc" icon to browse to disc driver and load DVD movie into this app.

pavtube dvdaid  

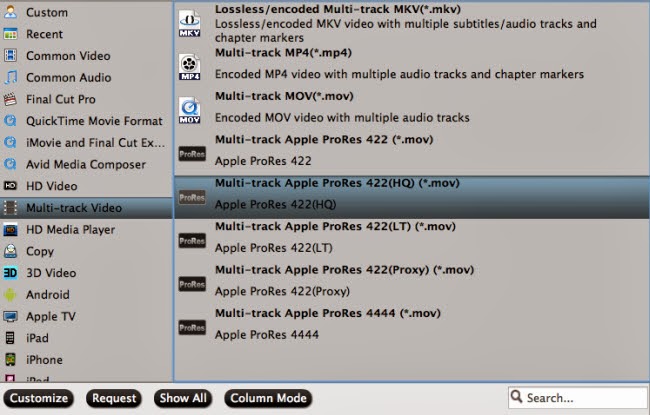
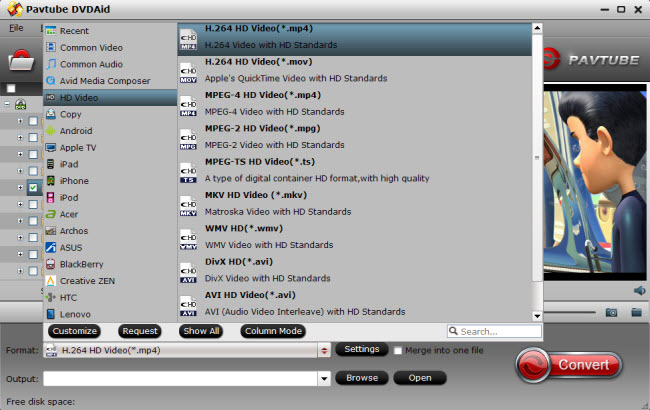
Step 2: Choose the optimized format for output. In order to watch DVD movies on my iPad Air, I select "iPad" > "iPad Air HD Video(*.mp4)" as output format.
 
choose mp4 format 

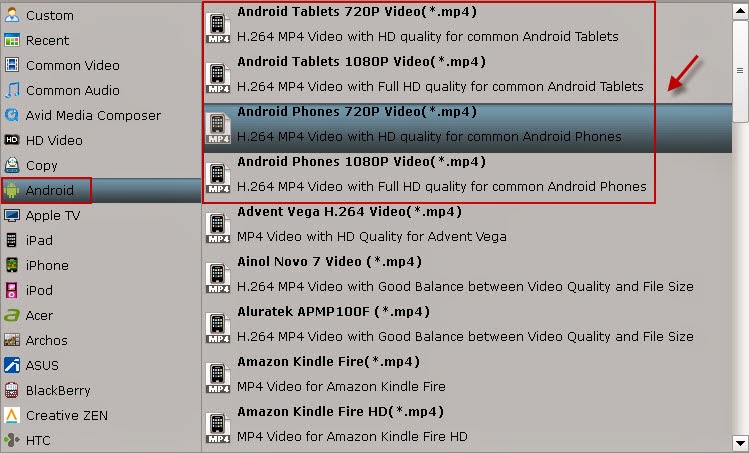
If you have other mobile device, search for the particular profile from the "Format" drop-down list. When you cannot find your smartphone or tablet there, don't worry, use the similar format with your device or choose Android or Window profile, and then adjust profile presets to achieve the best video and audio quality for your device.


Step 3: click on the "Convert" button and start ripping DVD movie. When the conversion is done, I will find the converted MP4 movie in output folder and transfer to my iPad Air via iTunes 11. And the whole process of ripping DVD to iPad Air completes and I am ready to reach my DVD collection on iPad Air, iPhone 5S, and other mobile devices.

Read more:


Thursday, March 27, 2014

How to export Blu-ray/DVD content to Avid Media Composer with high-quality video for editing on Mac?

Want to convert contents from Blu-ray and DVD discs to a high-quality video format(like DNxHD mov) for editing in Avid Media Composer on Mac? Whatever you are novice and pro users, you can export Blu-ray/DVD to Avid Media Composer easily with Pavtube ByteCopy for Mac.

"Hi I'm an amateur video editor who wants to make some trailer or mash-up to improve my skills. I do own hundreds of Blu-ray and DVD discs but want to extract some clips out to Avid Media Composer for editing; high-quality video is my first choice. Is there any good software for this? Many thanks!"

To extract clips from Blu-ray and DVD disc is much different from playing back directly. Firstly, commercial DVD and Blu-ray are protected from copying, so you have to roll off disc protection firstly; then the format and quality issue.


The workflow seems to be complicated. However, with Pavtube ByteCopy for Mac I'm running, it can't be easier to get high quality DNxHD .mov file from BD/DVD.

Pavtube ByteCopy for Mac is the "All in one" Blu-ray ripping software, simple and easy to use with lot's of presets which I can change.

Which I like most is the DVD/Blu-ray decoder, I don't care about protections, Pavtube take card about everything. As long as your disc has been downloaded, it's decrypted. So make sure your Internet connection is ok.

And it provides multi-track MP4/MOV/ProRes/MKV presets in which I can isolate dialogue and music in one movie if I want.

Free trial download link: http://www.multipelife.com/download/bytecopy-mac/bytecopy_setup.dmg

How to use Pavtube ByteCopy for Mac to rip BD/DVD to high quality DNxHD .mov on Mac? 

Step 1. First of all, get this Blu-ray/DVD to Avid MC Converter installed and insert DVD to Mac. Btw, Mac cannot read Blu-rays directly, if you want to rip Blu-ray, plug-in your external Blu-ray drive to Mac and read Blu-ray there.

Now click the first disc-like icon on the top, click your disc name to load. Pavtube ByteCopy for Mac will detect the main title automatically, unless you wan to rip the extras, do not touch it.

load dvd movie to dvd to mede8er converter

Step 2. The next step, click "Format" drop-down list and choose "Avid Media Composer>Avid DNxHD(*.mov)".


Step 3. Now the most important step to get DNxHD file in best quality.

Click the "Settings" icon (next to "Format"), set bitrate to "High quality". The higher bitrate you choose, the larger file size and better video quality will be.
Also you can free change other settings like frame rate, audio sample rate, channels, etc. here.

Step 4. Well it's all set now. Back to main UI, hit the big red "Convert" to start ripping Blu-ray/DVD to DNxHD MOV in best quality for Avid Media Composer on Mac. Wait for moments, hit "Open output folder" or "Open" to quick find the converted files.

Related articles:

Saturday, March 22, 2014

Pavtube ByteCopy for Mac v1.0 Giveaway [Save $42]

Giveaway!!!! Giveaway!!!! Giveaway!!!!

Hi, Friend! I'm so excited to tell you the amazing news that we are going to have a giveway of Pavtube ByteCopy for Windows and Mac at 0:00 on March 23th, 2014, U.S.A. California Los Angeles time. This is only a 24 hours giveway which is providing the great and strong BD/DVD multi-track tool totally the same as Pavtube official (42usd) retail version; no time limit, no watermarks. 

Key features for Pavtube ByteCopy (Windows/Mac) are as below:
  • Backup BD/DVD to MKV without quality loss (keep 1080p quality at 16:9 aspect ratio). 
  • Convert/rip/shrink/copy latest Blu-ray/DVD movies for Android/iOS/Windows device, editing program, HD player, game console, etc. 
  • Allow full preservation of all audio tracks, subtitles and chapter markers. 
  • Remove unwanted subs streams and audio tracks 
  • Preserve soundtracks and subs in multiple languages, e.g. English, Spanish, French, Deutsch… 

The giveaway page is here:

ByteCopy (Windows) giveaway:

http://giveaway.glarysoft.com/pavtubebytecopyv1.0-728/

ByteCopy (Mac) giveaway:

http://giveaway.glarysoft.com/pavtubebytecopyv1.0(formac)-729/


Note: The giveaway version may not be updated in the future.

How to get the giveaway?

The way to get licence is very easy and convenient. Just visit the Glarysoft Giveaway page and click download now when the giveaway start to get fully licensed software for free. Only available on 23th, please don't miss this chance.

Hurry Up!

Got it? Great! I know you're gonna like the software but you can click the thumb to praise and say “Thanks” by tweeting this link and sharing on Facebook. By doing this, you're giving your friends a $42 dollar gift and you're supporting us to host more giveaways! Come on, sharing only takes about 5 seconds.

More featured titles:
Blu-ray Ripper is capable of 1:1 copying BD/DVD Disc content to local computer or external hard drive in original file structure with all subtitle tracks and audio streams preserved. Pavtube Blu-ray Ripper also supports backing up only movie content without extras to save time and storage space. At the same time, it rips/converts 3D Blu-ray discs, 2D Blu-ray discs, and standard DVDs to your desired HD and SD media formats.
  
Pavtube DVD Ripper provides movie lovers, children and people in any group with the easiest and fastest way to backup and rip DVD movies. It rips and converts DVD movies to MP4/AVI/MKV/WMV and many other video and audio formats with high quality. It lets you enjoy DVD movies on any portable device like iPhone 5, Galaxy S4, Lumia 920, PS4, Xperia Z, Surface, etc.
  
Pavtube Video Converter Ultimate provides 1:1 backup Blu-ray/DVD movies from disc to PC hard drive for disc burning and ISO image creating. It converts Blu-ray, DVD and video to MP4/AVI/MKV/WMV any popular video and audio formats. Besides, it allows for video editing tools including trimming, cropping, splitting, attaching srt/ass/ssa subtitles and special effects to add more fun when watching movies and videos.

More step-by-step guides can be found here:

Bytecopy windows guides: http://www.multipelife.com/bytecopy/how-to-use-bytecopy
ByteCopy for Mac guides: http://www.multipelife.com/bytecopy-mac/how-to-use-bytecopy-mac

Thursday, March 20, 2014

Convert & Import Blu-ray/DVD to Final Cut Pro X with 5.1 sound on Mac Mavericks

This is a detailed guide to help you extract Blu-ray/DVD movie, convert it to ProRes 422 HQ with 5.1 surround sound in FCPX with a clean edit.  

Why I am missing 5.1 surround sound after converting Blu-ray/DVD to ProRes? Why FCP X log and transfer does not work with Blu-ray/DVD? Can I obtain all the languages without losing surround sound in my digitized Blu-ray/DVD movies?

You may have tried some blu-ray ripping tools and run into problems above. To be fair I have not tried many of them but also have problems like this. Hereby, with a successful trial, I'd like to share my experience here.


Firstly, you need a tool which is capable of rolling off Blu-ray/DVD disc protection, then convert them to multi-track ProRes 422 HQ with surround sound for editing in FCPX. On this step I recommend Pavtube ByteCopy for Mac because it’s quite easy to use and work reliably.
  
How to rip BD/DVD to ProRes 422 HQ with 5.1 sound for FCP X?

Step 1. Download and install this Pavtube ByteCopy for Mac, load disc.

Note: you need an external Blu-ray drive to make your Mac recognize Blu-rays firstly. Insert your discs, launch Pavtube and click the top left icon, you will find it detects your disc and shows the name automatically. Just click it to load.


Step 2. Choose format for editing on FCP X.

Click the “Format” icon; you may notice there’re two options of ProRes 422HQ. One is inside the “Final Cut Pro” the other is inside >Multi-track Video”. The only difference between these two presets is that the former is common one-track preset while the later could keep all your audio tracks (languages). I’d prefer the Multi-track one.

Okay choose “Multi-track Video>Multi-track Apple ProRes 422(HQ)(*.mov).


Step 3. Customize V&A settings.

Let’s move to “Settings” icon (right besides “Format”), you will find two tabs one for Video and the other for Audio. On Video tab, you can change target video quality as there are three levels for you to choose. 

In the Audio tab, we can check the audio tracks we need as below:


Just leave unwanted audio tracks unchecked, change audio channels to “5.1 Channels”. Click OK to confirm the change.

Step 4. Start conversion.

Back to main interface and hit “Convert” to start ripping Blu-ray/DVD to multi-track ProRes 422HQ. After it completed, click “Open output folder” to quick locate the converted MOV files.

Read more:

Tuesday, March 18, 2014

Why didn't DVD play on my computer?

Hello DVD fans! Have you encountered "wrong region" problems when playback DVD on computer?

We all know that a region 1 DVD cannot playback on region 2 DVD player or computer due to region code issue. It's what film distributors used to control aspects of film release, including content, box office, price or so, according to the region.

Here is a DVD region code map worldwide:


In most computers, region code restriction is written to DVD drive firmware. If you didn't set it properly, you cannot playback most DVDs even if this DVD drive is transferred to another computer. WinDVD offers five times to allow you change DVD drive region code, for example you can change your DVD drive to region 1 to play a region 1 DVD. But note if the number of allowances reaches zero, the region last used will be permanent.

Okay here is a brief guide of how to change DVD region code:

1) Open My Computer;

2) Right click drive-> Select Properties;


3) Select the one you are trying to use -> then click the "Properties" button;


4) Select the "DVD Region" Tab to set the region & change "Current Region" to "Region 1".


If you have any questions of Pavtube programs, feel free to let me know or contact dvdwinsupport@pavtube.comand dvdmacsupport@pavtube.com for help.

Tips: News, updates, programmings, all can be found on our facebook or google+: