Showing posts with label Backup. Show all posts

Wednesday, March 25, 2015

Convert ISO files to MKV in both English and Hebrew audio

Want to rip ISO images to MKV with English and Hebrew audio, let’s talk about ISO to MKV Converter and how to keep both audio at first.

Q: “ I want to transfer it to HD MKV movies, but can not find the way so i can have it in different audio ( english and hebrew) and also to have few subtitles ( hebrew and english)  is there a way to do it ? i can not mark more then one in the program, and when i mark Hebrew for subtitles, i can not even play it without subtitles...”
  
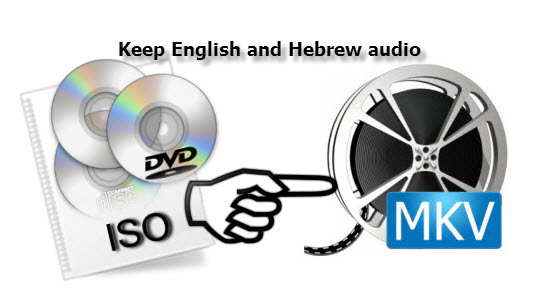
Nowadays many folks like backing up their DVD discs into ISO image files for managing their DVD movie in an easy way. ISO images are stored in an uncompressed format. If you’re intend to put and play the ISO files with english and hebrew audio. It’s impossible.  you need to do some work in advance.


In fact, with the right program, you can get all done easily and quickly. I recommend you Pavtube Bytecopy, which is special designed for users to rip Blu-ray/DVD ISO files to MKV with multiple audio tracks(english and hebrew). Moreover, it's also a professional Blu-ray/DVD ripper, allows you to rip and convert Blu-ray/DVD discs to any video format you like. Intimate is, there are many optimized presets for tablet and smartphone, including Kindle Fire HDX, Google Nexus 7/Nexus 10/Nexus 4, Galaxy S6/S6 Edge, Galaxy Tab 4, iPad Air 2, iPhone 6 Plus etc. which will give you best video quality.
  
Note: If you are a Mac user, you can turn to ByteCopy for Mac. Now get the right version and follow the below guide to finish converting ISO to MKV with english and Hebrew audio. 

Easy Solution to Convert ISO files to MKV in both english and hebrew audio 
  
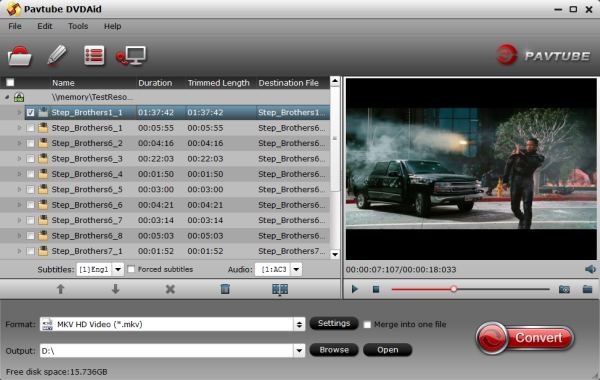
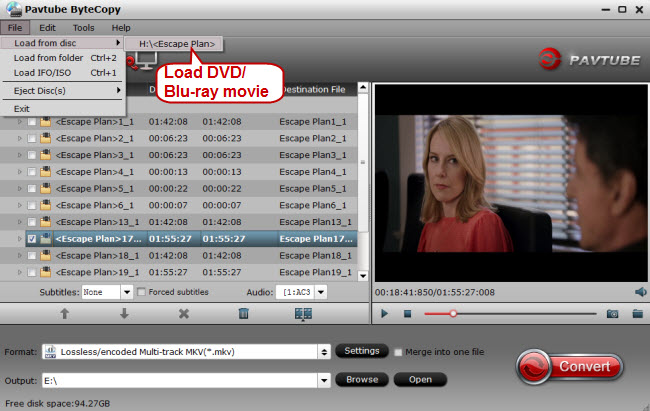
Step 1. Free download the best Blu-ray/DVD ISO to multi-track MKV converter, install and launch it. Click "Load disc" button to import my source movie from disc drive. 


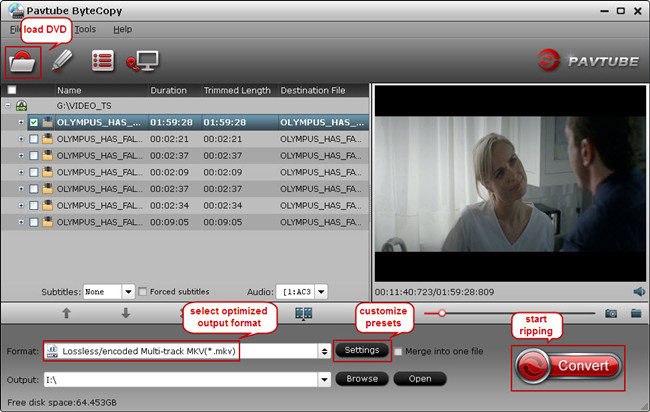
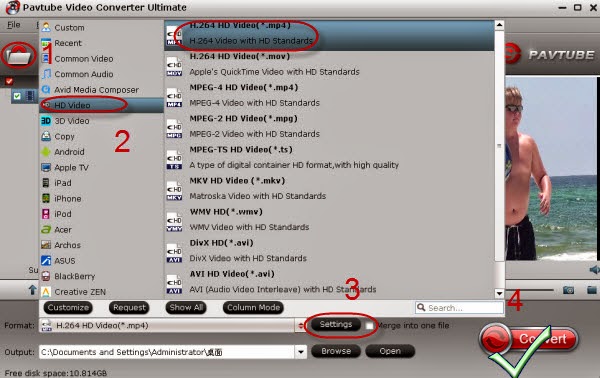
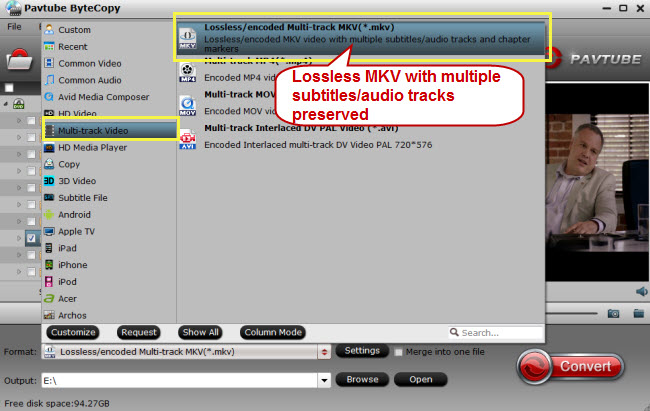
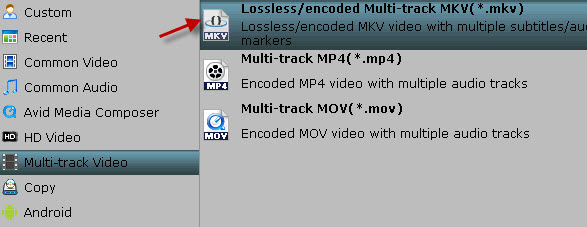
Step 2. Choose "Lossless/encoded multi-track MKV (* mkv)" from "Multi-track Video" under "Format" as output format. The profile exports Blu-ray/DVD ISO to MKV with more than one audio track.


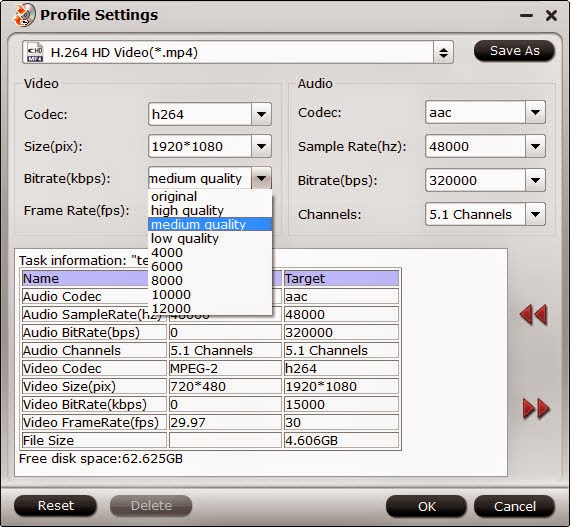
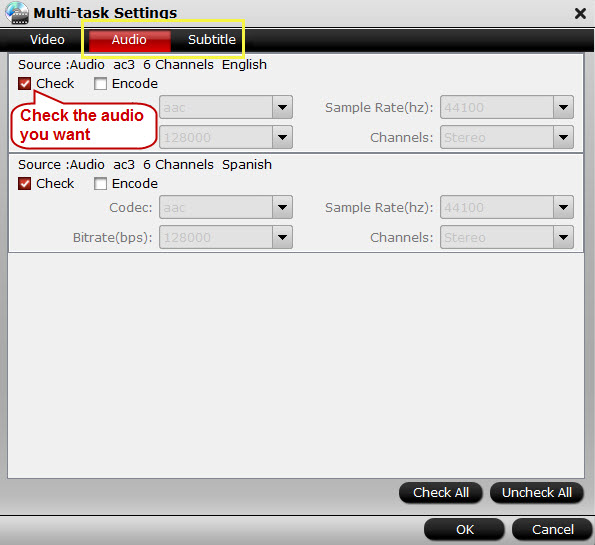
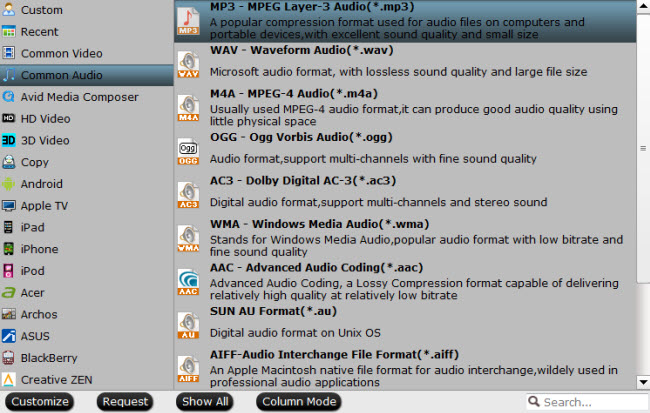
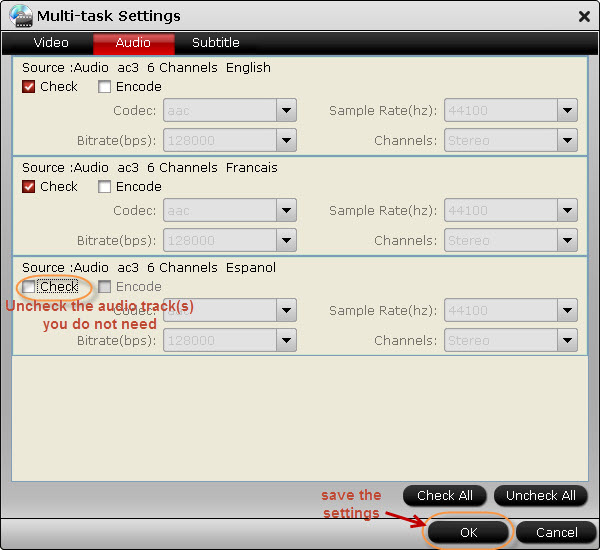
Step 3. 4. Adjust profile settings to save both English and Hebrew audio tracks. Click the “Settings” button next to Format Tab, switch to “Audio” option and unchck other audio tracks and only leave English and Hebrew audio, and save your settings. 


Step 4. Then hit the big "Convert" button on ByteCopy main UI and rip ISO movies to multi-track MKV with english and hebrew audios. Once it finishes, open output folder and get the created multi-track MKV movie for watching on both TV and tablet. 

Read More:

Monday, February 9, 2015

Copy/Convert DreamWorks DVD movies for watching effortlessly

Are you searching high and low for a way to rip, convert and copy your DreamWorks DVD collection for easier store or playback? If so, get the quick fix from this article.

For most movies fans, DreamWorks Animation may be quite familiar since it is a world-famous animation studio that creating a bunch of animated feature films, television programs, and online virtual worlds.

However, when it comes to watching latest DreamWorks movies in theater, you may inevitably miss some of your favorite ones. Then you will choose to buy some DreamWorks DVDs like How to Train Your Dragon 2, Rise of the Guardians, Shrek Forever After, etc. for watching to make up for this pity.

Copy/Convert Disney DVD movies for watching

In this case, most people are troubled by finding out the needed DreamWorks DVD in time from a pile of DVDs. On one hand, DreamWorks DVD collection takes so much space that it is difficult store. On the other hand, it needs DVD drive or DVD player to play DVD videos. If you want to enjoy recent DVDs on tablet, you have to backup these DVDs to hard drive first.

Try some freeware to do this job but get disappointed? Since as you know, DreamWorks DVDs is copy protected, which most DVD ripping tools can't deal with. For example, the freeware like Handbrake and Freemake Video Converter can only deal with the non-protected DVDs and DVD Decrypter, like DVD Shrink, although can decrypt protected DVDs, but they upgrade very slowly and can do nothing about the latest released DVDs. Also even some paid DVD ripping programs can't successfully finish this task.

What you need is a more professional DVD ripping tool. Unlike the free DVD transcoder software, Pavtube DVDAid is an intelligent DVD copy and ripping tool that is very easy to use. It has already successfully ripped several new released DreamWorks DVD movies to decent format MP4 I need and other formats like MKV, AVI, WMV, MOV, M4V, FLV, etc. Also the converted DVD quality is quite satisfactory; you even cannot notice the difference between the original DVD and the ripped version. If you are Mac users, please turn to DVDAid for Mac. Now download the right version and start the conversion.

How to convert DreamWorks DVD movies to video/audio files

Step 1> Import DreamWorks DVD movie

Insert the DreamWorks DVD disc into your computer's hard drive and run the DreamWorks DVD Ripper. Then click "Load DVD" and import your DVD movies. You can also add DVD folders, ISO image files or IFO files to rip.


DVD to Plex Ripper

Step 2> Choose output format

Click "Format" bar and select the output video/audio format you like. You can either choose MP4, MOV, AVI, WMV, etc. as the output format.


Plex Media Server video format

Tip: If you can also select the icon of a device/software to get videos with optimized settings for a certain device/software like iPhone, iPad, iPod, Samsung, PS3, etc.

Step 3> Start ripping DreamWorks DVD

Click "Convert" button to start the DreamWorks DVD ripping process. After the conversion completes, you can click "Open" to get the ripped media files. After that, you can enjoy DreamWorks movies anywhere you want them.

Tips: If you want to 1:1 copy DreamWorks DVD to hard drive without anything loss, please go to the way backing up DVD in Video_ts folder.

More related:  

Friday, February 6, 2015

Backup 2015 Oscar Video from YouTube for watching on mobile devices

Here is a guide of how to backup movies performed by 2015 Oscar film Winners and Nominees from YouTube for watching on mobile devices for watching at free will.

The nominees of the 87th Academy Awards were announced on Jan,15th, one month earlier than the final ceremony which will be launched on February 22, 2015 at the Dolby Theatre in Hollywood, Los Angeles. Although the final ceremony of the 87th Oscars is still a while to go, audiences are able to enjoy those nominees they've missed from various online channels, like YouTube.

Backup 2015 Oscar Video from YouTube

All the 2015 Oscar awarded and nominated films from YouTube are worth collecting, if you have downloaded some of the YouTube movies onto computer with a YouTube Downloaders, it is a great way to copy them onto mobile devices, then you can watch them anytime anywhere you like on the go.

Obviously to backup 2015 Oscar YouTube Movie to mobile devices for future watching with your family, you need a third-party software at first. Well, masses of tools like Xilisoft Video Converter Ultimate, Handbrake can be found on the Internet that makes it reasonably easy to convert 2015 Oscar Video from YouTube for storage. But you know, not all the tools are good enough and with no quality loss.

Here the best one I tried is Pavtube Video Converter Ultimate which can do us such a favor in converting 2015 Oscar YouTube Video to AVI, MP4, MPEG(2), MOV, WMV, FLV, ISO image, or other digital video files for watching 86th Academy Awards Best Pictures on Apple TV, iPhone 6/6 Plus, iPad Air 2/mini 3, Android, iPod Touch, Samsung Galaxy S3/S4/S5, Note 4/Edge/3, Kindle Fire HD, Xbox, PSP, and so on. Plus, you can edit video to get clips of your favorite scenes from a movie before conversion. Mac vesion is here. In this article, I'll show the best way to backup 2015 Oscar Video from YouTube for watching on mobile within four simple steps.

How to convert downloaded 2015 Oscar YouTube Video to mobile devices with Ease

Step 1: Import FLV files from YouTube.

Launch the best mobile YouTube Converter. Click the button “Add Video” to add YouTube video files. If it is necessary, you can double click the each file to have a preview.

Tip:
If you have several video files, and wanna combine video files for mobile devices, you just need to tick off the “Merge into one” box.

Step 2: Select an output format and set the output folder.

Click on the dropdown menu of “Format” and then move your pointer to “Common Video” and choose “H.264 HD Video(*.mp4)”, “MPEG-4 HD Video(*.mp4)” are compatible format. And then you can set the output folder.


Step 3: Click “Settings” icon to adjust audio and video parameters for mobile devices.

Click the “Settings” icon and you will go into a new interface named “Profile Settings”. You can adjust codec, bit rate, frame rate, sample rate and audio channel in the interface according to your needs and optimize the output file quality.

Step 4: Start converting your 2015 Oscar YouTube flv videos to mobile MP4.

Click the “Convert” button; it will convert 2015 Oscar videos from YouTube to MP4 for mobile devices immediately. Once the conversion is done, you will be able to get the output files via clicking on “Open” button effortlessly.

Tips:

If you wanna convert 2015 Oscar Video from YouTub to audio files, iTunes, Windows Media Player, Video Converter Ultimate is also of great help. Why do you still hesitate? Download and begin the enjoyment now! As you see, watching YouTube video on mobile devices without limitation is quite a piece of cake!

More related: 


Wednesday, February 4, 2015

Copy Blu-ray/DVD movies to Seagate Wireless Plus for widely sharing wirelessly

This article shows you an easy way rip and convert Blu-ray/DVD to Seagate Wireless Plus supported video for widely sharing wirelessly on a trip.

Forget about having to choose which files to load onto your tablet or smartphone before a trip. Bring a Seagate Wireless Plus all with you! Wireless Plus has enough built-in storage like the 2TB one can load up to 500 movies or thousands of songs, photos and documents. Wanna adding your large Blu-ray/DVD collection to Seagate Wireless Plus for enjoying on trip with your family? Now learn the step-by-step guide on the way to realize.


adding Blu-ray/DVD collection to Seagate Wireless Plus

Since Seagate Wireless Plus can not meet the demands of put Blu-ray/DVD discs online, to save Blu-ray and DVD on Wireless Plus for convenient access, you need to convert and rip Blu-ray/DVD to Seagate Wireless Plus supported video files at first.

Software Requirement:

Pavtube ByteCopy or ByteCopy for Mac is such a wise choice for you. With it, you can not only rip and convert Blu-ray/DVD to Seagate Wireless Plus with super fast conversion speed and excellent image and sound quality, but also easily backup your Blu-ray and DVD disc with whole content copy or backup main movie. Best of all, you can lossless copy your discs in mkv for storage with multiple audio tracks keeping. (Read comparison review: ByteCopy & MakeMKV) Let's have a closer look at the basic steps.

How to rip and copy Blu-ray/DVDs to Seagate Wireless Plus friendly video

Step 1: Load Blu-ray/DVD movies

Run the Blu-ray/DVD to Wireless Plus Ripping program and click “BD/DVD disc” icon to load Blu-ray/DVD movies for converting. You can also import movies files from Blu-ray/DVD folder or ISO image files.

Blu-ray/DVD to Wireless Plus Ripping program

Tip: Highlight the movie title you want to rip, and then you can click the dropdown menu after “Subtitles” and “Audio” respectively to select your wanted subs and audio track to be preserved in the resulted files.

Step 2: Choose output format

As Seagate Wireless Plus is powerful enough to almost all kinds of formats, you can choose the format according to your own needs like MP4, MOV, AVI, MKV, etc. If you would like to enjoy movies from physical discs to your mobile phone and tablet, you can select a decent format like "iPad > iPad HD Video(*.mp4)" from the profile list comes with the software.

Seagate Wireless Plus supported format

Tip: Click Settings bar, you can adjust the level of compression to suit the quality you want.


Note: If you prefer a much better video quality and don’t mind the output file size, you can rise the video bit rate higher. Generally speaking, the higher video bit rate will result in the larger output file size, and vice versa.

Step 3: Rip Blu-ray/DVD to Seagate Wireless Plus

Finally, click "Convert" button to rip/convert Blu-ray/DVDs to optimized format for Seagate Wireless Plus. When the conversion finishes, click Open button to find the output files and you can do the online movie sharing via your Seagate Wireless Plus on iPad with family members and friends. Also you can stream your video onto any smart TV or devices in the house using Seagate.

More related:

Monday, February 2, 2015

How to Copy and Rip DVD to Plex Media Server for Streaming

This article mainly shows you an easy way to rip and store DVD on Plex Media Sever for free streaming, playing and sharing with your TV and mobile devices freely.

Plex is designed to organize all of your personal media so you can enjoy your movies freely on  TV, iPad, computer or phones both home and away. Have have a diverse library of DVD movies? What if we want to store DVD on Plex Media Server? No worry, the article will focus on how to rip DVD to Plex Media Sever for playing and streaming. 


store DVD on Plex Media Server
  
To get your DVD collection to Plexwhat you need to do is to convert your DVD movie library to Plex Media Server friendly format at first. There’s all kinds of different DVD ripping software out there (some free, some not) with a variety of different options. It seems a bit overwhelming. Well, more than one guys recommend Pavtube DVDAid, which can help us finish DVD conversion bypassing DVD copy protection.

With it, we can convert DVD to Plex Media Server with MP4 format (the most compatible video format for Plex Media Server) without quality loss. Plus, it also allows users to copy DVD to hard drive with original structure or main movie only. Best of all, with its built-in video editor, you can personalize and retouch your videos in clicks. For Mac users, DVDAid for Mac will be a helpful app.


How to Backup and Rip DVD to Plex Media Sever

1. Add DVD movies

Install and launch DVD Ripper program, and then click the disc icon to import your source movies to this program. Set your wanted subtitles and audio track from the drop-down box of “Subtitles” and “Audio” tab.

DVD to Plex Ripper

2. Select an output format

Click the “Format” option, and choose HD Video > MKV HD Video(*.mkv) as output format. You can also select H.264 HD Video (*.mp4) for Plex Media Server.

Or backup DVD with Main Title only and original structure for storage.

Plex Media Server video format

Tip: If you like, you can click “Settings” to change the video encoder, resolution, frame rate, etc. as you wish. Keep in mind the file size and video quality is based more on bitrate than resolution which means bitrate higher results in big file size, and lower visible quality loss, and vice versa.

Plex Media Server video settings

3. Start ripping DVD for Plex Media Sever

Click the "Convert" button under the preview window, and the DVD ripper will start the conversion from DVD movies to MKV or MP4 for Plex Media Sever. After conversion, you can stream DVD movies through Plex Media Server to HDTV or iPad, Galaxy Tab, or other DLNA-compliant devices.

More related:


Wednesday, January 28, 2015

Backup Blu-ray Collection into Synology DiskStation DS215j readable video

Read this article and you will quickly learn how to backup and convert Blu-ray movies to Synology DiskStation DS215j friendly video for streaming.

As a devoted owner of a collection of Blu-ray discs, you would love to share some awesome movies with your friends or family, or watch movies in your smart phone while traveling. And of course you don’t want to break them if you use them many times. So that may be a dream to put all your Blu-ray in a NAS like Synology DiskStation DS215j with 6TB. (Have a 3TB external network drive? The Blu-ray backing up is just a piece of cake!)

Backup Blu-ray Collection to Synology DiskStation DS215j

With a Synology Ds215j, your Blu-ray movies can be accessible from any device from anywhere or displayed on TV at home via network. Then how to realize your dream?

In fact, to backup a Blu-ray disc to Synology DiskStation, a powerful third-party software for backing up Blu-ray is surely needed at first. Here Pavtube BDMagic is the best Blu-ray to NAS Ripper (Read the top Blu-ray Rippers review) that can output Synology DiskStation and multimedia players readable formats such as .mp4, .mov, .m4v, .mkv for storage from Blu-ray with ease. Meanwhile, you can freely select the desired subtitle and audio. And the most important thing is that by using NVIDIA CUDA technology or AMD APP tech, the conversion speed can be even faster than before. Mac version is here. Here are simple 3 steps  for you to do the backup.

3 Steps to Rip and Copy Blu-ray to Synology DiskStation DS215j

Step 1. Import Blu-ray files

Download Pavtube BDMagic and run it. Import a Blu-ray folder or Blu-ray ISO file you have. (Learn how to keep DVD chapter markers when copying)

Blu-ray To Synology DiskStation Converter

Step 2. Choose an output format

Move your mouse cursors down and see “Format” box. Yeah, don’t hesitate, just click it and you  can choose Synology DiskStation DS215j best supported mp4 format which is also playable on your media devices, or you can select the corresponding format for iPad, iPhone, PS3, Apple TV, etc. for easily streaming.

Synology DiskStation Supported Formats

Tip: If you want to output smaller size and save space in your DS215j, you can adjust “Bitrate”in “Settings”by choosing a smaller bitrate.


Step 3. Start to copy Blu-ray to Synology DiskStation

Press “Convert” and now it will start your Blu-ray copying with lossless quality. After you finish ripping your Blu-ray to Synology DiskStation DS215j, click “Open” button down to find your output file.

Now what you need to do is to connect the Synology DiskStation to PC and stream videos from Synology DS215j to iPad, iPhone, Apple TV, PS3, or other media players for enjoying anywhere! Note that you need to make sure the wireless network is accessible between your Synology DiskStation and the media player. So easy! Isn't it?

Monday, December 22, 2014

Rip Blu-ray title to AVI format for playing on any modern portable media player

This tutorial is about how to use Pavtube BDMagic to convert Blu-ray title to AVI for playback with specific modern portable media player. Please follow me step by step.
 
In the past, if you want to preserve your hundreds of Blu-ray discs, it may take you the space of a whole shelf. Now to clean up your Blu-ray collection and get them freely playback on any modern portable media player, ripping Blu-ray to AVI format should be the right thing to do. So today I am here to give you guys the one-stop solution to convert Blu-ray to AVI with original video quality.
convert Blu-ray to avi

For those who would like to realize the ripping process, Pavtube BDMagic will be your best option. (Here is review) It enables you to remove Blu-ray protections and then rip Blu ray to AVI format, which is playable on majority of PC media players, with keeping most razor-sharp image. Besides AVI, users may use it to convert their Blu-ray to other formats like MP4/MOV/MKV/WMV/MPEG, and to play on other devices as well.

Now I will show you the full guide on how to convert Blu-ray to AVI with High Quality and Fast Speed. Check out. 

Tutorial: How to Rip Blu-ray to AVI for playing on any modern portable media player

Step 1: Load Blu-ray Movies

Install and run the ideal Blu-ray to AVI Converter(For Mac users, BDMagic for Mac will do a great job). Simply click the "Load BD" button on program toolbar to load Blu-ray movies from disc or computer. All imported Blu-ray movies could be previewed on program right viewing window. 

Blu-ray to AVI Converter

Tip: All titles of the original Blu-ray movies could be seen on program left panel. And in every title, you can see various chapters. Just check the titles or chapters you want to rip.

Step 2: Choose Desired Subtitles for Output 

To convert Blu-ray movies to AVI with subtitles contained, just simply click “Subtitles” and select the one you prefer.

Tip: You can also choose to rip Blu-ray with forced subtitles if you don’t want to have extra subtitles on screen for your native language.

Step 3: Select AVI output format
Select “DivX AVI - Audio Video Interleaved(DivX)(*.avi)” as output format from “Common Video” category under the drop-down list of “Format”. If you want to get better HD video quality, choose “AVI HD Video(*.avi)” from “HD Video” category as the output format for playback on any modern portable media player.

  avi video format

Step 4: Start ripping Blu-ray to AVI

As all settings are done, you can click bottom-right button "Convert" to start converting Blu-ray to AVI. The time that it takes Depends on your source movie quality and Movie Length. And thanks to its built in Nvidia CUDA and ATI stream accelerate technology. Makes the conversion speed at least 6X faster than common conversions. 

When the task is done, click “Open” button to find the result movie file. Then, you can grab a top AVI player and view Blu-ray titles in modern portable media playersOf course, the lossless quality is ensured on output files. In addition to Blu-ray playback, you can also get Blu-ray for editing in your Premiere Pro freely. 

Friday, December 12, 2014

Convert PAL DVD to MP4 NTSC DVD for freely Playback or Burning

Below tutorial guides you to rip and convert PAL DVD to MP4, MOV, AVI, MKV for playback and to NTSC video for later DVD burning.

When do you need to convert your DVD video from PAL to NTSC?

The answer is simple: when you want people overseas to watch your DVD. It’s not a secret that different countries use different analog television encoding standards. So when you plan to let your friends play a European or Chinese commercial PAL DVD on their American NTSC player, they may be unable to successfully watch it on their DVD players. 
Convert PAL DVD to MP4 NTSC DVD

To resolve the incompatibility problem of NTSC and PAL formats, you will need software which will allow you to convert PAL DVD to MP4 NTSC DVD. Pavtube BDMagic offers just what you are looking for!
  • Review: Best Software for ripping Blu-ray on Windows and Mac
This convenient PAL to NTSC Converter will allow you to turn PAL DVD to region free and rip PAL DVD to MP4, MOV, AVI, MKV, etc. so as to be compatible with all the media players. With this PAL DVD ripper in hand, you can play your PAL DVD anywhere anytime without worrying any incompatibility issue. What's more, you can also convert your PAL DVD to NTSC format video for burning into a blank DVD. The mac verion is BDMagic for Mac.

Part I: How to Rip and Convert PAL DVD to MP4 AVI MKV MOV

1. Import PAL DVD

Install and run the  PAL DVD ripper. Insert the DVD disc into your computer drive and then load DVD files that you want to convert to the program.

PAL DVD ripper

2. Specify an output format

Click the Format bar to choose an output format. Usually, popular format like WMV, AVI, MP4 can be play smoothly in Windows. So, choose these format from Common Video profile list.

MP4 video format

Tip: Each format parameters can be customized. You can adjust them as per needs or just keep the original settings.

3. Start PAL DVD conversion

When all settings are done, click the Convert button to start the ripping process. After the PAL DVD ripping procedure is over, you can finally enjoy PAL DVD movies on any country you like. 
  • Read more DVD and Blu-ray ripping tips here.
What's more, here is another workaround to play PAL DVD on computer:

1. Click the "Start" button on the desktop, then right-click "(My) Computer" and select "Properties" from the pull-down menu.
2. Choose "Hardware," then "Device Manager." This loads a window with all the hardware installed on the computer system.
3. Choose the "DVD" option, then right-click the DVD and select "Properties."
4. Click the "DVD Region" setting. This brings up the DVD region change option window. 
5. Determine the region of your PAL DVD. A PAL DVD from Europe and South Africa is Region 2, while India is Region 5, China is Region 6, South East Asia (Thailand, Indonesia, Malaysia and Singapore) is Region 3 and Australia is Region 4.
6. Select the PAL region on the computer settings and click "Apply" to accept the changes. 

Note: You can change the region only five times. Besides, for those who wanna play and share PAL DVD anywhere freely, we still recommend the first solution.

Part II: How to Rip and Convert PAL DVD to NTSC DVD 100% Quality Reserved

1. Insert DVD in your computer DVD-ROM, click the DVD disc button to import your DVD movies. 

2. Click “Format” bar, choose “VOB Format” > “DVD-Video Format - NTSC(*.vob)” from the Format menu to copy the . vob files from your PAL DVD.


3. After that, do remember clicking “Convert” button to do PAL DVD video to NTSC conversion on Mac. After a few minutes, you can garner your desired NTSC DVD video and burn it to your blank NTSC DVD disc for storage. You’re done.
Tip: To burn your PAL or NTSC videos to DVD right after conversion, you can use Pavtube DVD Creator. And this comprehensive software BDMagic + DVD Creator package will help you to save more money.

Tuesday, December 9, 2014

Ideas for Storing 1000 DVDs in Super Small Apartment- Cool and Creative!

If have huge DVD collections in hand, here a few cool and creative DVD storage solutions to store thousands of DVDs in small places.

Q: My husband collects books, records, and DVDs. After years of trying to streamline, we still have two ten foot tall bookcases filled a couple rows deep with books and three mismatched CD racks scattered throughout the apartment, each holding at least 250 DVDs, not to mention a couple hundred more stashed in various drawers. The problem is that we live in a tiny, narrow tenement apartment. I've been working hard to de-clutter and to cultivate a home that feels cozy but not cramped. Any ideas? Please help!

DVD Storage Ideas 
In fact, it may take you great efforts to declutter and to cultivate a home to make it tidy but not cramped. If you have a mountain of collections scattering around the room and run out of ways to store those DVDs, now you can say goodbye to the stubborn piles as here some smart and creative DVD storage ideas are shared with all you guys to store thousands of DVDs in your tiny apartment.

Unique Digital Idea for DVD Storage
Digital Idea for DVD Storage

To keep thousands of DVDs intact without taking up any space, one of the perfect DVD storage solutions goes to digitize your DVD collections. With Pavtube BDMagic for Mac, you can store as many DVDs as you want in your computer or other devices, with the DVD movie quality untouched and no space occupied. Besides, you can crop the black bars, add special video effects, split or merge videos, etc. as you like with the built-in editor. The windows version  is here
Other Cool DVD Storage Ideas

1. Hide DVDs in DVD Storage Units like Bench, Bed etc

Bed offers a lot of space for you to store DVDs. You can just install a drawer under the bed to fit more DVDs while stay easy to retrieve them when needed. Also, the bench used as the landing place to sit and put on shoes in the entryway is another good place to store DVDs.

2. Put DVDs on DVD Storage Shelves

As a matter of fact, you can add some special visual interest with wall mounted DVD storage racks, also known as floating shelves by mounting them on the wall in a way to create creative letters or designs. Besides, the DVDs can also be sorted by colors or some other style to make it more creative.

For your reference: If you have bought tons of movies like Jurassic Park, Disney, The Expendables 3, 2014 27th European Film AwardsTop 10 Steven Spielberg movies, you can backup these DVD collections to hard drive, convert them to portable devices, store them in other memory device and even upload them onto cloud to get rid of any possible physical damages.

Note: Whichever DVD storage solutions you have selected to organize DVD collections, for better accessibility purpose, you are suggested to organize them by certain category like alphabet, genre, mood etc. And tabs can help you easily find the disc you want.

Sum: While it is good to see that DVDs are getting smaller and smaller which makes the storage of them much easier, among those genius and creative DVD storage ideas, you are still suggested to make a digital copy of your DVD collections with a proper DVD ripper.

Sunday, December 7, 2014

Rental DVD Backup: Rip and Copy Rented DVD from RedBox, NetFlix, Amazon

This page shows the way for rip rental DVDs as common video MP4, MOV, AVI for mobile watching or copy them for owning forever.

Often rent DVD movies from RedBox, NetFlix, Amazon? What sticks in your gizzard is every borrowed DVD has a rental period, which leads to an overwhelming trend to rip rental DVD and even make a copy of a rented DVD for permanent keeping. Then is there a way around the copy protection, so we can watch these Rental DVDs some other times or places? You are definitely right being here! Just keep on reading.

Rip and Copy Rented DVD from RedBox, NetFlix, Amazon

In this article, we will tech you how to rent a RedBox, NetFlix, Amazon movie, and own it forever. (Of course, you can do it with only personal use, not for commercial use.)
Part 1: Copy Redbox/Netflix DVD Rentals for DVD Backup

As we all know, Redbox/Netflix DVD movies are copy protected, making it impossible to backup these DVD rental with generally DVD backup software like Handbrake. So you need the emergence of Pavtube DVDAid to get the issue over, able to get rid of the tricky DVD copy protections while making a copy of rental DVD at fast speed.
It is decent DVD copier which is capable of 1:1 copying DVD disc content to local computer or external hard drive in original file structure with all subtitle tracks and audio streams preserved as well as directly copy DVD movie content and leave out extras, commentary, etc.
Part 2: Rip DVD Rentals to MP4, MOV, AVI, WMV, FLV, MPEG for Mobile Watching

Rather than copy protected DVD, more and more people tend to convert rented DVD movies from Netflix or Redbox to a format or device that are going to play with. For an ultimate borrowed DVD ripping solution, Pavtube DVDAid is the ideal program to rip DVD rentals. Except for its excellent skill in rental DVD copies, the DVD ripper also demonstrates a seamless conversion from rental DVDs to AVI, MP4, WMV, MOV, MKV, FLV, etc. This process becomes very simple and straightforward.

Step 1: Add DVD to Pavtube DVDAid

Plug DVD drive to computer, insert DVD disc and launch Pavtube DVDAid. See the disc-like icon on the top? Click it and you will see your disc name inside, hit it.

DVD Rental Ripper

Step 2: Select MP4, MOV, AVI, WMV, FLV, MPEG, etc. as the output format

There’re lots of preset inside “Format” list. I prefer "H.264 Video(*.mp4)" from "Common Video" option as it’s widely accepted by most devices. 


And it also ensure a fast and direct DVD ripping to iPhone 6, iPhone 6 Plus, iPad Air 2, iPad Mini 3, Samsung Galaxy Tab S, Galaxy S5, Amazon Fire Phone, PS4, etc.
 

Step 3: Start to convert Rented DVD from RedBox, NetFlix, Amazon

After everything is done, hit the "Convert" button to convert rental DVD to  MP4, MOV, AVI, WMV, FLV, MPEG, etc. And all the tasks will be done at fast speed and high quality. The conversion speed often depends on the original video size and your PC configuration.

Bingo! You made it! Now you can edit these DVD videos in Avid Media Composer or enjoy these videos on Kindle Fire HD(X)iPad Air 2iPhone 6(Plus) freely.  For Mac users wanting a rented DVD backup, please go to the mac version.  

Friday, November 28, 2014

Backup BD/DVD movie directory to a 3TB external network drive for use when traveling

The article mainly tells you how to backup and rip Blu-ray and DVD to a 3TB external network drive in MP4 format for watching anytime while traveling.

As a disc collection owner, you will choose to rip your Blu-ray/DVD movies for backing up or more convenient playback while traveling. And if you have a external network drive, you probably would like to copy your Blu-ray/DVD collection like Avatar, Million Dollar Baby, Serenity, The Last Samurai, The Lost Room, etc. to your external drive to allow you to view via media player like VLC or mobile devices like Asus laptop.

backup blu-ray dvd on external travel drive
And now I will show best way to take the Blu-ray/DVD and put the disc movie library on a 3TV external network drive drive for playing.

Well, to backup dozens of BD/DVD movies to external network drive, you need to get the content off the disc as a protection-free and easily readable element for your external drive. In this case, powerful a third-party software for backup Blu-ray or DVD to external network drive is what you need.

Here, Pavtube BDMagic can do you a favor. It is capable of ripping Blu-ray/DVD to MP4, AVI, MKV for external network drive streaming with no quality loss; it also enables you to copy BD/DVD main movies for backup onto external network drive in .m2ts/.vob format. If you are running on Mac OS X, turn to BDMagic for Mac. Now let's learn how to do it.

How to rip and copy Blu-ray or DVD to a 3TB external network drive

Step 1: Load Blu-ray/DVD movies

Install and launch the best Blu-ray Backup & Ripper, and then click the disc icon to import your source movies to this program. Set your wanted subtitles and audio track from the drop-down box of "Subtitles" and "Audio" tab.

best Blu-ray Backup & Ripper

Step 2: Select an output format

To convert Blu-ray/DVD for external network drive storing and syncing, just click on the drop-down menu of "Format", here I prefer "Common Video > H.264 Video(*.mp4)" for output since it produces an acceptable quality and is supported by most media players.

If you want to keep 1080p resolution as source movie, you can choose HD Video > H.264 HD Video(*.mp4) as output format.

Is there a way to lossless backup Blu-ray/DVD to MKV file for playback on PC and HD Media Players? Here it is!

external travel drive video format

Tip: If you like, you can click "Settings" to change the video encoder, resolution, frame rate, etc. as you wish. Keep in mind the file size and video quality is based more on bitrate than resolution which means bitrate higher results in big file size, and lower visible quality loss, and vice versa.

MP4 video settings

Step 3. Rip BD/DVD movies to external network drive

Click the "Convert" button under the preview window, and the Blu-ray ripper will start the conversion from Blu-ray movies to MP4 for your external network drive. After the conversion, you can hit "Open" to quick locate the converted video。

Now you can get your movie directory for wide use on Asus laptop via USB or TV with a HDMI and USB port using a Microsoft wireless display when traveling. When watching movies in public, such as on a plane, you can even use a Skullcandy wireless headset for sound. So wonderful!

What's more, you can also stream BD/DVD via Home Network or copy DVD to QNAP TS-469L NAS.  

Thursday, February 27, 2014

Rip 1080p Blu-ray movies to 720p MKV with lossless audio for playback on Windows media player

From this article, you can learn how to keep 1080p Blu-ray movies to 720p MKV on hard drive for playback on media player with lossless audio.

I used to think that I could play my Blu-ray movies on my media player. But when I have a try by myself, it shows that I was wrong. After did some research and I found something. Take Windows media player as an example, Windows media player is capable of playing all types of media. However, many video formats, such as Blu-ray, are proprietary and typically require a royalty payment in the form of a license to its owner. In order for Microsoft to include support for Blu-ray discs, it would have to pay Sony a royalty, which would likely mean passing on that cost to consumers. Instead, Microsoft chooses to let the consumer decide on whether to pay to use Blu-ray technology.

Due to this, I searched online for a blu-ray ripping software to convert 1080p Blu-ray movies to 720p MKV while keeping all lossless audio for playback on my Windows Media player. I searched for “was capable of ripping Disney blu-rays” and many blu-ray ripping software came up. I’ve tried some such as MakeMKV, Handbrake and son on. However, although MakeMKV helps me to get MKV files, it suffers a little quality loss, while Handbrake only help me convert normally 30GB file down to 3-6GB. My problem wasn’t completely solved until I tried Pavtube ByteCopy (Mac user: ByteCopy for Mac). I really appreciate its profile of backing up blu-ray movies to MKV without quality loss. Beside, it could have worked on all my movies.

Below is the method how I convert 1080p Blu-ray movies to 720p MKV keeping all lossless audio for playback on my Media player.

1. Install and run the converter. Click load disc button to import the Blu-ray movies to the program.


Blu-ray to Multi-track MKV Converter

2. Click the Format menu, select “Lossless/encoded Multi-track MKV(*.mkv) as the output video format. 

Choose lossless mkv format

3. This specific profile could allow you to choose the audios you want as well as encode them.

Check audio settings

4. Finally click the Convert button to begin ripping blu-ray to 720p MKV keeping all lossless audio.

After encoding process has finished successfully, go into the destination directory and backup the converted files to my hard drive, then I could playback on a media player I like.

Some articles about ripping blu-ray movies:

Wednesday, February 26, 2014

Convert video/films from school DVD/Blu-ray to WMV for use in classrooms

If you are a teacher, to make your class more vivid, you need the help of muti-media. Video is one of the representatives of media teaching. If you comes up with the problem of converting school DVD/Blu-rays to the format you need, please read on.

“As an IT manager in school, my job is to help teacher to make the videos for classroom computers and delivering lessons. Some of the source videos are school dvd/blu-ray, while some are various school films or clips. Due to the variety of format, I need some useful software to help me finishing the format conversion”


With the population of media teaching and with the help of Blu-ray/dvd videos, the class will become more vivid and attractive to children. However, with the limitation of media player in class, you are not allowed to play these Blu-ray/DVD source files directly in class. If you have the same problem and was searching for useful software as the guy above, after reading this article, you could stop you step.

Software recommended: Pavtube Video Converter Ultimate

Pavtube Video Converter Ultimate is an all-in-one solution to backup Blu-ray/DVD movies, convert disc content and transcode common videos. It supports to convert Blu-ray/DVD and videos to friendly format for your either your media player or classroom computer. If you are a Mac user, it also has the Mac version Pavtube iMedia Converter for Mac.

How to convert school DVD/Blu-ray to WMV on Windows?

Step 1. After install and launch the program, load school DVD/Blu-ray to the program by clicking “Load file” icon.


Step 2. Choose the friendly format for your computer in class. Here we take “HD Video > WMV HD (*.wmv)” as example.


Step 3. When these steps are done, hit the big “Convert” button to start the conversion of School DVD/Blu-ray to WMV. 

After the conversion is over, just located the output WMV format and transfer it to the player you want need via USB cable. With the help of these videos, you could give a vivid class to your children.

Thursday, February 20, 2014

How to Extract Blu-ray Audio to MP3 Music to listen on CD?

Want to listen the audio of Blu-ray movies on your portable players? Want to rip Blu-ray to lossless audio? If you happened to have such questions, don't worry any more. This article is just writing to help you to extract Blu-ray audio to MP3 Music to listen on CD with lossless quality.

Question:
"I would like to have the audio parts of Blu Ray copied to CD for use in the car,etc.Is there any way to extract the audio from a Blu Ray concert?"
"I'm a classical music fan. As such, I have a number of Blu-ray discs of classical concerts and operas. I recently got it into my head that I wanted to rip the audio from some of these to be able to listen to them on my office stereo. I wasn't interested in the surround-sound mixes—I don't have the appropriate equipment to play back music in such formats—just the stereo tracks."
Answer:
All the commercial Blu-ray discs are encrypted by mighty Blu-ray protection to avoid pirate. So before extract MP3 music out of Blu-ray disc, you need a powerful program which can defeat all Blu-ray encryptions and read the BD audio track then decompress / recompress the audio to MP3 format (from AC3 DTS to MP3), even  FLAC, WAV, AIFF. It's that easy to rip music and audio from Blu-Ray on a Mac computer or on a Windows PC with the help of Pavtube ByteCopy or ByteCopy for Mac.

About Pavtube ByteCopy
  • Backup BD/DVD to MKV without quality loss.
  • Preserve all audio tracks, subtitles and chapter markers.
  • Provide best settings for tablets like Samsung Galaxy Tab 3 10.1, Galaxy TabPro 10.1, iPad Air, Surface 2, Kindle Fire HDX; phones like Sony Xperia Z1, Galaxy S4, Galaxy Note 3, iPhone 5S, iPhone 6.
  • Edit movie by trimming, cropping, merging, etc.
How to Extract Blu-ray Audio to MP3 Music to listen on CD?

Step 1: Install and launch the program; import your Blu-ray Disc or Backup saved on hard drive by clicking "Load File" icon.


Step 2: Choose "Common Audio" > "MP3 – MPEG Layer -3 Audio (*.mp3)" as the output format. You could choose other audio format according to your own audio player.


Tip:
If you want to extract just the music or the beloved audio from one Blu-Ray chapter, so you need to use the Trimming function to cut off the unwanted audios. So, just click Edit, them trim to get the songs for extracting later


Step 3: Right click the Convert button to start the conversion.

Just wait a while and when the conversion is over, click the "Open" icon to locate the output .mp3 file. The last thing you need to do is transfer the converted audio file to your audio player. You could enjoy the audio of your Blu-ray everywhere without limitation!

More posts: