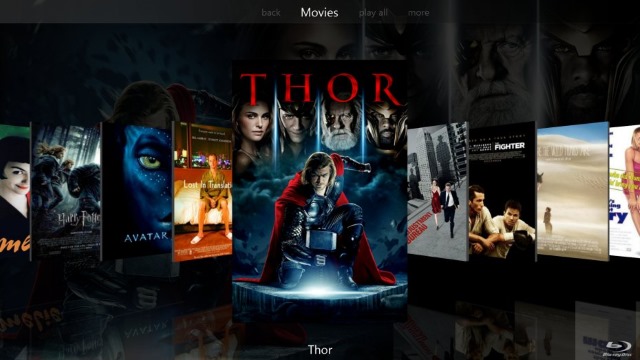
From DVDs to HD, 4K to HDR — to find the best model for whatever delights you: be it for game day, movie night or a frag-fest. Still looking for a big screen on a budget? Based on our extensive testing, your best bet is Vizio's 55-inch E-Series, which costs less than $600 but offers a good picture with a full-array LED backlight. After you got the great Vizio 50" - 60" Smart TV and would like to this stunning cinema experience and you may got into trouble: Q1: “Can vizio smart tvs play mkv files? - Its a smart tv and i want to play an mkv file that i have on the smart tv. ” Q2: “How to play mkv files on vizio usb port - Why do mkv files run on some devices and not on others. “A: “It work for my vizio 60 inch smartv change the end of the file from .mkv to .mp4.” To help user simplify the process of watching common video on Vizio 50" - 60" Smart TV, Pavtube has upgraded support for TV profile output. Just download Pavtube Video Converter Ultimate/Pavtube iMedia Converter for Mac, you will be able to directly output any video to Vizio 50" - 60" Smart TV/Samsung/Panasonic/LG 4K Ultra TV/Panasonic TV profile optimized file format with all the suitable profile parameters. In addition, you can also upscale SD, HD and full HD video to 4K UHD with a resolution of 3840*2160 in the output “Profile Settings” window. Free Download this Top Video to Vizio TV Converter: 
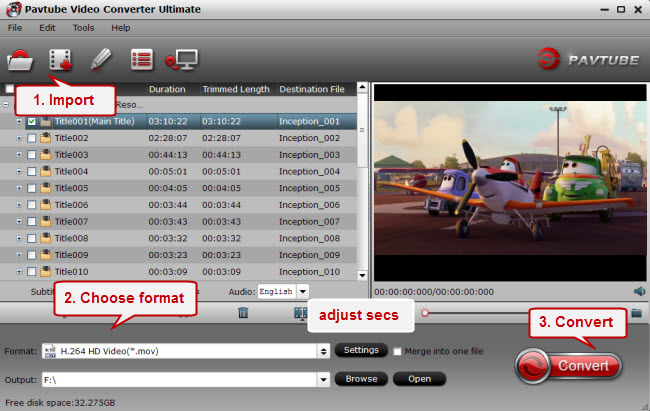
 Other Download: - Pavtube old official address: http://www.pavtube.cn/blu-ray-video-converter-ultimate/ - Cnet Download: http://download.cnet.com/Pavtube-Video-Converter-Ultimate/3000-2194_4-75938564.html How to Convert MKV/MP4/AVI movies on Vizio 50" - 60" Smart TV via USB Flash DriveStep 1: Add source files to the program. Start up the program on your computer click “File” > “Add Video/Audio” or “Add from folder” to import source files to the program.
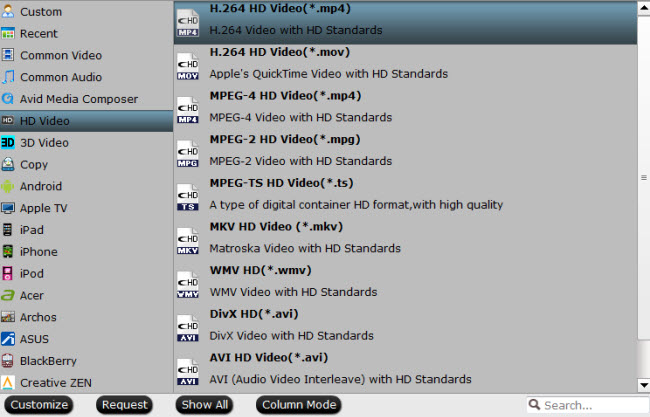
  Step 2: Choose TV optimized output file format. Go to “Format” bar, from its drop-down select, choose TV optimized file format to output according to your VIZIO Vizio 50" - 60" Smart TV brands. You can just choose “Commen Video” - “H.264 HD Video (*mp4)” for your Vizio 50" - 60" Smart TV.
 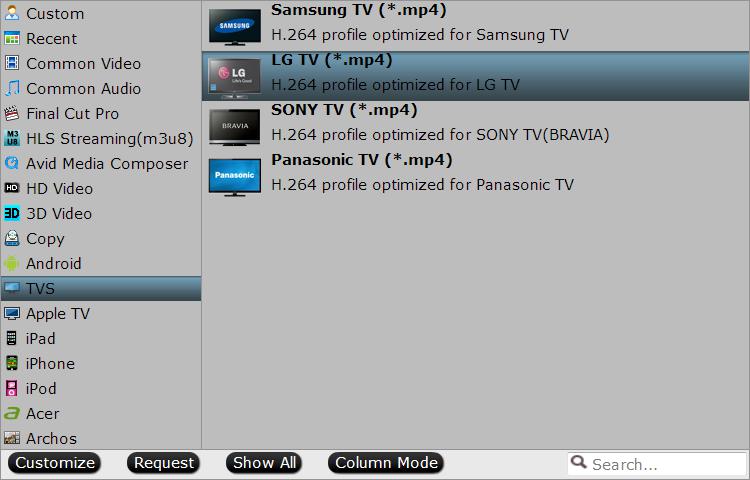 Note: if you own a LG 4K TV, you can select “TVs” > “LG TV(*mp4)” as your desired output file format. Step 3: Upscale to 4K resolution. Click “Settings” icon on the main interface to open “Profile Settings” window, enter “3840*2160” in “Size(pix)” brackets, so that you will be able to upscale your SD or HD content to 4K resolution content for Vizio 50" - 60" Smart TV.
 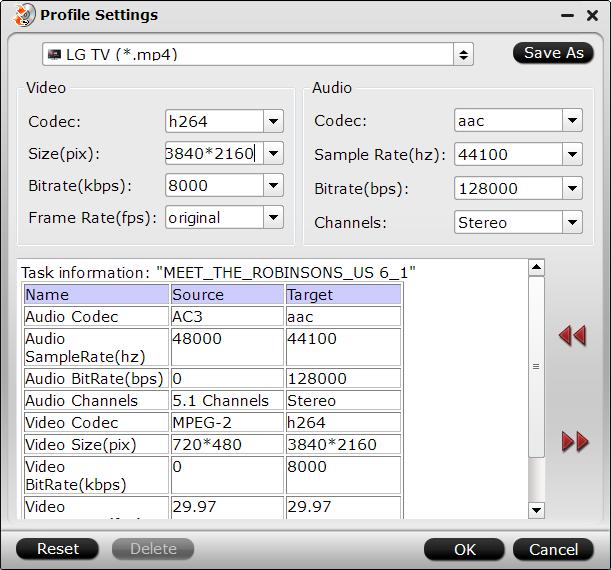 Step 4: Start Video to Vizio Smart TV conversion process. After all the setting is completed, hit the "Convert" button under video previewing window to start the video conversion process. When the conversion is completed, you will be able to watch more sharper and detailed videos and movies on Vizio 50" - 60" Smart TV. This TV Converter also Support:Samsung: UN65HU8550F, UN55HU8550F, UN65HU9000F, UN55HU9000F, UN85S9VF, UN65F9000AF, UN55F900AF, UN85S9AFXZA; Sony: XBR-55X900A, XBR-65X850A, XBR-65X950B, XBR-49X850B, XBR-65X850B, XBR-65X900A, XBR-55X850A, XBR-79X900B, XBR-70X850B, XBR-65X900B, XBR-55X850B, XBR-55X900B, XBR-85X950B, VPL-VW600ES, VPL-VW1100ES; LG: 84LM9600, 65LA9650, 65LA9700, 55LA9650, 55LA9700, 84LA9800, UB8500, UB9500, UB9800Further Reading:
Developers also need a simple solution to fix the MKV to Kodi aostware security and crashing issue when users have encountered after they upgrade to Kodi 15. Here are details:
Q1: MKV files not playing properly on XBMC - MKV files act like they are in slow motion on XBMC with no audio. I opened the file on my computer and it plays fine so I know its not a bad file. I googled the issue and found a post that said to turn off interlace but im not seeing that as an option. Any ideas?
Q 2: OSMC-Kodi Plays .MKV as Audio- No video - I have 512mb Raspberry pi running r2 of OSMC. The problem is every time I try to play certain .MKV's they play as audio with no video. Originally I had not messed with any settings except network settings, Now I have tried to set the 512 GPU MEM to 100, 126, 152, 200, 256. None of those fixed the issue. Help greatly appreciated.
Q3: After update to July version MKV videos not playing / no sound - so finally I also did the upgrade and unfortunately ran into a problem. Some of my videos (avi/mp4) are playing fine but all my MKV (recorded from DVB and transcoded to x264 and mp3 are not playing at all in standard setting maybe a single frame shown but thats it the logs for that are here. A small sample of the file can be found here. All of that files are playing 100% fine on the same machine when I use a SD card that I have not upgraded.
First, Get the Best MKV to Kodi 15 Video Converter:
As we know, the MKV formats are not listed in the XBMC supported format list. One of the methods to solve the problem that playing MKV videos on XBMC is to convert MKV files for XBMC, as XBMC supports MKV video codec or MP4, AVI for output. Here, Pavtube Video Converter Ultimate - It is undoubtedly the best video converter of all times. (Read review). It features a simple yet sleek interface and performs files conversion with fast speed enables you to complete the task in just a few clicks at your fingertips.
Acted as the best MKV to Kodi converting tool, this video app works as the best software to change MKV to Kodi (XBMC) compatible format with least quality loss. Besides that, you can also convert MKV to MP4, MOV, AVI, MPG, WVM, etc for easily opening, playing, editing and uploading without any hassle. No worry about any audio/video sync problem.
The Mac version is iMedia Converter for Mac. Now, Free download it and the following passage shows a best way to convert MKV to play on Kodi (XBMC).
Other Download:
- Pavtube old official address: http://www.pavtube.cn/blu-ray-video-converter-ultimate/
- Cnet Download: http://download.cnet.com/Pavtube-Video-Converter-Ultimate/3000-2194_4-75938564.html
Convert MKV files to Kodi (XBMC) With Best Video/Audio Settings
Launch the program and add the MKV movie you want to encode by clicking the “Load file(s)” icon on the main interface. You can see the chapter information of your Blu-ray movies on the main interface after you loading to the program.
 Then choose the output format. According to XBMC supported format, you can choose some play common multimedia formats like “H.264 HD Video(*.mp4)” or “MKV HD Video(*.mkv)” from “HD Video”.
 Tip: If you like, you can click “Settings” to change the video encoder, resolution, frame rate, etc. as you wish. Keep in mind the file size and video quality is based more on bitrate than resolution which means bitrate higher results in big file size, and lower visible quality loss, and vice versa.
The last thing you need to do is hit the “Convert” button to copy MKV to Kodi compatible MP4 format. Just wait a moment and then you can output videos. Then you can copy the result files onto Kodi with the best quality. Have a fun of it!
Tips for How to Add a Video Source in Kodi
Setting up a media server together with Kodi (formerly called XBMC) can take up quite some time. Especially when you’re doing it for the first time, you might be close to giving up because you cannot figure out things that aren’t that difficult.
When I was setting up Kodi, I had no idea where to start after I installed it on my Amazon Fire TV. The most important step, of course, is to tell Kodi where it can find all my media files. Adding video sources is pretty straightforward if you know what to do. For the sake of your nerves, I’m going to show you how it’s done, so that such a small yet important setup won’t cost you more than a couple minutes.Adding sources in Kodi
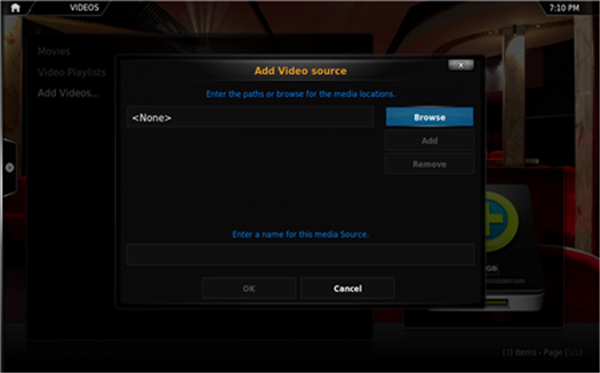
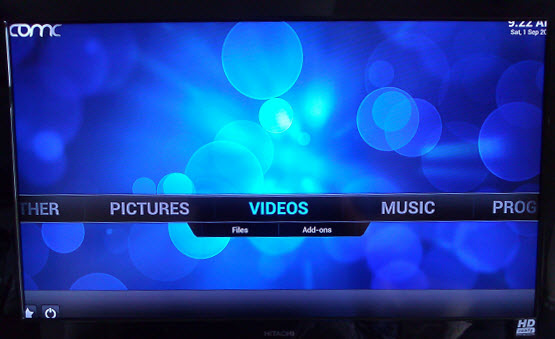
In the main menu of Kodi, select Videos and then Files. Now you should be able to select “Add Source”.
Tip: If you like, you can click “Settings” to change the video encoder, resolution, frame rate, etc. as you wish. Keep in mind the file size and video quality is based more on bitrate than resolution which means bitrate higher results in big file size, and lower visible quality loss, and vice versa.
The last thing you need to do is hit the “Convert” button to copy MKV to Kodi compatible MP4 format. Just wait a moment and then you can output videos. Then you can copy the result files onto Kodi with the best quality. Have a fun of it!
Tips for How to Add a Video Source in Kodi
Setting up a media server together with Kodi (formerly called XBMC) can take up quite some time. Especially when you’re doing it for the first time, you might be close to giving up because you cannot figure out things that aren’t that difficult.
When I was setting up Kodi, I had no idea where to start after I installed it on my Amazon Fire TV. The most important step, of course, is to tell Kodi where it can find all my media files. Adding video sources is pretty straightforward if you know what to do. For the sake of your nerves, I’m going to show you how it’s done, so that such a small yet important setup won’t cost you more than a couple minutes.Adding sources in Kodi
In the main menu of Kodi, select Videos and then Files. Now you should be able to select “Add Source”.
 In the Add Source window, select Browse.
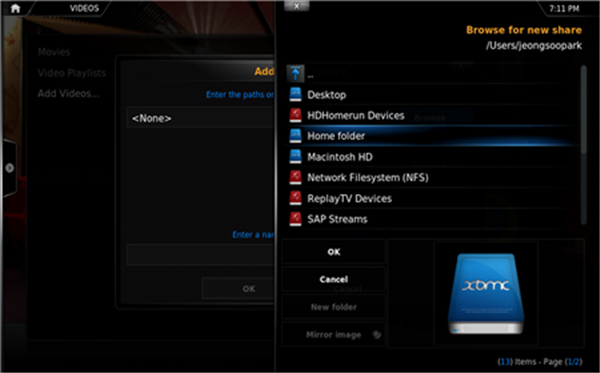
 Search for the folder you keep all your video files in and hit the OK button.
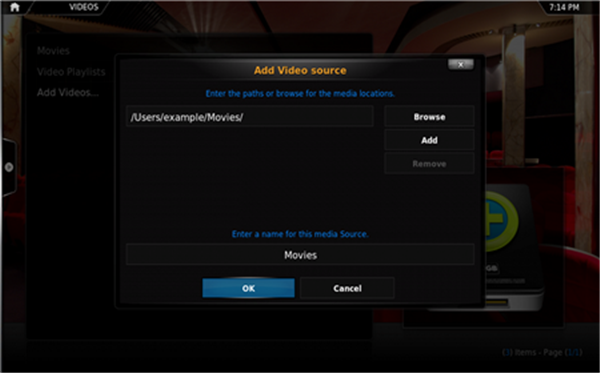
 Give the source a name of your choice.
 Now you have to set the content of the source which means telling Kodi if this source contains media like movies or TV shows. This way, Kodi can download the correct meta info of your media such as images, plot summaries and trailers.
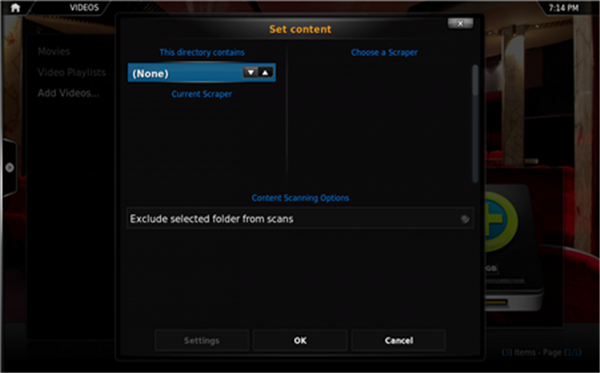 On the bottom, select the scan option you prefer the most.
 That’s it. Hit OK and then Yes in the pop-up asking if you want to do the initial scan of all media within the source. You can also add more than one location to a source. For example, you might want to combine a location on your computer with an external drive, both containing movies. The process is basically the same. All you have to do is editing an existing source and select “Add” to add another location to the source.
 Should you run into any troubles and need help, feel free to comment! Read more details from here.
Read More:
Should you run into any troubles and need help, feel free to comment! Read more details from here.
Read More:
Windows 10 becomme more and more popular, most Windows users would like this powerful system. And with it a bunch of new features. But wherever you find new features, you’ll also find holes, where old favorites have been deprecated.
With Windows 10, the Windows Media Center will no longer be supported. This means that if you have it installed, WMC will stop working when you upgrade to Windows 10. Not ideal, especially if Windows Media Center was your favored solution after cutting the cord.
Learn>> Windows 10 Supported Video/Audio Formats | Top 3 Free Windows 10 Video Players | Best Media Players for Windows 10
The time has come, therefore, to find a new media center application compatible with Windows 10 to take you forward. Microsoft’s Deprecated Media Features
It isn’t just Windows Media Center support that is ending. DVD playback has gone too in Windows 10. While both were included in Windows 7, both features were removed in Windows 8, although support remained should have you installed Windows Media Center, a premium upgrade.
 With Windows 10, however, you’ll need to find not only a replacement for Windows Media Center, but also for playing back DVDs (something that was possible with WMC).
Fortunately, we’re overwhelmed with options on both counts, so let’s take a look at the best of what’s available, beginning with DVD and Blu-ray playback. How to Play a DVD or Blu-ray on Windows 10
If you’re running Windows 10 and need to play a DVD or Blu-ray disc, the first thing you should do is head to the Windows 10 Store and look for the DVD player app, which will be coming.
@brianfagioli The main scenario people used WMC for was to play DVD. We'll provide another option for DVD playback in the future. — Gabriel Aul
However, it might be that the app isn’t available when you want it. The alternative (as it was with Windows 8) is to find a media player that handles DVDs and Blu-rays. A flexible, versatile media player that offers full control over menus, jumping to chapters… yes, we’re talking about VLC media player again.
If you’re not already using VideoLan’s amazing media player (it does audio and pictures, too), then now is the time. Already supporting Windows 10, VLC media player is free to download and use, so head towww.videolan.org/vlc/download-windows.html to get your copy.
VLC media player also has a host of hidden features that may prove useful.Windows Media Center Replacements for Windows 10
As popular as Windows Media Center is, it has been largely superseded by various superior systems, from XBMC (now known as Kodi) to Plex. But switching from one media center solution to another is no longer something to be overly concerned about. Whereas once you might have been anxious about issues with incompatible tags and having to recollect metadata and album or movie covers, these days such apprehensions are unwarranted.
The services that provide this data are far quicker, and with a fast Internet connection it shouldn’t take too long to populate a new media center database.
Releated Guides >>Directly copy DVD into a vob file with VLC | VIDEO_TS Files on VLC | Blu-ray to VLC
But which media center system will you use to replace Windows Media Center on Windows 10?
XBMC/Kodi
The default choice for many is probably Kodi, the new name for XBMC. This started as a media center hack for the original Xbox, Microsoft’s first console which was basically a locked-down PC. With the release of the Xbox 360, the XBMC was spun off into a full media center app for Linux and Windows PCs, and has proven very popular since. You’ll find versions on Android and the Raspberry Pi (we’ve previously demonstrated how to set up a RaspBMC media center). If the default look and features don’t suit, don’t worry–skins and plugins are available to extend functionality.
With Windows 10, however, you’ll need to find not only a replacement for Windows Media Center, but also for playing back DVDs (something that was possible with WMC).
Fortunately, we’re overwhelmed with options on both counts, so let’s take a look at the best of what’s available, beginning with DVD and Blu-ray playback. How to Play a DVD or Blu-ray on Windows 10
If you’re running Windows 10 and need to play a DVD or Blu-ray disc, the first thing you should do is head to the Windows 10 Store and look for the DVD player app, which will be coming.
@brianfagioli The main scenario people used WMC for was to play DVD. We'll provide another option for DVD playback in the future. — Gabriel Aul
However, it might be that the app isn’t available when you want it. The alternative (as it was with Windows 8) is to find a media player that handles DVDs and Blu-rays. A flexible, versatile media player that offers full control over menus, jumping to chapters… yes, we’re talking about VLC media player again.
If you’re not already using VideoLan’s amazing media player (it does audio and pictures, too), then now is the time. Already supporting Windows 10, VLC media player is free to download and use, so head towww.videolan.org/vlc/download-windows.html to get your copy.
VLC media player also has a host of hidden features that may prove useful.Windows Media Center Replacements for Windows 10
As popular as Windows Media Center is, it has been largely superseded by various superior systems, from XBMC (now known as Kodi) to Plex. But switching from one media center solution to another is no longer something to be overly concerned about. Whereas once you might have been anxious about issues with incompatible tags and having to recollect metadata and album or movie covers, these days such apprehensions are unwarranted.
The services that provide this data are far quicker, and with a fast Internet connection it shouldn’t take too long to populate a new media center database.
Releated Guides >>Directly copy DVD into a vob file with VLC | VIDEO_TS Files on VLC | Blu-ray to VLC
But which media center system will you use to replace Windows Media Center on Windows 10?
XBMC/Kodi
The default choice for many is probably Kodi, the new name for XBMC. This started as a media center hack for the original Xbox, Microsoft’s first console which was basically a locked-down PC. With the release of the Xbox 360, the XBMC was spun off into a full media center app for Linux and Windows PCs, and has proven very popular since. You’ll find versions on Android and the Raspberry Pi (we’ve previously demonstrated how to set up a RaspBMC media center). If the default look and features don’t suit, don’t worry–skins and plugins are available to extend functionality.
 Switching to Kodi makes perfect sense as it is probably the most widely-used media center alternative and has great community support. Kodi’s Live TV recording is superior to the Windows Media Center PVR, too, mainly thanks to continued development in this area.
Releated Guides >>DVD via Raspberry Pi on TV with XBMC | MKV to XBMC | M2TS files on Kodi (XBMC) |AVI to XBMC
Plex
Ridiculously easy to setup, Plex fulfils the role of media server and player admirably, providing support to other devices (such as Android and iOS) via a mobile app.
Switching to Kodi makes perfect sense as it is probably the most widely-used media center alternative and has great community support. Kodi’s Live TV recording is superior to the Windows Media Center PVR, too, mainly thanks to continued development in this area.
Releated Guides >>DVD via Raspberry Pi on TV with XBMC | MKV to XBMC | M2TS files on Kodi (XBMC) |AVI to XBMC
Plex
Ridiculously easy to setup, Plex fulfils the role of media server and player admirably, providing support to other devices (such as Android and iOS) via a mobile app.
 Plex is a media server which delivers media stored locally, externally, or attached to your home network, to a client app. Internet Explorer is the server’s user interface, where channels can be added (such as Soundcloud and Vimeo), and your library managed. To enjoy your media, you can use mobile and desktop apps, perhaps streaming films and TV to your TV using Apple TV or Google Chromecast.
One thing to note is that Plex is a little picky about how you organize and name your media collection, particularly TV shows that run across multiple series. Get it right, however, and the service will run seamlessly. Our detailed guide to Plex will help you get started.
Releated Guides >>DVD ISO Files over Plex | 3D Blu-ray on Plex | M2TS with Plex | DVD to Plex |
MediaPortal
Like XBMC/Kodi, MediaPortal is open source and free, and has a full TiVo-style PVR built in for recording TV (through a TV card, of course). Hundreds of plugins and skins are available, and the app also supports streaming and recording of live radio.
Plex is a media server which delivers media stored locally, externally, or attached to your home network, to a client app. Internet Explorer is the server’s user interface, where channels can be added (such as Soundcloud and Vimeo), and your library managed. To enjoy your media, you can use mobile and desktop apps, perhaps streaming films and TV to your TV using Apple TV or Google Chromecast.
One thing to note is that Plex is a little picky about how you organize and name your media collection, particularly TV shows that run across multiple series. Get it right, however, and the service will run seamlessly. Our detailed guide to Plex will help you get started.
Releated Guides >>DVD ISO Files over Plex | 3D Blu-ray on Plex | M2TS with Plex | DVD to Plex |
MediaPortal
Like XBMC/Kodi, MediaPortal is open source and free, and has a full TiVo-style PVR built in for recording TV (through a TV card, of course). Hundreds of plugins and skins are available, and the app also supports streaming and recording of live radio.
 Plugins offer support for flash games, a Netflix app and support for online video playback, making MediaPortal a strong contender. In fact, MediaPortal and XBMC/Kodi have been rival media center apps for several years now, but in all honesty there is little to choose between them,
JRiver MediaCenter
Available from $49.98 for a single license, JRiver is the premium option, but don’t let the price put you off. This remains a strong choice, offering support for audio, video, and photos, as well as network support for DLNA devices. For many, playing music from any device is a big selling point, and having built in DLNA support has helped JRiver MediaCenter attract some strong reviews lately.
Releated Guides >>Blu-ray to FLAC for JRiver
Plugins offer support for flash games, a Netflix app and support for online video playback, making MediaPortal a strong contender. In fact, MediaPortal and XBMC/Kodi have been rival media center apps for several years now, but in all honesty there is little to choose between them,
JRiver MediaCenter
Available from $49.98 for a single license, JRiver is the premium option, but don’t let the price put you off. This remains a strong choice, offering support for audio, video, and photos, as well as network support for DLNA devices. For many, playing music from any device is a big selling point, and having built in DLNA support has helped JRiver MediaCenter attract some strong reviews lately.
Releated Guides >>Blu-ray to FLAC for JRiver
 There is a sense with this software that everything just works, which is obviously a boon for any premium application. As with the other options, support is delivered via a forum and wiki.
Emby
Posting easy connectivity, Live TV streaming, easy DLNA, media management, mobile and cloud sync, sharing and parental controls, an attractive user interface and even Chromecast support, Emby is possibly the dark horse of the media center apps, and can perform re-encoding on the fly with a sufficiently suitable PC.
There is a sense with this software that everything just works, which is obviously a boon for any premium application. As with the other options, support is delivered via a forum and wiki.
Emby
Posting easy connectivity, Live TV streaming, easy DLNA, media management, mobile and cloud sync, sharing and parental controls, an attractive user interface and even Chromecast support, Emby is possibly the dark horse of the media center apps, and can perform re-encoding on the fly with a sufficiently suitable PC.
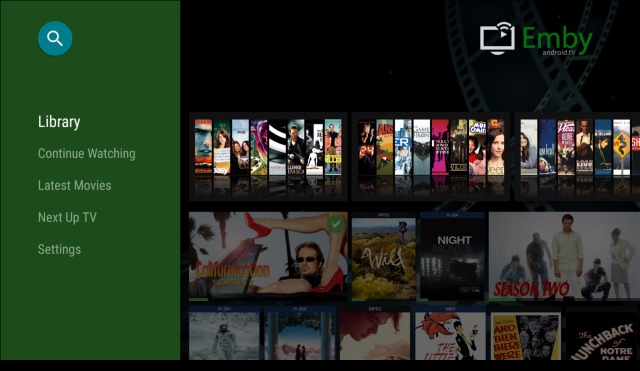 Like Plex, Emby comes in two parts, a PC-based server that looks after the media database, which you then browse and enjoy via one or more client apps.
Available free for Windows (as well as Linux, Mac, and even FreeBSD), media is managed through your browser. The Emby server must be installed first, with TV apps for Android TV, Amazon Fire TV, Chromecast (and, ironically, Windows Media Center) and mobile apps for Windows 8, Windows Phone, iOS, and Android required to view your media content.Windows Media Center Can Be Replaced Easily
When your Windows 10 upgrade arrives, Windows Media Center will no longer work. But don’t worry: any of these five alternatives can be employed as a complete (even superior) replacement. Of course, you might use this development as a change to flip your media center setup, and switch from a HTPC to a much smaller, dedicated media center device such as the Apple TV or Roku.
Have you tried any these Windows Media Center replacements? Perhaps you know of another? Tell us all about it in the comments.
Source: http://www.makeuseof.com/tag/5-alternatives-windows-media-center-windows-10/
Note: For media entertainment users, the media players with Windows 10 is still not powerful enough to play every media files we throw to it, you can use Video Player for Windows - Pavtube Video Converter Ultimate to convert all SD, HD, 4K video, H.265 video to Windows 10 compatible file formats. Here is review.
Read More:
Like Plex, Emby comes in two parts, a PC-based server that looks after the media database, which you then browse and enjoy via one or more client apps.
Available free for Windows (as well as Linux, Mac, and even FreeBSD), media is managed through your browser. The Emby server must be installed first, with TV apps for Android TV, Amazon Fire TV, Chromecast (and, ironically, Windows Media Center) and mobile apps for Windows 8, Windows Phone, iOS, and Android required to view your media content.Windows Media Center Can Be Replaced Easily
When your Windows 10 upgrade arrives, Windows Media Center will no longer work. But don’t worry: any of these five alternatives can be employed as a complete (even superior) replacement. Of course, you might use this development as a change to flip your media center setup, and switch from a HTPC to a much smaller, dedicated media center device such as the Apple TV or Roku.
Have you tried any these Windows Media Center replacements? Perhaps you know of another? Tell us all about it in the comments.
Source: http://www.makeuseof.com/tag/5-alternatives-windows-media-center-windows-10/
Note: For media entertainment users, the media players with Windows 10 is still not powerful enough to play every media files we throw to it, you can use Video Player for Windows - Pavtube Video Converter Ultimate to convert all SD, HD, 4K video, H.265 video to Windows 10 compatible file formats. Here is review.
Read More:
Everything you need to know about DLNA: The de facto home-entertainment network standardIf you’ve ever watched the photos on your digital camera come alive on your TV or played the music files on your computer over your home theater system, you’ve brushed against the magic of DLNA. This widely integrated but little understood technology allows you to stream media files from a hard drive or memory card to other devices on your home network without your needing to know a whole lot about codecs, file formats, or even how your network operates.DLNA stands for Digital Living Network Alliance, the trade group founded by Sony in 2003 to define the interoperability guidelines that make this communication possible. Prior to DLNA, setting up a home-entertainment network was an arduous process of gathering IP addresses and configuring each component to talk to the others with no guarantee of success. DLNA simplified the process by establishing a single protocol that ensured DLNA-certified multimedia devices from different manufacturers would work together. A great example is your DVR for recording television shows. Normally this is restricted to playing only on the TV where it is attached. With a DLNA media player you can watch the shows on any network attached DLNA TV, PC, or other playback device in the house. Learn More>>here. Hot Search: AVI to DLNA | ISO to DLNA | HD Movies to DLNA | DVD to DLNA | HDD Media Players are designed to give you a wide range of connectivity. Many units allow you to access network attached storage devices, USB hard drives, and shared folder on Windows PC’s and Macintosh computers (e.g WD TV Live Plus/Hub, Popcorn Hour NMT). DLNA players take integration in a completely new direction. A DLNA media player can seamlessly integrate with any other DLNA compliant devices in your home. Let’s discuss the real vision of DLNA. Your other high definition media players may allow you to view videos from PC’s scattered about the house, but normally they are restricted to displaying your videos on only one television, the one they are attached to.You will need to choose between a DLNA wireless media player or one which connects to your wired network. Just match it to your home setup.If you want the smoothest, most consistent interface from room to room in your home, DLNA cannot be beat. With a DLNA media player you will be able to share your media throughout the home with ease.If you are interested in the home of the future DLNA can lead you in the right path. You will need to start planning your purchases for all audio and video equipment more carefully, to transition your home to a fully DLNA enabled home. Luckily, most DLNA media players also support all the functions of other HD digital media players. They just extend the technology for the future of your home. Top DLNA Video Converter Software for DLNA Owners: Not all the videos can be streamed from PC to HDTV via DLNA. Only specified media formats (MPEG-1, MPEG-4 and WMV 9) are good for DLNA video streaming. Errors occur in case of unsupported video format. Native formats for DLNA media streaming:  To stream MKV, AVI, H.264 videos to HDTV, you can transcode the format to one of the applicable required formats. A recommended transcoder here is Pavtube Video Converter Ultimate, which uses CUDA acceleration tech and converts videos fast enough. You can also use Pavtube BDMagic app to convert Blu-rays and DVDs to PC hard drive and your PC a DMS for streaming to HDTV and other DLNA certified devices like PS3 and Xbox 360.Free Download and trail: Other Download:- Pavtube old official address: http://www.pavtube.cn/blu-ray-video-converter-ultimate/- Cnet Download: http://download.cnet.com/Pavtube-Video-Converter-Ultimate/3000-2194_4-75938564.htmlRead More:
In the age of home theater, 4K TV (and HD TV, 8K TV) contribute a lot in picture and sound quality. Many people would like to spend most of the time sitting on the couch and watching TV for the movie viewing on UHD TV experience is so fantastic. However, these so smart UHD TV still have to play DVD by heavy DVD drive and need you to get your body off the couch to change DVD disc. How to watch DVD on 4K TV (and HD TV, 8K TV) without needing DVD drive?There are many ways to watch DVD on 4K TV without needing DVD drive, like copying DVD to Plex, Dropbox, hard drive, etc in advance and then watch these DVD movies on 4K/HD/8K TV. But before you put DVD movies to cloud storage, hard drive, you need to rip DVD to 4K/HD/8K TV supported formats. To get the work done, you need a DVD Ripper to remove the copy protection from DVD disc and then change DVD movies to 4K TV accepted format. If you don’t have idea about the DVD ripper, I can recommend you for Pavtube DVDAid. It is a professional DVD ripper, which can rip DVD to 4K/HD/8K TV in MP4, MKV, AVI, MOV, M4V, etc with original video quality. Importantly, backing up a DVD disc will cost 1-2 hour according to configuration of computer and bandwidth. But Pavtube DVDAid fully makes use of NVIDIA CUDA technology and AMD Accelerated Parallel Processing (APP) to largely accelerate DVD encoding speed from one format to another by using H.264 codec on Windows. You can free download and install Pavtube DVDAid here: Other Download:- Pavtube old official address: http://www.pavtube.cn/dvd_ripper/- Cnet Download: http://download.cnet.com/Pavtube-DVDAid/3000-7970_4-76158510.htmlHow to play DVD on 4K, HD, 8K TV without DVD drive?Step 1. Import DVD movies to the programInsert your DVD disc into computer’s DVD-Rom and then launch the DVD Ripper. Click Load DVD button to load the movies from your DVD discs.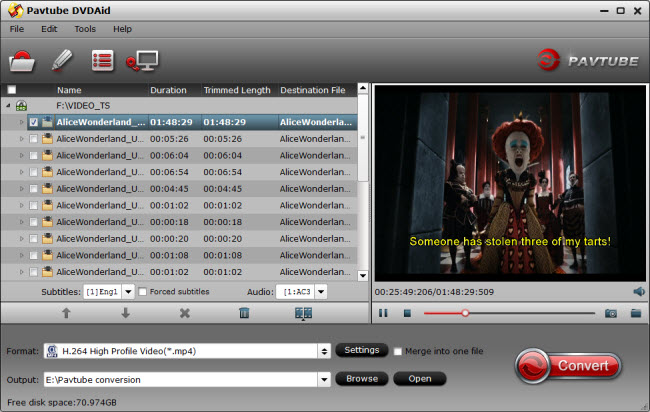 Step 2: Choose optimized format for 4K TVClick “Format” and select an output format for 4K HD TV. Here, you are recommended to choose format from TVs profile. For example, you can choose “Sony TV(*.mp4)” for your Sony 4K TV.
 Tip: The format we have choosed has already been the optimized format for your Sony TV. If you still want to adjust some video and audio parameters. You can simply open profile settings window by clicking “Settings”.
 Step 4: Backup DVD to 4K, HD, 8K TVAfter all the settings is done, hit right-bottom “Convert” button to start copying DVD to 4K, HD, 8K TV. When the process finishes, you can locate the generated videos in output folder.You can simply store this ripped DVD videos to NAS, USB Flash drive, Dropbox for playing. Then, you can watch these DVD movies on your 4K, HD, 8K TV via the cloud storage or external hard drive without need the DVD disc in -and-out.Related Articles:
Q: “ I need ripping my Blu-ray and DVD Collections to plex, I will use my plex server to play them on my Raspberry Pi 2 rasplex device, as well as tablets. I'm ripping my kids movies first, as they get more wear and tear on them. I was not pleased with DVDFAB. So, Anyone can help me? Which is the Top Blu-ray ripper for Plex and also works on Raspberry Pi 2 rasplex. ”  How to enable stream Blu-ray movies on Raspberry Pi 2 rasplex via Plex? At first, you need to use a DLNA app like XBMC or rasplex to enable streaming. Then, you can streamed from Raspberry pi 2 to your rasplex. What’s the point? Not all movies can be streamed from Raspberry pi 2, the MP4 is the best choice. So, if you have any video files, you need to use use Pavtube BDMagic to convert these files to MP4 format. Tip: Raspberry Pi 2 so tiny that many people choose to build a multimedia center at home with it and XBMC. Follow this guide to learn how to achieve it. Pavtube BDMagic – A top Blu-ray Ripper can help you to remove Blu-ray/DVD region lock convert them to multiple format like FLV, AVI, WMV, MKV, MOV, VOB, MTS, M2TS, TOD, etc for playback on your HDTV easily without any restriction. The process the straight forward. After launching, drag and drop your video files to the program, choose output format and then start the conversion. Free download and install it and below is the detailed guide. For Mac users, Pavtube BDMagic for Mac is a helpful app to encode videos for further usage.
Best Way to Convert Blu-ray to Raspberry Pi 2 rasplex via Plex Step 1. Run Pavtube Top Blu-ray Ripper for rasplex and Insert the Blu-ray disc you want to rip into your hard drive and run the program. Then load your Blu-ray movies to it for converting. As you can see, loaded files will be displayed on the left item bar and you can select your preferred audio track, subtitle, etc. ISO, IFO and DVD folder are also well supported.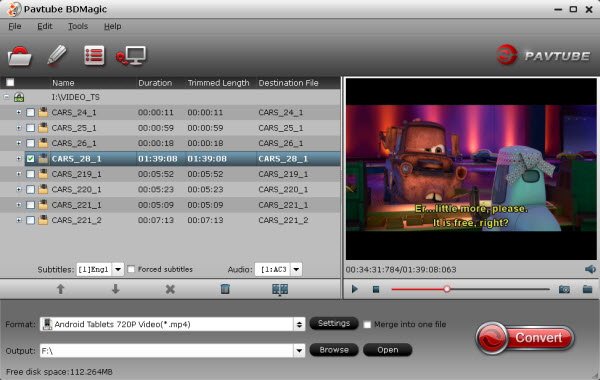 Step 2. Click the dropdown menu between "Format" and "Settings" to choose target video format. There are various presets sorted of device model and programs. For Raspberry Pi 2, we need to choose "HD Video>H.264 HD Video (*.mp4)", Which is the Best formats for rasplex.
  Step 3. Click the Setting icon to have the Profile settings box. In the setting interface, you are allowed to adjust codec, bit rate, frame rate, sample rate and audio channel to optimize the output file quality. Step 4. Click the “Convert” icon, and the conversion will be started quickly. Once finished, you can get the output videos for your Raspberry Pi 2 rasplex via clicking on “Open” button effortlessly. Afterward, connect your Raspberry Pi 2 rasplex on PC and then transfer the videos to rasplex via Plex. Now, you can easily enjoy your all Blu-ray and DVD collections on Raspberry Pi 2 rasplex via plex. Have fun! See Also: