Showing posts with label Backup. Show all posts

Monday, December 14, 2015

Store Blu-ray/DVD to NAS for Playback via Apple TV 4/PS3

NAS is the extender for home sharing. You can share and watch files from NAS on multiple computers, TV, iPad, iPhone, Android phone, or other devices. If you wanna ripping mainly blu-rays so they are not destroyed in the handling. But also use it to rip older DVD formatted movies. Or want to copy Blu-ray/DVD collection to NAS for streaming with your Apple TV 4 and PS3? This article will shows you with an easy workaround for copying Blu-ray/DVD to NAS for streaming by ripping Blu-ray/DVD to NAS friendly video format for Apple TV 4 and PS3 on Windows and Mac.


To be sure, most of you know how to rip Blu-ray and DVDs, and have been doing so just fine. The problem you face is how to rip Blu-ray/DVD to a NAS proper format with best settings for NAS streaming while maintaining the highest quality possible. As far as we know, MP4, MKV are commonly supported formats for Apple TV 4PS3 etc via streaming videos from NAS. Thus, what you need is a professional Blu-ray ripping tool that supports converting Blu-ray to MP4/MKV for NAS streaming with the best quality. 

There are many, many Blu-ray/DVD ripping tools on the market. I’ve tired a pile of them. Pavtube BDMagic is the best one I’ve tried yet. It is capable of ripping Blu-ray/DVD to MP4, AVI, MKV for NAS streaming on Apple TV 4/PS3 with no quality loss; it also enables you to copy Blu-ray/DVD main movies for backup onto NAS in .m2ts format. Read the review

Besides, What I’ve learned is that MKV would fit for your Apple TV 4/PS3, and MP4 would be one best target format for it is fully compatible with nearly all media devices including iPad, iPhone, PS4, Apple TV, etc. If you are running on Mac OS X El Capitan, turn to BDMagic for Mac. If you haven’t got the software, download it now and let’s start the conversion.

Ripping and copying Blu-ray/DVD to NAS for watching on Apple TV 4/PS3

Free Download and trail: 


Other Download:

- Pavtube old official address: http://www.pavtube.cn/blu-ray-ripper/
- Cnet Download: http://download.cnet.com/Pavtube-BDMagic/3000-7970_4-75922877.html

Good News! To thanks for your continuous support, Pavtube Official Website and Pavtube Facebook all has been released its 2015 Christmas Day Deal. Pavtube BDMagic is available with 30% off is provided on christmas week, Don’t miss it! Pay less to get powerful Blu-ray/DVD Ripper/Copier to build your own home media center on your becoming Christmas!  

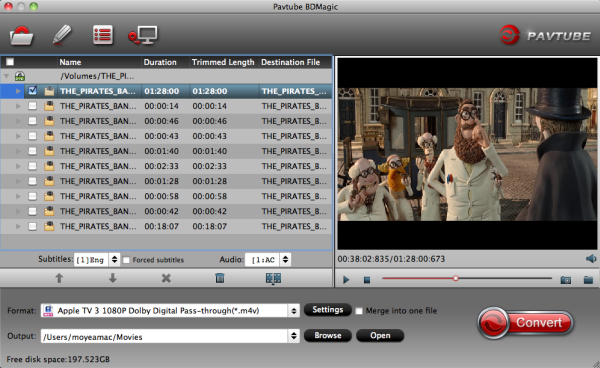
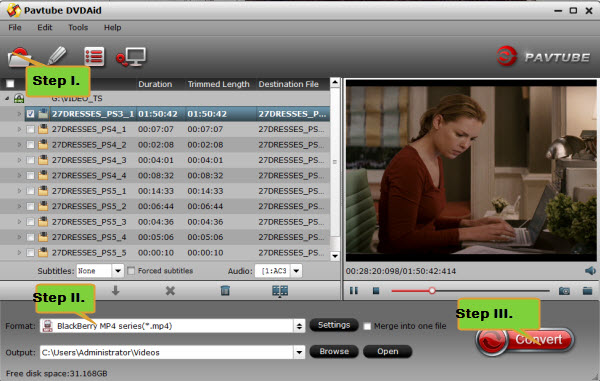
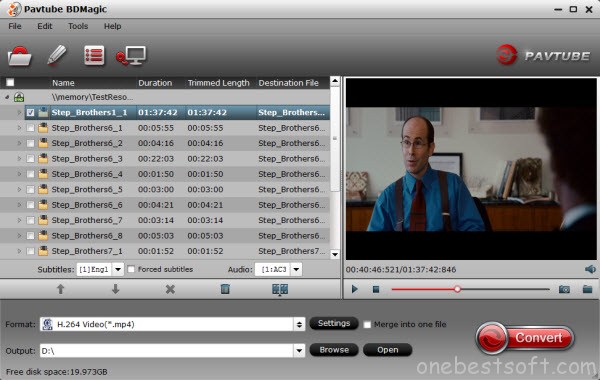
1. Launch the Blu-ray/DVD ripping program for NAS devices . Then click “Load Blu-ray/DVD” to import the Blu-ray/DVD files you want to convert. To select the subtitles you like, simply click Subtitle and select the one you prefer. P.S. Before start the conversion, you can choose to backup Blu-ray/DVD main movies. 


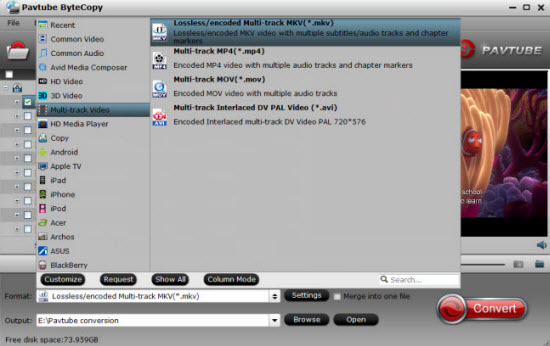
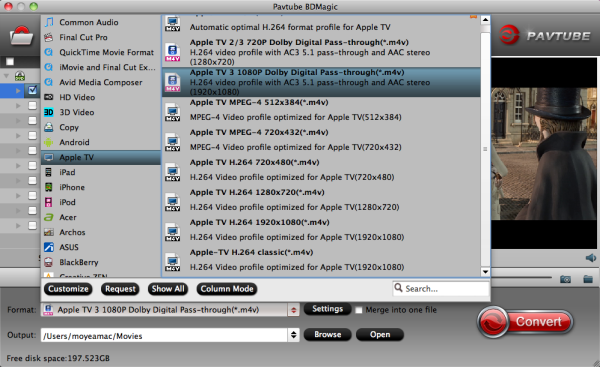
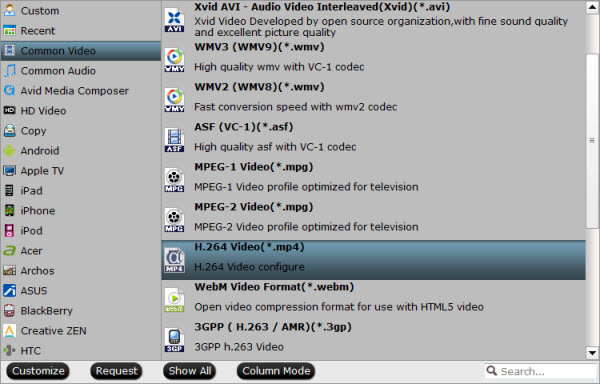
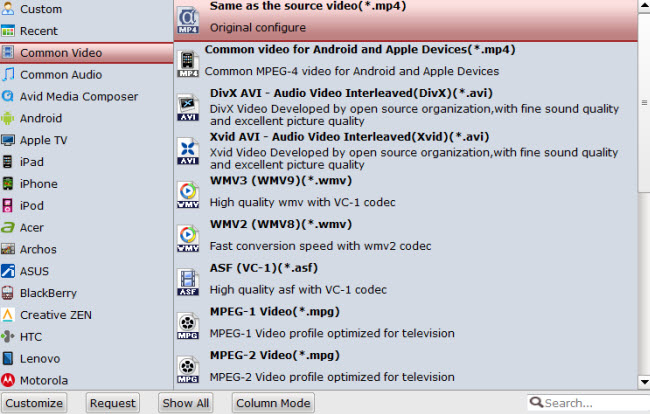
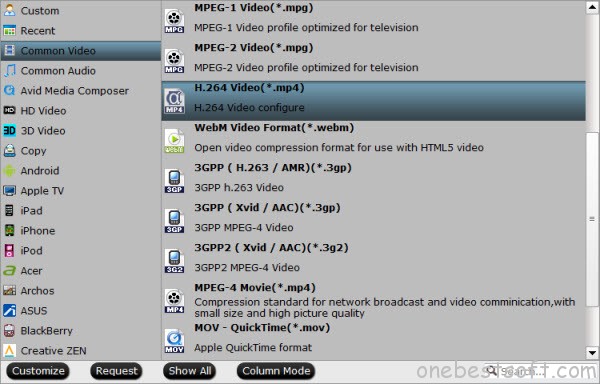
2.Click Format bar and choose your desired format. To store hundreds of Blu-ray/DVD’s on NAS, you can rip Blu-ray/DVD to .mp4, or .avi, .mkv, etc compressed format. Here for watching on Apple TV 4/PS3, MKV or MP4 format is suitable.


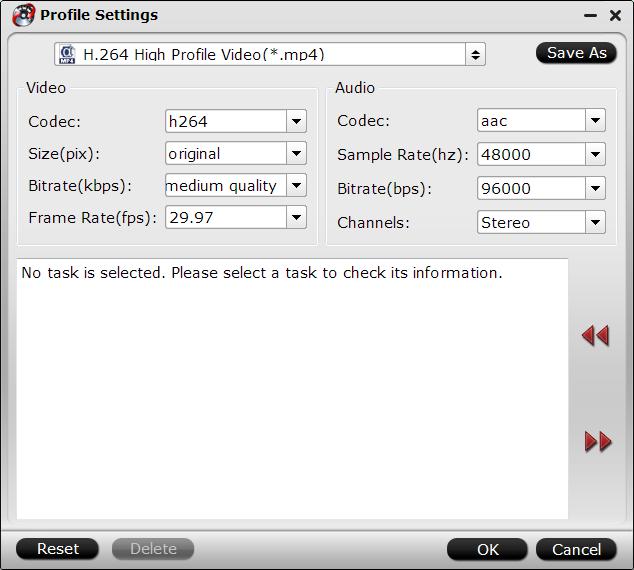
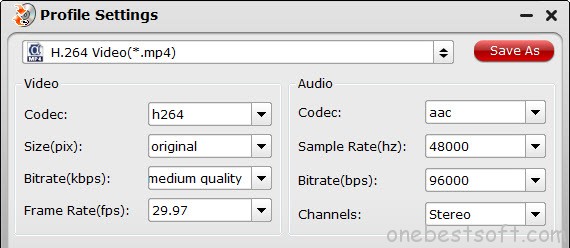
Tip: And click Settings bar, you can adjust the level of compression to suit the quality you want. Keep in mind the file size and video quality is based more on bitrate than resolution which means bitrate higher results in big file size, and lower visible quality loss, and vice versa.


3. Press the “Convert” button to start ripping Blu-ray/DVD for NAS streaming.

After the conversion, click Open button to find the output files. Make sure the wireless network connection is accessible among the NAS and Apple TV 4/PS3 or other media players. Then just enjoy the high quality Blu-ray/DVD movies with your family anytime you like. 

Learn>> Stream Any Videos to Apple TV 4 for Playable format | Stream all media files from a PC to PS3 console 

Read More:

Monday, November 16, 2015

Copy DVD Movies to Xtreamer Ultra Full HD Media Player

Summary: This article will show you how to easily and quickly convert DVD movies to Xtreamer Ultra Full HD Media Player supported video formats for watching on your HDTV.
What Xtreamer have done with the Ultra is to offer a nettop type mini-computer with a layer of software adapted for multimedia playback. This souped up HTPC with its Atom processor and 4 GB of RAM comes with a Linux OS that has been reworked by Xtreamer to provide XBMC or Boxee straight to the user. Xtreamer Ultra is really a gorgeous Full HD media player. With it, you can easily play your personal and Internet media files on your TV's big screen. So it will be a delightful experience to enjoy your DVD movies on your HDTV via Xtreamer Ultra. However, Xtreamer Ultra Full HD Media Player doesn't support DVD discs. 

To complete your task, you need the assistant of a DVD ripping program that is capable of copying DVD files to Xtreamer Media Player. Here Pavtube ByteCopy is highly recommended to help your rip DVD movies (including protected commercial DVD movies) to Xtreamer Ultra Full HD Media Player supported MKV, WMV, MP4, AVI, VOB, MOV, etc. so that you can play your DVD movies on HDTV via Xtreamer Ultra Full HD Media Player without any limitations! Here is the reivew

Why choose Pavtube ByteCopy for DVD Movies to Xtreamer Media Player backup:

  • Lossless video quality. Pavtube ByteCopy can copy DVD contents to MKV without changing anything. You get highest possible video quality, i.e. original DVD video contents, just in a different container format. And WD TV Live handles DVD contents well.
  • Fast forward and chapter locating. Original chapter structure is preserved. You can quickly skip to any chapter you like when playing MKV.
  • Proper subtitles display. Pavtube ByteCopy converts the subtitles to vobsub which is more compatible when play on Western Digital players.
  • Flexible audio output. Audiophiles can pass-through Dolby TrueHD, DTS-MA, and LPCM audio to MKV so as to send the audio to AV receiver for de-coding and reproducing the surround sound faithfully (studio effects). Average users can down convert 7.1 audio to Dolby Digital 5.1 or stereo.
Pavtube ByteCopy always keeps a pace with latest DVD copy-protections, and registered users can upgrade Pavtube ByteCopy for free whenever a new version is released. 

Good News! To thanks for your continuous support, Pavtube Official Website and Pavtube Facebook are now holding the biggest sale for this Weekend with fantastic 35% off discounts and giveaway. Pay less to get powerful Blu-ray/DVD/Video Converter to build your own home media center on this Weekend of Nov.13~Nov.20 2015!

How to Convert and Rip DVD to Xtreamer Ultra Full HD Media Player

Download the DVD Ripper for Xtreamer Media Player:


Other Download:

- Pavtube old official address: http://www.pavtube.cn/bytecopy/
- Cnet Download: http://download.cnet.com/Pavtube-ByteCopy/3000-7970_4-76158512.html

Note: This guide uses DVD Ripper for Windows (Windows 10 compatible) screenshots. The way to rip DVD on Mac (El Capitan and Yosemite) is the same. Just make sure you've downloaded the right version according to your situation. 

Step 1: Load DVD movie.

There are several ways to import DVD into ByteCopy. You could either load Blu-ray from disc drive, or add DVD folder, DVD ISO/IFO files from local drive.


Step 2: Choose format and set profile.

Select the optimized video format for output. In order to save original audio tracks, chapter markerssubtitles, etc, you are suggested to choose "Multi-track Video" "Lossless/encoded Multi-track MKV(*.mkv)" as output format.


Step 3. Adjust Video/Audio/Subtitle settings

Enter Settings and you can adjust profile presets as you desire. Remove unwanted audio/subtitle track, encode audio, etc.


Step 4: Convert DVD to Xtreamer Media Player.

Hit on the "Convert" button and start ripping DVD to lossless MKV format. Thanks to its powerful features, it would take about half an hour to complete the task. 

Open output folder and find the ripped MKV file. Now you can watch DVD on Xtreamer Ultra Full HD Media Player with original audio track preserving without hassle.

Read More:

Thursday, August 27, 2015

Blu-ray to iTunes - Rip Blu-ray to Hard drive for Adding to iTunes

M4V is a file container format designed by Apple for its applications and devices like QuickTime player, iTunes, iPad, iPhone, iPod, etc. Thus, if you want to play and watch Blu-ray movies on QuickTime player, iTunes, iPad, and other Apple’s products, the best solution is to rip and convert Blu-ray to M4V videos on Mac. If you are interested in ripping Blu-ray movies to a hard drive, where you can access them any time via an Apple TV or similar device, this tutorial will give you some effective tips on how to converting Blu-ray discs into iTunes for Apple TV etc.

Hot Search: VIDEO_TS iTunes Solution | DVD to iTunes | MOV to iTunes | H.265 to iTunes 

As we know, most portable devices don’t have the Blu-ray drive for Blu-ray playback and Apple devices are no exemption. To finish the conversion, a Blu-ray ripping program is needed.

How to Complete the Blu-ray to Hard drive for Adding to iTunes conversion

Once I have tried Handbrake, but it can deal with non-protected DVD or Blu-ray only, also I having tested some Blu-ray/DVD ripper and converter for Mac from google searching, I'm not satisfied until I find Pavtube BDMagic for Mac. It is on the top list of many online reviews and is regarded as the most easy-operated and powerful BD Ripping Tool. So in this tutorial, I will introduce and share an easy way to rip Blu-ray to digital format for using in iTunes.

Free download and install it:

Pavtube BDMagic for Mac which can help you convert Blu-ray to iTunes compatible format for playback without any limitation. I've found the quality to be excellent, and see no difference when compared to playing the discs themselves.

How to Rip existing Blu-ray library to Apple TV in Mac OS X El Capitan?

1. Load Blu-ray source.

First of all, insert your Blu-ray to Blu-ray drive and keep networked. Now it's time to open the Mac Blu-ray to iTunes Ripper and click "Load files" icon to load Blu-ray source.


2. Choose output M4V format for iTunes.

In the dropdown list of Format menu, you can find several options for output. According to my experience, "M4V - MPEG-4 Video(*.m4v)" from "Common Video" preset is highly recommended for putting onto iTunes.


I was very pleased to find so many M4V file types built into BDMagic. So for Apple TV, I choose "Apple TV 3 Dolby Digital Pass-through (*.m4v)" profile in "Apple TV" column to get a 1080p m4v output with stereo and Dolby Digital 5.1 pass though.

  • Find no 5.1 Surround Sound from Apple TV? Here is your best solution.


Tips: For some advances users, you can go to adjust video and audio parameters like bitrate, resolution, channels, etc. Click "Settings" button you can go to check and change them as you like.

3. Convert Blu-ray to iTunes/Apple TV video on Mac.

Click Convert button to rip Blu-ray to iTunes/Apple TV recognized M4V video for playing. Afterwards, transfer the converted video for watching on your iPadiPhone, iPod, etc via iTunes with ease.

More Tips. add Blu-ray movies to iTunes

After the conversion, click on “Open” button to access to the videos you ripped. Open your iTunes and import the Blu-ray (now in iTunes friendly video format) to its Movies library by clicking File -> Add File to Library.


After that, you can transfer and watch Blu-ray on iTunes or your iPod Touch 5, iPhone 5, the new iPad, iPad Mini, Apple TV 3 and more Apple devices freely. On Apple TV, I browse the iTunes library for the movie and it plays smoothly and at full quality. I don’t think it could get much simpler (unless of course, Apple provides native support for Blu-Ray which doesn’t seem likely).

Read More:

Monday, July 20, 2015

Copy DVD Into the Woods Full Movie to iPhone/iPad/Android

Into the Woods is fun, exciting, and catchy. It’s an adaptation of James Lapin and Stephen Sondheim’s award winning Broadway musical of the same name. No doubt Into the Woods is a must-have for new movies on DVD 2015. Well yeah, the DVD Disney Into the Woods needs around $20 on Best Buy, Walmart and Amazon. To not pour money down the drain, you are advised to make a digital copy of DVD Into the Woods. But how to backup and copy DVD Into the Woods Disney movie? Hold on reading and find the answer...
  
Newly released  DVD Movies Review : Top Antonio Banderas Movies | 2015 New Disney Movies Reviews | Best Summer Movies 2015


There are many DVD ripping software claiming to have the ability to copy DVD Into the Woods, however, that's not the case. Because of so many DVD rippers do a good job in ripping DVDs, but most of them crash or fail when it comes to Disney movies, including the famous Handbrake, Wondershare etc.This is due to the special DVD protection measures imposed on Into the Woods by Disney. 
  
So how to convert the Disney DVD movie Into the Woods? Take it easy, there is still a qualified Into the Woods DVD ripper you can rely on: Pavtube DVDAid. This DVD ripper for Into the Woods outshines other programs for that: it’s capable of ripping/converting just about every title that I own; it’s easy of use and choices for decode/encode to all popular formats. Read the review

With this Into the Woods DVD ripper is an expert in ripping DVD Into the Woods to MKV, MP4, AVI, MOV and any other commonly-used video formats as well as to the popular mobile devices, including iPhone 6/6 Plus/5S/5C/5, iPad, Samsung, HTC, Blackberry, and Nokia phone, PSP etc. With 1:1 original quality reserved but 6X faster speed. The Mac version is Pavtube DVDAid for Mac
  
Step 1: Free download the Top DVD ripper for Into the Woods Disney movie. Import DVD Disney Into the Woods and launch the DVD ripper. Then click "DVD Disc" to load the disc.


Note: To put it another way, you can not only backup DVD Into the Woods smoothly, but also rip latest DVD movies from 20th Century Fox, Paramount, Columbia, Warner Bros., Pixar and other big film companies.

Step 2: Choose Output format. 
  
The general format is “Common Video >H.264 Video(*.mp4)” it’s the most widely used format which will be supported by your all HDTV, HD Media Players, Tablet, Smartphone and iOS devices.  


There are two ways you can go:

1.To convert DVD Into the Woods to MP4, MKV, AVI, FLV or other common video formats, choose the target video formats from the list. 

2.To backup DVD Into the Woods to iPhone/iPad/Android, you can either choose one of the device supported formats as per the guide above, or select the device directly from the list if you don't want to bother. 

Step 3 Convert DVD to MP4 for portable devices. 

Click the “Convert” button to start converting DVD to MP4 format. With the technology of CUDA acceleration it will provide you fast conversion speed. Once completed, go to “Open” the generated MP4 files for playback on your all portable devices. 

Now, you can get all the Into the Woods DVD Movies and know the best solutions for Ripping Into the Woods DVD for enjoying his best movies on iPad/iPhone/Android and other portable devices on the go. Have a good time!  

DVD Into the Woods Copy Alternative: Disney Into the Woods Full Movie Free Download

In addition to rip and copy DVD Into the Woods to digital files, there is anther common way to enjoy this Disney movie: download Into the Woods free from online torrent sites. Considering that the strict movie protection measures imposed by Disney, to free download Into the Woods may result in power quality or copyright infringement. 

Well, for who want to get Disney Into the Woods full movie download in high quality, the professional Pavtube Video Converter Ultimate will help. This Into the Woods movie downloader can easily download Into the Woods full movie in HD 4K 2160p, 1080p/720p free from 300+ movie sites, like YouTube, onlinemovies.pro, Dailymotion, youku, Tudou, dbtv, letv, Pandora.tv and many more, with 100% percentage original quality reserved. No virus, no malware, totally clean. Furthermore, the downloaded movie can be saved in MP4, AVI, MKV, MOV etc for you for free playback on iPhone/iPad/Android. If you are running a Mac OS X computer, iMedia Converter for Mac is the alternative. 
  
Read More:

Monday, June 29, 2015

Full disc copy Blu-ray with keeping 7.1 audio

As you know, Blu-ray comes with lossless audio quality. You are definitely love Blu-ray audio with the high quality sound experience. There are mainly three lossless audio codecs used in Blu-ray disc: PCM, Dolby TrueHD and DTS-HD MA. And the Dolby TrueHD technology and DTS-HD Master Audio can deliver unprecedented home theater experience, so there may be no one willing to loose the wonderful audio while backup a Blu-ray movie. If you have collected lots of original BD disc and want to keep the Dolby TrueHD 7.1 audio from Blu-ray discs. Here we will give you an easy fix. 
The thing is that most Blu-ray rippers in the market can not recognize the two stunning audios at all, and this may be the probable thing that troubles you a lot. With luck, Pavtube ByteCopy is here for you, which is able to read TureHD audio and DTS Master Audio, and output them as 7.1 channels. (Read ByteCopy review).Here, Pavtube offers three ways for keeping 7.1 audio channels, one is Full disc copy, another is directly copy, third is that convert blu-ray to lossless mkv with Dolby TrueHD 7.1 audio from Blu-ray discs.

The top Blu-ray Copying tool is able to read TureHD audio and output 7.1 TrueHD passthrough. It supports convert Bluy-ray (with Dolby TrueHD 7.1) to a common video with TrueHD 7.1 audio pass through as you want and even lossless Blu-ray to MKV conversion keeping the original audio tracks, chapter info and subtitles without to do any parameter settings. Mac version is Pavtube ByteCopy for Mac. Below we take the example how to using the Pavtube ByteCopy to convert Blu-ray with TrueHD 7.1 audio.

Full Disc Copy Blu-ray with keeping 7.1 audio using Top Blu-ray Copying tool
 

Step 1. Add Blu-ray movies

Insert Blu-ray Disc into your external or internal BD drive and launch the Blu-ray Ripping program. Click “disc” button to import Blu-ray movies for converting/copying.


Step 2. Choose an output folder

Click "Browse" button to select a destination folder for the output files.

Step 3. Decide Blu-ray Copy Mode for keeping 7.1 audio

Full Disc Copy Mode: Copy Disney Blu-ray Disc to a full Blu-ray folder containing all the content in original BD.  

As soon as the copying task finished, you can click "Open" button to locate the Blu-ray directory. The decrypted Blu-ray folder contains all information and contents in the original disc. Among them, the BDMV folder is the most important one with audio and video files in it. Open BDMV -> STREAM folder and you will find all the .m2ts movie clips. 

Tip: To keep TrueHD 7.1 audio, you can also choose “Common Video > WMV3(WMV9)(*.wmv)” as the output format, for it provides the 7.1 audio channels for you. But make sure the original BD disc does contain Dolby TrueHD audio, otherwise you still can’t get Dolby TrueHD 7.1 audio saved. 
  
Note: Make sure the original BD disc does contain Dolby TrueHD audio, otherwise you still can't get Dolby TrueHD 7.1 audio saved. 

Step 4. Play Blu-ray files on PC.
After the copy completed, you may click ‘Open’ buttonto locate the Blu-ray directory. Open BDMV-> STREAM folder and you will find all the m2ts movie clips. For playing the m2ts files, you may use VLC player orKMPlayer.

That’s it! Your Blu-ray video will now be encoded and a few hours later you will have a great high definition video file with preferred audio and subtitles using Pavtube ByteCopy with No Error. Have Fun!  

Read More:

Thursday, June 11, 2015

Play DVD with AirStash on Plan Trips Use Reliable Tool

Maxell Airstash is the first wireless USB memory stick and the wirelessly transfers your media and documents from its flash storage onto any Wi-Fi enabled device, via its own generated Wi-Fi connection. Essentially a USB stick with a mobile hotspot, it's the perfect companion for devices that you can use AirStash to stream, transfer and manage media files wirelessly with the assistance of the free AirStash app for iOS and AirStash app for Android


With AirStash, you can not only make a complete backup of your DVD movies, but also has the capability to share them on your smartphones and tablets wirelessly. If you want to rip DVD Collections to AirStash, you need a program that is able to convert and then compress the videos to a format that is computer/AirStash/Portable devices-friendly. There’s all kinds of different DVD ripping software out there (some free, some not) with a variety of different options. Here we introduce rip DVD to AirStash with Pavtube DVDAid, a professional and easy-to-use DVD ripping software. 

Pavtube DVDAid as a powerful yet easy-to-use DVD to AirStash Converter software to rip purchased copy-protected DVD to AirStash compatible format like MP4, etc. in good quality and high speed with a wink, and even extract MP3, WMA, FLAC, OGG, etc. audio from DVD movies, then you can put converted videos to AirStash for watching freely. 
   
Now you can free download it and follow the easy steps below to convert DVD to AirStash with a few mouse clicks. The Mac equivalence to convert DVD to AirStash on Mac Yosemite is Pavtube DVDAid for Mac


Hot News! Pavtube Studio has launched a user-requested upgrade for full line of Pavtube products to version 4.8.6.2.  Existing bugs, improvements and new elements for M3U8 encoding are added and has the capability of encoding or decoding H.265/HEVC files well..

Step 1: Insert DVD and add movies

Open the DVD Ripper, then insert a DVD disc to your DVD-Rom and click DVD Disc to load your DVD movies. You can also import DVD folder from your computer hard drive.


Step 2: Select AirStash stream-able format.

Click "Format" drop-down list and select "H.264 Baseline Profile Video (*.mp4)" as the output profile format to stream from AirStash to portable devices.


Step 3: Customize output profile parameters.

Click "Settings" to open "Profile Settings" window, here you can adjust video codec, size, bitrate, frame rate and audio codec, sample rate, bit rate and channels according to your own preference.


Step 4: Start converting DVD to AirStash

Finally, hit the "Convert" button at the bottom of the main interface to start ripping DVD for AirStash. After the conversion, you can hit "Open" button to quick locate the converted videos; then you can load the files on AirStash or downloaded to SD cards to use with AirStash on plane trips and grandchildren watch on car trips. 
  
Note: Now you don't need to spend money on the devices with more memory, (e.g. the iPhone 6 64GB model), or sift through your files and delete them to make space. Just switch on the Airstash, search for a Wi-Fi connection on your iPhone and connect. Download the free app from the internet and it acts as a media browser, so any photos, songs or videos you have on the Airstash you can access at a fingertip. Multiple devices can connect to it at any time so you can share your media with friends or colleagues. 

Read More:

Monday, April 13, 2015

How to Burn Purchased iTunes Movies to DVD Disc?

This tutorial will teach you the simplest solution to remove iTunes DRM and then you can convert iTunes movies to other video or audio file you needed or burn iTunes to a new DVD disc.

“ How to Convert iTunes movies to DVD I have purchased several movies from iTunes. Since most of the times these movies are played on my APPLETV. However from time to time the children want to watch the movies in their room. I can not find any menu option that will allow me to burn purchased movies to a DVD. Please explain how to do this?” 

Hot Search: iTunes to TV, iTunes to WMP, VIDEO_TS to iTunes, iTunes to PS Vita


Many of users would encounter the same problem as Noppie. However, music and movies purchased from iTunes can be only played on Apple products due to DRM (Digital Rights Managements) protection. If you want to view your iTunes purchased movies on your home DVD player, you will have to remove iTunes DRM first and then you are able to burn iTunes movies to DVD. So, What's the best way to burn movies from iTunes? You'll find all the solutions here. Here two programs are recommended to copy iTunes movies to DVD with customized DVD menus:

A: Burn iTunes Movies to DVD with Pavtube ChewTune
B: Burn Movies from iTunes to DVD with Pavtube DVD Creator
    
Part One: Convert DRM-protected iTunes Video to DVD for Playback

Pavtube ChewTune has been recognized as the most powerful iTunes DRM Removal Software which lets you remove DRM protection from iTunes to DVD easily. Highly recommended and you will be amazed at how it works. Read the Review. This is a top iTunes DRM removal tool which get iTunes to DVD conversion fully supported by removing DRM from M4V and burning DVD at one place. It also preserves the original quality of M4V video. The software has a very easy to use and simple user interface so that it can be easily used by a novice and a professional user. 
  
The steps that you need to follow to remove DRM protection from both iTunes rentals and purchases and output all kinds of formats or iTunes compatible format using this software are as followed. Note that the Mac version is Pavtube ChewTune for Mac. 

Step-by-step guide: convert iTunes DRMed videos to DVD

Step 1: Launch the Pavtube DRM removal tool and converter and click “Add Video” to load the iTunes video files to the program for converting. You can also simply drag and drop media files to the source pane to add. Batch conversion is supported so that you can add multiple files.


Step 2: Choose the output format for iTunes. For example, choose MP4 as the output format. 


Step 3. Adjust video specs (optional). Click "Settings" button to enter Profile Settings window, you can adjust video size, codec, bitrate and frame rate and some other audio parameters here.

Step 4: Start conversion. You can click the round icon "Convert" to start removing DRM of iTunes videos. 

Part II: How to Burning DRM-free iTunes Videos to a new DVD? 
  
Pavtube DVD Creator features: It lets you burn any kind of video sources to playable DVD. With its simple wizard-style user interface and powerful editing features, DVD authoring and burning can’t be easier. Almost any kind of fair videos (MKV, AVI, MP4, WMV, MOV, MTS, TiVo, etc) can be imported and converted to DVD video. Photos can be made into slide show DVD simply with a few clicks. In addition, the Quick Burn feature enables users to burn archived ISO image and DVD-Video structure instantly.Just follow the step guide 

After read this guide, you will have no issues on iTunes purchased movies playback issues, enjoy your time! 

If you have many other videos to deal with, it is the right place for you. Just go to find your favorite: