Summary: Want to copy Christmas Blu-rays to iMac on Mac OS X (El Capitan)? This article will share you how to get it done with professional iMac Blu-ray backup software for VLC playback.To meet 2015 Christmas, you will decorate a beautiful Christmas illumination, buy Christmas gifts for your kids, prepare Christmas party games and download movies for watching on Christmas. Just before Christmas we wanted to purchase a series of Blu-rays for Christmas. But you may forget one thing – How to Backup Christmas Blu-ray on iMac for VLC playback at the Christmas day? Is there any way to turn/transfer these Blu-rays to iMac such that I can play the movies anywhere anytime? Instead of searching for and downloading Christmas full movie torrent online free to iMac, ripping Blu-rays to watch Christmas movie on iMac (Mac OS X El Capitan) is much easier! And it is less risky yet more high-quality guaranteed. Then, how to make iMac work perfectly with Blu-ray discs? An easy and quick solution I’ve figured out is to rip Blu-ray disc with a piece of Blu-ray backup software as long as it is compatible with your iMac, such as on the latest Mac OS X El Capitan. And your primary concern may be how to keep the best compromise between high visual quality and less take-up of storage. Pavtube ByteCopy for Mac can fulfill your needs and provides perfect solutions for all the Mac OS X users. Overall, it is a professional Christmas Blu-ray handling tool, featured with decent decrypting capability, high quality video output, considerate backup solution and specific format templates for versatile media players QuickTime, iPad, iPhone, Apple TV, etc. It does work for DVD/Blu-ray: rip, backup, convert and edit DVD/Blu-ray movies to other video formats, like M3U8, H.265, 3D MP4, lossless MKV. The equivalent Windows version is Pavtube ByteCopy, which shares almost all functions with Mac version. I was doing a general search for Blu-ray rippers for mac. I read reviews and tried a number of them in which Pavtube has been the best. Now download the software on computer and follow the guide to start ripping.Free Download Top Christmas Blu-ray Ripper for Mac:
 Other Download:- Pavtube old official address: http://www.pavtube.cn/bytecopy-mac/- Cnet Download: http://download.cnet.com/Pavtube-ByteCopy/3000-7970_4-76177783.htmlCopy Christmas Blu-ray Movies on iMac for VLC playback (Mac OS X El Capitan)Step One: Run the program and insert the Blu-ray disc with BD Drive; click “Load file(s)” icon to import the Blu-ray movies. When the files are loaded, you can select the subtitle and audio track as you like. Blu-ray/DVD ISO & DVD folders are also supported here.
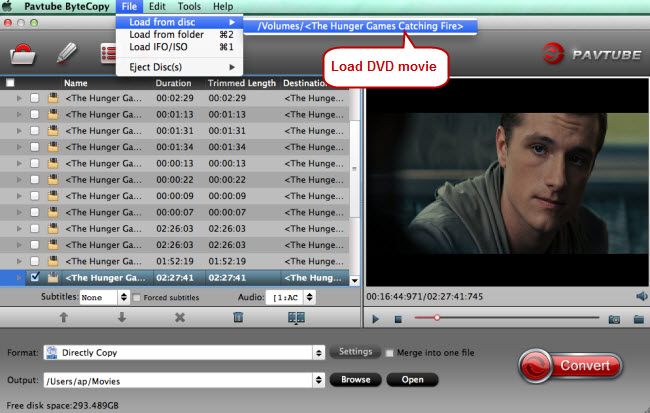 Step Two: Select and custom output format. Click “HD Video” > “H. 264 HD Video (*.mp4)” or “MKV HD Video(*mkv)” to get the optimized output file for Blu-ray to VLC conversion. For iMac, "Common Video" > "MOV - QuickTime(*.mov)" as the output file format for iMac.
 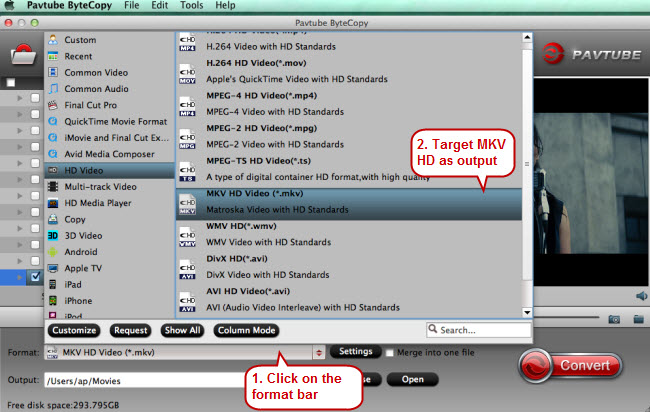 Tip: Besides, Pavtube ByteCopy for Mac could edit videos by trimming, cropping, splitting video, add text/image/video watermark as copyright protection, and attach external *.srt, *.ass, or *.ssa subtitles into source media for entertainment. Step Three: When everything is OK, press the big “Start conversion” button to start Blu-ray to iMac conversion on Mac OS X (El Capitan). Once completed, locate and find the generated .mp4 or .mkv files by clicking “Open” icon on application UI, and you are able to enjoy converted Christmas Blu-ray movies in VLC on iMac without hassle. Read More:
Apple has updated the entire iMac family, bringing a new Retina 4K display to the 21.5-inch iMac for the first time and the Retina 5K display to every 27-inch iMac. So it's reasonable to want to watch movies and TV shows on such a high-definition screen. Here in this article, you will be informed of everything about how to play HD video on iMac 4K 21.5- inch retina display, be it 4K/8k UHD video or 1080P video in MKV, MTS, or AVCHD format. Here we introduces an simple solution for you to get 4K movies to play on 4K 21.5-inch iMac (with El Capitan). Many Mac users mentioned issues online about “Retina iMac can’t stream 4K video”, “errors when editing 4K videos on 21.5-inch iMac”, etc. the problem occurs when trying to play H.265/HEVC format files on iMac because of different types of codec issues and the fact that there is no description available for H.265/HEVC format files on iMac. In fact, all of these problems can be handled by a 4k video converter for iMac 4K like a hot knife through butter.Here, Pavtube iMedia Converter for Mac provides Mac users the possibility to play various videos, either 4K or 1080p HD, on 5K iMac display. Below is the detailed introduction about how to enable 4K Retina iMac to display any 4K and 1080p HD movies. Here is the review. With this video converter you will be able to play 4K videos with a wide variety of formats files on iMac seamlessly without having to download any additional component for additional 4k media player. The biggest advantage is that the 4K video converter is compatible with Mac OS El Capitan, Yosemite, Mavericks, Snow Leopard, Mountain Lion and Lion. Moreover the files which have been converted using the video converter can be transferred to other Apple products such as iPhone, iPad, Xbox One and iPod for playback. Follow the guide below to learn how to convert 4k video to iMac with 4K Retina display and watch 4k video in 1080p or higher on iMac 4K. Download 4K decoder for Mac: Other Download:- Pavtube old official address: http://www.pavtube.cn/imedia-converter-mac/- Cnet Download: http://download.cnet.com/Pavtube-iMedia-Converter/3000-2194_4-76177788.htmlGreat News!!! Pavtube Software officially released its 2015 Thanksgiving Deal. UP to 50% off is provided lasting to November 25. Don't miss it! And find more 2015 Thanksgiving Day, Black Friday Holiday Cyber Monday Crazy Promotion at Pavtube Facebook. Convert 4K to 21.5-inch iMac 4K for Playback Limitless with No Format RestrictionStep 1. Add 4K sourceInstall and run this 4K to iMac converter and then import your 4K video files to it either by clicking “Add video” button or dragging & dropping. Step 2. Select output formatClick Format bar and select output format. Here “Common Video” > “MOV- QuickTime (*.mov)” is highly recommended. MP4 or M4V are also friendly format for playing on 21.5-inch iMac 4K.
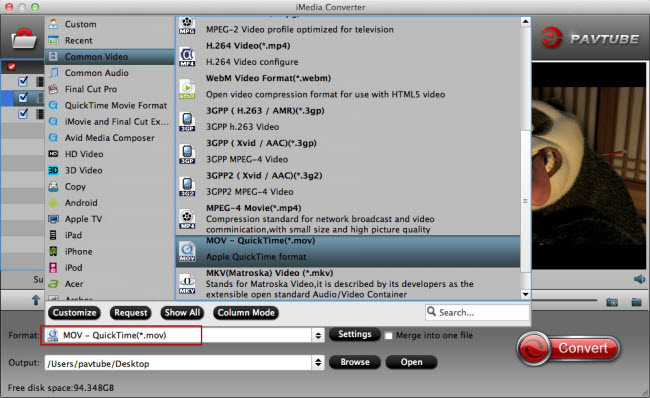 Tip: Before conversion, this Mac 4k video converter software allows you to click “Settings” button right besides “Format” and enter “Profile Settings” panel to adjust video size, bit rate, frame rate, sample rate and audio channels. Learn how to downscale 4K to 1080p video for easier playback.
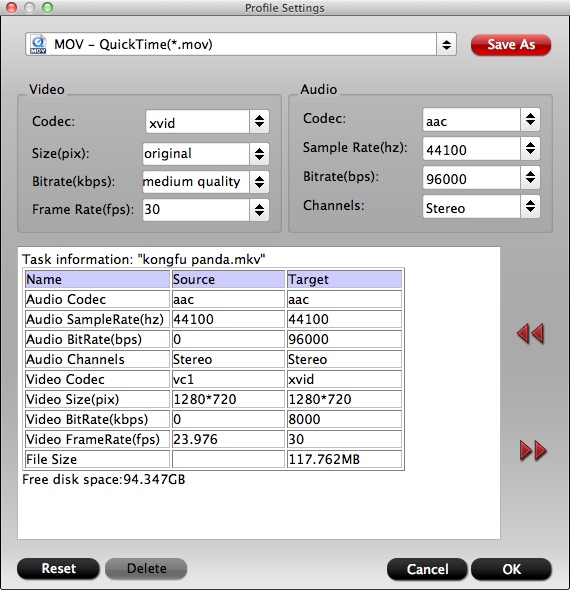 Step 3. Start 4K conversionFinally click “Start conversion” button to start converting 4k to iMac format on Mac OS X (El Capitan). Once the conversion is done, click Open button to locate the results videos. Now you can play the converted 4k files 21.5-inch iMac 4K on Mac OS X El Capitan with ease. Read More:
Q: I am new to Plex and I've started to figure out how everything works. When I access files from my NAS, MP4-files play nicely on the Apple TV 4. However, it seems that it cannot play my MKV-files. It loads them up just fine with meta-info and all, but when I hit "Play", it just loads for a while before returning to the main screen for the movie. What am I missing here? The files play just fine in the browser on my MacBook. Any suggestions? Thanks in advance. As more and more users get the Apple TV 4, there are many Apple TV 4 about Plex related questions asked on the forums and websites, one of the hot topics is the MKV playback on Apple TV 4 via Plex. A lot of users have MKV videos and movies stored on computer, and now they want to play MKV on Apple TV 4 so that they can enjoy the videos and movies on big HDTV. But when they tried to play MKV on Apple TV 4 they get failure, the Apple TV 4 can’t play MKV videos, what’s the reason? The MKV to Apple TV 4 playback issue is caused by the video format limitation of Apple TV 4/Plex. If you check Apple TV 4 user manual or its product page you will learn that Apple TV 4 supported video formats are limited, it can only play H.264/MPEG-4 MOV, MP4 and M4V files, for other video formats like MKV, AVI, WMV, etc. Apple TV 4 is not able to play them, so you can’t play MKV on Apple TV 4/Plex direct.Okay, for all users, if you want to stream MKV files to the new Apple TV, Apple TV 3/2 for playback, you'll need to convert your MKV files to Apple friendly format (e.g. m4v). Along with some help from third-party software. WithPavtube iMedia Converter for Mac, a great Mac MKV Converter for Apple TV 4, you can easily achieve your goal smoothly. In addition to converting MKV to the new Apple TV, it also can MP4, H.265, Tivo, AVCHD, VOB, MPEG-2, MXF, WMV, AVI, DivX, Xvid, Flash format, WebM, and etc to Apple TV 4 video format. Overall, this all-in-one Video Converting tool can help you to rip Blu-ray, DVD and various video files to your Apple TV 4 for watching. Furthermore, it is also equipped with advanced editing function like add subtitles, effect, text or picture watermark to MKV files, crop MKV black bars, trim or merge MKV files, compress output file size and etc. (Learn more functions in this review). Other Download:- Pavtube old official address: http://www.pavtube.cn/imedia-converter-mac/- Cnet Download: http://download.cnet.com/Pavtube-iMedia-Converter/3000-2194_4-76177788.html The following guide shares with you how to encode 1080p/720p MKV to Apple TV 4 for playback on Mac step-by-step. Step 1. Install and launch the MKV Converter for Apple TV 4, and click "Add file" or "Add from folder" button to load your MKV files. The software supports batch conversion so that you can add several MKV files to convert at one time. You can also load Internet torrents movies.
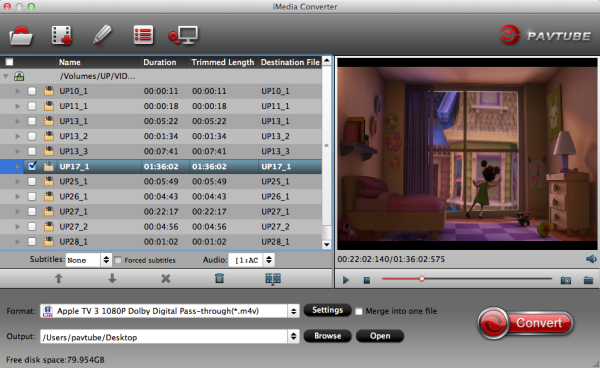 Step 2. Click on "Format" boarder to set output format. Click on the dropdown menu of “Format” and then move your pointer to “Apple TV 3 1080P Dolby Digital Pass-through(*.m4v)” from “Apple TV” which is the compatible format for Apple TV 4. Then you can set the output folder by clicking “Browse” icon as you need.
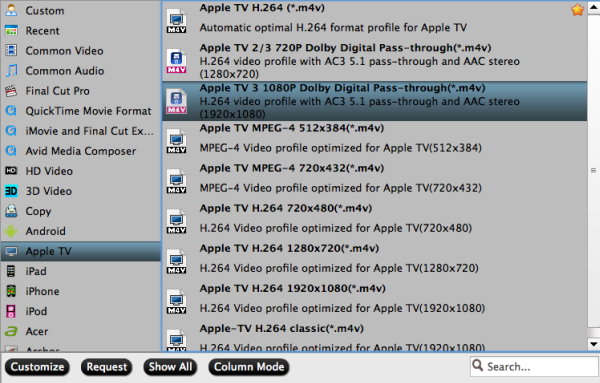 Step 3: Adjust audio and video parameters.Click the “Settings” icon and you will go into a new interface named “Profile Settings”. You can adjust codec, aspect ratio, bit rate, frame rate, sample rate and audio channel in the interface according to your needs and optimize the output file quality. To get AC3 5.1 auido files, you can set audio codec to AC3 and change audio channels to 5.1 Channels. Learn>> how to set up Apple TV 4.
 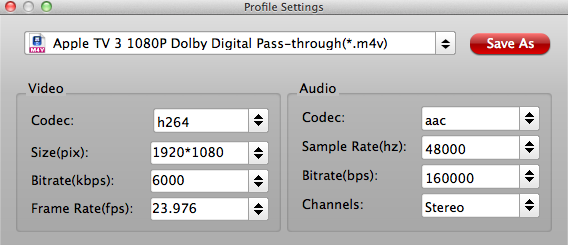 Step 3. Finally click on "Convert" button to start converting MKV to 1080p HD M4V for Apple TV 4 on Mac. After conversion, get converted video files for transferring to ATV 4 via Plex from Mac. In this way, you can get MKV files playable on Apple TV 4 with Mac OS X without problems. We hope this short article will bring some new multimedia life to your Apple TV 4. Note: If you have some issues about Plex Playback, you can read : use Plex with QNAP NAS | Plex FAQ | Add Movies to Plex | Best Video Settings for Plex | Stream MKV to Apple TV 4 via AirPlay or iTunesVia AirPlay: Firstly, to use AirPlay, you need to prepare one of the following devices: iPhone 4 (or later), iPad, iPad mini, or iPod touch (4th generation or later). Add the converted MKV movies to iTunes and sync to your iOS device.Secondly, be sure iOS device and Apple TV are in the same Wi-Fi network; start play the video on your device, and then swipe up from the bottom of your device screen to access Control Center and tap AirPlay; finally, tap the name of the device you want to AirPlay to.Via iTunes: Firstly, add the converted MKV videos to iTunes. Then, go to iTunes > Preferences, choose Apple TV, and make sure "Look for Apple TVs" is selected.Secondly, on your Apple TV 4, choose Settings > Computers > "Connect to iTunes," and note the passcode displayed; in iTunes, select the Apple TV 4 (below Devices), and enter the passcode.Thirdly, click the Summary button and select one of "Automatic Sync" and "Custom Sync".Now, all content are streamed to Apple TV via Plex for enjoyment. Could you image an easier way to do this than Pavtube MKV to Apple TV 4 Converter? See Also:
Overview: Is there a way to make losslessly copies of your Blu-ray movies on Mac OS X EL Capitan at all? Absolutely not, this article show you 3 ways to backup a copyright protected Blu-ray quickly and efficiently. When got a pile of Blu-ray discs, you may worry about the kids will scratch or damage them. The safe way is to make a Blu-ray copy. Well, if you have no idea how to make it, get some tips from this article. We'd like to recommend you the best Blu-ray backup software for El Capitan, which can help you copy Blu-ray movies on Mac OS X El Capitan with the original quality.Hot Search: Blu-ray to PS3 | Blu-ray Tips | | Methods about BD Backup | Directly Copy Blu-ray with keeping 7.1 | 3D Blu-ray to Stereoscopic Player Pavtube ByteCopy for Mac El Capitan is the best ripper to copy Blu-ray on Mac for its comprehensive features, fastest speed and quality service. It is an all-in-one Blu-ray & DVD copying and ripping tool as well as providing multi-track and 3D ouput. Besides, it can rip Blu-rays and DVDs to popular video formats, AVI, MOV, WMV, MP4, FLV etc, for playback on Mac and mobiles or uploading to video-sharing website.If you don't need multi-track output, Pavtube BDMagic for Mac is enough which features in copying Blu-ray and DVD with original structure, and converting Blu-rays and standard DVDs to watchable video/audio format for mobile devices. (Here is the review)Learn the 3 different 3 ways to copy Blu-ray to Mac El Capitan using ByteCopy for Mac:Option 1. Full disc Copy: 1:1 Copy Blu-ray Without Compression on MacOption 2. Directly Copy: Backup Blu-ray TV series discs with DTS audio | Copy DVD movies with chapter markersOption 3: Lossless MKV output: Make copy of DVD/Blu-ray discs to hard drive on Mac losslessly
 Other Download:- Pavtube old official address: www.pavtube.cn/bytecopy-mac/- Cnet Download: download.cnet.com/Pavtube-ByteCopy/3000-7970_4-76177783.htmlStep by Step Guides of Lossless Backup Blu-ray on Mac El Capitan in 3 Wayspart 1. Load Blu-ray Files.Insert your Blu-ray disc into Blu-ray external Blu-ray drive and connect with your Mac computer, then launch the application, Click "File" > "Load Disc" to import Blu-ray disc to the program.Part 2. Backup Blu-ray to OS X El Capitan.Method one:Make a full disc copy of Blu-ray movieHit the top tool menu bar "
 " icon to make a full disc copy of your original Blu-ray movies.From "Format" drop-down list, go to "Copy" > "Direct Copy" and backup Blu-ray movies in m2ts format.
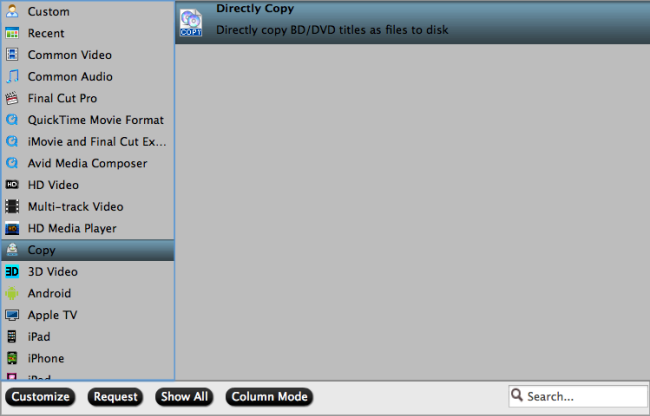 Method two:Backup Blu-ray to Multi-track video format.Hit "Format" bar, go to "Multi-track Video" option, there are four different Multi-track video for you to output, select your desired one as the final backup format.
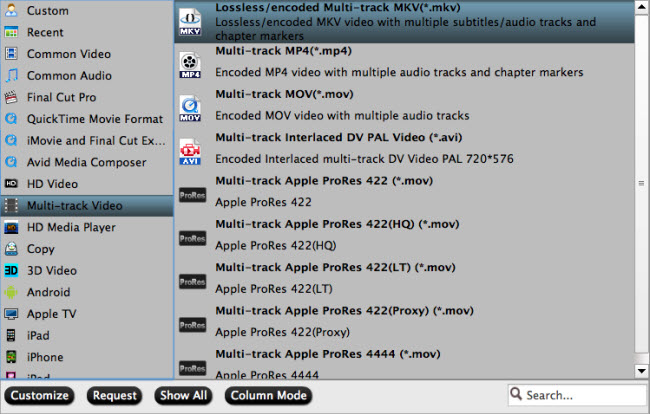 Method three:Backup Blu-ray to media file formats.You can output a common media file format or a device optimize file format according to your own needs.Part 3: Start Blu-ray to Mac OS X El Capitan backup process.Press the "Convert" button to start the backup process.Good News! To thanks for your continuous support, Pavtube Official Website and Pavtube Facebook are now holding the biggest sale for this summer with fantastic 50% off discounts and giveaway. Pay less to get powerful Blu-ray/DVD/Video Converter to build your own home media center on this summer!Giveaway: First Five customers can share this post, email us your order numer and the snapshot to win one more FREE license, no product limit! Read More:
Below is a complete set of solutions which can help you when it comes to adding YouTube videos to Keynote via Mac OS X El Capitan.For Mac users Keynote is really a good tool to do presentation, and it's possible to embed YouTube to Apple Keynote. The Keynote application included with Mac OS X El Capitan. There are so many funny and interesting videos on YouTube, have you ever thought that use them to make your presentation more vivid and cogent? Is there a possible way to download and embed a YouTube video into the Keynote other than creating a hyperlink for it? The answer is Yes. See below how to embed YouTube to Keynote on Mac in order to share Youtube videos in Keynote presentation with audiences. While, before inserting YouTube clips to Keynote for sharing, you need do some preparations. First, you need to download YouTube videos on your Mac, and then convert YouTube (.flv) video to Keynote supported video formats. Afterwards, it would be easy for you to import a YouTube video to Keynote on Mac. The following article is divided into 3 parts:Part I. How to download YouTube videos on your MacPart II. Convert YouTube (.flv) video to Keynote supported video formatsPart III. Embed YouTube video to Keynote on MacPart I: How to download YouTube videos on your MacActually, there are kinds of methods for downloading YouTube video to your Mac. Here we show you how to download videos from YouTube to your Mac with Safari. After opening the URL, pause the video when it starts to play for seconds, and wait for the video to fill the grey progress bar. Then click Window on the menu bar -> Activity, and find the line that represents your video, double click it and the download will begin. With this method, you do not need any Youtube Downloaderor software, but have to wait for the videos being complete processed. Part II. Convert YouTube (.flv) video to Keynote supported video formatsAs we know,YouTube FLV videos can be played using QuickTime 7 with the Perian component, but embed them into a Keynote presentation and they often won't play like other video files. (This is annoying because if a file is compatible with QuickTime, you'd expect it to work with other software that uses QuickTime functionality to play media - which is just about everything on a Mac OS X El Capitan.) Today here we have found a professional FLV to Keynote Converter for Mac to solve this problem. Maybe you don’ t know the best format for Keynote is MOV. How to work Keynote well with FLV files via Mac 10.11 we may learn from the following page. Here is review. Free Download the FLV to Keynote Converter for Mac for a first step. Other Download:- Pavtube old official address: http://www.pavtube.cn/imedia-converter-mac/- Cnet Download: http://download.cnet.com/Pavtube-iMedia-Converter/3000-2194_4-76177788.html Step 1: Load Youtube (FLV) files. Then, Launch the program, drag your FLV files from your computer to the program main interface or load your files by Click "File" > "Add video/audio" or directly drag and drop the Halloween horrible videos to the program window.Step 2. Select output format. Go to "Format" bar, to play Youtube video on Keynote, go to select "Common Video" > "MOV - QuickTime(*.mov)" as the output file format. You can also select to choose other output file formats according to your own needs.
 Step 3: Edit Youtube (FLV) video.For more users, this program is not only a converting tool but also a simple editor. From the pencil icon ‘Editor’, we can see more editing items in. Something like ‘Trim’, ‘Crop’ or ‘Effects’ you can have a try by yourselves.
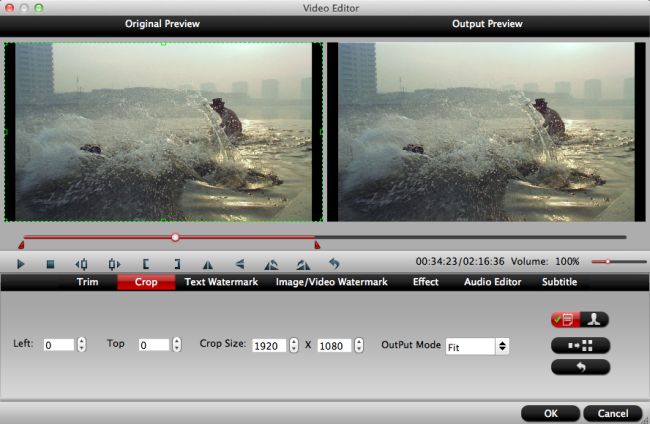 Step 4: Start Conversion.Hit the Convert button to start YouTube (.flv) to Keynote conversion on Mac OS X 10.11. Once the conversion process shows in 100%, click Open button to locate the output .mov videos.Part III. Embed YouTube video to Keynote on Mac OS X El CapitanYou can now drag this video file directly into Keynote. Like any other media asset you can use Keynote's inspector panel to add a border, shadow and even a reflection. You can trim the YouTube videos as you like for the YouTube video to Keynote presentation.That's all. Only with a few simple steps, you can get YouTube videos and put them to your Keynote presentation. Get started now!Read More:
More and more people have upgraded their Mac system to the newest 10.11 El Capitan. When they are enjoying the benefits OS X El Capitan brought, many of them are suffering the softwares incompatibility issue on Mac OS X El Capitan, such as Blu-ray Ripper and DVD Ripper. Pavtube Studio updated its Mac products to meet the trend to prevent Pavtube users from the softwares incompatibility with El Capitan issue. Products that works compatible well with El Capitan including: Pavtube Video Converter for Mac, Pavtube HD Video Converter for Mac, Pavtube MTS/M2TS Converter for Mac, Pavtube MXF Converter for Mac,Pavtube iMixMXF, Pavtube BDMagic for Mac, Pavtube ByteCopy for Mac, Pavtube DVDAid for Mac, Pavtube iMedia Converter for Mac.
Rip and Backup Blu-ray/DVD on El CapitanAfter updated to El Capitan, you can't rip and copy Blu-ray/DVD any more? Don't worry! Pavtube Blu-ray/DVD rippers have solved the system incompatibility issue.With Pavtube newly upgraded Blu-ray/DVD products, you will get no difficulty to make a full disc copy or the main movie copy of the original 2D/3D Blu-ray/DVD disc on Mac OS X El Capitan. Besides that, the program also enables you to rip/convert Blu-ray/DVD disc to various different file formats on El Capitan platform for playing on iPhone/iPad/iPod, Android phone and tablets, Windows phones or tablets, game consoles, HD media players, streaming to Apple TV/Amazon Fire TV/Roku, etc.
Support 4K UHD, 8K video conversionUpdated Pavtube Mac products can fully support you to convert 720P, HD, 4K even 8K videos differentiates itself from the pool of video converters on Mac OS X El Capitan. With preset profiles for Apple and Android, the best video converter for OS X El Capitan enables you to convert any videos of any resolution to iPhone(6S Plus/6 Plus), iPad(Air 3/Mini 4/Pro), Samsung(Galaxy S6), HTC, Blackberry, Sony, etc. in a single click. It's very simple to use, requiring less time to learn the user guide.
Related Articles:
Q: “ I am trying to encode some of my 3D rips to play in 3D on my Apple TV 4, but Handbrake is only encoding the image in 2D. I know the 3D is part of the MKV file, but I can't figure out how to encode it into a MP4. Ideas?” As the new Apple TV 4rd generation users, ever thought of putting your Blu-ray collections to Apple TV 4? With the backup Blu-ray ripping on Apple TV 4, you will no longer need to hunt for a movie in hundreds of Blu-rays and then bother to place it in a Blu-ray player and even should consider the region codes of your commercial BDs. Instead, you just sit on the bed and select desired movie with a handy remote control. In this page, we give you the easy solution.
If you also collected some 3D Blu-rays, do you know how to play the 3D Blu-ray movies on the ATV 4? Before you can watch 1080p 3D Blu-ray movies on Apple TV 4, you have to rip and convert the 3D Blu-rays to Apple TV 4 supported video format on Mac OS X El Capitan first. For convenience playback, you can choose to rip 3D Blu-ray to Apple TV 4 supported MP4, MOV, M4V or 3D MP4 format. And in order to play 3D Blu-ray movies on the ATV 4 freely, one easy-to-use Blu-ray ripper that supports handling 3D Blu-rays disc is necessary. Here Pavtube ByteCopy for Mac is a nice Mac 3D Blu-ray Converter to help you rip 3D Blu-ray to Apple TV 4 on Mac with no matter excellent MP4, MOV, M4V video or 3D MP4 format at fast speed. With it, you can also easily rip/convert 3D Blu-ray to Apple TV 4 as well as other 3D players like Stereoscopic Player and BenQ W1070 Projector with Side by Side effect in MP4 format. Read review. Free Download: Other Download:- Pavtube old official address: http://www.pavtube.cn/bytecopy-mac/- Cnet Download: http://download.cnet.com/Pavtube-ByteCopy/3000-7970_4-76177783.html Step 1. After installing, launch the Blu-ray to iTunes Converter app on your computer. and then press "Load Disc" icon to import 2D/3D Blu-ray movie. Choose "File > Load from ISO/IFO" if you'd like to import Blu-ray ISO image file. 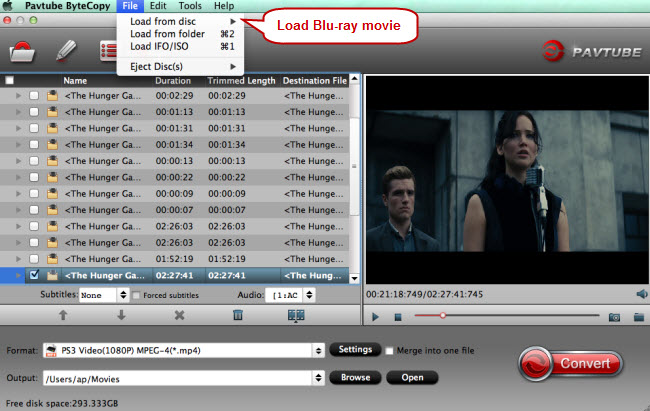 Step 2. To get acompatible format for iTunes, you can choose HD MP4, M4V and MOV format. If you want to keep 3D effect when ripping 3D Blu-ray, choose the 3D Side-by-Side MP4 format from "3D Video".
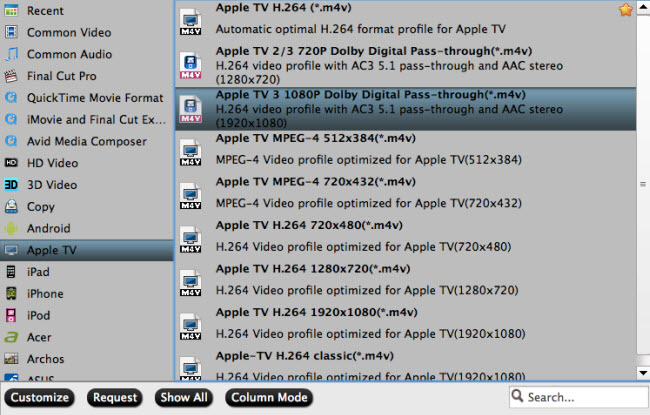 Tip: You can click "Settings" to change the setting from the new default HD profile 4000 to 5000~8000 bitrate (Note: bitrate higher results in big file size, and lower visible quality loss). Learn how to set up Apple TV 4 for Dolby Digital 5.1 pass-through.P.S. The key setting Video Size for your Apple TV 4 is according to your source video exactly. If your source video is in 1080p such as Blu-ray, you can set your video size in 1920*1080 in H.264 codec; while, if your original video size is in standard, 720p in enough. Step 3. Transcode MP4 to Apple TV 4 on Mac. Start the 3D Blu-ray to Apple TV 4 conversion on Mac by clicking on the "Start conversion" button at the bottom right corner. After the short conversion, you will be able to get the output files for Apple TV 4 via clicking on "Open" button effortlessly. Now you can stream 3D Blu-ray on the new Apple TV 4 for enjoying with high quality. You should know, for streaming media from a Mac, iTunes must be 10.6 or later. And to get 5.1 sorround sound, AV Reciever is necessary.Stream ripped 3D Blu-ray on Apple TV 4 via AirPlay or iTunesVia AirPlay: Firstly, to use AirPlay, you need to prepare one of the following devices: iPhone 4 (or later), iPad, iPad mini, or iPod touch (4th generation or later). Add the ripped 3D Blu-ray movies to iTunes and sync to your iOS device.Secondly, be sure iOS device and Apple TV are in the same Wi-Fi network; start play the video on your device, and then swipe up from the bottom of your device screen to access Control Center and tap AirPlay; Thirdly, tap the name of the device you want to AirPlay to.Via iTunes:Firstly, add the ripped 3D Blu-ray videos to iTunes. Then, go to iTunes > Preferences, choose Apple TV, and make sure "Look for Apple TVs" is selected.Secondly, on your Apple TV, choose Settings > Computers > "Connect to iTunes," and note the passcode displayed; in iTunes, select the Apple TV (below Devices), and enter the passcode.Thirdly, click the Summary button and select one of "Automatic Sync" and "Custom Sync".After all the operation, you should be able to play 3D Blu-ray on your Apple TV 4 freely. Just enjoy now!Read More: