Description: This article show you how to convert ISO image files, Sony AVCHD footage and PVR recordings to MKV/MPG format, so that you can edit them in Adobe Premiere Elements or watch on WDTV Live.
Q: “I made some family videos with a Sony CX155E this Christmas, and recorded my son’s favorite TV show in PVR; we both have something to do with the videos together with download ISO image files: I want to edit in Adobe Premiere Elements and my son wish the watch on WDTV Live in the living room. Is there a multi-task tool can help us with the format problem?”
I love make and editing videos as a hobby so I am not new to format and codec issues. Usually when you want to playback a ISO image file on computer, you should run a virtual drive to mount this file then open it. PVR recordings can be playback smoothly on the box, but it’s not the best format for WDTV – WDTV prefers MKV format. As for the Sony CX155E, I browsed and found its footage is in AVCHD file structure.
So things become simple: to accomplish all the tasks, you need to find a tool which is able to convert ISO, PVR and AVCHD into MKV for WDTV Live, or MPG for editing in Adobe Premiere Elements.
Although there are various video converting tools on the market, dare I say the Pavtube Video Converter Ultimate is the simplest program to use. This all-in-one video converting tool support converting Blu-ray/DVD ISO files, AVCHD footages and PVR recordings to various formats in presets for different using; import, choose preset, convert. It’s as simple as that.
Note: its Mac version is renamed as iMedia Converter for Mac.
How to convert ISO, AVCHD & PVR recordings to WDTV Live or Adobe Premiere Elements
Step 1. Install and launch this Video Converter Ultimate; import video
Firstly you need to keep camera on and connect it to computer, then download the AVCHD from card; click the top left “plus” icon to import AVCHD file to it.
ISO image files can be dragged and dropped into it directly; so is PVR recordings.
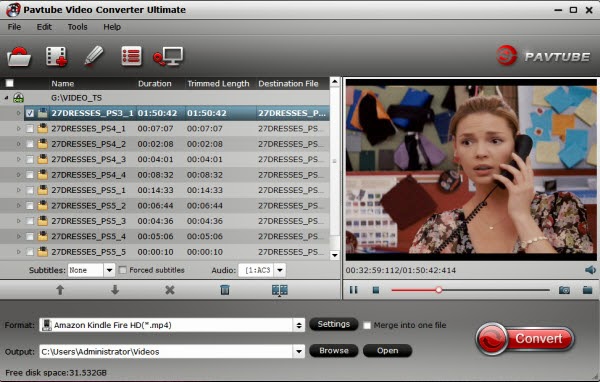
Tick the “Merge into one file” if you want to combine several videos into one file.
Step 2. Choose format.
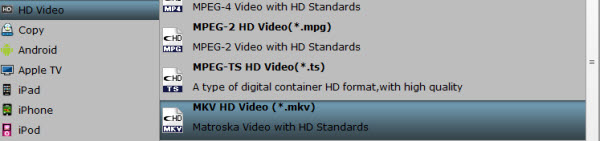
Click the drop-down list besides “Format”, you will find many presets sorted with different device model, editing program, etc.
For people who need to watch on WDTV, you can choose “HD Video>MKV HD Video(*.mkv)” as below:
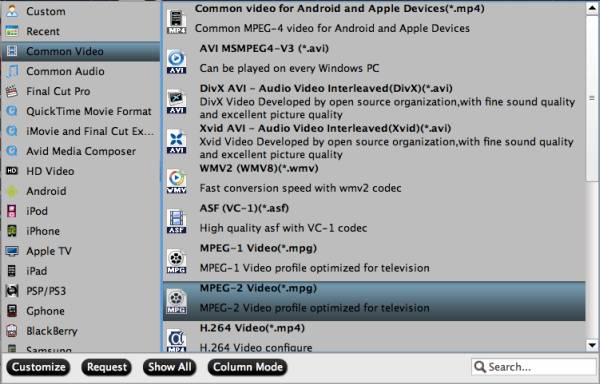
If you want to load the video to Adobe Premiere Elements for editing, let’s hit “Adobe Premiere/Sony Vegas>MPEG-2(*.MPG)”:
Step 3. Adjust target file setting (Optional).
If you are not satisfied with the default video/audio settings, click “Settings” to change file size, bitrate, frame rate and other specs.
Step 4. Start conversion.
Ok now back to the main interface, find the big “Convert” and hit it; it will process the tasks in batch. After it completed, click “Open” or “Open output folder” to find the converted videos quickly.
Besides, I used to burn the final video to DVD after editing. Pavtube studio also released a DVD Creator program for this.
Money saving bundles for you:
Q: “I made some family videos with a Sony CX155E this Christmas, and recorded my son’s favorite TV show in PVR; we both have something to do with the videos together with download ISO image files: I want to edit in Adobe Premiere Elements and my son wish the watch on WDTV Live in the living room. Is there a multi-task tool can help us with the format problem?”
I love make and editing videos as a hobby so I am not new to format and codec issues. Usually when you want to playback a ISO image file on computer, you should run a virtual drive to mount this file then open it. PVR recordings can be playback smoothly on the box, but it’s not the best format for WDTV – WDTV prefers MKV format. As for the Sony CX155E, I browsed and found its footage is in AVCHD file structure.
So things become simple: to accomplish all the tasks, you need to find a tool which is able to convert ISO, PVR and AVCHD into MKV for WDTV Live, or MPG for editing in Adobe Premiere Elements.
Although there are various video converting tools on the market, dare I say the Pavtube Video Converter Ultimate is the simplest program to use. This all-in-one video converting tool support converting Blu-ray/DVD ISO files, AVCHD footages and PVR recordings to various formats in presets for different using; import, choose preset, convert. It’s as simple as that.
Note: its Mac version is renamed as iMedia Converter for Mac.
How to convert ISO, AVCHD & PVR recordings to WDTV Live or Adobe Premiere Elements
Step 1. Install and launch this Video Converter Ultimate; import video
Firstly you need to keep camera on and connect it to computer, then download the AVCHD from card; click the top left “plus” icon to import AVCHD file to it.
ISO image files can be dragged and dropped into it directly; so is PVR recordings.
Tick the “Merge into one file” if you want to combine several videos into one file.
Step 2. Choose format.
Click the drop-down list besides “Format”, you will find many presets sorted with different device model, editing program, etc.
For people who need to watch on WDTV, you can choose “HD Video>MKV HD Video(*.mkv)” as below:
If you want to load the video to Adobe Premiere Elements for editing, let’s hit “Adobe Premiere/Sony Vegas>MPEG-2(*.MPG)”:
Step 3. Adjust target file setting (Optional).
If you are not satisfied with the default video/audio settings, click “Settings” to change file size, bitrate, frame rate and other specs.
Step 4. Start conversion.
Ok now back to the main interface, find the big “Convert” and hit it; it will process the tasks in batch. After it completed, click “Open” or “Open output folder” to find the converted videos quickly.
Besides, I used to burn the final video to DVD after editing. Pavtube studio also released a DVD Creator program for this.
Money saving bundles for you:
- ByteCopy($42) + Video Converter Ultimate($65) = Only $79.9, Save $27.1
ByteCopy($42) + DVD Creater($35) = Only $44.9, Save $32.1
ByteCopy($42) + Vidpie($29) = Only $54.9, Save $16.1
ByteCopy($42) + MXF MultiMixer($45) = Only $69.9, Save $16.1
Related Articles: