Thursday, December 15, 2016

Good News - Pavtube Announces 2016 Christmas Up to 50% OFF Promotion

Welcome, my best friends! Merry Christmas!!

This article is about the biggest promotions of Pavtube Studio for celebrating Christmas and New Year. Here we provide you the biggest promotion up to 50% off including various products like Blu-ray/DVD/Video ultimate product, MXF MultiMixer, MKV video converter, BDMagic, DVDAid and more. Let’s start our Christmas story!

Pavtube Promotion 1 - Video Converter Ultimate (20% OFF)

A. Pavtube Video Converter Ultimate (20% OFF)

Pavtube Video Converter Ultimate is the best BD/DVD/Video solution for Windows users to backup BD/DVD, compress disc and transcode video clip (including H.265) to almost all popular video and audio formats like m3u8, H.265/HEVC MP4, MKV, M4V, AVI and play on iPad, iPhone, Android phones, Windows phones, game consoles, HD media players, and more. (Read more its detailed Christmas promotion)

Pavtube Video Converter Ultimate

B. Pavtube iMedia Converter for Mac (20% OFF)

Pavtube iMedia Converter for Mac assist you easily handle all SD, HD, 2K and 4K video file formats, decode and encode H.265 video, 4K videos, transcode Sony XAVC videos, create 3D movies from 2D resources on Mac OS X El Capitan. (Read more its detailed Christmas promotion)

Pavtube iMedia Converter for Mac

Pavtube Promotion 2 - DVD and Bluray Ripper (30% - 40% OFF)

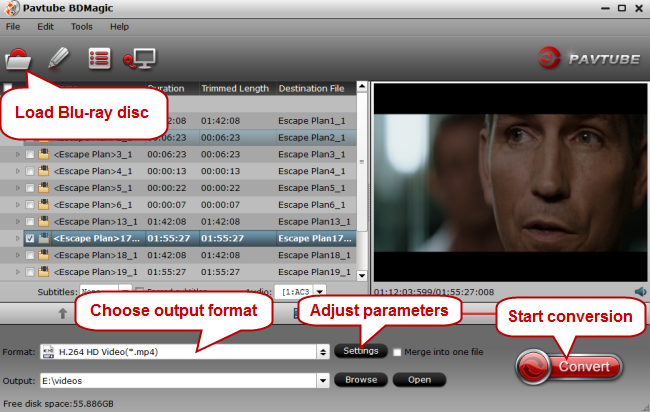
a. Save 30% to Get the Best Blu-ray Ripper - BDMagic (Blu-ray/DVD)

Pavtube BDMagic (Pavtube BDMagic for Mac ) is a professional solution to convert BDs/DVDs to any video and audio format for your enjoyment and entertainment.

(Read more its detailed Christmas promotion)

(Now $34.3 Original Price $49)

Pavtube BDMagic

b. Save 40% to Get the Best DVD Ripper - DVDAid (Various DVD)

As a software expert, Pavtube DVDAid(Pavtube DVDAid for Mac) is capable to rip and convert DVDs to more than 200 video and audio formats just for your enjoyment and entertainment. (Read more its detailed Christmas promotion)

(Now $21 Original Price $35)

Pavtube DVDAid

Pavtube Promotion 3 - Wonderful Video Converters (50% OFF)

Pavtube MXF MultiMixer (Only $22.5)

Pavtube Media Magician for Windows/Mac (Only $23)

Pavtube MKV Converter for Windows/Mac (Only &14.5)

Pavtube FLV/F4V Converter for Windows/Mac (Only $14.5)

(Read more video converters' detailed Christmas promotion)

Pavtube Promotion 4 - Software Bundles


MXF Converter + MTS/M2TS Converter for Mac

Original Price $58

Now: $29.9

iMixMXF + HD Video Converter for Mac

Original Price $80

Now $54.9

ByteCopy + Video Converter Ultimate

Original Price: $107

Now: $79.9

Video Converter Ultimate + ChewTune

Original Price: $94

Now: $74.9

ByteCopy + ChewTune

Original Price: $71

Now: $54.9

Video Converter Ultimate + DVD Creator

Original Price: $100

Now: $64.9

ByteCopy + Video Converter

Original Price $77

Now $60  

ByteCopy + DVD Creator

Original Price: $77

Now: $44.9

Source: http://mediaconverting.blogspot. ... xmas-promotion.html

Thursday, December 8, 2016

Import Yuneec Q500 4K video to Edius Pro 8.30 without any problems

The Yuneec Typhoon Q500 4K ($1,449 as tested) is a big drone that tries to set itself apart from others in its price range by doing a bit more. Its camera is removable, and can be used handheld with an included accessory grip. And its remote control incorporates a touch-screen Android device into its design, so you don't have to use your own phone. The Q500 captures steady 4K video when in flight, but the video is noticeably blurry as you move toward the edges of the frame.

Have recorded some 4K video by your Yuneec Q500? Tried Import Yuneec Q500 4K video to Edius Pro 8.30 but failed? Have a look at the Yuneec Q500 4K to Edius Pro 8.30 issue:

“Hi hope somebody can help , before I updated to Pro8.30, I was able to import into Pro8.22 and Pro7 , my Drones (yuneec Q5004k) footage with no problem and Edius pro 8.22 had no iusses. I am able to import my DJI P3 footage into 8.30 no problem. I am able to import the same Yuneec footage in to Adobe PPRoCC2015 I have no problem to play the footage and edit. But why when import Yuneec Q5004k to Edius Pro 8.30 i failed. What’s wrong? Who can help me?”

Do you also have some problems importing Yuneec Q500 4K video to Edius Pro? No worry, here we give you one easy solution.

Working Yuneec Q500 4K videos in EDIUS Pro EDIUS Pro is extremely hardware intensive. We recommend that you use an Intel Xeon-based system, especially if you are working with multiple layers. If you are running on an old computer and don't wanna turn to a new one, you will meet Typhoon Q500 4K video file stuttering problems with EDIUS Pro. And the Yuneec Q500 4K in specially the MP4 video sometimes is not friendly with EDIUS Pro. So if you're planning to use 4K files in , you do need to convert Yuneec Q500 4K video to using MPEG-2 (1080p) as primary delivery format. You can use Pavtube Video Converter to help you done.

Popular search: MKV to Edius Pro ǀ MP4 to Edius Pro ǀ GoPro to Edius Pro ǀ 4K to Edius Pro ǀ MOV to Edius Pro

Key features of the 4K to Edius Pro video converter:

- Compress Yuneec Q500 4K to 1080p, 720p for better usages.
- Convert Yuneec Q500 4K video to any formats like MP4, MKV, AVI, H.265, WMV etc.
- Convert Yuneec Q500 4K to Windows Movie Maker, Premiere Pro, DaVinci Resolve, Cyberlink - PowerDirector etc editors supported video format.
- Edit your Yuneec Q500 4K video with hot video editing functions.
- Convert Yuneec Q500 4K to VLC, TV, PS3, PS4, Projector etc.
- Merge several Yuneec Q500 4K video into one file for batch converting quickly.

How to Convert Yuneec Q500 4K footage for editing in EDIUS Pro 7/8

Step 1. Add Yuneec Q500 4K video source

Run the best 4K Video Converter program you just set up. Drag and drop the Yuneec Q500 4K video files to the converter. You can also hit Add files button to import videos to the app. If you wanna combine several videos into one file, you can click the "Merge into one" box.

Step 2. Select output format for Edius Pro

Click the "Format" bar and select "Adobe Premiere/Sony Vegas > MPEG-2 (*.mpg)" as Edius Pro’s output format on the drop-down menu. It ensures the smooth editing with Edius Pro.

Step 3. Advanced Yuneec Q500 4K video/audio settings

Click "Settings" button if you'd like to customize advanced audio and video parameters like Video Codec, aspect ratio, bit rate, frame rate, Audio codec, sample rate, audio channels. Note: If you want to get original Yuneec Q500 4K resolution, just keep the video size as original. If you want to downscale Yuneec Q500 4K to 1080p, you can choose 1980*1080 from “Size”.

Step 4. Start converting 4K footage

Hit the Convert button of the best 4K file converter. It will start converting Yuneec Q500 4K for importing to EDIUS Pro immediately. Soon after the conversion, just click "Open" button to get the generated files for natively editing in EDIUS Pro 8/7 beautifully.

PS: Mac user can get Pavtube Video Converter for Mac to convert any 4K video, HD video, SD video in any formats to any video/audio format for your usages on Mac (macOS Sierra, El Capitan Yosemite, Mavericks, Lion included)

Read More:

Monday, December 5, 2016

Open GoPro Hero 4K MP4 to Premiere Pro CC 2017 smoothly

Good news is that Adobe recently has just released the latest versions of Creative Cloud apps including Premiere Pro CC 2017. But it is depressing that this latest version Adobe Premiere Pro still won't open some MP4 files like GoPro Hero 4K MP4. How to open GoPro Hero 4K MP4 in Premiere Pro CC 2017? Any solution for it? Yes, just read on to get the solution.

Solution for Importing GoPro Hero MP4 to Premiere Pro CC 2017 for editing

In order to successfully import GoPro Hero 4K MP4 to edit in Premiere Pro CC 2017, a smart solution is to convert or change the GoPro MP4 to a codec that PPro CC 2017 can natively handle like MOV, MPEG-2 or Apple Prores. That's easy, what you need is just top Mac MP4 video converter like Pavtube HD Video Converter for Mac. After downloading and installing the gorgeous video converter gadget, you can effortlessly transcode unsupported MP4 to Adobe Premiere Pro friendly video format while keeping the excellent media quality. More than that, it also supports fast converting other popular video formats including MOV, MKV, MPEG, WMV, H.265… to seamlessly suit for Premiere Pro, FCP X, Avid Media Composer, iMovie, FCE, Windows Movie Maker etc to satisfy your diverse editing demands.

Now don't hesitate to download it and follow the step-by-step guide to transcode GoPro Hero 4K MP4 videos for editing in Premiere Pro smoothly. The program even has the advanced editing options to lets you fine-tune the final look of your video.

Key features of GoPro video converter for Mac (Windows version)

  • Convert SD, HD, 4K video to Premiere Pro CC 2017.
  • Transcode H.264, H.265, XAVC, XAVC S, XAVC L etc to Premiere Pro CC 2017.
  • Convert MP4, MOV, MKV, MXF, MTS, M2TS, AVI etc to Premiere Pro CC 2017.
  • Output formats for Premiere Pro(CC), iMovie, FCP X, FCP 6/7, FCE, iMovie, Avid MC, After Effects CC, Premiere Elements, DaVinci Resolve Lite, DaVinci Resolve etc.
  • It has a perfect compatibility with macOS Sierra, Mac OS X 10.11 El Capitan, 10.10 Yosemite, 10.9 Mavericks, 10.8, 10.7, 10.6, 10.5.

Easy guide to Convert GoPro Hero (4K) MP4 into Adobe Premiere Pro CC 2017

Step 1. Add GoPro Hero MP4 files

Install and run the best MP4 to Adobe Premiere Pro CC 2017 Converter, and click the "Add File" button to load GoPro Hero MP4 video.

Step 2. Choose output format

This GoPro Hero MP4 video converter offers optimized format preset for Adobe Premiere Pro. Just click the drop-down button of "Format", and then choose "Sony Vegas Pro/Adobe Premiere" under "Format".

Note in the window, you'll see a variety of presets for iPhone, iPad, TV, PSP/PS3/P34 etc. categorized in different lists. In most cases, you can just focus on them, which will save you a lot of time.

Step 3. Start converting MP4 to Adobe Premiere Pro

Click "Convert" button to start converting MP4 to Adobe Premiere Pro supported format program. Once the conversion is finished you can click "Open" button to get the output files effortlessly, and now you are ready to import and edit MP4 files with Adobe Premiere Pro. Just import the converted files to PPro CC 2017 for editing by using the Media Browser or the Import command and do whatever you wanna do.

Read More:

Monday, November 28, 2016

Rip All Your Blu-ray to Seagate Central 3TB for Better Entertainment 

You maybe have collected hundreds of Blu-ray discs on the shelf. If you want to watch these amazing movies you collected anywhere and anytime without Blu-ray player. Then you should move all your physical Blu-rays to Seagate Central 3TB to enjoy your loved Blu-ray videos at home and on move. Seagate Central, as personal cloud storage, realize that putting all your Blu-ray movies and stream media to multiple devices, such as LG Smart TV, Xbox, Surface tablet, PS4, etc. 


Considering Blu-ray copy protection and format compatible with kinds of media players, you maybe need to rip and backup Blu-ray to another common video format. A Blu-ray Ripper can offer you the help. Pavtube BDMagic provides the best solution to rip and convert Blu-ray to video and audio in popular file formats for game consoles, media players, Smart TVs and other many devices so that give you convenience to store Blu-ray on Seagate Central 3TB. It could backup Blu-ray to MP4, MKV, MOV, AVI, WMV, MP3, AAC, etc to move your Blu-ray movies to Seagate Central 3TB, which can let you enjoy Blu-ray movies on any mobile device like iPhone 7/7 Plus, iPad Air 3, iPad Mini 3, Galaxy S7/S7 Edge, Kindle Fire HDX, PS4 Pro, Surface, and more on the go. 

Free Download and trail: 


Other Download: 

- Pavtube old official address: http://www.pavtube.cn/blu-ray-ripper/ 
- Cnet Download: http://download.cnet.com/Pavtube-BDMagic/3000-7970_4-75922877.html 

How to move Blu-ray to Seagate Central 3TB? 

Step 1: Load Blu-ray disc to the software. 

Insert your Blu-ray disc into your computer Blu-ray drive, then launch the program, from "File" menu drop-down list, select "Load from disc" to import source Blu-ray disc movies to the program. 


Step 2: Select output format. 

Click "Format" bar, from its drop-down option, switch to "Common Video" > "H.264 High Profile Video(*.mp4)" or you can choose HD MP4 from "HD Video" as the output streaming and playing format, which is supported by nearly all devices. 


Tip: In "Profile Settings" window, you can adjust the output video codec, size, bit rate, frame rate, audio codec, sample rate, bit rate, channels to make better quality video to Seagate Central 3TB. 

Step 4: Convert Blu-ray to Seagate Central 3TB 

Carry out the conversion process by hitting the right-bottom convert button to start to rip Blu-ray to Seagate Central 3TB for streaming with Xbox, PS4, Smart TV and so on. 

Move Blu-ray video to Seagate Central 3TB on computer 

1. Set up your Seagate Central by opening the Public folder and clicking on the “Manage the Seagate Central” link. 
2. Before you decide to transfer a large amount of files to your Seagate Central, Seagate recommends you make sure you have the most up-to-date firmware. See the instructions at the end of this article on how to check and update firmware. 
3. Open the Start menu, then open (My) Computer or Windows/File Explorer. 
4. In the left sidebar, click on the triangle icon next to Network to expand the menu: 


5. Find the Seagate Central and click on it and the Seagate Central will appear with the hostname. Example: Seagate-123456. The Public folder will appear. You may also see folders with titles that correspond with your username and other users you have set up. If you plan to view your content outside of your home using the Seagate Media app, this content must be placed in the Public folder. 

6. Open another Windows/File Explorer or (My) Computer window and navigate to the files you would like to add to your Seagate Central. 
7. Select the content you would like to copy and drag and drop the content to the folder of your choice. The private folder”s title is your username. That folder will always require a login and should be used to store files you don't want readily available on your local network. You can add files to this folder by double-clicking on the folder and providing your credentials. Once you're logged in, you can manually transfer files to that folder. 

How to verify and update firmware? 

To verify whether you have the latest version of the firmware on the Seagate Central, open the Public folder and click on the “Manage the Seagate Central” link. Once logged in, go to “Settings” and then click on “Advanced” and “Firmware Update”. On the right-hand side, click on “Check for update” and apply any updates it may find. 

After moving Blu-ray to Seagate Central 3TB, now you can enjoy your favorite Blu-ray movies anywhere with your portable devices. 

Related Article: