SUMMARY: Is there no way to stream MKV from Mac or Windows to your Apple TV for easy playback? This guide will show you 3 ways of convert MKV to MP4 or M4V for ATV smoothly playback.
MKV is similar in conception to other multimedia containers like AVI, MP4 or MOV. It's more flexible in compression and usually renders in a smaller size with same quality video/audio output, especially for HD videos. Great-quality movies are increasingly seen being delivered over the internet via MKV format. Is there a way to play MKV on Apple TV without converting the video format? Apple TV so far does not support MKV video properly. The most convenient approach is to convert the MKV file into Apple TV supported formats, like H.264/MPEG-4 video up to 720p.
In this guide, we will show you the best three methods of convert MKV to Apple TV best video formats for enjoyment. Just pick up the way as you like.
Top Effective Way of Convert MKV files to M4V with Apple TV Compaitable format
If you want to stream MKV files to the Apple TV, Apple TV 3/2, Apple TV 4, Apple TV 5 for playback, you’ll need to convert your MKV files to Apple friendly format (e.g. m4v). Along with some help from third-party software. With Pavtube iMedia Converter for Mac, a great Mac MKV Converter for Apple TV 4, you can easily achieve your goal smoothly. In addition to converting MKV to the new Apple TV, it also can MP4, H.265, Tivo, AVCHD, VOB, MPEG-2, MXF, WMV, AVI, DivX, Xvid, Flash format, WebM, and etc to Apple TV 4 video format.
Overall, this all-in-one Video Converting tool can help you to rip Blu-ray, DVD and various video files to your Apple TV 4 for watching. Furthermore, it is also equipped with advanced editing function like add subtitles, effect, text or picture watermark to MKV files, crop MKV black bars, trim or merge MKV files, compress output file size and etc. (Learn more functions in this review).
Free Download Top MKV to MP4 Converter for Apple TV:


Other Download:
- Pavtube old official address: http://www.pavtube.cn/imedia-converter-mac/
- Cnet Download: http://download.cnet.com/Pavtube-iMedia-Converter/3000-2194_4-76177788.html
The following guide shares with you how to encode 1080p/720p MKV to Apple TV 4 for playback on Mac step-by-step.
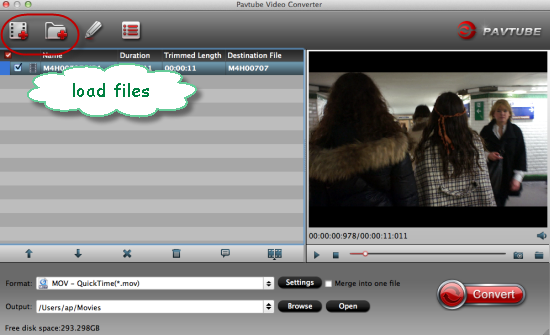
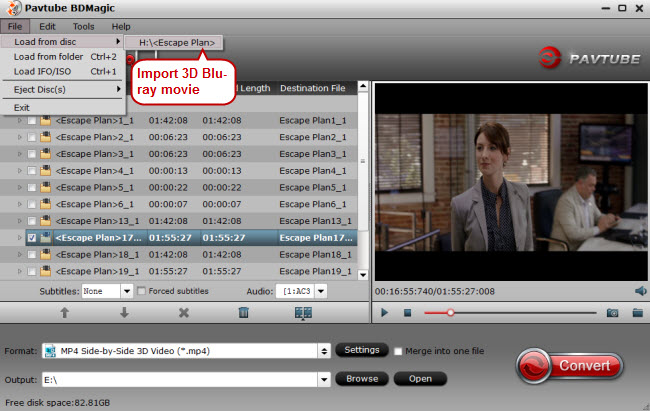
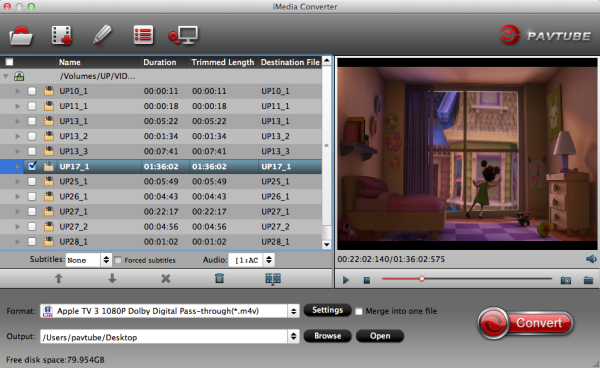
Step 1. Install and launch the MKV Converter for Apple TV 4, and click “Add file” or “Add from folder” button to load your MKV files. The software supports batch conversion so that you can add several MKV files to convert at one time. You can also load Internet torrents movies to Apple TV4.
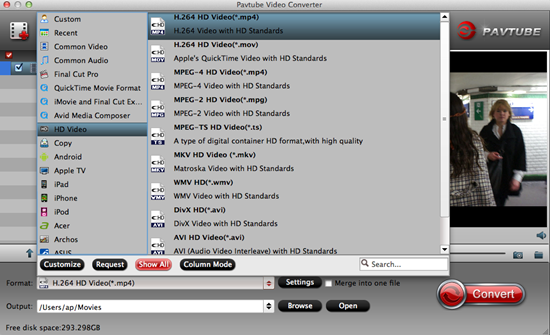
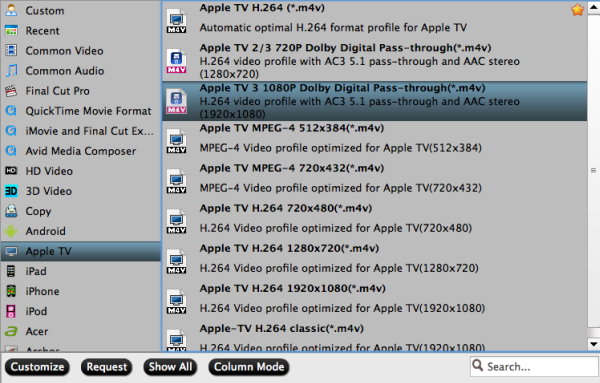
Step 2. Click on “Format” boarder to set output format.
Click on the dropdown menu of “Format” and then move your pointer to “Apple TV 3 1080P Dolby Digital Pass-through(*.m4v)” from “Apple TV” which is the compatible format for Apple TV 4. Then you can set the output folder by clicking “Browse” icon as you need.
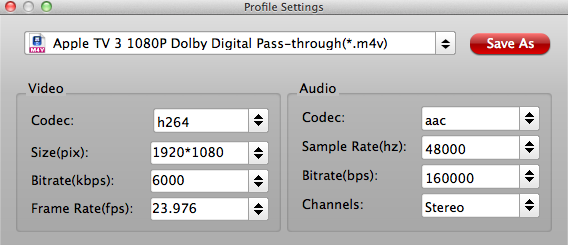
Step 3: Adjust audio and video parameters.
Click the “Settings” icon and you will go into a new interface named “Profile Settings”. You can adjust codec, aspect ratio, bit rate, frame rate, sample rate and audio channel in the interface according to your needs and optimize the output file quality. To get AC3 5.1 auido files, you can set audio codec to AC3 and change audio channels to 5.1 Channels. Learn>> how to set up Apple TV 4.
Step 4. Finally click on “Convert” button to start converting MKV to 1080p HD M4V for Apple TV 4 on Mac.
After conversion, get converted video files for transferring to ATV 4 from Mac. In this way, you can get MKV files playable on Apple TV 4 with Mac OS X without problems. We hope this short article will bring some new multimedia life to your Apple TV 4.
How To Perfectly Convert MKV to MP4 for Apple TV
As we continue with our obsessive compulsion with hacking the crap out of the Apple TV 2G, today we'll be covering how to convert MKV videos into an MP4 format that's acceptable in your iTunes library so you can stream it via WiFi with 5.1 sound. Why Apple keeps their systems so closed is beyond us, but like many things in life, when there's a will, there's a way! Now, let's get hackin'!
Update: Thanks, funstraw! Fixed the numbering for ya. Not sure how that happened.. hehe :)
WHAT YOU NEED:
* Apple TV 2G
* Windows PC (OSX users will have to use the Handbrake alternative or something like that, but you won't get getting 5.1 sound unfortunately)
* XMedia Recode (FREE)
HOW TO DO IT:
1) Download and install XMedia Recode.
2) Launch XMedia Recode.

3) Drag and drop your MKV into the program. 4) Select the MKV you want to convert.
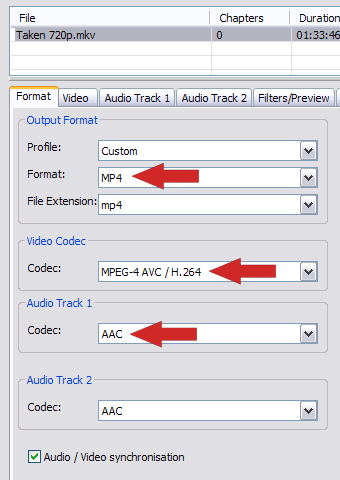
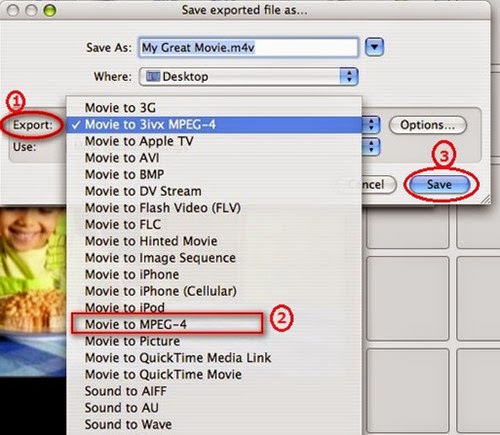
5) Under Format Tab, change the Format the MP4 and the video codec to MPEG-4 AVC/H.264, audio codec to AAC. 6) Under the Video Tab, check the box that says "Video copy."
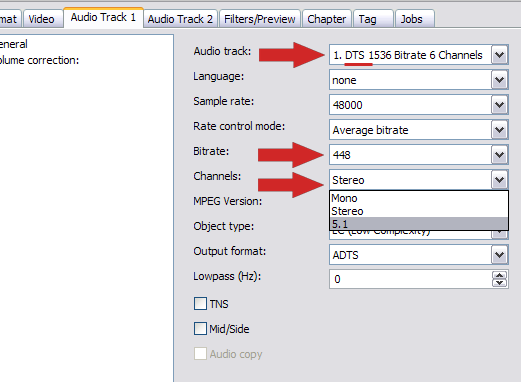
7)Now, under the Audio Track 1 Tab, check to box "Audio copy" if AAC is your default soundtrack. If it's DTS or anything else, choose Bitrate 448 and change Channels to 5.1 (or if you have only 2 channels, choose Stereo). 8) Hit Add Job, then Encode. 9) If everything was done right, it shouldn't take more than 10 minutes on a Core 2 Duo machine to remux it into the MP4 container. 10) Now just drag into iTunes and enjoy the 5.1 sound with no damage hit to video quality! :)
Source:http://www.apartmenttherapy.com/how-to-convert-mkv-to-mp4-for-135756
Using FFMPEG to convert MKV to M4V for Apple TV
Being able to quickly convert MKV to M4V for iTunes has so far proved very useful.
The following process has worked so far for a variety of MKV files that are H.264 and either AAC, AC3 or DTS audio.
I have created a similar batch file for converting FLAC audio files into MP3.Objectives
I wanted to achieve the following:
I use the following folder structure:
c:\source (The folder I put all my MKV files into)
c:\source\done (The folder the original MKV is moved into after processing)
c:\output (The folder that the complete M4V files are written to)
c:\ffmpeg\bin (The location that FFMPEG is installed in)
There are some key elements to the batch file which are worth discussing a little further.
Source:http://www.epinionated.net/quickly-convert-mkv-to-m4v-for-apple-tv/
Read More:
MKV is similar in conception to other multimedia containers like AVI, MP4 or MOV. It's more flexible in compression and usually renders in a smaller size with same quality video/audio output, especially for HD videos. Great-quality movies are increasingly seen being delivered over the internet via MKV format. Is there a way to play MKV on Apple TV without converting the video format? Apple TV so far does not support MKV video properly. The most convenient approach is to convert the MKV file into Apple TV supported formats, like H.264/MPEG-4 video up to 720p.
In this guide, we will show you the best three methods of convert MKV to Apple TV best video formats for enjoyment. Just pick up the way as you like.
Top Effective Way of Convert MKV files to M4V with Apple TV Compaitable format
If you want to stream MKV files to the Apple TV, Apple TV 3/2, Apple TV 4, Apple TV 5 for playback, you’ll need to convert your MKV files to Apple friendly format (e.g. m4v). Along with some help from third-party software. With Pavtube iMedia Converter for Mac, a great Mac MKV Converter for Apple TV 4, you can easily achieve your goal smoothly. In addition to converting MKV to the new Apple TV, it also can MP4, H.265, Tivo, AVCHD, VOB, MPEG-2, MXF, WMV, AVI, DivX, Xvid, Flash format, WebM, and etc to Apple TV 4 video format.
Overall, this all-in-one Video Converting tool can help you to rip Blu-ray, DVD and various video files to your Apple TV 4 for watching. Furthermore, it is also equipped with advanced editing function like add subtitles, effect, text or picture watermark to MKV files, crop MKV black bars, trim or merge MKV files, compress output file size and etc. (Learn more functions in this review).
Free Download Top MKV to MP4 Converter for Apple TV:
Other Download:
- Pavtube old official address: http://www.pavtube.cn/imedia-converter-mac/
- Cnet Download: http://download.cnet.com/Pavtube-iMedia-Converter/3000-2194_4-76177788.html
The following guide shares with you how to encode 1080p/720p MKV to Apple TV 4 for playback on Mac step-by-step.
Step 1. Install and launch the MKV Converter for Apple TV 4, and click “Add file” or “Add from folder” button to load your MKV files. The software supports batch conversion so that you can add several MKV files to convert at one time. You can also load Internet torrents movies to Apple TV4.
Step 2. Click on “Format” boarder to set output format.
Click on the dropdown menu of “Format” and then move your pointer to “Apple TV 3 1080P Dolby Digital Pass-through(*.m4v)” from “Apple TV” which is the compatible format for Apple TV 4. Then you can set the output folder by clicking “Browse” icon as you need.
Step 3: Adjust audio and video parameters.
Click the “Settings” icon and you will go into a new interface named “Profile Settings”. You can adjust codec, aspect ratio, bit rate, frame rate, sample rate and audio channel in the interface according to your needs and optimize the output file quality. To get AC3 5.1 auido files, you can set audio codec to AC3 and change audio channels to 5.1 Channels. Learn>> how to set up Apple TV 4.
Step 4. Finally click on “Convert” button to start converting MKV to 1080p HD M4V for Apple TV 4 on Mac.
After conversion, get converted video files for transferring to ATV 4 from Mac. In this way, you can get MKV files playable on Apple TV 4 with Mac OS X without problems. We hope this short article will bring some new multimedia life to your Apple TV 4.
How To Perfectly Convert MKV to MP4 for Apple TV
As we continue with our obsessive compulsion with hacking the crap out of the Apple TV 2G, today we'll be covering how to convert MKV videos into an MP4 format that's acceptable in your iTunes library so you can stream it via WiFi with 5.1 sound. Why Apple keeps their systems so closed is beyond us, but like many things in life, when there's a will, there's a way! Now, let's get hackin'!
Update: Thanks, funstraw! Fixed the numbering for ya. Not sure how that happened.. hehe :)
WHAT YOU NEED:
* Apple TV 2G
* Windows PC (OSX users will have to use the Handbrake alternative or something like that, but you won't get getting 5.1 sound unfortunately)
* XMedia Recode (FREE)
HOW TO DO IT:
1) Download and install XMedia Recode.
2) Launch XMedia Recode.
3) Drag and drop your MKV into the program. 4) Select the MKV you want to convert.
5) Under Format Tab, change the Format the MP4 and the video codec to MPEG-4 AVC/H.264, audio codec to AAC. 6) Under the Video Tab, check the box that says "Video copy."
7)Now, under the Audio Track 1 Tab, check to box "Audio copy" if AAC is your default soundtrack. If it's DTS or anything else, choose Bitrate 448 and change Channels to 5.1 (or if you have only 2 channels, choose Stereo). 8) Hit Add Job, then Encode. 9) If everything was done right, it shouldn't take more than 10 minutes on a Core 2 Duo machine to remux it into the MP4 container. 10) Now just drag into iTunes and enjoy the 5.1 sound with no damage hit to video quality! :)
Source:http://www.apartmenttherapy.com/how-to-convert-mkv-to-mp4-for-135756
Using FFMPEG to convert MKV to M4V for Apple TV
Being able to quickly convert MKV to M4V for iTunes has so far proved very useful.
The following process has worked so far for a variety of MKV files that are H.264 and either AAC, AC3 or DTS audio.
I have created a similar batch file for converting FLAC audio files into MP3.Objectives
I wanted to achieve the following:
- Quickly convert MKV to M4V
- Ensure the audio tracks are iTunes / Apple TV compatible
- Be able to process a number of files at a time
- Work quickly
I use the following folder structure:
c:\source (The folder I put all my MKV files into)
c:\source\done (The folder the original MKV is moved into after processing)
c:\output (The folder that the complete M4V files are written to)
c:\ffmpeg\bin (The location that FFMPEG is installed in)
There are some key elements to the batch file which are worth discussing a little further.
- Give the batch file a name like convert.bat and save it, you can then run it by double clicking on it or by calling it from a command prompt
- The whole thing is built inside a for do loop, meaning it will run once for every .MKV file it finds in c:\source
- By using the -map feature, we are able to take the primary audio from the source MKV file and create both a stereo AAC track at 160k and a 5.1 AC3 track at 640k which keeps both iTunes and the Apple TV happy
- Once the file has been converted, it is moved from c:\source to c:\source\done
Source:http://www.epinionated.net/quickly-convert-mkv-to-m4v-for-apple-tv/
Read More:
- Watch HD movies on Apple TV 3 with Dobly Digital 5.1 sounds
- Best Program to stream 2016 DVD movies for Apple TV 3
- Convert Tivo to Apple TV without commercials on El Capitan
- Convert Any Video to M3U8 for Streaming to Apple TV
- Stream H.265/HEVC 4K Video to Apple TV Via Plex
- Play movies using Apple TV 4 on 1080p TV with 5.1 Audio