Thursday, November 12, 2015

Copy Blu-ray ISO to Popcorn Hour A-500 Pro Media Player

Topic of this post is about how to play ISO files on Popcorn Hour A-500 Pro Media Player without Blu-ray player as long as you convert Blu-ray ISO to Popcorn Hour friendly format. 

Cloud Media have made available a new addition to their range of media players with the launch of the Popcorn Hour A-500 Pro. Which is powered by a Sigma Designs SMP8758 processor offering 2x Cortex-A9 cores @ 1.2GHz. The A-500 Pro processor is combined with Mali-400 MP4 graphics and supports HEVC decode and VXP, together with 2GB DDR3 RAM. If you have an .iso image file create from ImgBurn, Disk Utility, or download the ISO/IFO file from online websites, you can burn it to a disk or play it on computers, but don't expect to stream Popcorn Hour A-500 Pro Media Player, as it's not a streaming media format and you can see it's not a Popcorn Hour Media Player frinedly format. 


In case that your Blu-ray and DVD ISO files are not viewable on Popcorn Hour A-500 Pro Media Player, you'd better convert your iso to Media Player supported format for playing. This can be done by Pavtube ByteCopy which is ease of use with reasonable price and fast speed. Probably the main feature is multi-track preservation which means you can backup your Blu-ray/DVD to lossless mkv files with all multiple audio and subtitle tracks, and chapter markers keeping. I am a home user and I have a Popcorn Hour A-500 Pro Media Player, and I only choose ByteCopy to rip my Blu-ray, DVD, IFO files and store the rip versions on a hard drive for easy viewing on HDTV. Here is the reivew

Now go to try the trial version to experience what it can do for you. Here let me show you how to convert Blu-ray to HD MP4 format for Popcorn Hour A-500 Pro Media Player step by step. Before going on, please make sure having downloaded and installed it. Note: Pavtube ByteCopy for Mac is made for Mac users)


Other Download:

- Pavtube old official address: http://www.pavtube.cn/bytecopy/
- Cnet Download: http://download.cnet.com/Pavtube-ByteCopy/3000-7970_4-76158512.html

Streaming Blu-ray ISO to Popcorn Hour A-500 Pro Media Player

This guide uses Blu-ray Ripper for Windows (Including Windows 10) screenshots. The way to rip Blu-ray ISO on Mac OS X El Capitan is almost the same. Just make sure you’ve downloaded the right version.

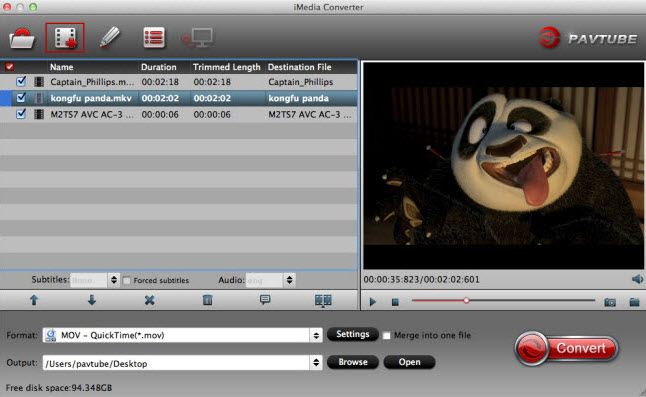
Step 1. Load ISO files.

Launch the program Run Pavtube ISO to Popcorn Hour Ripper, click “Load file” to choose Load IFO/ISO file. It will recognize the ISO image file automatically so that you will not have to run virtual drive to mount the ISO any more. 


Note 1: Check the “Merge into one file” on the main interface; you will get multiple selected titles into one output file. It merges not only the chapter in to a title and file but also merges the titles in to one file.

Note 2: When playing Blu-ray ISO, the PopCorn Hour A-500 plays the MAIN FEATURE ONLY. If you copy Blu-ray to .m2ts streams, you can copy the main feature only, leaving out menus and extras. This will save some storage for you. 


Note 3:As there is no equivalent ImgBurn for Mac OS X El Capitan, if you want to turn Blu-ray to PopCorn Hour A-500 playable videos on Mac, just store your Blu-ray into BDMV folder on Mac or backup Blu-ray to m2ts on Mac or copy Blu-ray to lossless mkv on Mac

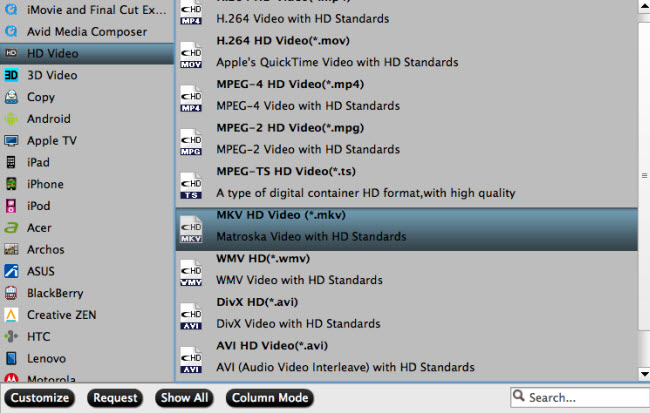
Step 2. Choose MP4 format.

In the dropdown list of “Format”, there are a mass of video format. You can choose “HD Video -> H.264 HD Video (*.mp4)” directly or choose the desired portable devices which is the best streaming format via Popcorn Hour Media Player. Just choose according to your own needs.


Tip:

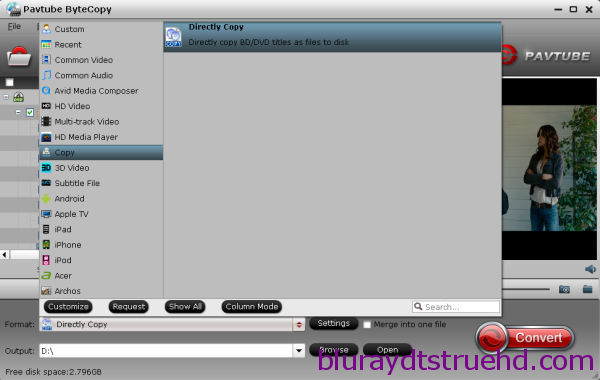
1. If you want to get output blu-ray video keeping multiple audio tracks, multiple subtitles and with with lossless quality, you can choose “Multi-track Video” > “Lossless/encoded Multi-track MKV(*mkv)” format.

2. You are also allowed to change the video and audio parameters like codec, bitrate, channels, frame rate, etc. You can adjust it according to your demand or keep it default for output.


Step 3. Convert Blu-ray ISO to MP4.

Click the “Convert” button to start converting ISO to MP4 format. With the technology of CUDA acceleration it will provide you fast conversion speed. Once completed, go to “Open” the generated MP4 files. Now you can connect to an HDTV using an HDMI cable and access the Internet with either a direct connection to a router or by joining a home network like DLNA, just get your Blu-ray ISO playback on your Popcorn Hour A-500 Pro Media Player with ease.

Note: You can also backup your Blu-ray movies for viewing on KDLinks media player and AC Ryan Player

Read More:

Wednesday, November 11, 2015

Play M2TS with Plex media server via Mac OS X El Capitan

Does Plex support m2ts streams natively? Read the following service and you will know the step about convert M2TS to Plex compatible format via Mac OS X El Capitan.

Q: “ I have several m2ts files in my movie/video folder, but they are not recognized by Plex. Is it required to convert these to an mkv or other supported format before Plex will pick them up and add them to my library? Based on a quick google search, it doesn't seem so, but I can't figure out why mine don't show up.” - Asked from reddit

At First, you may want to know: Why Plex media server cannot play m2ts?

Again this is a question that has several answers and for the same reasons it is difficult to answer all of these by part. The answers will therefore be answered in points and parts to get a clearer view:
  • The Plex Media support has a very limited outside codec support.
  • In some cases the user needs to make sure that the m2ts files are transcoded and the Plex media player will play them.
  • It is also advised to make sure that the relevant format which the Plex media server is supporting is used and the file is converted to this format to make sure that the playback is not interrupted ever in this regard.
  • The Plex TV support is also effective to make sure that the m2ts files are converted to the appropriate formats which are usually using the .FLV extension in this regard.
Searching Plex forum, we found many guys are facing the similar troubles "MTS files not seen in Plex", "Plex won't play MTS files"... In fact, there is an easy way to fix the issue. In order to stream MTS files via Plex Media Server from Mac 10.11 without problems, the easy option is to convert MTS to Plex most compatible video files(MP4 seems to be the best one). 

Hot Search: DVD to Plex | YIFY videos to Plex | WTV files via Plex | Blu-ray to Plex | VIDEO_TS files to Plex  

Here, Pavtube iMedia Converter for Mac is high recommended for you. (review). this video app is professional on fast transcoding M2TS to Plex Media Server with MKV format without quality loss from Mac OS X El Capitan. In addition, it not only supports TiVo videos, but also handles various common video formats, like MXF, MTS, MOV, MP4, AVI, WMV .etc. Plus, with the built-in video editor, you can also choose to trim, crop, add watermark to your original videos. 

For Windows users, Pavtube Video Converter Ultimate is also a helpful app to encode M2TS to Plex on Windows 10 for further usage. Follow below guide to start M2TS movie to Plex conversion on Mac OS X (El Capitan included). 

Learn>>Best Windows video to Mac Mini Converter with Plex installed

Free Download M2TS to Plex Converter for Mac 10.11: 


Other Download:

- Pavtube old official address: http://www.pavtube.cn/imedia-converter-mac/
- Cnet Download: http://download.cnet.com/Pavtube-iMedia-Converter/3000-2194_4-76177788.html 

Step 1. Load original M2TS files. Click “Add Video” button on the main interface to load your M2TS files to the program. (Drag&Drop function is included.)


Step 2. Specify output format for Plex. Click Format bar and choose a compatible format for Plex Media Server. MP4, MKV from Common Video are the proper choice. 


Tip: With the right settings you can retain the quality of the original video while also saving space. This is particularly helpful when streaming over your network, depending on your network quality. Simply click Settings bar and you can tweak the settings to your satisfaction and even save it as preset. 

Step 3: Start M2TS to Plex Conversion 

Once you’re sure all the settings are OK, click the Convert button to start converting M2TS format to Plex. It will take several minutes to finish the conversion. 

After the conversion, you can easily find the converted M2TS video clips in the destination folder by clicking “Open” button. Now it’s easy for you to play and share your movie on different media devices via Plex Media Server. 

Learn>> How to Add Your Movie Collection to Plex for Streaming?

Conclusion:

The expert advice can also be utilized if the user is not the member of these forums as the guest login can be created to get the issues resolved. The Plex media server also has a guide that has been published online and for all those users who want to play m2ts and mts players can make sure that the issue is resolved for them and they get the best deals within no time at all. There are wide range of media file extensions both audio and video that are supported by this service and the user just needs to make sure that the needful is done within no time at all. These file extensions can also be viewed at https://support.plex.tv/hc/en-us/articles/203810286-What-media-formats-are-supported- and the user can get the player as per the advice that has been provided there. 

Read More:

How to Recover Photos from iPhone 6S Without Backups on Mac?

The youth, especially the girls, are fond of record their life with photos on their iPhone 6S. But situations may occur due to different reasons, such as iOS upgrade, device damaged, failure jailbreak, etc. If you do have some important photos in your iPhone 6S, you perhaps need to recover it. So how to do it? 

This article aims to show you the easiest way to retrieve the lost photo of your iPhone 6S on Mac when you don’t have iTunes/iCloud backups. Since you can directly recover the photo from backups easily so I think it doesn’t need to state the way again. Before the beginning, you have to prepare a Mac iPhone/iPad Data Recovery program. If you don’t have any idea about it, I recommend you Wondershare Dr.Fone for iOS for Mac. It has more powerful function that deserves you to try:

1. Wide Supported Data Types to Recover: Recover iOS data including photos, videos, messages, contacts, notes, reminders, calendar events, call history, etc. No matter what kind of photos you want to recover from iPhone 6S, Camera Roll photos, Photo Stream photos or Photo Library photos, Wondershare helps you make it.

2. Recovery Modes: Offers you 3 ways to recover deleted or lost photos from iPhone: from iDevice directly (without using any backup), from iTunes backup, and from iCloud backup. No matter whether you have made an iTunes or iCloud backup, you can get a way to retrieve them.

3. Selectively Recover Photo: Instead of performing a complete iTunes restore, Wondershare lets you preview the deleted photos in thumbnails and recover what you need instead of all the data.

4. Easy-to-use: Intuitive interface makes basic and advanced users can use it with ease.

5. Supports all models of iPhone: Supports iPhone 6S (Plus)/6 (Plus)/5S/5C/4S/4/3GS and iPad, iPod Touch. Compatible with iTunes 12.1. iOS 9 and Mac OS X El Capitan. (Read its review)

Free Download and Install Mac iPhone Data Recovery
    

How to recover photo from iPhone 6S directly without backups?

Step 1: Open Wondershare on your computer > Connect your iPhone 6S to the computer with USB cable > Choose Recover from an iOS Device. Then click on “Start Scan”.


Step 2: Preview and recover the photo

Once the scan ends, you can preview all the contents of your iPhone 6S, including messages, iMessages, contacts, etc on the left. Check photo option on the left list. Then click “Recover” to save all your photo to your computer. You can see the search box on the top right interface, so you can search for the exact contact you want to recover.

That’s all. Is it easy? Just try.

Related Software:
Wondershare Dr.Fone for Android for Mac - First aid to recover deleted or lost contacts, text messages, photos, videos, audio files, documents, whatsapp history, call history, etc from Android phones and tablets.
Wondershare MobileTrans for Mac - One click and risk-free solution to move contacts, text messages, call logs, calendar, photos, music, video and apps between iPhone, Android, Blackberry and Nokia(Symbian) phones.
Wondershare TunesGo for Mac - Transfer and copy music, videos, playlists and other media files from iPhone, iPad and iPod touch to iTunes and PC with no difficulty.
Pavtube iMedia Converter for Mac - Convert any 4K/SD/HD and Blu-ray/DVD to iPhone, iPad, iPod Touch with suitable format.

Related Articles:

Tuesday, November 10, 2015

Get 40% OFF Blu-ray/DVD Copy to Copy Thanksgiving Blu-ray/DVDs on PC/Mac

Thanksgiving Day is coming. Some of you are probably planning the Thanksgiving menus for your family while some are ready for selecting the best Thanksgiving present for their parents. With great blessing and best wishes, Pavtube Studio also prepared a big gift for their consumer - Thanksgiving Promotion 2015 to celebrate Thanksgiving Day with our friends. Focusing on product quality and customer needs, Pavtube offers up to 40% discount for hot products to reward our customers.


Thanksgiving Day always comes with movies. I believe you must have prepared some Thanksgiving movies for enjoy with your family after dinner. With this wish, how can you bear the incompatibility issue when playing Thanksgiving Blu-ray/DVD movies on your HD TV, iPad, 4K Projector, etc. To avoid the embarrassing situation, you’d better rip the Blu-ray/DVD movies to your multimedia players with most compatible format and specs by using
Pavtube BDMagic for Windows / Mac
Pavtube DVDAid for Windows / Mac
Pavtube ByteCopy for Windows / Mac

When enjoying the Thanksgiving movies and having the Thanksgiving dinner together, how can you not record the scene to remember the warm time? After you record the happy time, you maybe want to edit the shooting in iMovie, FCP, Premiere Pro CC, etc before you sent it to your other family members or share it on Facebook. While putting the shoot into video editing program, you probably need the help of Pavtube Video Converter Ultimate and iMedia Converter for Mac, which can convert your HD/4K shoot to H.265 MKV/MP4, HD MP4, QuickTime, MOV, ProRes, AIC, DNxHD, MPEG-2, WMV, H.264, MPEG-4, etc. for your FCP X, iMovie, Premiere Pro CC, Sony Vegas Pro 13, Windows Media Player, VLC, Youtube, etc. On Windows 10/8.1/8/7/XP and Mac OS X 10.11 El Capitan, 10.10 Yosemite, 10.9 Mavericks, 10.8 Mountain Lion, 10.7, 10.6, 10.5.

Pavtube Video/BD/DVD software can convert Blu-ray/DVD, 4K/SD/HD video in any format to H.265 MP4/MKVM3U8, MP4, MOV, MKV, AVI, M4V, etc. Especially, ByteCopy can rip Blu-ray/DVD to lossless MKV keeping multi-track subtitle/audio and all chapter markers. What’s more, Pavtube adds optimized preset profile for main digital products, like TV series, iPad, iPhone, Samsung, Sony, PS3/PSP, Xbox One/360, Android Tablet/Phone, Surface, etc. 

Hot Search: Blu-ray Tips | DVD Tips | Chromecast Tips | Roku Tips | PS4 Tips

All of the products can be get now at up to 40% off discount. Below is the list:

1. 40% OFF Pavtube DVDAid for Windows/Mac

Original price: $35
Now: $21

Reasons to choose Pavtube DVDAid


2. 30% OFF Pavtube BDMagic for Windows/Mac

Original price: $49
Now: $34.3

Reasons to choose Pavtube BDMagic


3. 20% OFF Pavtube ByteCopy for Windows/Mac 

Original price: $42
Now: $33.6

Reasons to choose Pavtube ByteCopy


4. 20% OFF Pavtube Video Converter Ultimate for Windows/Mac

Original price: $65
Now: $52


You won’t get a Blu-ray/DVD Software at such low price in normal days. So if you have a plan to purchase a BD/DVD/Video Converter in the near future, why not push the schedule forward and get it in Pavtube Thanksgiving Promotion activity.

Additional: To help you make a wise choice, I did a deep review and comparison between the four backup tools. You can check out the differences and then choose the favorite to create high quality Blu-ray/DVD/ISO/4K/HD Video and Movie backups: Pavtube Softwares Comparison: ByteCopy vs BDMagic vs DVDAid vs Video Converter Ultimate

Related Guides

1. Pavtube DVDAid for Windows/Mac Guides
2. Pavtube BDMagic for Windows/Mac Guides
3. Pavtube ByteCopy for Windows/Mac Guides
4. Pavtube Video Converter Ultimate for Windows/Mac Guides
That’s All!

PS. Have more questions about how to download, buy and use our Blu-ray/DVD Ripper, various Video Converter programs, please feel free to contact us>> or leave a message on our Official Facebook

Monday, November 9, 2015

How to Fix iPhone White Screen of Death on Mac El Capitan?

White screen of death is a phenomenon that many iPhone users including iPhone 6S (Plus) have to face every now and then. White screen of death shows as a black screen with an Apple logo or just completely blank scree. It occurs for several reasons but the main reasons are as below:


The Reason for iPhone White Screen of Death:

1.Multi-tasking maybe the reason:

If your iOS is lower than iOS 7.0.2, you maybe encounter the issue that you were multi-tasking between several apps. 

2. Stressed out Hardware components: 

If you have been using your iPhone for prolonged periods of time without giving it some time off, the hardware components of the iPhone may get stressed out and result in the appearance of a black screen of death.

3. Software Malfunction: 

White screen of death may also be a result of a glitch in the software or iOS of your iPhone.

4. Application Incompatibility: 

Trying to run apps that may be taking too much toll on your iPhone’s software and hardware may result in the appearance of white screen of death.

Generally, there are several ways to fix the white screen of death situation. You can try to handle this by yourself as the following steps:

1.Turn off your iPhone with the "Sleep/Wake" button. Now it is completely powered off. Then you can turn on it again.

2.Press both the Home button and Sleep/Wake button, holding them for at least for 10 seconds. Then the battery symbol or the Apple logo will appear on your screen when iPhone is reset. If you see the battery symbol, please charge your iPhone until it is totally charged.

3.If the white screen is still there, go to connect your iPhone to the computer with the data cable.

4.Get in to iTunes and select your device from the Devices list.

5.Tap "Summary" and then tap "Restore". Click "Back Up" if prompted.

6. Tap "Restore" to restore your iPhone.

All the things have been done now, and if there still is a white screen on your iPhone you had better to ask for professional help. You can go to visit an Apple store to get the device checked and repaired but you must afford to pay $199 and more upfront. Local repair shops can also repair a hardware caused white screen of death but when it comes to software, the user does not has many options to look forward to.

If you didn’t handle white screen of death issue as above steps and you don’t want to afford extra $199 to repair it, maybe you can try Wondershare Dr.Fone for iOS for Mac. Although it also is a paid one, it is cheaper and it not only can fix white screen of death but handle stuck in recovery mode issue and recover you lost iOS data, like message,contacts, notes, call history on your iPhone, iPad and iPod Touch. It supports iTunes 12.1 and Mac OS X 10.11 El Capitan. (Read its review)

For Windows users, pls turn to Wondershare Dr.Fone for iOS Windows. 

Free Download and Install Mac iPhone Data Recovery
    

How to Fix White Screen of Death with Wondershare Dr.Fone for iOS?

Step 1: Download and install Wondershare Dr.Fone for Mac and launch it. Connect your iPhone or iPad with USB cable to computer. From the main window, select "Fix iOS to Normal" located at the bottom left  of the screen. Wait for Wondershare Dr.Fone for Mac to detect your iOS device. Click "Start" once the device has been detected.


Step 2: To fix white screen of death on your iOS, Dr.Fone will download the latest version of your firmware after detecting your current iOS version. Hit "Download" and wait for the download to complete.


Step 3: After downloading and selecting the official firmware for your iPhone (iOS 9 supported), you should click the button "Start Fix" to let the program to fix the white screen of death issue for you without damaging your data. In less than 10 minutes, you will get a message saying that your device is restarting to normal mode.

Now, you should handled your white screen of death issue on your iOS device if you have followed the steps aforementioned. 

Tip: How to avoid white screen of death?

1.The most important but simple trick to prevent getting your iPhone (including iPhone 6s and iPhone 6s Plus) into the white screen of death is to take good care of it. Don’t drop it; if butterfingers run in the family, keep it inside your pocket as much as you can.

2.Buy a protective case with extended edges to prevent direct contact of the phone with the surface that it fell on. Minimal impact means minimal chances of hardware abnormality resulting from the drop.

3.Sometimes, extra stress on the battery and other hardware resources of the iOS device can be the cause of the white screen of death. Therefore, avoid using the device for abnormally prolonged periods of time. If you notice that the device is heating up or getting stuck every now and then, give it some rest.

4.Shut down your phone once a month and then turn it back on after 10 seconds. Your phone runs non-stop for you, fetches all your emails, keeps all your pictures safe, it probably deserves this little break. This simple activity will give your phone with the time out that it needs minimizing the chances of appearance of a white screen of death.

5. White screen of death is not always caused by faulty hardware. Sometimes, glitches in the software cause the screen to go blank and white without any apparent reason. Such glitches are more common in iOS version below the iOS version 7. Therefore, keep your iOS devices updated to the latest iOS 9 version.

Related Software:
Wondershare Dr.Fone for Android for Mac - First aid to recover deleted or lost contacts, text messages, photos, videos, audio files, documents, whatsapp history, call history, etc from Android phones and tablets.
Wondershare MobileTrans for Mac - One click and risk-free solution to move contacts, text messages, call logs, calendar, photos, music, video and apps between iPhone, Android, Blackberry and Nokia(Symbian) phones.
Wondershare TunesGo for Mac - Transfer and copy music, videos, playlists and other media files from iPhone, iPad and iPod touch to iTunes and PC with no difficulty.
Pavtube iMedia Converter for Mac - Convert any 4K/SD/HD and Blu-ray/DVD to iPhone, iPad, iPod Touch with suitable format.

Source site: http://iphone-ipad-recovery.over-blog.com/fix-white-screen-of-death

Related Articles: