Thursday, July 30, 2015

Tivo to WMC- Watching TiVo videos in Windows Media Center

The recorded TiVo files usually are not compatible with most media players we adopt, so this article enables you to convert TiVo to Windows Media Center within Four steps.

Hot Search: Alternatives for WMC | TiVo files to WMP | iTunes to Windows Media Center | DVD to Windows Media Center | Blu-ray to Windows Media Center

With the rising popularity of the TiVo format, it becomes the pursuit of more and more people who are getting bored with endless and annoying ads. But, you may get into trouble - just like cannot play TiVo files on Windows Media Center. that's because the recorded TiVo files usually are not compatible with most media players we adopt, Thus, looking for a work-around to add TiVo playback ability to Windows Media Center is much important. So this article enables you to convert TiVo to Windows Media Center within four steps.   

Fortunately, after searching online for a long time, we found a simple workaround. Since Windows Media Center can not support TiVo files natively, then we can change TiVo to Windows Media Center supported video formats like WMV or AVI with a powerful third party program. Here, Pavtube Video Converter Ultimate is a great Tivo Converter for Windows Media Center, you can easily achieve your goal smoothly. This video app works as the best software to change TiVo to Windows Media Center compatible format with least quality loss.

Besides that, you can also convert Tivo recordings to MP4, MOV, AVI, MPG, WVM, etc for easily opening, playing, editing and uploading without any hassle. No worry about any audio/video sync problem. (Here is the review). If you are running on Mac, please turn to its equivalent Mac version.

Here is a step-by-step tutorial to convert TiVo files to high quality H.264 MP4 on Windows for Windows Media Center playback. Let’s take a look!

Tips: How to Transfer Television Programs (TiVo files) to PC

Launch TiVo Desktop software on your PC. Connect TiVo to your home network, and then the TiVo Desktop will provide you with a list of shows for transferring to your PC. Then please transfer the TiVo TV shows you want to PC. Once all the shows you selected have been downloaded from your TiVo, they will appear in the Now Playing list in TiVo Desktop.


Step 1. Download Windows Media Center video converter – Pavtube Video Converter Ultimate(for Windows, for Mac). Install and launch it. 


Other Download:
- Pavtube old official address: http://www.pavtube.cn/blu-ray-video-converter-ultimate/
- Cnet Download: http://download.cnet.com/Pavtube-Video-Converter-Ultimate/3000-2194_4-75938564.html


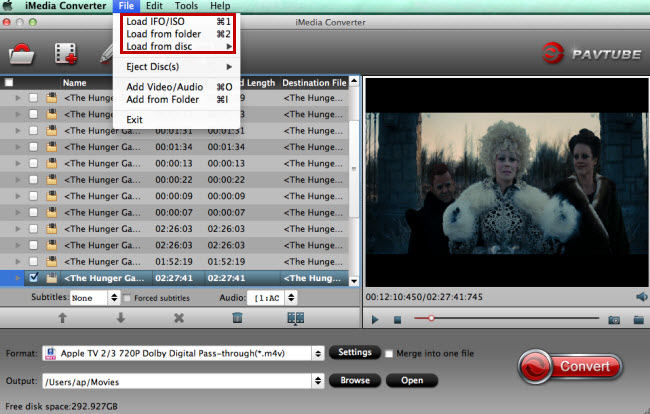
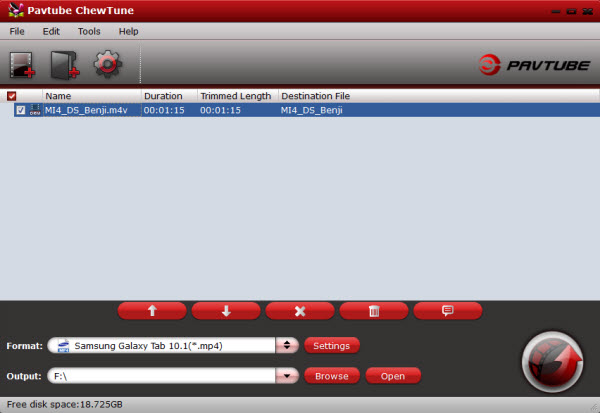
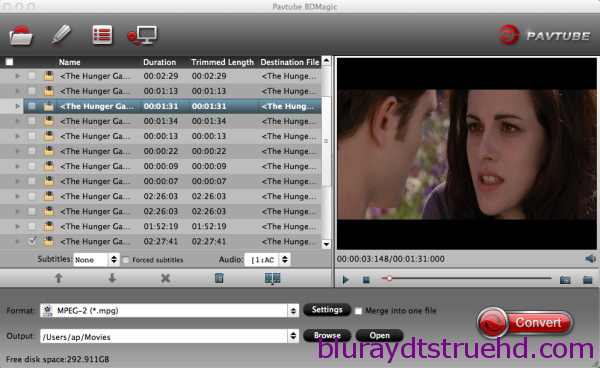
Step 2. Import TiVo files to the software.

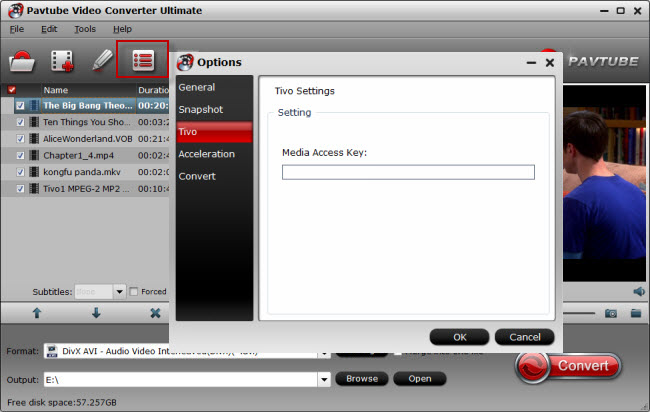
Launch the TiVo file converter, click Add button to load your TiVo video files. When first loading, the program will ask you to input your Media Access Key. Simply enter your Media Access Key and click “OK” to confirm.


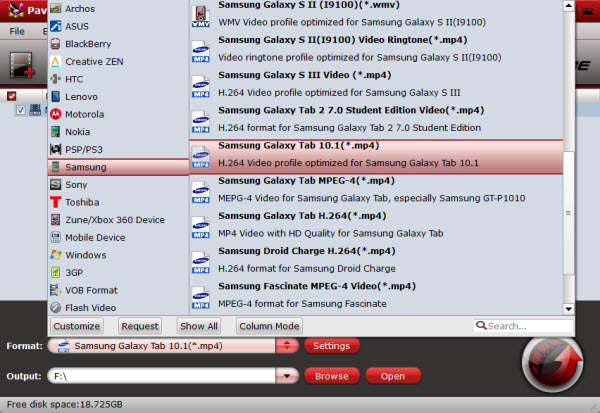
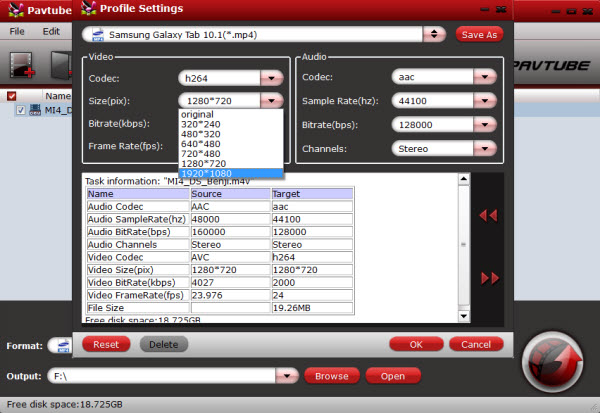
Step 3. Choose setout format. 
   
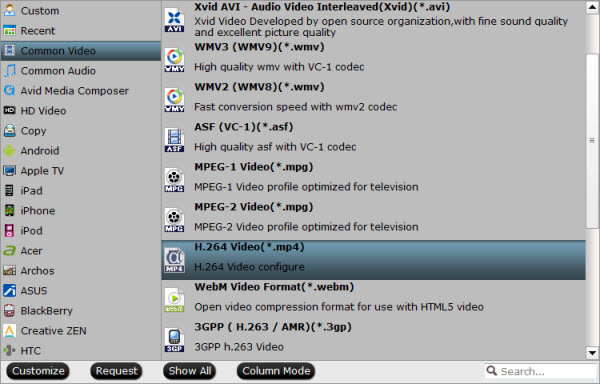
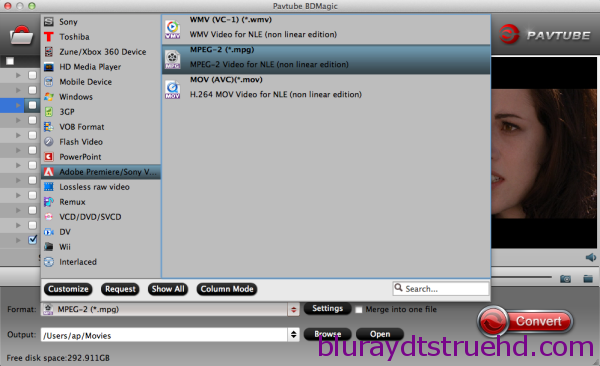
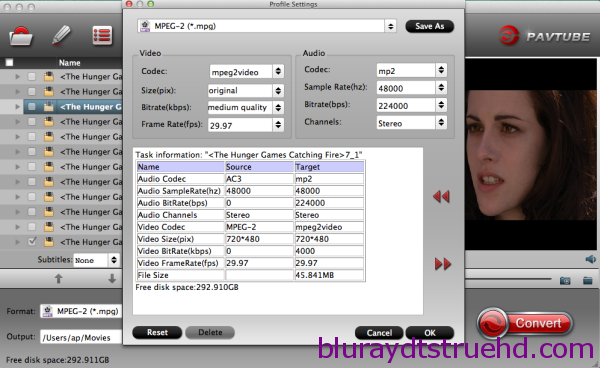
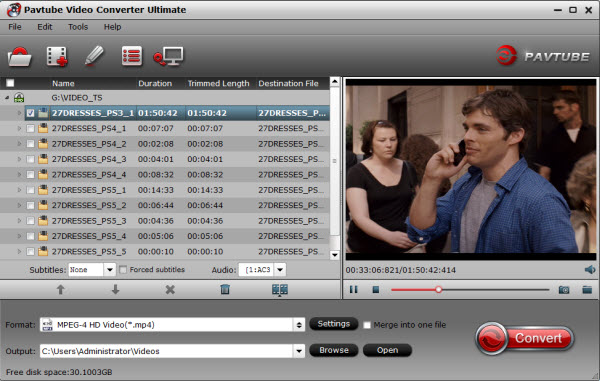
a.Click the drop-down list on the right side of the “Format” to select desired audio or video formats from “Common Video” or “HD Video” Category.

b. If your source TiVo video files are 1080p or above 1080p resolution, choose “HD H.264/MPEG-4 AVC Video(*.mp4)” from “HD video” or “WMV HD(*.wmv)” category. 

c. If your source TiVo files are 720p or lower resolution, choose “H.264/MPEG-4 AVC Video(*.mp4)” or or “WMV3 (WMV9) (*.wmv)” from “General Video” category. 


Step 4. Start Convert. Click “Convert” button to start convert TiVo to Windows Media Center supported MP4 or WMV. 

With the help of the professional WMC Video Converter, now you can easily solve Windows Media Center cannot play video TiVo, MKV, MP4, AVI, FLV, WebM, MXF, MTS, MOD, TOD issue. It’s that easy to play any kinds of video in Windows Media Center.  

Read More:

Wednesday, July 29, 2015

Play GoPro 3D Movies on Gear VR via Oculus Cinema on Mac

Q: “ Hey, I have a 2 camera go pro, 3d, I need a tool which can help me convert GoPro 3D movies and want to view my video in milkvr on samsung's gear vr into the oculus cinema. By the way, please tell me how to adjust the size of the screen.” 

GoPro just bought a virtual reality company. GoPro says that more spherical videos will be available soon on other platforms like Oculus VR and the Samsung Gear VR, too. If you got some videos shot with a GoPro camcorder and hope can share the 3D Movie files with your friends and families, why not transfer and play these 3D recordings on your Gear VR for sharing as long as you have one? Read the Top 3D glasses to choose the right Gear VR and enjoy the 3D Times. In this article, we introduce an easy approach to assist you play GoPro 3D Movies on Gear VR with Oculus Cinema and excellent quality.


Hot Topics for Gear VR users: iTunes to Gear VRSet Up Gear VRYouTube video to Gear VR ...
  
To Enjoy GoPro 3D Movies on Gear VR, you need to convert the GoPro 3D Movie files to Samsung Samsung Gear VR supported formats. When it comes to playing 3D videos, Samsung Gear VR requires either side-by-side or top-to-bottom (top down), but most Blu-rays are in the "frame packed" format. So the workaround is to download a 3D Blu-ray ripping program that can convert a frame packed Blu-ray to 3D SBS MP4/MKV files for Gear VR.     

Here, Pavtube iMedia Converter for Mac that supports handling GoPro 3D Movies is necessary for Mac. 
  
With this all-in-one 3D Video Converter Ultimate for Gear VR on Mac, you can easily convert 3D Movies no matter from Blu-ray disc, Blu-ray movie folder, DVD disc, MKV, AVI, VOB, WMV, Tivo, MPG, FLV/F4V files and export Anaglyph, Top-Bottom, Side-by-Side 3D video supported by Samsung Gear VR unit/Oculus Cinema with the best quality easily.  If you are a Windows user, then Pavtube Video Converter Ultimate is your first choose (Windows 10 include). Read the Windows 10 Solution

Now, download this professional App and follow below guide to learn How to Convert GoPro 3D Movies to SBS MP4/MKV for Samsung Gear VR on Mac. 


Other Download:
- Pavtube old official address: http://www.pavtube.cn/imedia-converter-mac/
- Cnet Download: http://download.cnet.com/Pavtube-iMedia-Converter/3000-2194_4-76177788.html 
    
Step-by-step: How to Watch GoPro 3D Movies on Samsung Gear VR with Oculus Cinema via Mac?

Step 1: For video file, click the "Add video" button, browse to computer hard drive and import GoPro 3D video into this app. For discs, Insert your 3D/2D Blu-ray or standard DVD movie to disc drive, and click "Load from disc" button to load Blu-ray or DVD from ROM. 


Step 2: Tap on "Format" bar and find "3D Video", there are a lot of format options for you. "MP4 Side-by-Side 3D Video (*.mp4)" is recommended for Samsung Gear VR. (Read the differences Between Anaglyph 3D and Side-by-Side 3D)


Step 3: Click the “Settings” icon and you will go into a new interface named “Profile Settings”. You can adjust codec, aspect ratio, bit rate, frame rate, sample rate and audio channel or 3D Depth in the interface according to your needs and optimize the output file quality. So, you may know the way of adjust the size of the screen. 

Step 4: Click "Convert" button, video to SBS 3D MP4 conversion begins. After the conversion, place your video files into the folder named "My Videos" on your MicroSD card for Samsung devices. Now, transfer GoPro 3D files and you are ready to watch 3D videos on Samsung Gear VR. 
  
Now, Simply select one of your files and Play GoPro 3D contents in full immersion with Samsung Gear VR through Oculus Cinema on Mac! Have Fun! 
  
Editor Notes: 

Top 5 3D movies on Gear VR? I find most Disney/Pixar movies to look amazing on 3D. Especially Finding Nemo and Toy Story 3. Also ripped my 3D blurays of Imax Under the Sea and Journey 2 The Mysterious Island all look fantastic. What 3D movies have you seen that blew you away on the Gear VR so far? - Gravity. Micro Monsters with David Attenborough is pretty good. Read Here

Read More:

Thursday, July 23, 2015

Remove DRM from BBC iPlayer to Samsung Galaxy Tab S

The Samsung Galaxy Tab S is good. Really good. With long battery life, a stunning screen and an especially thin and light design, it's a near-perfect product. If you want the extra screen real estate for watching movies, It's cheaper, with a crisper screen, identical camera and just as much horsepower as the bigger model. Either way, you can't go wrong. Sure, If you owned Samsung Galaxy Tab S and want to cracking the DRM system and converting the BBC video (.wmv or .mp4) into free MP4 files that are naturally supported by Galaxy Tab S, just read the following guide.  

Hot Search: WMV DRM Removal Tools | HD Video to Galaxy Tab S | DVD to Galaxy Tab S | Videos on Galaxy Tab S

Why to remove DRM from BBC iPlayer programmes? That’s because of the downloaded BBC iPlayer video files will self destruct after 30 days because they are encypted by Microsoft's DRM scheme. If you want to keep BBC iPlayer videos on your computer permanently, convert downloaded BBC iPlayer videos to BBC-incompatible Galaxy Tab S, you will need to strip BBC's iPlayer DRM protection. Fortunately, there are still many ways to strip DRM protection from BBC iPlayer MP4 files. Here, Pavtube ChewTune can help you get rid of BBC iPlayer MP4 DRM for your Samsung Galaxy Tab S. Read the top DRM removal program

With it, you can fast crack DRM protection from BBC iPlayer WMV videos and convert them to iTunes H.264-compliant videos for smoothly playback on your Galaxy Tab S. Meanwhile the playback of the converted videos is as decent as possible as original. Now just download the program and follow the guide below to transfer BBC iPlayer WMV files to Galaxy Tab S for smoothly playing. 
 
Free Dwonload BBC iPlayer DRM Removal trial version: 


Convert BBC iPlayer WMV videos to Galaxy Tab S compatible video formats

Step 1: Add downloaded BBC iPlayer programmes. Install and launch the DRM converter as what you usually do with other application software. Then click "Add Video" button to import BBC iPlayer downloaded DRM .wmv files, or directly drag and drop them into the main window. Batch conversion is supported so that you can add multiple files. 


When converting protected WMV files, please make sure your videos play well in Windows Media Player (Windows Media Player is required for the conversion). Otherwise, the conversion may fail. 

Step 2: Choose output format. Click "Format" bar, you can easily find the optimized videos for Galaxy Tab S tablet under Samsung > Samsung Galaxy Tab 10.1(*.mp4). The output videos could fit on Galaxy Tab S well. Learn>> Best Video Formats for Galaxy Tab S


Tips: If you like, you can click "Settings" to change the video encoder, resolution, frame rate, etc. as you wish. Remember the file size and video quality is based more on bitrate than resolution which means bitrate higher results in big file size, and lower visible quality loss. According to my experience, for watching videos on the Galaxy Tab S, 720p with 2000~2500kbps is just all right. 


Step 3: Start the conversion. After finishing the settings, backward to main interface and click "Convert" button to begin stripping DRM from BBC iPlayer programmes and convert the BBC iPlayer WMV to Galaxy Tab S MP4 videos. 

When the conversion finishes, you can click "Open" to locate the DRM-free MP4 video files. And then you can simply use the Samsung Desktop Software to transfer the converted BBC iPlayer WMV videos to your Samsung Galaxy Tab S for watching. Have fun! 

When your Samsung tab is connected to computer via USB cable, you can put movies easily to the tablet since the device acts like a USB stick after tapping "Connect as USB Storage" on the screen. 

Read More:

Monday, July 20, 2015

Copy DVD Into the Woods Full Movie to iPhone/iPad/Android

Into the Woods is fun, exciting, and catchy. It’s an adaptation of James Lapin and Stephen Sondheim’s award winning Broadway musical of the same name. No doubt Into the Woods is a must-have for new movies on DVD 2015. Well yeah, the DVD Disney Into the Woods needs around $20 on Best Buy, Walmart and Amazon. To not pour money down the drain, you are advised to make a digital copy of DVD Into the Woods. But how to backup and copy DVD Into the Woods Disney movie? Hold on reading and find the answer...
  
Newly released  DVD Movies Review : Top Antonio Banderas Movies | 2015 New Disney Movies Reviews | Best Summer Movies 2015


There are many DVD ripping software claiming to have the ability to copy DVD Into the Woods, however, that's not the case. Because of so many DVD rippers do a good job in ripping DVDs, but most of them crash or fail when it comes to Disney movies, including the famous Handbrake, Wondershare etc.This is due to the special DVD protection measures imposed on Into the Woods by Disney. 
  
So how to convert the Disney DVD movie Into the Woods? Take it easy, there is still a qualified Into the Woods DVD ripper you can rely on: Pavtube DVDAid. This DVD ripper for Into the Woods outshines other programs for that: it’s capable of ripping/converting just about every title that I own; it’s easy of use and choices for decode/encode to all popular formats. Read the review

With this Into the Woods DVD ripper is an expert in ripping DVD Into the Woods to MKV, MP4, AVI, MOV and any other commonly-used video formats as well as to the popular mobile devices, including iPhone 6/6 Plus/5S/5C/5, iPad, Samsung, HTC, Blackberry, and Nokia phone, PSP etc. With 1:1 original quality reserved but 6X faster speed. The Mac version is Pavtube DVDAid for Mac
  
Step 1: Free download the Top DVD ripper for Into the Woods Disney movie. Import DVD Disney Into the Woods and launch the DVD ripper. Then click "DVD Disc" to load the disc.


Note: To put it another way, you can not only backup DVD Into the Woods smoothly, but also rip latest DVD movies from 20th Century Fox, Paramount, Columbia, Warner Bros., Pixar and other big film companies.

Step 2: Choose Output format. 
  
The general format is “Common Video >H.264 Video(*.mp4)” it’s the most widely used format which will be supported by your all HDTV, HD Media Players, Tablet, Smartphone and iOS devices.  


There are two ways you can go:

1.To convert DVD Into the Woods to MP4, MKV, AVI, FLV or other common video formats, choose the target video formats from the list. 

2.To backup DVD Into the Woods to iPhone/iPad/Android, you can either choose one of the device supported formats as per the guide above, or select the device directly from the list if you don't want to bother. 

Step 3 Convert DVD to MP4 for portable devices. 

Click the “Convert” button to start converting DVD to MP4 format. With the technology of CUDA acceleration it will provide you fast conversion speed. Once completed, go to “Open” the generated MP4 files for playback on your all portable devices. 

Now, you can get all the Into the Woods DVD Movies and know the best solutions for Ripping Into the Woods DVD for enjoying his best movies on iPad/iPhone/Android and other portable devices on the go. Have a good time!  

DVD Into the Woods Copy Alternative: Disney Into the Woods Full Movie Free Download

In addition to rip and copy DVD Into the Woods to digital files, there is anther common way to enjoy this Disney movie: download Into the Woods free from online torrent sites. Considering that the strict movie protection measures imposed by Disney, to free download Into the Woods may result in power quality or copyright infringement. 

Well, for who want to get Disney Into the Woods full movie download in high quality, the professional Pavtube Video Converter Ultimate will help. This Into the Woods movie downloader can easily download Into the Woods full movie in HD 4K 2160p, 1080p/720p free from 300+ movie sites, like YouTube, onlinemovies.pro, Dailymotion, youku, Tudou, dbtv, letv, Pandora.tv and many more, with 100% percentage original quality reserved. No virus, no malware, totally clean. Furthermore, the downloaded movie can be saved in MP4, AVI, MKV, MOV etc for you for free playback on iPhone/iPad/Android. If you are running a Mac OS X computer, iMedia Converter for Mac is the alternative. 
  
Read More:

Thursday, July 16, 2015

DVD to Premiere - Rip and Import DVD to Premiere Pro CS6

Adobe Premiere pro CS6 comes with Encore already integrated into the system to ease the process of creating a DVD or Blue-ray media disc. There must be some occasions when you want to edit your favorite DVD movies to make some modifications. Adobe Premiere Pro is widely used by video professionals. However, you will discover nothing happened when you try to import DVD into Adobe Premiere Pro. And this article discusses the details to tell you two ways of edit DVD videos into Premiere Pro CS6 for sharing.  

Though Adobe Premiere supports lots of video and audio format, such as 3GP, 3G2, ASF, DV-AVI, DV, FLV/F4V, M4V, MOV, MP4, MPEG, MPE, MPG, WMV, etc. etc. it doesn’t support DVD importing like most video editing software. To add DVD movies to Premiere Pro CS6, you’ll need to convert DVD files to Premiere compatible video format. 

In order to solve the issues, two possible solutions are provided for you. 

Solution 1: Put the DVD into your computer player, open the DVD in Explorer, copy the folder Video_TS to your computer. Open the folder and rename all the files with the extension VOB to MPG. That’s it. Premiere will now import them.

Important note: This way seems to work only for non-protected DVDs. If have some commercial DVDs, you may need another solution. By the way, we searched the issues online, some guys give the feedback renaming the files didn’t work; the files would import but then was unusable in Premiere Pro. 

Solution 2: The alternative trick is to rip the video files out of the DVDs, transcode them to a format that Adobe Premier Pro does support then import. You best bet is to use a DVD to Adobe Premiere Pro Converter to rip DVD and convert video to MPG format, which can be easily recognized by APP. 

To rip DVD to Premiere Pro CS6, you will need a DVD ripping software, here you can try Pavtube BDMagic for Mac, (See other options), this is top Mac Blu-ray Ripper software on the market, which can convert Blu-ray and DVD to MPEG-2/MOV for Adobe Premiere Pro native editing, or rip BD/DVD to MKV, AVI, WMV, MP4, M4V, FLV for playback. 

In the program, there are many output formats have been optimized, they are for portable devices and editing software, so you just need to click and choose as you want. Below are the detail steps for ripping Blu-ray and DVD on Mac to use in Premiere Pro CC, CS6, CS5.Rip Blu-ray/DVD to Premiere Pro CC, CS6, CS5 with Best Blu-ray Ripper for Mac. 

Rip DVD to Premiere Pro CS6 with Best Blu-ray Ripper for Mac

Get this Best Mac Blu-ray Ripper for Premiere Pro installed;


Other Download:

- Pavtube old official address: http://www.pavtube.cn/blu-ray-ripper-mac/
- Cnet Download: http://download.cnet.com/Pavtube-BDMagic/3000-7970_4-76177782.html

There is a disc icon on the top left which let you load from disc, folder or ISO/IFO respectively.


Step 2. Choose your Output directory down.

For editing DVD movies in Premiere Pro CS6, the MOV is preferred. Click “Format” and choose “MOV (AVC)(*.mov)” or “MPEG-2 (*.mpg)” from “Adobe Premiere/Sony Vegas” option.


PS: It has various profiles and formats so that you can rip DVD to various formats according to your needs.

Step 3. Set up frame rate, bitrate and other output settings.
Click Settings, you can find file details including codec, size, bitrate and frame rate. You are able to fix them according to your needs.Pls rember: the higher bitrate you choose, the better video quality it outputs.


Step 4. Start ripping.

Now just press the big circular “Convert” button to convert DVD to Premiere Pro CS6 and let it do its magic. Then, you can learn how to import video files into Premiere Pro.Wait for moments and you will get the fresh hot converted videos for Premiere Pro. 

Read More: