Q: “Importing DVD to iMovie? I am completely new to iMovie so forgive me if this is a completely stupid question. Many years ago I had 8 mm home movies transferred to VHS tape. A few years back a friend transferred the tapes to DVD. I am wondering if there is any way to get those "movies" from the DVD into iMovie. All Ican tell you about the DVD is the "format" is listed as Universal Disc Format (UDF). I am working with iMovie 9.0.4. Help will be very appreciated. “
 To answer all DVD-iMovie-importing questions, we need to first get to the bottom of it – what are iMovie compatible formats. iMovie supports MPEG-2 and AVCHD, DV-Standard and HDV (High Definition Video), QuickTime Movie, MEPG-4. So that's why you can not import DVD to iMovie to edit directly. Actually, here is a workaround - Below are the steps and tips on how to convert DVD to iMovie for further editing with this free DVD to iMovie converter.
Pavtube Pavtube BDMagic for Mac as the Top DVD to iMovie Converter with powerful functions can help you convert DVD to iMovie supported formats so that you can put DVD to iMovie on Mac for editing (Yosemite and Mavericks included). Here is the review. Now dwnload this program and follow this guide below to complete your task. If you’re editing DVD clips with iMovie, chances are you already installed this great utility. If not, download it it from here.
To answer all DVD-iMovie-importing questions, we need to first get to the bottom of it – what are iMovie compatible formats. iMovie supports MPEG-2 and AVCHD, DV-Standard and HDV (High Definition Video), QuickTime Movie, MEPG-4. So that's why you can not import DVD to iMovie to edit directly. Actually, here is a workaround - Below are the steps and tips on how to convert DVD to iMovie for further editing with this free DVD to iMovie converter.
Pavtube Pavtube BDMagic for Mac as the Top DVD to iMovie Converter with powerful functions can help you convert DVD to iMovie supported formats so that you can put DVD to iMovie on Mac for editing (Yosemite and Mavericks included). Here is the review. Now dwnload this program and follow this guide below to complete your task. If you’re editing DVD clips with iMovie, chances are you already installed this great utility. If not, download it it from here.

 Step-by-step: How to Convert DVDs for Editing in iMovie smoothly
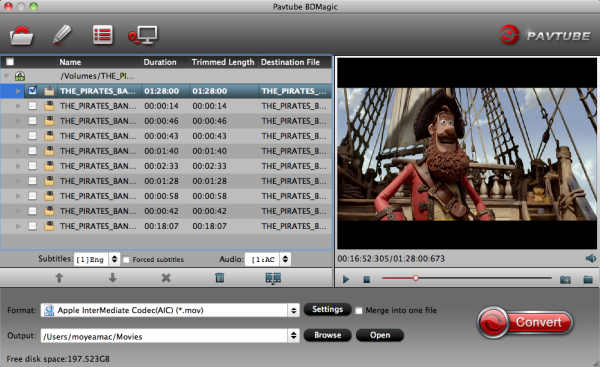
Step 1: Run the DVD to iMovie Converter Mac and click “Load DVD” to import the DVD you want to convert. As you see, Blu-ray and DVD disc, ISO/IFO files are all well supported. You can also use the drag-and-drop method to load the media files to the application UI.
Step-by-step: How to Convert DVDs for Editing in iMovie smoothly
Step 1: Run the DVD to iMovie Converter Mac and click “Load DVD” to import the DVD you want to convert. As you see, Blu-ray and DVD disc, ISO/IFO files are all well supported. You can also use the drag-and-drop method to load the media files to the application UI.
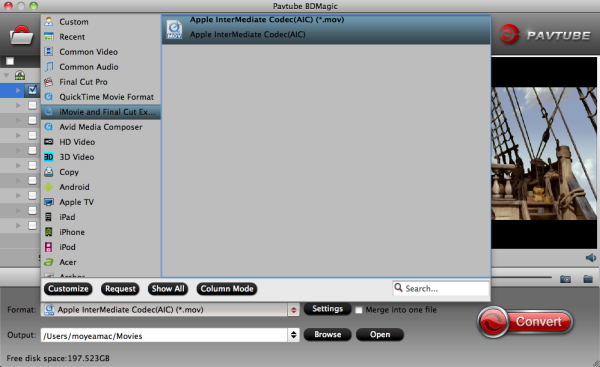
 Step 2: Choose an output format for iMovie. Click the Format icon to open the format list. Then select iMovie and Final Cut Express -> Apple InterMediate Codec (AIC)(*.mov), as the output format to get videos with optimized settings for iMovie.
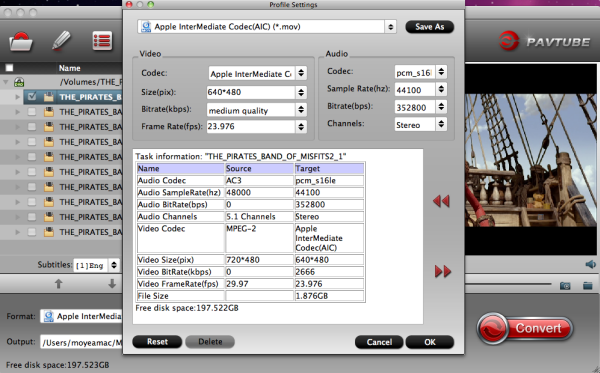
 Tip: If you like, you can click “Settings" to change the video encoder, resolution, frame rate, etc. Remember bitrate higher results in big file size, and lower visible quality loss.
 Step 3: When all the settings are fine, click the “Convert” button to start converting your DVD to optimized AIC .mov video files for iMovie. When then conversion completes, click the Open button to get the ripped video files. Launch iMovie and click File > Import > Movies to import the converted videos to iMovie for further editing. Just create your masterpiece with joy!
Additional Tips:
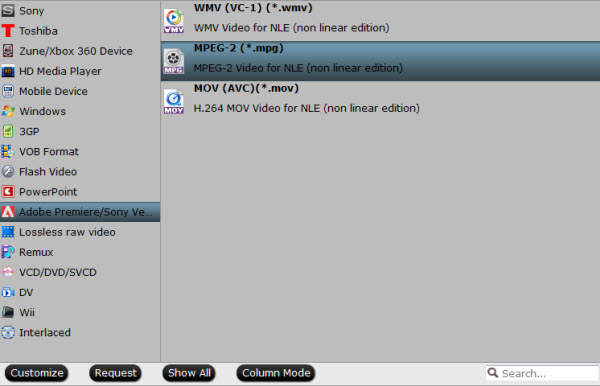
1) If you want to edit DVD clips in Final Cut Pro X or FCP 7/6, you just need to choose the “Final Cut Pro > Apple ProRes 422 (*.mov)” as output format in the second step; For Avid MC, choose “Avid Media Composer->Avid DNxHD(*.mov)” as output; For Adobe Premiere Pro or Vegas Pro, choose Adobe Premiere/Sony Vegas> MPEG-2(*.mpg) as output.
2)If you want to convert Blu-ray, DVD as well as video files like MTS, AVI, WMV, MKV, FLV, VOB, etc. to iMovie/FCE supported video formats, just turn to Pavtube iMedia Converter for Mac, which is an all-in-one toolbox to convert BD/DVD and various video formats to iMovie/FCE video formats. (Now, you can get 50% OFF discount after liked our FaceBook.) More Money Saving Tips, you can Click Special Offer. Just feel free to have a try!
Now, you have owned the top DVD to iMovie Converter for Mac, so you may not have troubles on ripping DVD to iMovie on Mac. Have Fun!
Read More:
Step 3: When all the settings are fine, click the “Convert” button to start converting your DVD to optimized AIC .mov video files for iMovie. When then conversion completes, click the Open button to get the ripped video files. Launch iMovie and click File > Import > Movies to import the converted videos to iMovie for further editing. Just create your masterpiece with joy!
Additional Tips:
1) If you want to edit DVD clips in Final Cut Pro X or FCP 7/6, you just need to choose the “Final Cut Pro > Apple ProRes 422 (*.mov)” as output format in the second step; For Avid MC, choose “Avid Media Composer->Avid DNxHD(*.mov)” as output; For Adobe Premiere Pro or Vegas Pro, choose Adobe Premiere/Sony Vegas> MPEG-2(*.mpg) as output.
2)If you want to convert Blu-ray, DVD as well as video files like MTS, AVI, WMV, MKV, FLV, VOB, etc. to iMovie/FCE supported video formats, just turn to Pavtube iMedia Converter for Mac, which is an all-in-one toolbox to convert BD/DVD and various video formats to iMovie/FCE video formats. (Now, you can get 50% OFF discount after liked our FaceBook.) More Money Saving Tips, you can Click Special Offer. Just feel free to have a try!
Now, you have owned the top DVD to iMovie Converter for Mac, so you may not have troubles on ripping DVD to iMovie on Mac. Have Fun!
Read More:
Good News! Pavtube upgraded Video Converter Ultimate/iMedia Converter for Mac to version 4.8.6.2, which features strong and perfect support for Blu-ray/DVD/Video to H.265 MP4 encoding.  Download Pavtube Video Converter Ultimate/iMedia Converter for Mac:Windows version 4.8.6.2: http://www.multipelife.com/download/video-converter-ultimate/video_converter_ultimate_setup.exeMac Version 4.8.6.2: http://www.multipelife.com/download/imedia-converter-mac/imedia_converter_setup.dmgWhat's New: 1.support encoding to .m3u8 2.support new Blu-ray/DVD movies 3.fix some bugs This updated Ultimate Converter can handle all common SD and HD video, encode 2D/3D Blu-ray and standard DVD to playable m3u8 format with the default H.264 video codec and AAC audio codec on Windows 10, Windows 8.1, Windows 8, Windows 7 and on Mac OS X 10.10 Yosemite, 10.9 Mavericks, 10.8 Mountain Lion, etc. The converted m3u8 file can be dragged to any point correctly if you want to enjoy on your m3u8 players immediately and the player will ensure smooth m3u8 playback without interruption of network speed and resolution.As a powerful all-in-one utility integrated by DVD Ripper, Blu-ray Ripper, DVD Copy, Blu-ray Copy, Video Converter, Video Editor, etc., it also offers an all in one solution to convert Blu-ray, DVD, MP4, MOV, MKV, MXF, TiVo, et to any other video and audio format. The decoding and encoding of H.265/HEVC codec, create 3D movies from 2D or 3D resources is also supported by the program. Pricing and Availability Video Converter Ultimate iMedia Converter for Mac now is offering with $65 with a lifetime free upgrade. Other upgraded products are listed below:Pavtube DVDAid/DVDAid for Mac Pavtube BDMagic/BDMagic for Mac Pavtube ByteCopy/ByteCopy for Mac Pavtube Video Converter/Video Converter for MacPavtube HD Video Converter/HD Video Converter for MacPavtube MTS/M2TS Converter/MTS/M2TS Converter for MacPavtube MXF Converter/MXF Converterfor MacPavtube MXF MultiMixer/iMixMXFNote:The output m3u8 files should be named without space and file path should be in plain English or pure digital, otherwise you couldn't play them successfully. After conversion, you just need to set up a server to enjoy M3U8. All customers are welcomed to get these upgraded hottest and comprehensive products. Get more money-saving bundles at http://www.multipelife.com/special-offer. Come on!For more info about this Pavtube update, just visit: http://www.multipelife.com/pavtube-upgrade-with-m3u8-encoding.htmlSource: http://best-tablet-converter.com/2015/06/12/ultimate-converter-output-m3u8/
Maxell Airstash is the first wireless USB memory stick and the wirelessly transfers your media and documents from its flash storage onto any Wi-Fi enabled device, via its own generated Wi-Fi connection. Essentially a USB stick with a mobile hotspot, it's the perfect companion for devices that you can use AirStash to stream, transfer and manage media files wirelessly with the assistance of the free AirStash app for iOS and AirStash app for Android.
 With AirStash, you can not only make a complete backup of your DVD movies, but also has the capability to share them on your smartphones and tablets wirelessly. If you want to rip DVD Collections to AirStash, you need a program that is able to convert and then compress the videos to a format that is computer/AirStash/Portable devices-friendly. There’s all kinds of different DVD ripping software out there (some free, some not) with a variety of different options. Here we introduce rip DVD to AirStash with Pavtube DVDAid, a professional and easy-to-use DVD ripping software.
Pavtube DVDAid as a powerful yet easy-to-use DVD to AirStash Converter software to rip purchased copy-protected DVD to AirStash compatible format like MP4, etc. in good quality and high speed with a wink, and even extract MP3, WMA, FLAC, OGG, etc. audio from DVD movies, then you can put converted videos to AirStash for watching freely.
Now you can free download it and follow the easy steps below to convert DVD to AirStash with a few mouse clicks. The Mac equivalence to convert DVD to AirStash on Mac Yosemite is Pavtube DVDAid for Mac.
Hot News! Pavtube Studio has launched a user-requested upgrade for full line of Pavtube products to version 4.8.6.2. Existing bugs, improvements and new elements for M3U8 encoding are added and has the capability of encoding or decoding H.265/HEVC files well..
Step 1: Insert DVD and add movies
Open the DVD Ripper, then insert a DVD disc to your DVD-Rom and click DVD Disc to load your DVD movies. You can also import DVD folder from your computer hard drive.
With AirStash, you can not only make a complete backup of your DVD movies, but also has the capability to share them on your smartphones and tablets wirelessly. If you want to rip DVD Collections to AirStash, you need a program that is able to convert and then compress the videos to a format that is computer/AirStash/Portable devices-friendly. There’s all kinds of different DVD ripping software out there (some free, some not) with a variety of different options. Here we introduce rip DVD to AirStash with Pavtube DVDAid, a professional and easy-to-use DVD ripping software.
Pavtube DVDAid as a powerful yet easy-to-use DVD to AirStash Converter software to rip purchased copy-protected DVD to AirStash compatible format like MP4, etc. in good quality and high speed with a wink, and even extract MP3, WMA, FLAC, OGG, etc. audio from DVD movies, then you can put converted videos to AirStash for watching freely.
Now you can free download it and follow the easy steps below to convert DVD to AirStash with a few mouse clicks. The Mac equivalence to convert DVD to AirStash on Mac Yosemite is Pavtube DVDAid for Mac.
Hot News! Pavtube Studio has launched a user-requested upgrade for full line of Pavtube products to version 4.8.6.2. Existing bugs, improvements and new elements for M3U8 encoding are added and has the capability of encoding or decoding H.265/HEVC files well..
Step 1: Insert DVD and add movies
Open the DVD Ripper, then insert a DVD disc to your DVD-Rom and click DVD Disc to load your DVD movies. You can also import DVD folder from your computer hard drive.
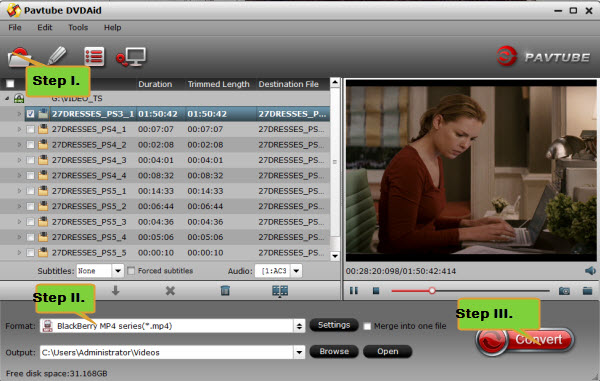 Step 2: Select AirStash stream-able format.
Click "Format" drop-down list and select "H.264 Baseline Profile Video (*.mp4)" as the output profile format to stream from AirStash to portable devices.
Step 2: Select AirStash stream-able format.
Click "Format" drop-down list and select "H.264 Baseline Profile Video (*.mp4)" as the output profile format to stream from AirStash to portable devices.
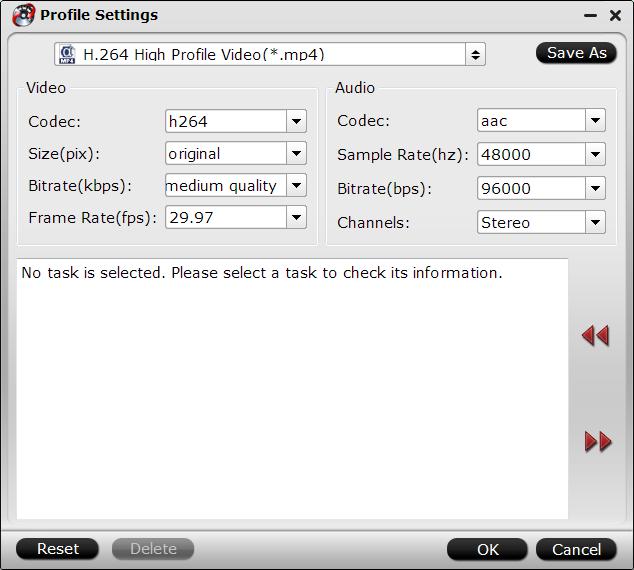
 Step 3: Customize output profile parameters.
Click "Settings" to open "Profile Settings" window, here you can adjust video codec, size, bitrate, frame rate and audio codec, sample rate, bit rate and channels according to your own preference.
Step 3: Customize output profile parameters.
Click "Settings" to open "Profile Settings" window, here you can adjust video codec, size, bitrate, frame rate and audio codec, sample rate, bit rate and channels according to your own preference.
 Step 4: Start converting DVD to AirStash
Finally, hit the "Convert" button at the bottom of the main interface to start ripping DVD for AirStash. After the conversion, you can hit "Open" button to quick locate the converted videos; then you can load the files on AirStash or downloaded to SD cards to use with AirStash on plane trips and grandchildren watch on car trips.
Note: Now you don't need to spend money on the devices with more memory, (e.g. the iPhone 6 64GB model), or sift through your files and delete them to make space. Just switch on the Airstash, search for a Wi-Fi connection on your iPhone and connect. Download the free app from the internet and it acts as a media browser, so any photos, songs or videos you have on the Airstash you can access at a fingertip. Multiple devices can connect to it at any time so you can share your media with friends or colleagues.
Read More:
Step 4: Start converting DVD to AirStash
Finally, hit the "Convert" button at the bottom of the main interface to start ripping DVD for AirStash. After the conversion, you can hit "Open" button to quick locate the converted videos; then you can load the files on AirStash or downloaded to SD cards to use with AirStash on plane trips and grandchildren watch on car trips.
Note: Now you don't need to spend money on the devices with more memory, (e.g. the iPhone 6 64GB model), or sift through your files and delete them to make space. Just switch on the Airstash, search for a Wi-Fi connection on your iPhone and connect. Download the free app from the internet and it acts as a media browser, so any photos, songs or videos you have on the Airstash you can access at a fingertip. Multiple devices can connect to it at any time so you can share your media with friends or colleagues.
Read More:
As a 4K-capable camera, the NX500 Mirrorless Digital Camera from Samsung is among the most compact cameras in its class. Actually, both of NX1 or NX500 are good choice because of they employs H.265 compression to save space. If you are shooting with a Samsung NX1 or NX500 4K camera, you may have issues editing its H.265/HEVC 4K video in Adobe Premiere Pro CC. The guide will show you How to edit Samsung NX1 or NX500 H.265 with Premiere Pro CC natively.
 Actually, the H.265 standard simply has not yet been adopted by Apple, Adobe or any of the other of the software industry leaders. The main reason is that NX1 or NX500's recording H.265 codec are not native codec for Premiere Pro CC. That means if you want to work H.265 videos in Premiere Pro CC, you’ll need to convert H.265/HEVC video files to something usable for Premiere Pro CC; mostly likely MPEG-2. With luck, I found some third-party software likePavtube Video Converter Ultimate can help you transcode H.265 to MPEG-2 for Premiere Pro CC easily and quickly. Here is review.
The program is an ideal Video Converter Ultimate for fully supporting H.265/HEVC codec and transcoding H.265/HEVC codec to MPEG-2 without quality loss. Meanwhile, besides H.265/HEVC, it is also able to deal with other common videos from camcorder or internet including MXF, MTS, MKV, MP4, AVI, WMV, MOV .etc. It also offers the optimal profiles for Avid Media Composer, FCP, iMovie and more. Download the program to start the H.265 to MPEG-2 conversion task. For Mac users, iMedia Converter for Mac is a helpful app to encode videos for further usage.
How to Rewrap Samsung NX1/NX500 H.265/HEVC videos for editing in Adobe Premiere Pro CC via MPEG-2 codec?
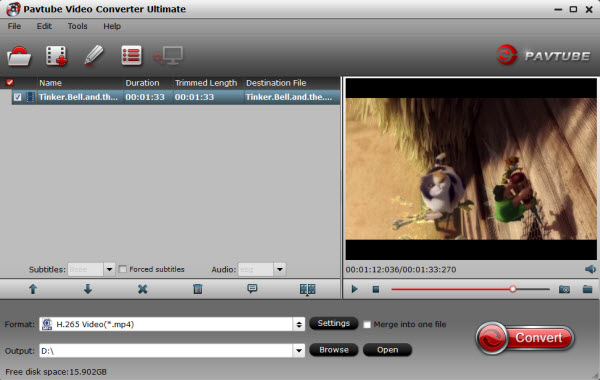
Step 1: Add NX1/NX500 H.265 video files - Launch the NX1/NX500 Movie Converter and click the “Add video” button to browse your computer hard disc and load the NX1/NX500 H.265 video files you want to convert to the software.
Actually, the H.265 standard simply has not yet been adopted by Apple, Adobe or any of the other of the software industry leaders. The main reason is that NX1 or NX500's recording H.265 codec are not native codec for Premiere Pro CC. That means if you want to work H.265 videos in Premiere Pro CC, you’ll need to convert H.265/HEVC video files to something usable for Premiere Pro CC; mostly likely MPEG-2. With luck, I found some third-party software likePavtube Video Converter Ultimate can help you transcode H.265 to MPEG-2 for Premiere Pro CC easily and quickly. Here is review.
The program is an ideal Video Converter Ultimate for fully supporting H.265/HEVC codec and transcoding H.265/HEVC codec to MPEG-2 without quality loss. Meanwhile, besides H.265/HEVC, it is also able to deal with other common videos from camcorder or internet including MXF, MTS, MKV, MP4, AVI, WMV, MOV .etc. It also offers the optimal profiles for Avid Media Composer, FCP, iMovie and more. Download the program to start the H.265 to MPEG-2 conversion task. For Mac users, iMedia Converter for Mac is a helpful app to encode videos for further usage.
How to Rewrap Samsung NX1/NX500 H.265/HEVC videos for editing in Adobe Premiere Pro CC via MPEG-2 codec?
Step 1: Add NX1/NX500 H.265 video files - Launch the NX1/NX500 Movie Converter and click the “Add video” button to browse your computer hard disc and load the NX1/NX500 H.265 video files you want to convert to the software.
 Step 2: Click “Format” bar to determine output format. Follow “Adobe Premiere/Sony Vegas” and select “MPEG-2(*.mpg)” as the output format. Learn Adobe Premiere Pro CC Supported formats.
 Step 3: Advanced Settings- You can adjust video/audio parameters such as bitrate, sample rate, frame rate, codec, channels, etc after clicking on “Settings” icon. You’d better keep the resolution as original one. Of course, if you don’t stick with 4K, you can downscale 4K to 1080p for easier editing.
Step 4: Click “Convert” button to start encoding NX1/NX500 4K H.265 to MPG for importing to Premiere Pro CC.
Conclusion: When the conversion task is finished, click “Open” button to get the exported files and then import the converted NX1/NX500 footage into Premiere Pro CC to do further editing without hassle.
Read More:
Step 3: Advanced Settings- You can adjust video/audio parameters such as bitrate, sample rate, frame rate, codec, channels, etc after clicking on “Settings” icon. You’d better keep the resolution as original one. Of course, if you don’t stick with 4K, you can downscale 4K to 1080p for easier editing.
Step 4: Click “Convert” button to start encoding NX1/NX500 4K H.265 to MPG for importing to Premiere Pro CC.
Conclusion: When the conversion task is finished, click “Open” button to get the exported files and then import the converted NX1/NX500 footage into Premiere Pro CC to do further editing without hassle.
Read More:
Rip Blu-ray to standard video to keep your Blu-ray discs from scratched, damaged, or manage your movies becomes the most convenient way! If you get a Blu-ray movie, you may want to play them on your different media players or portable devices like the new iPad, iPhone, Surface Pro, or HDTV. Then is there an available way to resolve the issue? Of course. The answer is to rip Blu-ray High Definition video formats, for these HD videos are often bigger than standard video and decrease the video damage. So the HD video seems to be lossless compared with the original Blu-ray.  You can read the Blu-ray Backup/Ripping Tips and Solutions | Solution for DVD Ripping and Copying... There are many tools on the market for users to copy and rip Blu-rays like Handbrake, MakeMKV,DVDFab. HerePavtube ByteCopy is highly recommended to help you roll off your Blu-ray protection and rip Blu-ray to HD MKV/MP4 for playback on TV with perfect aspect ratio and best A/V quality. Besides, this Blu-ray ripping tool allows you to lossless backup Blu-ray in MKV format or with whole structure or just make a main movie copy of BD according to your needs. Mac version is here. Download it right now and start enjoying your Blu-ray movies with full HD quality on TV through a BD Player!
 Rip Blu-ray to HD MKV/MP4 for watching in TV via a BD PlayerStep 1: Run the Blu-ray Ripper and click disc icon to load Blu-ray movies. To select the subtitles you like, simply click Subtitle and select the one you prefer.
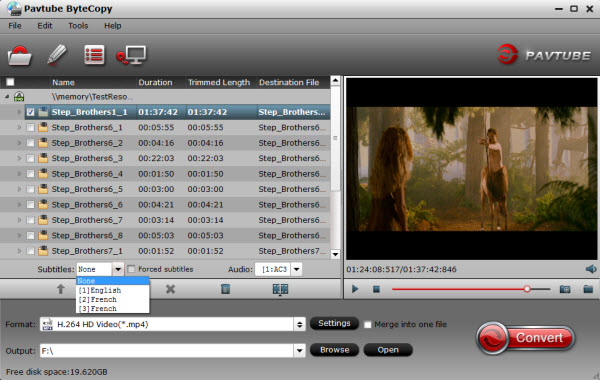 Step 2: Click Format bar and choose your desired format. To play Blu-ray on TV via a BD Player, you can rip Blu-ray to HD MP4, or MKV, etc compressed format. And click Settings bar, you can adjust the level of compression to suit the quality you want.
 Note: FYI: If you want to keep all the audio tracks (language) and soft subtitles, here’s another choice for you: you can choose “Multi-track MP4(*.mp4)” from “Format” menu as output format. Tip:1. If you are not satisfied with the defaulted settings, you can adjust codec, aspect ratio, bit rate, frame rate, sample rate and audio channel in the "Settings" page.2. If you want to trim, crop, edit audio/subtitles or adjust aspect ratio, click the pencil-like "Edit" icon and switch to "Crop" tab. Choose Advanced mode, lock the "Keep Ratio" and you can free change aspect ratio. Usually it will be set to "Original"; it would be ok to playback on TV via a BD Player, or you can change it to 16:9.
 Step 3: After all settings, tap "Convert" button to start Blu-ray movies to MP4/MKV for TV conversion immediately.Once conversion completes, you can get the output files via "Open" panel effortlessly. Now you can enjoy your Blu-ray movies on TV via a BD Player without any issue. Tips: 1.This powerful Blu-ray to MP4/MKV Converter can also work as a DVD ripper, so if you get some DVDs, you can rip and convert them to any popular video format MP4, MOV, WMV, AVI as you need. More information get from Pavtube Blu-ray to MKV Converter. 2.Pavtube ByteCopy for Mac can convert latest Blu-ray and DVD movies to any other formats like MP4, MOV , M4V, AVI, WMV, MPG, MKV, etc or MP4/MOV with multi-track audios for playback and it is also able to encode Blu-ray movies and DVDs to MKV container format with preserving chapter markers, multiple audio tracks and subtitles. Read More: