Wednesday, April 15, 2015

Backup iTunes Movies to Galaxy S6/S6 Edge for playback

If you want to backup iTunes M4V movies to Galaxy S6/S6 Edge for playback, Pavtube iTunes M4V to Galaxy S6/S6 Edge converter is the best choice for you.

Boasting a 5.1-inch Super AMOLED capacitive touchscreen with a resolution of 1440x2560 pixels, Samsung Galaxy S6/S6 Edge can bring us crisp images and superb visuals during playing movies. It also goes for iTunes purchased and rented M4V. Keep reading to find out how to backup iTunes HD 1080p movies/TV shows to Galaxy S6/S6 Edge.


Backup iTunes HD(1080p) M4V Videos to Galaxy S6/S6 Edge

iTunes videos in special M4V format, rented and purchased, 1080p HD and 720p SD, are under DRM protection without exception. It means iTunes users can only watch downloaded videos on limited Apple devices. As for the validity period of rental movies, 30 days to begin watch and only 24-hour to enjoy once it has been started to watch.


To watch iTunes movies TV shows on Galaxy S6/S6 Edge, you need to remove DRM protection and convert the video files to Galaxy S6/S6 Edge supported video format first. Here Pavtube ChewTune must be a favorite iTunes video converter to remove DRM protection from iTunes M4V, rentals & purchases, and convert to almost all video formats, like MP4 supported by Galaxy S6/S6 Edge.

Here is Galaxy S6/S6 Edge supported video and audio formats

Video: MP4 (MPEG4/H264), WMV, DivX, XviD, H.264/AVC
Audio: MP3, WAV, WMA, eAAC+, FLAC
Full HD(1080p) Playback & Recording

  (Click here for Mac OS X 10.5)

Tutorial on Backuping DRM iTunes M4V to Galaxy S6/S6 Edge

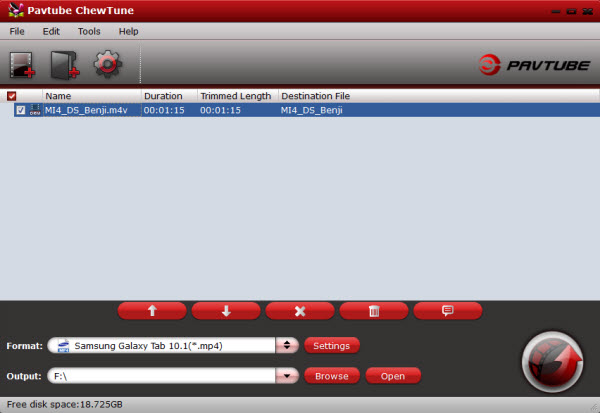
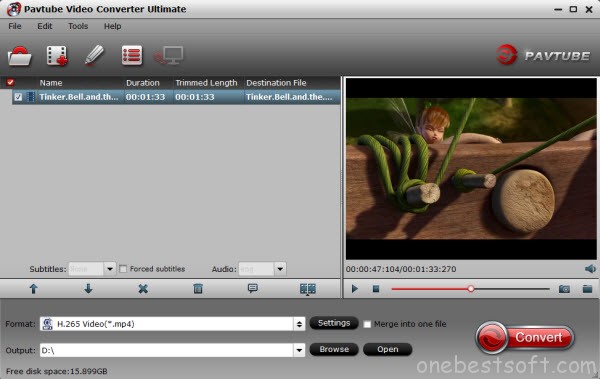
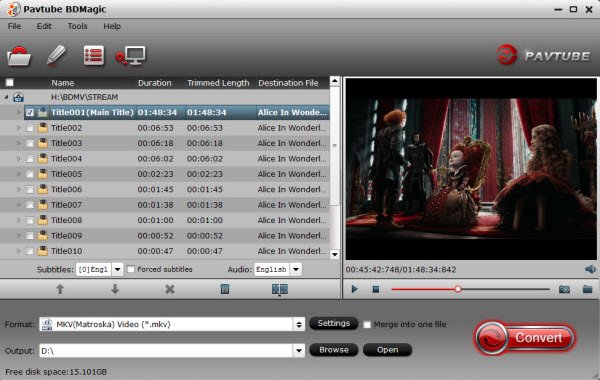
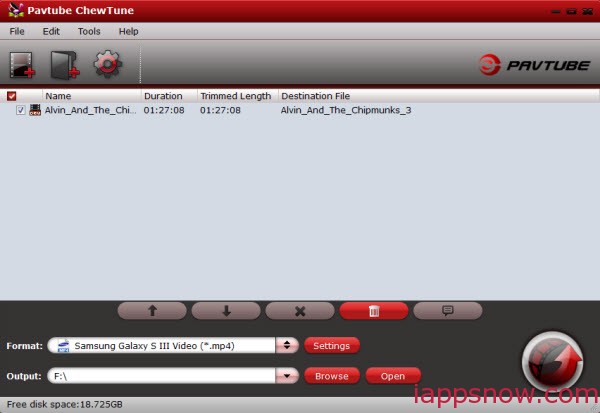
Step 1. Load M4V files to the DRM Removal Tool.

Get this DRM Removal Tool installed, drag and drop your iTunes M4V files to it directly.

iTunes to Galaxy Converter


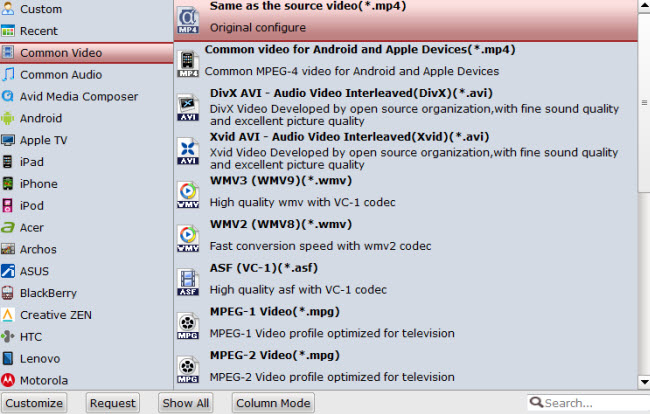
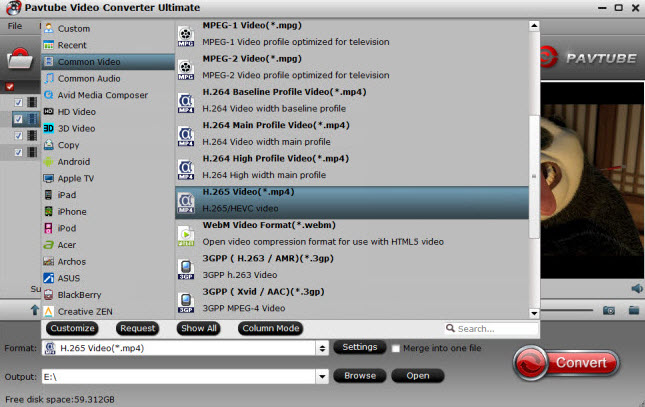
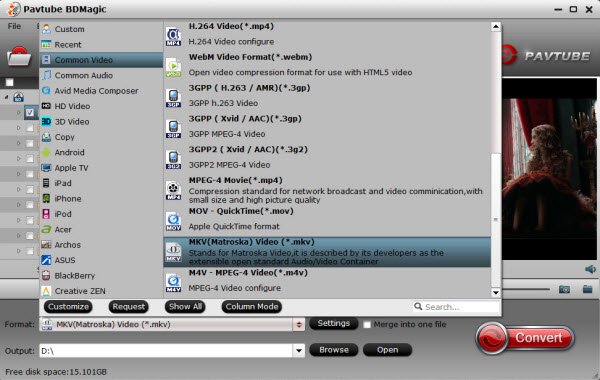
Step 2. Choose output file format for Galaxy S6/S6 Edge.

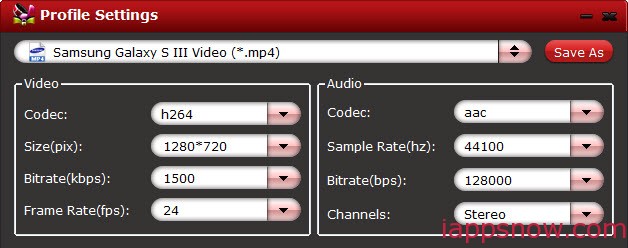
Galaxy S6/S6 Edge supports H.264, WMV, DivX, XviD file formats, Just click the drop-down list besides "Format" and choose "Samsung -> Samsung Galaxy S III Video (*.mp4)".

Galaxy S6/S6 Edge video format

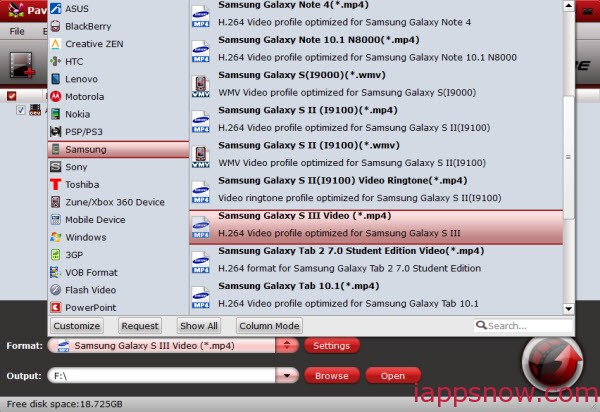
And "Settings" button provides you more customize options like video size, bitrate, frame rate, sample rate(Hz) etc. for output files.

Galaxy S6/S6 Edge video settings

Step 3. Strat removing DRM protection from iTunes M4V.

Now you can click "Convert" button to start removeing DRM protection and converting iTunes M4V for playing on Galaxy S6/S6 Edge smoothly. Wait for moments, then click "Open" to locate the DRM-free output file. And then transfer it to your Galaxy S6/S6 Edge via cable or SD card.

Learn more: 

Monday, April 13, 2015

How to Burn Purchased iTunes Movies to DVD Disc?

This tutorial will teach you the simplest solution to remove iTunes DRM and then you can convert iTunes movies to other video or audio file you needed or burn iTunes to a new DVD disc.

“ How to Convert iTunes movies to DVD I have purchased several movies from iTunes. Since most of the times these movies are played on my APPLETV. However from time to time the children want to watch the movies in their room. I can not find any menu option that will allow me to burn purchased movies to a DVD. Please explain how to do this?” 

Hot Search: iTunes to TV, iTunes to WMP, VIDEO_TS to iTunes, iTunes to PS Vita


Many of users would encounter the same problem as Noppie. However, music and movies purchased from iTunes can be only played on Apple products due to DRM (Digital Rights Managements) protection. If you want to view your iTunes purchased movies on your home DVD player, you will have to remove iTunes DRM first and then you are able to burn iTunes movies to DVD. So, What's the best way to burn movies from iTunes? You'll find all the solutions here. Here two programs are recommended to copy iTunes movies to DVD with customized DVD menus:

A: Burn iTunes Movies to DVD with Pavtube ChewTune
B: Burn Movies from iTunes to DVD with Pavtube DVD Creator
    
Part One: Convert DRM-protected iTunes Video to DVD for Playback

Pavtube ChewTune has been recognized as the most powerful iTunes DRM Removal Software which lets you remove DRM protection from iTunes to DVD easily. Highly recommended and you will be amazed at how it works. Read the Review. This is a top iTunes DRM removal tool which get iTunes to DVD conversion fully supported by removing DRM from M4V and burning DVD at one place. It also preserves the original quality of M4V video. The software has a very easy to use and simple user interface so that it can be easily used by a novice and a professional user. 
  
The steps that you need to follow to remove DRM protection from both iTunes rentals and purchases and output all kinds of formats or iTunes compatible format using this software are as followed. Note that the Mac version is Pavtube ChewTune for Mac. 

Step-by-step guide: convert iTunes DRMed videos to DVD

Step 1: Launch the Pavtube DRM removal tool and converter and click “Add Video” to load the iTunes video files to the program for converting. You can also simply drag and drop media files to the source pane to add. Batch conversion is supported so that you can add multiple files.


Step 2: Choose the output format for iTunes. For example, choose MP4 as the output format. 


Step 3. Adjust video specs (optional). Click "Settings" button to enter Profile Settings window, you can adjust video size, codec, bitrate and frame rate and some other audio parameters here.

Step 4: Start conversion. You can click the round icon "Convert" to start removing DRM of iTunes videos. 

Part II: How to Burning DRM-free iTunes Videos to a new DVD? 
  
Pavtube DVD Creator features: It lets you burn any kind of video sources to playable DVD. With its simple wizard-style user interface and powerful editing features, DVD authoring and burning can’t be easier. Almost any kind of fair videos (MKV, AVI, MP4, WMV, MOV, MTS, TiVo, etc) can be imported and converted to DVD video. Photos can be made into slide show DVD simply with a few clicks. In addition, the Quick Burn feature enables users to burn archived ISO image and DVD-Video structure instantly.Just follow the step guide 

After read this guide, you will have no issues on iTunes purchased movies playback issues, enjoy your time! 

If you have many other videos to deal with, it is the right place for you. Just go to find your favorite:

Friday, April 10, 2015

Store 3D Blu-ray ISO File on HTPC for Playback

For 3D movie fans, you may want to know how to play Blu-ray ISO image on HTPC with original quality. Read this guide and solve the HTPC playback issue.

“ I have lots of Blu-ray ISO image files from my PC and I need a tool to move movies (foreign) to my home entertainment server so I can add subtitles to them during playback. I also move TV shows to the server so I don't have to shuffle discs in and out of the player. Mp4 is better for compatibility with phones, tablets etc. which can gives me the ability to take my entertainment with me. So, my question is that Can I play 3D Blu-ray ISO File on HTPC? Any suggestions? “ 

Hot Search: 3D Movies to Oculus Rift, 3D Blu-ray on Smart TV, 3D Blu-ray to Gear VR, 3D Blu-ray to Plex


When you play 3D Blu-ray ISO files on HDTV via A Home Theater PC, you must be failed as above. Not all the devices can open and recognize the ISO files. It is common that 3D TV can’t open the 3D Blu-ray ISO files since it is not an accepted format. To solve this problem, there are many software created, among them, I suggest you Pavtube ByteCopy for Mac as the best 3D Blu-ray ISO converter for best video and audio playback with 3D effect. Now you can download the software and I will introduce this potential converter which is created to help you play convert a 3D Blu-ray ISO files to 3D AVI to watch on 3D TV. 

Stey-by-step: Convert 3D Blu-ray ISO File on HTPC with MKV/MP4 format

Step 1. Launch and install the best 3D Blu-ray ISO Converter (Windows user can have a look at Pavtube ByteCopy), then click the “Load IFO/ISO” icon to import the 3D Blu-ray ISO files, also you can select preferred language in “Subtitles” and “Audio” box. 


Step 2. Find the format bar and click it to go to the format list where you can select the right output format for your device or editing system. Here for HTPC and smartphones or tablets, you need to follow “HD Video > MKV HD Video (*.mkv).” or “HD Video > H.264 HD Video (*.mkv)”. 


Step 3. When you are finished and happy with the configuration, press “Convert”. It may well take its time to finish, but you will be extremely satisfied with the results. After 3D Blu-ray ISO conversion, put it on your USB-drive and connect it to your HTPC for enjoyment. 

Read More:

Wednesday, April 8, 2015

Best HEVC/H.265 Video Converter/Encoder for Windows 10

Here is the Best H.265/HEVC video converter for Windows 10 to convert HEVC/H.265 4K video to H.264 with suitable formats on Windows. 

Microsoft announces that Windows 10 will add native support for HEVC/H.265, MKV and FLAC. That mean you can to play H.265/4K videos on Windows 10, provided that you have an upgraded 4K screen/4K TV. Or you need a best Windows 10 H.265 video converter to convert H.265 to H.264, MPEG-4, etc. So, you may want to know which one is best H.265/HEVC video converter for Windows 10? Is there any best methods provided for us to handle the H.265 encode and decode workflow well for other common or h.265 on Windows 10? 

Hot Search: H.265 to iPhone, H.265 to Adobe Premiere Pro CC, H.265 to TV, H.265 to Youtube 


4K videos keep growing in popularity. But to realize the UHD playing of 4K/2160p movies on Windows 10, you will have to unlock a series of 4K video codec puzzles – HEVC/H.265. This tutorial explores the solutions for several interconnected H.265/HEVC issues, solving problems like what is the relationship between 4K and HEVC/H.265 and which is the best Windows 10 H.265 video converter to encode a H.265 video or convert H.265 to H.264, MPEG4, MOV, FLV, MKV, etc on Windows 10. 

Pavtube Video Converter Ultimate is the best H.265 video converter for Windows 10, it support H.265/HEVC codec right after the appearance of this very codec mainly for 4K video, support users to encode videos into H.265 and convert H.265/HEVC to up to 320 video codecs for playback on iPhone, iPad, Apple TV, Chromecast, Android mobile and tablets, etc.

Follow step guide: How to Convert H.265 to H.264 on Windows 10? 

Step 1: Load video files (h.265/hevc videos included) 

Launch this H.265 program, on the main interface, we can add our original files with ‘Add videos’ as individual video clips, or with ‘Add from folder’, we can load them in a complete folder. Look as the screen shot below. 


Step 2: How to encode or decode your H.265/HEVC footage on Windows PC? 

Just come to the output list, there are some changes in the upgraded version 4.8.2.0, individually in “HD Video” and “Common Video”, we find the added “H.265” there. Firstly for encoding our H.265 videos on Windows PC, select the “Common Video-> H.264 Baseline/Main/High Profile Video(*.mp4)” for an usual selection. Yes, three standards of H.264 codec types you can choose well. 

While for decoding H.265/HEVC videos, just go to the “HD Video” to make the “H.265 HD Video (*mp4)” as your best one. I have to mention here: with the smaller size and higher quality, it may need much more time to wait the job then. 


Additional Tips: 

1. Before conversion, you can go to the “Settings” to set the parameters for your movie. To compress the file size, adjust the parameters to be smaller. 

2. Click Edit button and you can trim, crop or adjust the video with the built-in video editor to get the very part and effect of yoru original H.265 video as you want. 

Step 3: Encode, Decode and Convert H.265 HEVC videos 

Finally, don’t forget to hit the ‘Convert’ on the main interface to finish your preparation work and get start. What’s more, this newest version has also brought us more advantages,if you want to move files from a Windows PC to a Mac because of the Mac can not support H.265, you can read here. Any other suggestions or opinions you can leave as comments below. Just enjoy your H.265/HEVC videos! Smaller and smaller! Higher and higher! 

See Also:

Friday, April 3, 2015

Put Blu-ray to Synology NAS for Roku 3 playback via DLNA

Read this article and you will quickly learn how to convert Blu-ray to DLNA on Synology friendly video for streaming to your Roku 3 compatible devices. 


“ What are the specific settings for ripping a DVD to put on a Synology NAS DLNA server for playback on a Roku 3 using the Roku Media Player app? I have tried several settings to create an MP4 with 5.1 sound, following instructions from your web site.  (H.264 HD Video MP4 with HD Standards and a few variations). All rips play video perfectly, but there is no sound when played on the Roku 3 Media Player. Any good idea? “ 

Can Roku 3 read Blu-ray movies from NAS? If you have a large Blu-ray movie collections, you may have this question. If you want to rip and store BD movies on Synology and then plug NAS in Roku 3 and use Roksbox app for enjoyment, you're definitely being the right place. In this article, we will show you a quick-start guide on ripping Blu-ray to NAS for playback on Roku 3 compatible video formats with high output quality. 

Hot Search: Roku Column, Apple TV 3 Column, Nexus 7 Column, TiVo Column

Well, To enable Roku 3 to play Blu-ray files from NAS, all we need to do is to convert Blu-ray to Roku 3 supported video formats with a professional Blu-ray to MKV/MP4 for Roku 3 Converter. Here, Pavtube BDMagic can help you converting Blu-ray/DVD to NAS then stream to Roku 3 by DLNA. Of course, this Blu-ray ripper can help you convert commercial Blu-ray movies to AVI, WMV, FLV, MOV, etc as well. What's more, it can also enable you to rip Blu-ray for directly playback on Android, iOS, Windows based devices. If you are using Mac, you can also use the BDMagic for Mac. Refer to the guide on Mac. 
 
How to Rip Blu-ray movies to Synology NAS for DLNA Streaming on Roku 3

Step 1: Load Blu-ray movies. 

Install and launch Blu-ray to MKV/MP4 Converter, and then click the disc icon to import your source movies to this program. Set your wanted subtitles and audio track from the drop-down box of "Subtitles" and "Audio" tab. 


Step 2: Select Output format. 

Select a format for conversion. To convert Blu-ray to MKV video, press on “Format” and choose “Common Video>> MKV(Matroska) Video (*.mkv)” format. 


Tip: If the default parameters can’t meet your needs, you can click “Settings” to change the video encoder, resolution, frame rate, etc. as you wish.

Step 3: Start Blu-ray Conversion. 

Hit convert button to start converting Blu-ray movies to MKV/MP4 for NAS sharing. After the conversion, click "Open" to quick locate the converted video; now you can stream  converted Blu-ray files through NAS to HDTV, PS3 and other DLNA device for enjoyment anywhere you like. 

After read this playback tips for Roku 3, you can easily solve your Blu-ray to NAS device for playback on Roku 3 for Sharing or viewing. 
 
Read More: