Sunday, June 15, 2014

Best Father's Day 2014 Giveaway and Deals at Pavtube- Up to 50% OFF

Now it’s time to celebrate that all-important guy in your life—dad. Dad is notoriously the toughest family member to shop for. If you've waited until now to pick up this year's Father's Day Gift, then you're going to need a great idea — fast.

Luckily, to celebrate Father's Day with you, Pavtube Studio launch a huge Coupon Code as the 2014 Father's Day Special Offer. Up to 50% off for your beloved dad! Backup your dad's favorite Blu-ray/DVD movie to iOS/Android gadgets, HD TV, home theatre or game console. Even better you can make a father's day video for your beloved dad on your own! It’s more precious than just picking up something on store casually! 


Her are Pavtube Great Deals and Specials at Father's Day 2014 weekend

1. 50% OFF Pavtube DVDAid (Win/Mac) as Father's Day Gift 2014

With this professional DVD ripping tool, playing DVD movies on DVD player at home has never been a problem for you. And you can now freely enjoy your favorite DVD movies on the road without worrying about the issues they jump on the most crucial scenes and are prone to scratches.

2. 30% OFF Pavtube Video Converter Ultimate/iMedia Converter for Mac as Father's Day Gift 2014

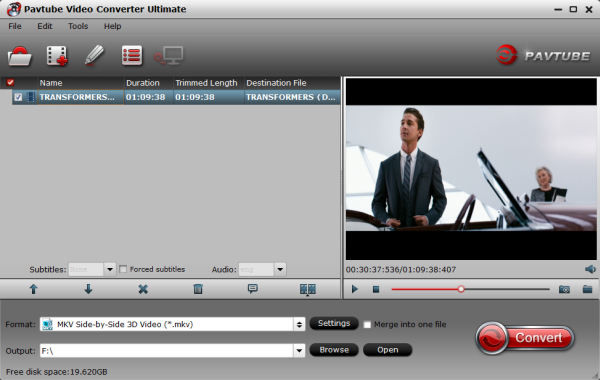
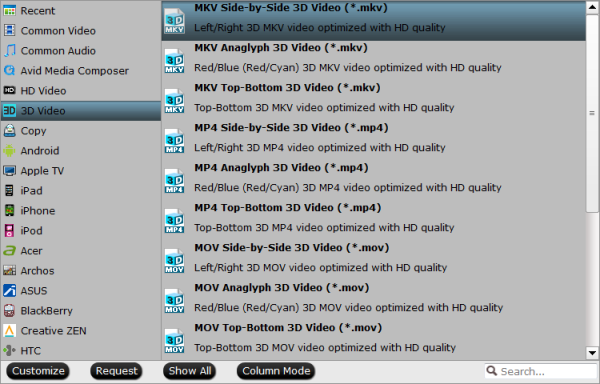
An all-in-one solution to fast convert Blu-ray/DVD and various videos to virtually any video/audio format for watching on any Android/iOS/Windows devices. Save a 100% intact BD M2TS/ DVD VOB movie without extras. Backup 3D Blu-ray movies to 3D video for watching on 3D devices with pleasant quality. 

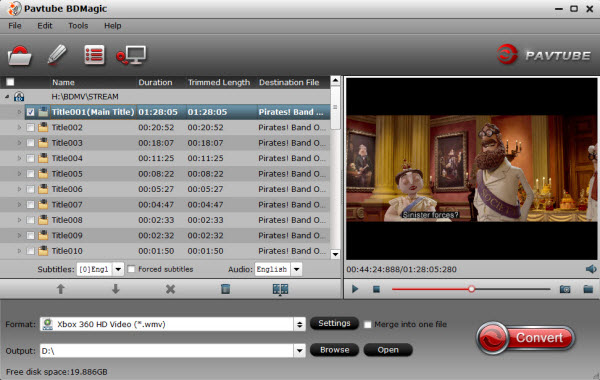
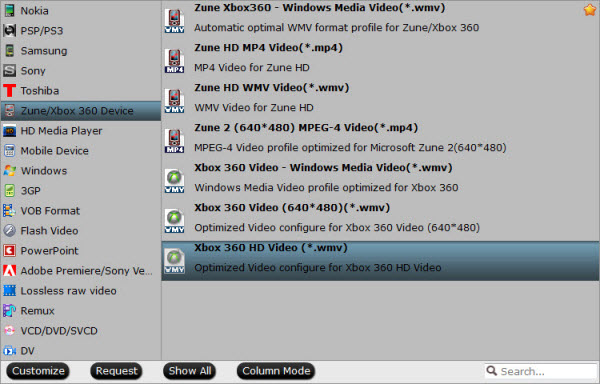
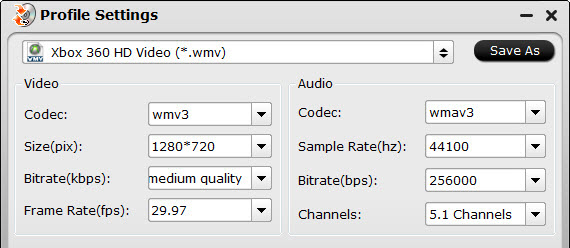
3. 20% OFF Pavtube ByteCopy (Win/Mac) as Father's Day Gift 2014

An easy to use Blu-ray and DVD movie ripping program is capable of ripping 3D Blu-ray discs, 2D Blu-ray Discs and standard DVDs to required video formats. Most important, it can lossless BD/DVD to MKV backup with multiple audio/subtitle tracks and convert BD/DVD to Multi-track MP4, MOV, AVI for watching on Plex, Roku 3, WDTV Live, Popcorn and more HD media players.

Like our Facbook page to get it Now! Expires on June 21, 2014. Never miss it!

https://www.facebook.com/pavtubefans/posts/761556840555421:0

More money saving bundles can be found here: 

http://www.multipelife.com/special-offer

Thursday, June 12, 2014

Simple Way to Rip Blu-ray/DVD to Microsoft Xbox One Losslessly for Unlimited Playback

Is there any way to rip Blu-ray/DVD to Xbox One for unlimited Playback? This tutorial will guide you to convert your BD/DVD disc to Xbox One supported video files.

Sony and Microsoft competed to claim they had the better exclusives, while the developer giants and indies unleashed a flood of computer-generated animations and live gameplay. Nintendo will get its moment in the sun later this week - but for now it was all about titles for the PlayStation 4 and Xbox One. According to E3 2014, Xbox One ad is switching on Microsoft consoles.


As a video game console, Xbox One can also act as a powerful home media center to stream photos, music and videos to HD TV for playing and sharing. If you have large BD/DVD collection and you maybe considering converting your Blu-ray/DVD to Xbox One in order to enjoy them on HD TV, is it possible?

In fact, Xbox One has no Blu-ray drive and it's a common sense that DVD discs are subject to scratch and damage easily due to time-to-time putting in and out Xbox One's DVD drive. That's why the demand of ripping Blu-ray/DVD to Xbox One is on the rise among Disc fans. Here, this article just shares you the simplest way to convert Blu-ray/DVD to Xbox One recognized format like wmv format with the help of a professional BD/DVD to Xbox One ripper.

To save you from the awkward situation, Pavtube BDMagic comes to give you a hand which is capable of ripping Blu-ray and DVD to Xbox One with fast speed and high quality. More stunningly, Pavtube BDMagic has the mighty power to disable any copy protection measure put on BD/DVDs in a walk, so that you can convert any copy-protected discs, like Despicable Me 2 and Frozen, to Xbox One without a hitch. For Mac users, try Pavtube BDMagic for Mac

How to convert Blu-ray and DVD movies to Xbox One supported format?

Step 1: Load Blu-ray, DVD movie to Pavtube BDMagic.

Insert your Blu-ray,DVD movie to disc drive, and click “Load Disc” button to load Blu-ray/DVD discs.


Step 2: Select video format.

Here we select mp4 with H.264 codec for Xbox One. Click the Format drop-down list, and select “Xbox 360 HD Video(*.wmv)” from "Zune/Xbox 360 Device" category. You can select other Xbox360 format for watching.


Tips: If you have special requirements on target video, click “Settings” to customize video size, bitrate, frame rate and sample rate.


Step 4. Ripping Blu-ray/DVD to WMV for Xbox One.

Click the red “Convert” button to start ripping Blu-ray/DVD to WMV for Xbox One. When it finishes, click the “Open Output Folder” icon to quick locate the converted video.

How to Transfer the Converted Video to Xbox One

Theoretically, there's no way to import videos to your Xbox One, unless you purchased it from Xbox Live. However, you can transfer the BD/DVD movies to Xbox One, if you:

1. Connect your Xbox One to a PC using Windows Media Center;
2. Copy the DVD movie media file to a USB flash drive and play it on Xbox One.

Using any one of the methods above, you can play Blu-ray/DVD videos on Xbox One free without buying videos on Xbox Live.

Related Articles

Tuesday, June 10, 2014

How to convert 2D to 3D video with 3D Converter?

This article walks you through the whole process of converting 2D to 3D with the top 3D Video Converter.

With 3D technology developing faster and faster, more 3D products including 3D television, 3D gaming console, 3D phones are available in the market. People who wish to enjoy 2D movies in a more realistic form can convert 2D to 3D which will bring a stimulating new experience to your favorite blockbusters. 


The article here would introduce a professional 2D to 3D Video Converter Ultimate helping you to convert 2D to 3D with ease! Only 3 steps, then you can get your own amazing 3D movies! Can't believe it? Well, you can figure the 2D to 3D conversion out by yourself. Just prepare a set of Blu-ray/DVD discs or other downloaded 2D video files and let’s start! 

What you need: 

1. A Blu-ray drive – to make your PC/Mac read this disc 

2. Pavtube Video Converter Ultimate – to roll off your Blu-ray/DVD protection and convert other videos and turn it into 3D (For Mac users, you can try Pavtube iMedia Converter for Mac)

Rip and convert your 2D to 3D videos with 2D to 3D video converter

1. Import 2D video files 

Insert your Blu-ray to external Blu-ray drive, then you can load BD/DVD disc or import your videos to this 2D to 3D Converter.


2. Set 3D as your output format 

Click "Format" and you will find many presets. There are three types of 3D effect: Anaglyph 3D, Side-by-Side 3D and Top-Bottom 3D. Here, you are suggested to choose the presets from "3D Video" option. 


Tip:
a. Adjust target video settings and 3D effect.

Click "Settings" which is next to "Format", free change your target video size, bitrate, frame rate and 3D depth. If you want to get best video quality, pls switch them to "original". 

b. Useful edit functions for enhancing your video files.

Clik "Edit" button, you can apply cool effects to your videos. To get more information about this, go to the user guide of Video Converter Ultimate.


3. Start conversion.

Now hit the big red "Convert" to start converting videos to start converting 2D to 3D video on PC/Mac. After the conversion, click "open output folder" to quick locate the generated media file and play 3D video files as you wish! Have a nice time!

Related guides:

Wednesday, June 4, 2014

How to edit 2014 World Cup MXF recordings in Final Cut Pro X/iMovie/Avid/Premiere Pro on Mac

Follow the guide below and you will know how to edit 2014 World Cup MXF recordings in Final Cut Pro X/iMovie/Avid/Premiere Pro on Mac OS X without any other problems.

2014 Brazil FIFA World Cup will be the exciting memories for soccer fans. It’s great to watch recorded 2014 World Cup soccer match with your HD camcorders like if you plan to travel to Brazil for the 2014 FIFA World CupNow it's time to get your Canon, Panasonic P2 and Sony XDCAM MXF camcorders ready to record the 2014 FIFA World Cup footaball matches, and edit them on Mac in Final Cut Pro X/iMovie/Avid/Premiere Pro after coming back.


While, if you want to edit World Cup MXF videos, you may find the high quality MXF files are not recognized by most editing software even iMovie, Final Cut Pro, iMovie, Avid, etc, but sometimes to edit he raw MXF files in iMovie/FCP/FCE/Avid/Adobe Premiere Pro, etc is necessary to get a good visual effect, so, how to convert/import World Cup MXF recordings to Mac for editing? Is there software can do the job? 

The answer is positive. To convert and import 2014 World Cup MXF footage to iMovie/FCP/FCE/Avid, etc, you just need Pavtube iMedia Converter for Mac to help you. It is the solid tool to help users make the MXF transcoding on Mac OS X. It offers the optimal preset profiles for Final Cut Pro 6/7 and FCP X, Avid Media Composer, Adobe Premirere Pro, iMovie, FCE and more. And there is no need to worry about the quality loss. Becides MXF files, this all-in-one toolbox support converting other HD recordings and ripping Blu-ray, DVD for editing and playback.

Below is the simple guide about how to convert 2014 World Cup MXF footage into Avid, Premiere, iMovie, FCP on Mac.

Step 1: You need to download, install and run the smart World Cup MXF Converter Mac and transfer your MXF recordings to the program from the HD camcorder. Join MXF clips via checking the “Merge into one” box. 


Step 2: Click on the “Format”bar and choose a best editable format. 

a. Select Final Cut Pro > Apple ProRes 422 (*.mov) as the output format for Final Cut Pro. 

b. To edit World Cup MXF footage in Avid MC, choose Avid Media Composer->Avid DNxHD(*.mov).  

c. For iMovie, choose iMovie and Final Cut Express > Apple Intermediate Codec(AIC) (*.mov). 

d. For importing World Cup MXF to Premiere Pro, please select Adobe Premiere/Sony Vegas > MPEG-2 (*.mpg). 

PS:

1. You also can click “Settings” to set video frame rate, video size and Video Bitrate as you want. 

2. Want to upload recorded 2014 World Cup soccer match video to YouTube? You can trim, crop, add watermarks, even adjust video volume, you can click that pencil icon, go to the editing panel, then you can so some simple editing works.

Step 3: As soon as all things are finished, please click “Convert” button to start the 2014 World Cup MXF conversion on Mac OS X. 

Once the conversion is 100% completed, you can smoothly copy the converted files to FCP/Avid/Premiere/iMovie for editing. 
Now it's time to sharing your edited or reorganized 2014 World Cup soccer match with your friends and family and review all the wonderful moments on 2014 World Cup football game!
More tips for enjoying 2014 World Cup Video:

How to Downgrade Mavericks to Mountain Lion

Are you wanting to downgrade Mac OS X 10.9 Mavericks to Mac OS X 10.8 Mountain Lion? The good news is that you can roll back your Mac to the operating system that was first installed on it in two ways. Keep on reading.

Apple has introduced a number of very positive changes in OS X Mavericks – and we generally advice that the majority of users would be best served updating to the latest version of OS X. This is particularly true considering that Mavericks has the same list of supported systems as OS X Mountain Lion, and is a free upgrade. However, not all users are thrilled with Mavericks, for whatever reason. As such, at least a certain segment of users have found that they want to downgrade from Mavericks back to Mountain Lion as a result.  Is it possible? How to get it done?


Method 1: Downgrade with Time Machine back up

Note: Before you get started, we strongly emphasize making a thorough backup through Time Machine of a good OS X Mountain Lion install immediately before your proceed. Not only is this Time Machine backup necessary to complete the downgrade, it will prevent or minimize your data loss.

Once you have your backup, you’ll need to boot your Mac into Recovery Mode by holding down Command + R while your system boots. Then, once the Recovery Volume boots, select the Restore from Time Machine Backup option. Make sure you have your OS X Mountain Lion Time Machine backup volume connected to your Mac.

Next, make sure you read and understand the “Restore Your System” screen, select your Mountain Lion Time Machine backup, and click continue. Now, just select a volume you’d like to restore the backup to, and choose Restore. OS X will now completely restore your Mac to Mountain Lion, based on the latest backup you have for that operating system.

Once the restore is complete, you’re good to go! Your Mac will then boot into OS X Mountain Lion, and will be ready for you to use. 

Method 2: Downgrading by erasing disk and Internet recovery

Step 1: Get a copy of Mac OS X Mountain Lion


The first thing you need to do is get a copy of the Mountain Lion installation file. You may already have this if you’ve done an install before. Open the Applications folder and check for the Install Mac OS X Mountain Lion folder.

If you haven’t go this file, then you’ll need to go hunting for it. If you purchased it from Apple then you can open the App Store, and click on Purchases. Look for the Mountain Lion purchase and click on Download next to it. This will download the Installer file to your Applications folder.

If you haven’t purchased it you need to buy a copy from Apple. You can’t buy one from the App Store. Instead click on this link to buy a copy of Mountain Lion from Apple (for £14) You receive a code that you can enter into the App sTore to download the app.

Step 2: Download recovery Disk Assistant.


You can get a copy of Recovery Disk Assistant from Apple. Click here to get Recovery Disk Assistant (click Download). You’ll need this. Double click the Recovery Disk Assistant.dmg file in Downloads to continue.

Step 3: Create a recovery install disk


Now create a recovery drive. This is an external drive (usually a USB Flash drive) that you use to create a recovery disk. Follow these steps

Open Disk Utility (click on Go, Utilities and double-click Disk Utility)
Select the recovery drive in the sidebar and click on Erase
Ensure that the Format is Mac OS X Extended and click on Erase and Erase.
Click Partition and change Current to 1 Partain
Click options and select GUID Partition Table.
Make sure the format for the partition is Mac OS Extended (Journaled).
Click Apply.

Now open the Recovery Disk Assistant program. and click on Agree. Click and choose the external hard drive in the middle of the window and click Continue. Enter your password and click OK.

See: Apple Support: Erase and reinstall OS X


Step 4: Clone your hard drive

It’s important to make a clone of the whole hard drive and keep it around for a while. This can be useful in case of emergencies (you can boot from the hard drive) and you can re-clone it back to the main drive if there’s a problem. Also you can keep this around and pick files from it to copy over to the rolled back installation. The best way to do this is using a program like Carbon Copy Cloner or SuperDuper along with an external hard drive. Choose your main hard drive in the source, and your external hard drive in the Destination. Now click on Clone.

Step 5: Restart the Mac in Recovery Mode

First of all make sure you are connected to the Internet (open Safari and browse around). You need an internet connection to install Mac OS X. Restart the Mac by clicking on Apple > Restart and hold down the Command and R keys until the Recovery Mode Utilities window appears.

See: Apple Support: Mac OS X Recovery

Step 6: Erase the drive

Select Disk Utility and click on Continue. Now choose your Startup Disk in the sidebar on the left, and click on the Erase tab. If you want to securely erase the drive choose Security Zero Data One-Pass. Click Erase to delete the hard drive. Note that this permanently erases all data on the hard drive so don’t do this unless you’ve cloned the drive or are happy to never have to get something from that drive again. When Disk Utility has finished exit the program by choosing Disk Utility and Quit Disk Utility.

See: Apple Support: Disk Utility

Step 7: Reset and restore

Reset the Mac and hold down the Alt key and choose the Recovery USB drive. Install the OS X version that is provided with Internet Recovery, it depends upon what originally came on the machine (typically it will be either Lion or Mountain Lion). Note that if you have a Mac with an optical drive you can also use the installation disc to install direct to that operating system.

We hope you found this useful and that it works for you if you find yourself with the desire to downgrade! Enjoy!