If you are a teacher, to make your class more vivid, you need the help of muti-media. Video is one of the representatives of media teaching. If you comes up with the problem of converting school DVD/Blu-rays to the format you need, please read on.
“As an IT manager in school, my job is to help teacher to make the videos for classroom computers and delivering lessons. Some of the source videos are school dvd/blu-ray, while some are various school films or clips. Due to the variety of format, I need some useful software to help me finishing the format conversion”
With the population of media teaching and with the help of Blu-ray/dvd videos, the class will become more vivid and attractive to children. However, with the limitation of media player in class, you are not allowed to play these Blu-ray/DVD source files directly in class. If you have the same problem and was searching for useful software as the guy above, after reading this article, you could stop you step.
Software recommended: Pavtube Video Converter Ultimate
Pavtube Video Converter Ultimate is an all-in-one solution to backup Blu-ray/DVD movies, convert disc content and transcode common videos. It supports to convert Blu-ray/DVD and videos to friendly format for your either your media player or classroom computer. If you are a Mac user, it also has the Mac version Pavtube iMedia Converter for Mac.
How to convert school DVD/Blu-ray to WMV on Windows?
Step 1. After install and launch the program, load school DVD/Blu-ray to the program by clicking “Load file” icon.
 Step 2. Choose the friendly format for your computer in class. Here we take “HD Video > WMV HD (*.wmv)” as example.
 Step 3. When these steps are done, hit the big “Convert” button to start the conversion of School DVD/Blu-ray to WMV.
After the conversion is over, just located the output WMV format and transfer it to the player you want need via USB cable. With the help of these videos, you could give a vivid class to your children.
Step 3. When these steps are done, hit the big “Convert” button to start the conversion of School DVD/Blu-ray to WMV.
After the conversion is over, just located the output WMV format and transfer it to the player you want need via USB cable. With the help of these videos, you could give a vivid class to your children.
This is a magic WAV to iTunes guide to let you add songs in WAV format to iTunes, so that you can stream them to iPhone, iPad, iPod via iTunes.
Q: "Hello hello. I'm having a bit of trouble with my iTunes at the minute. I have an album on my computer and the songs are in .wav format, and iTunes not letting me import them. Any help? Btw, my iTunes is at version is up to date."
WAV is an audio format for storing sound in files developed jointly by Microsoft and IBM. Support for WAV files was built into Windows 95 making it the de facto standard for sound on PCs. WAV sound files end with a .wav extension and can be played by nearly all Windows applications that support sound.
However, when it comes to Mac OS, some of the WAV files still can't be loaded to iTunes although it claims to support WAV format. It means you cannot stream your WAV songs to iPhone, iPad and iPod in this way.
In order to solve "iTunes won't import WAV" problem, I've tried several ways including convert WAV to aac format via iTunes but it still cannot be accepted by my iPod. So I turned over to third party software and luckily I found this Pavtube WAV Converter Ultimate (Read review).
This Pavtube Video Converter Ultimate, as the Pavtube WAV to iTunes Converter, is an all-in-one tool which does not only support converting WAV format to MP3 for iTunes, it support various audio & video (excluding CRM files) format so that you can stream the files to iPhone, iPad, iPod for watching. Moreover, it's also capable of digitalizing your Blu-rays and DVDs to MP4, MOV, etc. formats that your IOS devices accept; isn't it cool?
Tips: Find its Mac version here – iMedia Converter for Mac
Download a trial below:

 How to convert WAV to MP3 format for iTunes on iPad, iPhone and iPod
Step 1. Import WAV files; choose format.
Click the plus icon to import WAV files into it, or you can drag-and-drop directly. Then you will find a horn icon on the left that indicates it's an audio file.
How to convert WAV to MP3 format for iTunes on iPad, iPhone and iPod
Step 1. Import WAV files; choose format.
Click the plus icon to import WAV files into it, or you can drag-and-drop directly. Then you will find a horn icon on the left that indicates it's an audio file.
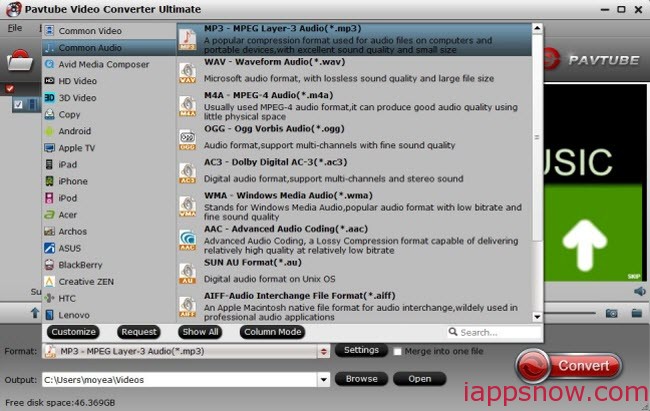
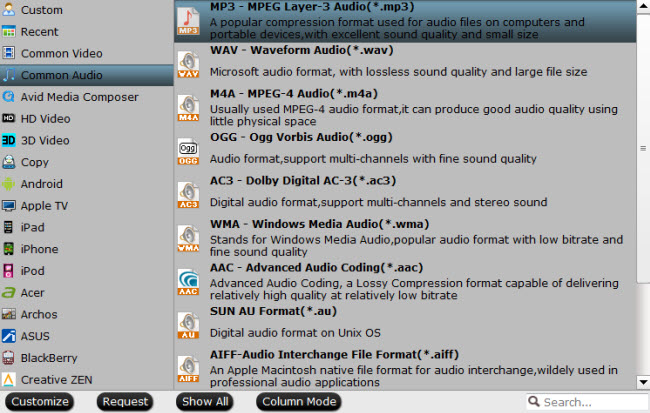
 Move your cursor to Format and choose "Common Audio > MP3 – MPEG Layer-3 Audio(*.mp3)" as below:
 As listed above, there are several presets for other audio format; just choose one as your needs.
Step 2. Adjust audio specs (optional).
If you are not satisfied with the default audio quality, just click the "Settings" icon and choose wanted audio settings including sample rate, bitrate and audio channel.
Step 3. Start converting WAV to MP3.
Now back to the main interface and hit "Convert" to convert your WAV files to MP3 format. It will start batch conversion automatically one by one. Wait for a while during the progress; after it completed, click "Open output folder" to locate the converted audio file.
Ok, now your WAV song has been converted to MP3 which is perfect for iTunes.
See how to transfer Media Files from iTunes to iPhone | Move Video/Music/Photo from iTunes to iPad
Related articles:
As listed above, there are several presets for other audio format; just choose one as your needs.
Step 2. Adjust audio specs (optional).
If you are not satisfied with the default audio quality, just click the "Settings" icon and choose wanted audio settings including sample rate, bitrate and audio channel.
Step 3. Start converting WAV to MP3.
Now back to the main interface and hit "Convert" to convert your WAV files to MP3 format. It will start batch conversion automatically one by one. Wait for a while during the progress; after it completed, click "Open output folder" to locate the converted audio file.
Ok, now your WAV song has been converted to MP3 which is perfect for iTunes.
See how to transfer Media Files from iTunes to iPhone | Move Video/Music/Photo from iTunes to iPad
Related articles:
If you want to search for an useful conversion software to put movie collection on Asustor NAS and play through TV, this article will give my own experience about it and it may provide some reference for you.
As a powerful multimedia storage and sharing center, Asustor NAS provides much convenience for my digital life. The most entertainment it helps me is enjoy my movie collection on the TV through the NAS.
However, at the fist time I was in the dilemma of how to convert my DVD and Blu-ray collections to MP4 so that it could be accepted by my Asustor AS-302T NAS. I used to use Leawo, but it stopped using for they stole MakeMKV code. Although there are many format converters on the market, I wan to pay for a worthy program. After searching on Internet, a blog named "Top 5 best Blu-ray Ripper Review" enlightened my way. This article lists top 5 best Blu-ray Ripper programs review during 2013 to 2014 according to Google Ranking and user popularity. Finally I choose Pavtube BDMagic which lists on the Top 1 of the review. After using it for a period of time, I really appreciate it for five reasons:
- Clean interface
- Quick retrieval of information before ripping
- Forced subtitles
- GPU acceleration
- Didn't steal from MakeMKV
Now, I will show the simply steps on how to convert Blu-ray and DVD movies to Asustor AS-302T NAS supported MP4 format.
Things you need:
Download the format converter: Pavtube BDMagic (if you are a Mac user, you should download BDMagic for Mac)
If you the movie you wanna convert are Blu-ray, you need a Blu-ray drive.
Then, let's begin the conversion process.
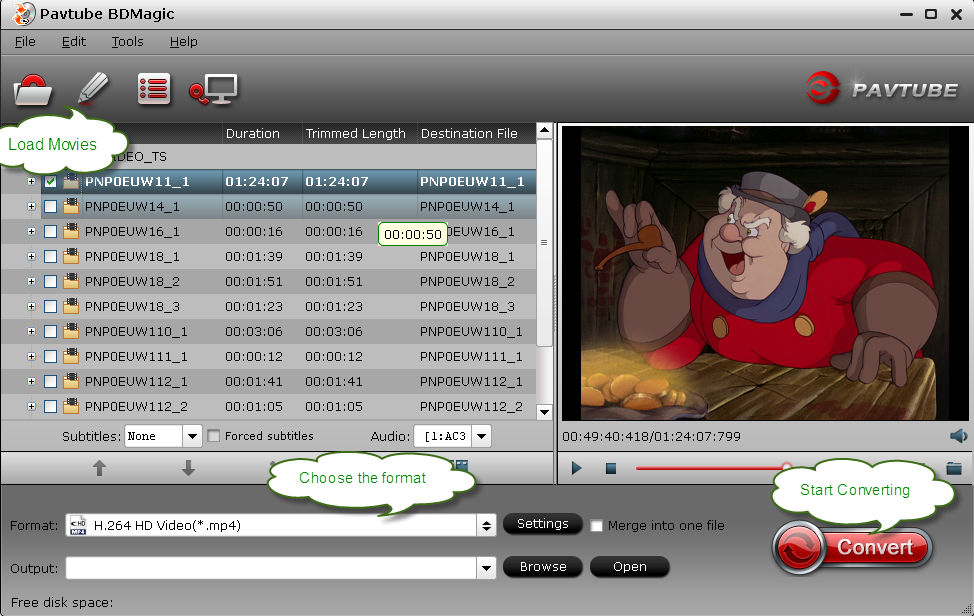
Step 1 Launch the movies to NAS converter and load Blu-ray and DVD movies to the program. The clean main interface is showed below:
Step 2 Choose the MP4 format for my Asustor AS-302T NAS. I always use "H.264 HD Vidoe(*.mp4)" under "HD Vidoe" profile.
Tip:
1. The Forced subtitle which I appreciate is also on the main interface and if you check this function, it could show the forced subtitles you chose in the output video.
 2. If your computer have Nvidia CUDA/ATI AMD ready graphics card, you can have GPU encoding and the conversion would be faster.
 Step 3 Hit the "Convert" button to start the conversion. It may take some time to finish the conversion, and with this period, I just do some housework to wait it.
When the conversion is over, just click the "Open" icon to locate the output video and then transfer the files to Asustor AS-302T NAS. So easy, right? Then I could enjoy these movie collections on my TV as I like.
Related articles:
Step 3 Hit the "Convert" button to start the conversion. It may take some time to finish the conversion, and with this period, I just do some housework to wait it.
When the conversion is over, just click the "Open" icon to locate the output video and then transfer the files to Asustor AS-302T NAS. So easy, right? Then I could enjoy these movie collections on my TV as I like.
Related articles:
Want to listen the audio of Blu-ray movies on your portable players? Want to rip Blu-ray to lossless audio? If you happened to have such questions, don't worry any more. This article is just writing to help you to extract Blu-ray audio to MP3 Music to listen on CD with lossless quality.
Question:
"I would like to have the audio parts of Blu Ray copied to CD for use in the car,etc.Is there any way to extract the audio from a Blu Ray concert?"
"I'm a classical music fan. As such, I have a number of Blu-ray discs of classical concerts and operas. I recently got it into my head that I wanted to rip the audio from some of these to be able to listen to them on my office stereo. I wasn't interested in the surround-sound mixes—I don't have the appropriate equipment to play back music in such formats—just the stereo tracks."
Answer:
All the commercial Blu-ray discs are encrypted by mighty Blu-ray protection to avoid pirate. So before extract MP3 music out of Blu-ray disc, you need a powerful program which can defeat all Blu-ray encryptions and read the BD audio track then decompress / recompress the audio to MP3 format (from AC3 DTS to MP3), even FLAC, WAV, AIFF. It's that easy to rip music and audio from Blu-Ray on a Mac computer or on a Windows PC with the help of Pavtube ByteCopy or ByteCopy for Mac.
About Pavtube ByteCopy
- Backup BD/DVD to MKV without quality loss.
- Preserve all audio tracks, subtitles and chapter markers.
- Provide best settings for tablets like Samsung Galaxy Tab 3 10.1, Galaxy TabPro 10.1, iPad Air, Surface 2, Kindle Fire HDX; phones like Sony Xperia Z1, Galaxy S4, Galaxy Note 3, iPhone 5S, iPhone 6.
- Edit movie by trimming, cropping, merging, etc.
How to Extract Blu-ray Audio to MP3 Music to listen on CD?
Step 1: Install and launch the program; import your Blu-ray Disc or Backup saved on hard drive by clicking "Load File" icon.
 Step 2: Choose "Common Audio" > "MP3 – MPEG Layer -3 Audio (*.mp3)" as the output format. You could choose other audio format according to your own audio player.
 Tip:
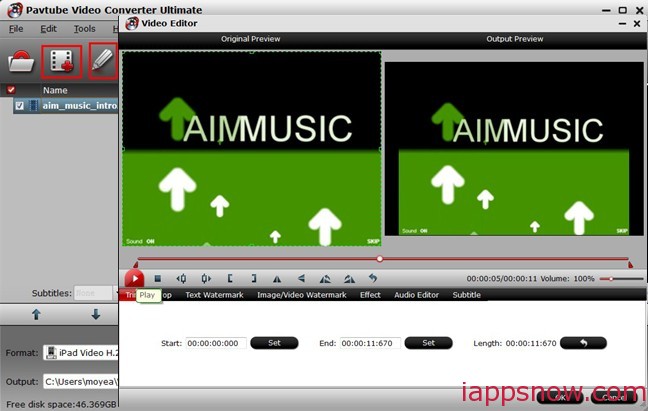
If you want to extract just the music or the beloved audio from one Blu-Ray chapter, so you need to use the Trimming function to cut off the unwanted audios. So, just click Edit, them trim to get the songs for extracting later
Tip:
If you want to extract just the music or the beloved audio from one Blu-Ray chapter, so you need to use the Trimming function to cut off the unwanted audios. So, just click Edit, them trim to get the songs for extracting later
 Step 3: Right click the Convert button to start the conversion.
Just wait a while and when the conversion is over, click the "Open" icon to locate the output .mp3 file. The last thing you need to do is transfer the converted audio file to your audio player. You could enjoy the audio of your Blu-ray everywhere without limitation!
More posts:
Step 3: Right click the Convert button to start the conversion.
Just wait a while and when the conversion is over, click the "Open" icon to locate the output .mp3 file. The last thing you need to do is transfer the converted audio file to your audio player. You could enjoy the audio of your Blu-ray everywhere without limitation!
More posts:
This article will give you an easy way to make digital copies of DVD and Blu-ray movies so you could watch them on your tablets.
Recently, I just bought an Asus MemoPad HD 7. The screen resolution is 1600*900 and it would be a good enjoyment to watch my DVD/Blu-ray collections on it. However, most DVD and Blu-ray movies are all protected. In order to solve the problem, the only way to make it possible is making digital copies of movies I owned so I could watch them on my tablet.
 Then I googled "blu-ray ripper" online and came across this article, Pavtube BDMagic were the top pick. After owning the program, I use it to rip movies so that I coluld watch them on my new tablet while traveling. Besides, my son has a Galaxy Tab 7. He is 11 years old and uses the Tab mostly for games, although I ripped a couple of his movies for him to watch.
Here is the easy process when I use Pavtube BDMagic to do the conversion.
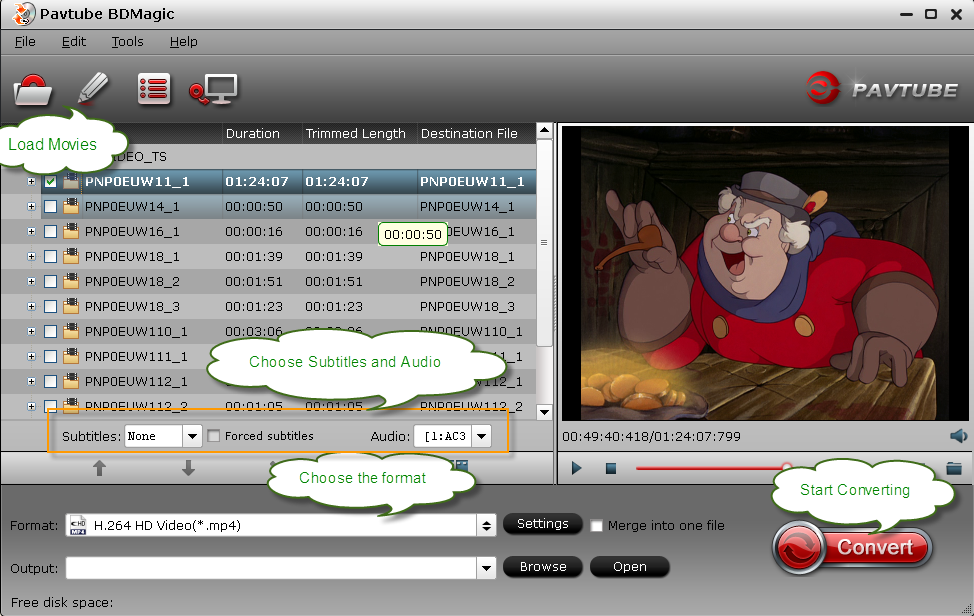
Step 1. After installing the program on your computer, launch it. Click "Load File" icon to load DVD/Blu-ray movies to the program. Then choose the subtitle and audio you need on the main interface.
Tip:
The "Setting" icon beside the format bar is designed for you to adjust specific video size, bitrate, frame rate, audio bitrate, channels, etc. according you own needs.
Step 2. Click "Format" bar and choose "HD Video > H.264 HD Video (*.mp4)" as the output format. This format is suitable for the new released tablet, either my Asus MemoPad HD 7 or my son's Galaxy Tab 7.
Then I googled "blu-ray ripper" online and came across this article, Pavtube BDMagic were the top pick. After owning the program, I use it to rip movies so that I coluld watch them on my new tablet while traveling. Besides, my son has a Galaxy Tab 7. He is 11 years old and uses the Tab mostly for games, although I ripped a couple of his movies for him to watch.
Here is the easy process when I use Pavtube BDMagic to do the conversion.
Step 1. After installing the program on your computer, launch it. Click "Load File" icon to load DVD/Blu-ray movies to the program. Then choose the subtitle and audio you need on the main interface.
Tip:
The "Setting" icon beside the format bar is designed for you to adjust specific video size, bitrate, frame rate, audio bitrate, channels, etc. according you own needs.
Step 2. Click "Format" bar and choose "HD Video > H.264 HD Video (*.mp4)" as the output format. This format is suitable for the new released tablet, either my Asus MemoPad HD 7 or my son's Galaxy Tab 7.
 Step 3. The last and not the least step is just start the conversion by clicking the "Convert" button on the bottom right corner.
Everything is OK! Wait for a moment and the program will finish the conversion automatically. As my own experience, the time of converting Blu-ray movies is much longer than DVD movies. When the conversion is over, hit the "Open" icon to locate the output videos, and transfer them to your tablet via USB cable.
So easy, right? I am sure even you are a fresh man of this program; you could do the conversion at ease. If you are a Mac user, it also has Mac version. Have fun of enjoying your movies on your tablet with the help of the easy-operated software.
Step 3. The last and not the least step is just start the conversion by clicking the "Convert" button on the bottom right corner.
Everything is OK! Wait for a moment and the program will finish the conversion automatically. As my own experience, the time of converting Blu-ray movies is much longer than DVD movies. When the conversion is over, hit the "Open" icon to locate the output videos, and transfer them to your tablet via USB cable.
So easy, right? I am sure even you are a fresh man of this program; you could do the conversion at ease. If you are a Mac user, it also has Mac version. Have fun of enjoying your movies on your tablet with the help of the easy-operated software.