Thursday, January 2, 2014

Permanent Play Rental DVDs on Transformer Book T100 Windows 8.1 Tablet

The Asus Transformer Book T100 is a windows 8.1 tablet. It houses a 10.1-inch IPS display with a resolution of 1,366 x 768 pixels, it will happily play 1080p video. It can also be a 'proper' laptop, running basic Windows desktop applications for multimedia and productivity. Plus, with a scaled-down version of the integrated graphics chip from Intel's Ivy Bridge processors, it should also play your favourite 3D games or movies as well.

Here this post is mainly talking about how to put and play (rental/bought) DVD movies on Transformer Book T100. For users who gather lots of DVD discs in their home, it's really good idea to stream DVDs to Book T100, after that, we can enjoy movies anywhere anytime as long as we take the Book T100.

Required Software:
Read Also: 2014 Top 5 Best DVD Ripper Program Review | Which One Will You Choose?

The Reason why we choose Pavtube DVD Ripper? 

The Windows 8 DVD Ripper that designed by Pavtube, is good at dealing with kinds of DVD movies, such as DVD disc, DVD ISO or DVD IFO image files. It supports 1:1 DVD archiving. You are allowed to quickly backup DVDs with no quality loss to your hard drive as well as backup the main movie files with selected chapters you like. Above all, it could import movie from DVD disc and encode DVD movies to all popular media formats, including WMV, MPEG, AVI, MOV, Xvid, Divx, MP4, FLV, 3GP, QuickTime, DV, MPEG-4, AVC MP4, MP3, AC3, WAV, AAC, OGG, FLAC, etc. Moreover, it take full advantage of NVIDIA's CUDA technology and ATI Stream (AMD APP) technology to accelerate conversion speed greatly. The GPU acceleration saves users lots of time when using H.264 codec to do format conversion.
How to convert DVD movies to Asus VivoTab Smart?

Step 1. Download and install this DVD to Transformer Book T100 converter on your computer.

PS: This application can work on Windows XP/2003/Vista/Windows 7/Windows 8 or Mac OS X 10.5 or 10.5 above(including Mac OS X Leopard, Snow Leopard, Mac OS X Mountain Lion) with 1G Hz or above Intel processor


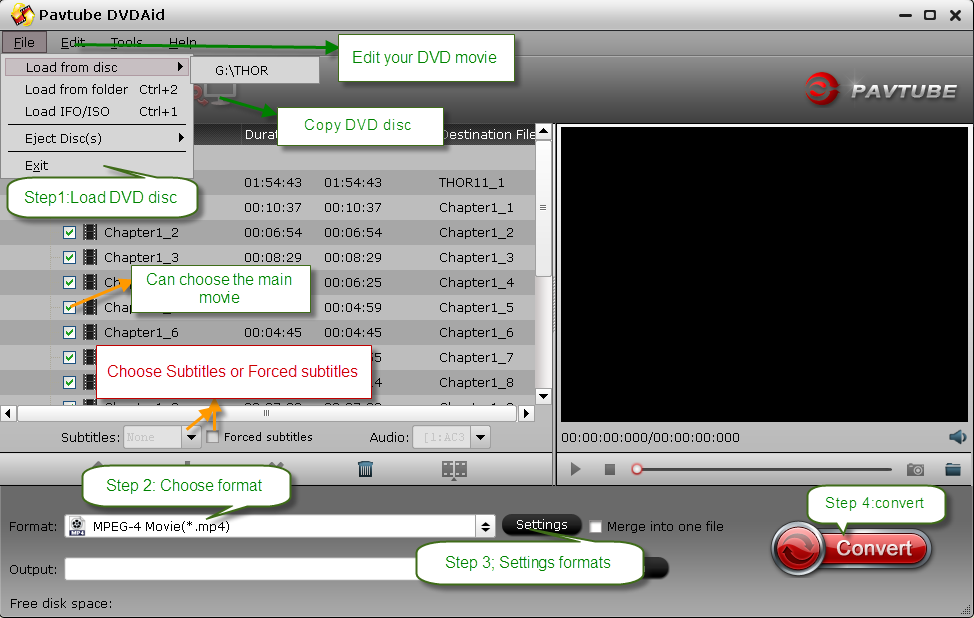
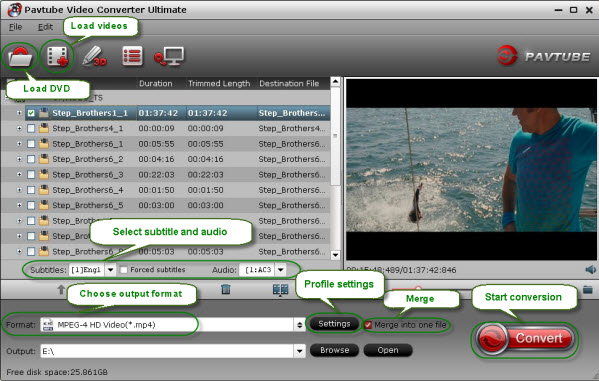
Step 2. Import your source DVD movies.

Step 3. Choose H.264 Video (*.mp4) as output for your win8 tablet.

Step 4. Click on "Settings" to modify video codec, resolution, frame rate, sample rate etc. Of course, different settings will have different results. And you should Know, the higher video quality with bigger video size, please pay attention to your storage. According to my own experience, the following settings are recommended for you. Which is the most suitable for Transformer Book T100.

Video
  • Codec: h.264
  • Size: 1280*720
  • Bitrate: 2000
  • Frame rate: 24

Audio
  • Codec: aac
  • Sample rate: 48000
  • Bitrate: 128000
  • Channels: Stereo

Step 5. Start ripping DVD movies to Transformer Book T100 by clicking on the "Convert" button.

Once the conversion completed, transfer the result MP4 video file to Book. Hope this Transformer Book T100 DVD Ripper also works well for you. That's all.

Related:

Edit JVC GY-HM650U ProHD MXF files with iMovie on Mac 10.9 Mavericks

Summary: This guide will show you how to easily convert and import JVC GY-HM650U ProHD MXF footage into iMovie for further editing on Mac (OS X 10.9 Mavericks included).

"I have a JVC GY-HM650U ProHD camcorder that records .MXF video format, now I would like to import these projects to iMovie for editing. What I want is to edit MXF files smoothly without codec problems, what video codec should I use? Can you recommend some software which can help me import and convert JVC MXF to iMovie smoothly?"

Everything goes perfect until you try to edit JVC GY-HM650U .mxf file in iMovie. Fail in import the MXF file into iMovie as iMovie can't recognize this file. Why does it happen? The answer is MXF file format incompatibility with iMovie (even iMovie'11).

As far as I know, in order to edit JVC GY-HM650U ProHD MXF files in iMovie flawlessly, the best method is to convert JVC MXF to Apple InterMediate Codec (AIC) which is a best editing codec for iMovie.

At first, you need 3rd-party tool - Pavtube MXF Converter for Mac

It is a professional MXF to iMovie Converter which can not only convert JVC GY-HM650U ProHD recorded MXF files to AIC for iMovie editing on Mac OS X Mavericks, but also provide simple video editing functions for you. This Mac MXF Converteris especially designed for converting Panasonic P2 MXF, Sony XDCAM MXF, http://www.pavtube.com/canon-camera-file-transcode.html]Canon XF MXF files for editing in Final Cut Pro, Final Cut Pro X, Final Cut Express, iMovie, Avid, Adobe Premiere etc. Below is how. (Learn more about MXF: MXF Column)

Guide - Encode JVC GY-HM650U ProHD MXF to AIC for iMovie editing on Mavericks

Step 1. Import MXF files from JVC GY-HM650U to the top MXF to iMovie Converter for Mac.

(Note: Before conversion, you need to transfer MXF files from your JVC GY-HM650U to Mac Hard Drive, then click the "add" button to browse to import MXF videos. This MXF Converter for Mac support batch conversion)


Step 2. Click the Format bar, and move mouse cursor to "iMovie and Final Cut Express -> Apple InterMediate Codec (AIC) (*.mov)", it's the best format for editing in iMovie.

convert mxf to aic mov for imovie

Step 3. Click "Convert" button to start transcoding JVC GY-HM650U ProHD MXF files to AIC Codec for iMovie under Mac OS X 10.9 Mavericks.

iMovie Importing: How to import video files or projects to iMovie?

Some more helpful features of the app:

1. Settings- click to set video resolution(1920×1080/1440×1080/1280×720/720×480), bitrate(from 1Mbps to 20Mbps), frame rate (24p/30p)

2. Editor (next to "Add" icon)- click to set deinterlace, denoise, mute, volume up, trim, crop, etc.

So there you have it. Pretty simple. After the workflow, you can go to the output folder to find the converted video files. Now you are free to start importing/editing JVC GY-HM650U ProHD MXF files in iMovie under Maveircks without problems.

Wednesday, January 1, 2014

Decrypt and remove commercials from Tivo recording for playback on Windows/Mac

A Tivo Converter Customer Review From Pavtube:
I have recorded an entire season of favorite TV plays via Tivo box and it have the commercials on it with Tivo. How can I skip them? TiVo DVRs do not offer a commercial skip feature. It’s totally understandable as the commercial is a part of the source signal; but it troubles me a lot when playback the recorded TV plays: I have to pause and skip the ads manually. I used to be fine with that but now my daughter grows up and she’s fond of this: every time when it comes to ads she will cry. I’m totally not computer-savvy but have to look for a good solution.
It’s widely accepted that TV recordings from Tivo box are protected; we cannot edit or change it nor remove the ads within that context. After spending several days browsing the websites, finally I get this Pavtube Video Converter Ultimate to work. It’s very easy to convert tivo files and you don’t need to change any specs; also the ads trimming is quite simple. Moreover, I also convert and copy many Disney Blu-ray movies to my Nabi 2 android tablet, my daughter can watch these movie on Nabi 2 when I'm busying in my yard.
Note: If you only have a Mac, the Mac version is more suitable
My workflow: Decrypt and remove commercials from Tivo recordings for different purposes on my computer
1. Install and launch this Tivo Converter; drag and drop Tivo recordings to it. Or you can click the small “plus” icon to load Tivo recordings. Pls note the first disc-like icon is to load discs – yes this tool also support converting Blu-rays and DVDs. 
2. Submit Tivo Key. 
This Tivo Converter requires your Tivo key to play the recordings. (Tips: How To Find Tivo Media Access Key) 
Right after you drag the media files to this program, it will pop up a window asking for the key; see this screenshot: 
Enter it and import the media files again; it will remember your key automatically so that we don’t need to set it any more. 
3. Remove commercials from Tivo recordings. 
Now back to the main interface; hit the pencil-like icon on the top to enter the video editor. It’s on “Trim” mode by default. Drag the two small triangles on the progress bar, you can customize the start/end point. 
Or you can submit the start and end timing on the below.
Hit “OK”. 
4. Choose format and convert. 
Find the “Format” drop-down list, there’re many presets for different using. As my only need is to watch on computer and Nabi 2 tablet, the MP4 format is most common so I chose it. Then hit the big “Convert” to start converting Tivo recording or Disney Blu-ray movie to MP4 on computer. After it completed, click “Open output folder” to get converted videos and save it to my drive for playback.
Here is some Related articles about Pavtube softwares:

Monday, December 30, 2013

M4V Player for Android - Play M4V videos on Android OS-based tablet

This article gives you two ways to play M4V on Android OS-based tablet with the best visual and audio effect: M4V Player for Android and M4V Converter for Android.

Nowadays, with the development of android, more and more people are using Android phone or tablet. But these devices aren't compatible with many format videos such as M4V. M4V is a format that created by Apple and protected by DRM. Due to the protection, this file format is not compatible with Android system. When I surf on the Internet, I have found that many people asked many problems about playing M4V files; here is one of the questions lifted on Android Forums:

"I am searching for a video player app that can play m4v files. I am an apple product fan and use an iPhone for this currently and have wanted to switch over to android. But as far as I can tell there are no video player apps that do this. Dose anyone know of an app that can do this?"

Many people reply to the thread, and according to these replies, I sort out two ways for you to solve the problem.
The First Way: M4V Player for Android 


One person recommended the MX Player. He said that the MX video player can play everything. I Google it and find MX Video Player is a free app for Android device that allows you to play videos on your phone.

This app enables you to play most video files and subtitle files with multi-core decoding capability. MX Video Player is the first Android video player performs multi-core decoding. It supports multiple movie files like 3GP, Divx, F4V, MP4, MPEG, MOV, M4V(have removed DRM protection) and VOB.

The Second Way: M4V Converter for Android
  
The second way is convert M4V to Android tablet supported format. If you want to play M4V format videos on Android tablets and avoid some unnecessary troubles, the M4V to Android tablet converter can aim your goal. It can meet all your needs with its powerful function; it can convert all videos like AVI, MKV, MP4, WMV, MOV, M4V. Let's begin with the detailed introduction about converting M4V files to Android OS-based tablet supported format.

First, free download Pavtube M4V to Android converter and install in your computer. It only take up a little space in your computer.

Get it now to enjoy 20% off on Pavtube Thanksgiving Special Offer.

Then, add the M4V files or videos in the M4V to android converter. Do this by clicking the "Add File" icon.

pavtube android video converter ultimate

The following, this is an important step that you need choose a right output format. It is the key to solve playback problem, you can choose MP4, it is the best compatible format for Android.

In the "Edit" you can edit your videos by trimming, cropping, adding Watermarket and subtitle.


The last step is clicking the convert button to start this conversion. Then a little time later, you can copy to Android devices for playback.

Note: The precondition of these two ways of playing M4V video is that you've removed the DRM protection of iTunes videos. If you want to convert the M4V videos protected by DRM, ChewTune (Review) is such a DRM removal tool legally strips DRM copy protection from Digital Copy, WMV, and M4V.

If you are interested in this M4V to Android tablet convert, you can have a try.

Related Posts:

MediaCoder Alternatives for Mac - Transcode any Video/Audio on Mac OS X (Latest 10.9 Mavericks supported)

Is there an alternative to the MediaCoder Mac software? You'll be pleased to know that a suitable alternative to MediaCoder is in fact the Pavtube Video Converter for Mac (Windows version available). It works much faster, more user-friendly, effective and simpler, supports more media formats and convert files smoothly in high quality.
"I can't find Media Coder for Mac OS X. If MediaCoder doesn't work for Mac, then is there a similar application that is compatible with Mac OS X?" - Jack
MediaCoder, just as its name indicates, includes the latest codes and tools to transcode from one codec to another. When it comes to file format conversion, compression or transcoding, MediaCoder is the software mostly used. MediaCoder is the software that uses several codec for file transcoding and compression. It was introduced in 2005 especially for the Microsoft Windows. The formats supported by MediaCoder includes Mp3, Vorbis, AAC, WMA, Real Audio, WAV, MPEG-4 AVC, MPEG-4 part 2, MPEG-2, AVI, Video CD and DVD video. However, the software is not available for Mac OS which is very important and common nowadays. And the MediaCoder Mac version is expected by large volume of users who want to make video/audio conversion on Mac.

It’s worth mentioning that you don’t have to wait for the release of MediaCoder for Mac now, a better choice is the Pavtube iMedia Converter for Mac (Windows Version), which works as the best  alternative of MediaCoder for Mac. With this best Video Converter and Editor for Mac, users can finish SD/HD video converting and editing process with fast speed and high video qualtiy. No need to install multiple MediaCoder for Mac programs any more.

This app offers an easy way to rip any Blu-ray/DVD movies, transcode virtually all video & audio types, camcorder HD footages and TiVo recordings to desired video/audio format for portable multimedia devices, HD media players or video editing software, such as:

Devices: iPad Air, iPad Mini 2, iPhone 5S, iPhone 5C, iPhone 5, iPad 4, iPad 3, iPod 5, Surface 2, Surface RT/Pro, Galaxy Tab 3, Galaxy Note 3, Kindle Fire HDX, Nexus 5, Nexus 7, etc.

Players: Apple TV 3, WD TV, PS3, Xbox 360, Popcorn Hour, Xtreamer Ultra, Dune HD Base 3D, Iomega ScreenPlay MX HD Media Player, NETGEAR NeoTV Max Streaming Player(NTV300SL), Asus O!Play Mini Plus, etc.

Video Editing Softwares: FCP, iMovie, Avid Media Composer, Premiere Pro, etc. Plus, you are allowed to freely customize and personalize the conversion files through its settings and options in order to get an individual output in your own way.

Not all video tools like Pavtube iMedia Converter for Mac offer so many video editing options in this full-features and powerful video converter. It edits videos by trimming, cropping, splitting videos, add text/image/video watermark as copyright protection, and attach external *.srt, *.ass, or *.ssa subtitles into source media for entertainment. Support perfect audio and video synchronization.

The conversion speed is very fast and it supports batch conversion. It converts multiple video clips at the same time, moreover it can shut down computer after the process is complete, so run the app overnight and you could enjoy the created videos next morning when you are up.

Tutorials: Converting Video/Audio on Mavericks or Mountain Lion with ease

Step 1: Load video files to this Media Coder Converter for Mac Alternative

Download the Pavtube Video Converter for Mac on your computer, install and run the program, add videos.You can choose to import videos or the entire folder by clicking the top left two icons.


Step 2. Choose a proper format.

Click "Format" drop-down list and choose the best preset for you portable device with best video quality. Plenty of presets that can be customized as necessary.

For iPad 3, iPad 4, iPad Mini, iPad Air or iPad Mini 2, the video formats from "iPad" option will meets your demand;

For iPhone, iPhone 4, iPhone 4S, iPhone 5, iPhone 5C, iPhone 5S, the preset from "iPad" option is able to work well.

For those who in demands of playing videos on Android devices, you can always find the one you want in Android preset.

Step 3. Customize video specs(Optional).

You could also click the "Settings" to adjust the video and audio parameters of output files.

In the Video Settings, you can select Encoder, Frame Rate, Resolution (you could define it yourself according to your device) and Bitrate for your movie.

In the Audio Settings, you can select Encoder, Channels, Bitrate and Sample Rate for your movie.

Step 4. Start Videos Conversion on Mac.

You can hit the big red "Convert" to start converting MKV, AVI, VOB, WMV, MPG, Tivo, M4V, FLV, F4V, MTS to MP4 with best video settings on Mac. After the conversion, click "Open output folder" in the conversion window, or "Open" in main interface to quick locate the converted video.

Now, you can transfer these videos to your portable Android/Window 8/Apple device on Mac for smooth playback without any problem. Enjoy your digital life!

Related Guide: