Thursday, October 17, 2013

Rip 2D Blu-ray movies to Side-by-Side 3D MKV for 3D LG TV with great 3D effect

This article walks you through the whole process of transferring 2D Blu-ray movies to Side-by-Side 3D MKV video with best 3D video quality on LG TV.
“I have a big problem with 3D. My final goal is to watch my 2D Blu-ray on LG TV with 3D effect. I did a lot of tests with some freeware, but in the final movie clip (3D) images are not aligned perfectly, as if they were slightly shifted. Any suggestions?”
You probably expect to enjoy the great video and audio effect of 3D movies on your 3D device you own at home such as LG TV. While most purchased Blu-ray disks before are in 2D effect and if you wanna get 3D playback on your 3D devices, you have to order another 3D version which costs extra money. 

How to copy 2D Blu-ray movies to 3D video without spending more money? You need the Blu-ray to SBS 3D MKV Converter to help transfer your 2D Blu-ray movies to MKV SBS 3D video and you could watch your favorite movies on LG TV with 3D effect preserved. Mac version is BDMagic for Mac.

The full guide of transferring 2D Blu-ray to Side-by-Side 3D MKV on LG TV presents in below article.

Tools needed:
  • The best Blu-ray to 3D MKV converter 
  • An external Blu-ray Disc Drive
  • A PC/Mac computer
  • 3D player – LG TV
  • Pairs of 3D glasses (don’t forget to turn the glasses on)
 
Step 1: Free download and install the best Blu-ray to 3D MKV converter.

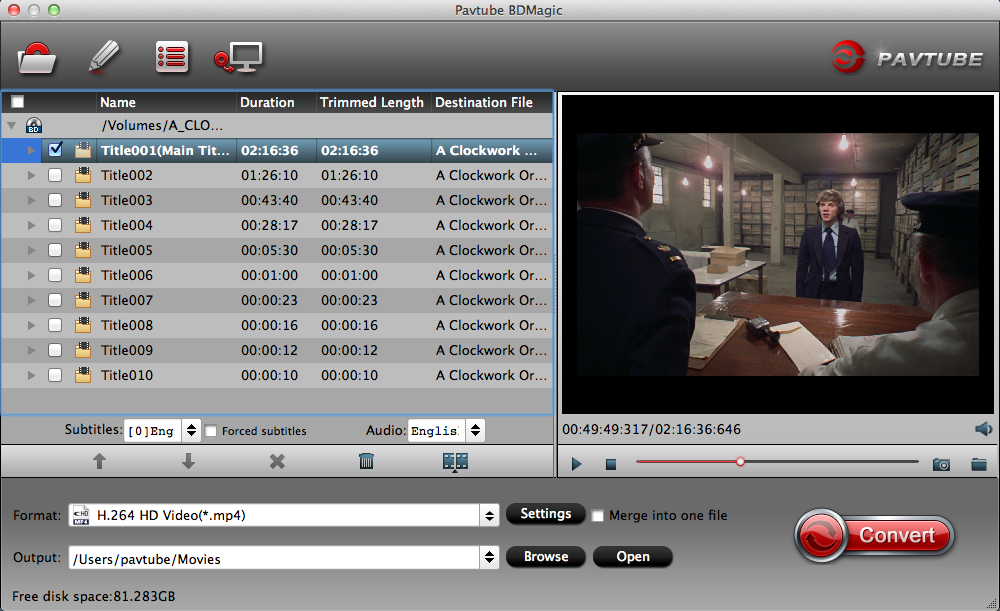
Step 2: Load your source Blu-ray movie from disc drive to 3D Blu-ray Ripper.

3D Blu-ray Ripper

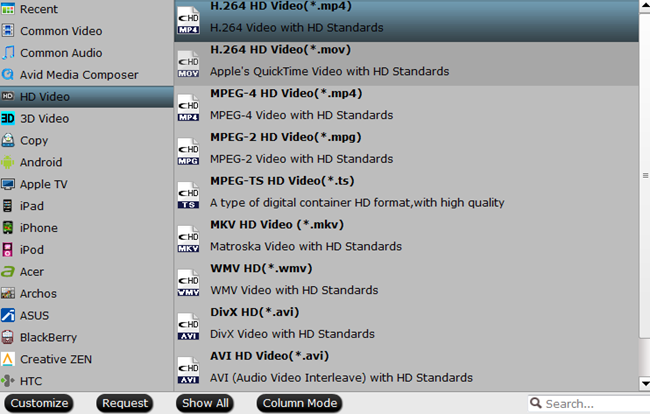
Step 3: Choose “MKV Side-by-Side 3D Video(*.mkv)” under “3D Video” category for your LG TV since the reader of the LG only handles SBS 3D MKV as supported format.

SBS 3D MKV format

Step 4: If you like, you could adjust video codec, bitrate, frame rate, etc to get better video quality in saved 3D MKV video. Meanwhile, you could choose 3D anaglyph and Depth in Profile Settings to avoid images misaligned.

Tip 1: When you have trouble getting aligned images in saved 3D SBS MKV video, adjust “Depth” in Profile Settings helps make the film images aligned perfectly.

Step 5: Hit the “Convert” button to copy your 2D Blu-ray movie to MKV Side-by-Side 3D video. When if finishes, click the “Open” option to locate the created 3D SBS MKV video and you are ready to transfer your 2D Blu-ray movies to LG TV for entertainment.

Tip 2: It is much complicated for encoding Blu-ray to SBS 3D video because of data analyzing and processing, so the process of copying SBS 3D video takes more than regular disc ripping.

Related Articles:

Tuesday, October 15, 2013

Play Blu-ray and DVD Movies in 16:9 display aspect ratio

Most people are more inclined to a 16:9 screen since it is a good compromise that fits a lot of movie formats without too much pillar boxing or letterboxing, not to mention it fits all HDTV programming perfectly. If you intend to digitalize your Blu-ray DVD collection for storing them on your NAS, so as to stream them to your laptops and/or DLNA compliant Home Theatre systems for watching in 16:9 widescree, you may find this article is worth reading. The purpose of this article is to help you create 16:9 widescreen MP4 files from Blu-ray and DVD movies. (Read more:What is an aspect ratio and Types of aspect ratio)

[Guide] Rip Blu-ray and DVD to widescreen (16:9) MP4 video using ByteCopy 

The software I will use is Pavtube ByteCopy. The reason I use Pavtube is because a reviewer put it at the top of the list of the 5 best Blu-ray rippers. Also, I found out that upon downloading its trial version that I was able to rip both my Blu-rays and DVDs to 16:9 MP4 straightly with satisfactory quality and fast speed. These are the two reasons why I picked Pavtube ByteCopy. 

Follow the detailed operating steps:

Step 1. Import source media.

Click “Load file(s)” button to import Blu-ray/DVD movie files. You can load a disc, a Blu-ray/DVD folder, or an IFO/ISO image file. 


Step 2. Select output format.

Pavtube ByteCopy offers several MP4 formats for users to choose from, including SD MPEG-4 MP4, SD H.264 MP4, HD MPEG-4 MP4 and HD H.264 MP4. Here we pick “H.264 HD Video (*.mp4)” for instance. To select H.264 HD MP4 as output, do as follows:

From Format bar, navigate to “HD Video” catalogue, and then choose “H.264 HD Video (*.mp4)” as target format.


Step 3. Set aspect ratio to 16:9.

Click “Settings” button to custom video aspect ratio. By default, the “H.264 HD Video (*.mp4)” profile uses 1920*1080 (16:9) aspect ratio. If you are using Blu-ray as input, you needn’t change anything here, because this ratio is proper for full HD Blu-ray movies, and you can get a 16 x 9 MP4 file in 1080p. But if your source media is standard DVD, we suggest you set the size down to 1280*720 to produce a 720p video in widescreen (16x9). 


How to crop black bars on top and bottom of the image and still keep 16:9 aspect ratio:

1). On the main interface, press “Edit” to enter video editor. Switch to “Crop” tab.
2). Click on the Keep Ration lock.
3). Select 16:9 from the Operation Ratio box.
4). Crop out the black bars by 16:9. This may sacrifice some image on left and right side.
5). Click “OK”, back to the main interface and go on ripping DVD/Blu-ray movies for playback.

Keep in mind that when it comes to DVD movies there is a formatting issue to consider. Many movies are wider than 16:9. For example, The Fifth Element, U-571, American Beauty, The Lord of the Rings, Dances with Wolves, Star Wars/Phantom Menace and Seabiscuit (to name a few) are all 2.35:1, not 1.78:1(16:9). When you display these movies on a 16:9 screen you will have black bars at the top and bottom of the screen. The black bars are not as large as they would be on a 4:3 screen, but they are there nevertheless. (view Wikipedia to learn more about Aspect ratio)

Step 4. Start ripping Blu-ray/DVD movies to 16:9 MP4 video.

When back to the main interface, click the “Convert” button to start converting Blu-ray DVD movie to MP4 video in 16 x 9 widescreen.

Read More:

Aspect Ratios Explained: What is an aspect ratio and Types of aspect ratio

Summary: A definition of aspect ratio, and the different types of aspect ratios such as 4:3 and 16:9 are described.

What is an aspect ratio?

An aspect ratio is simply a figure that represents the width-to-height ratio of an image. The easiest way to explain aspect ratios is to use an example. Take the aspect ratio 4:3. The first number, 4, signifies the width of the image while the second number, 3, indicates the height in any given unit of measure. In this case it could mean for every four inches the image is wide, it is three inches high. The measurements used are irrelevant, only the ratio matters.

Types of aspect ratio

There are multiple types of aspect ratios which are all used for different purposes. For example:

  • 4:3 is used for many computer monitors and older, non-widescreen televisions.
  • 1:1 is an uncommon square-format aspect ratio occasionally used in photography.
  • 5:4 is a computer monitor resolution, now more commonly used in mobile telephone cameras.
  • 16:9 is the aspect ratio used for High Definition television, as well as movies.
  • 14:9 is a compromise aspect ratio used to create a picture acceptable to both 4:3 and 16:9 televisions.
  • 16:10 is utilized in the majority of widescreen computer monitors.


Native aspect ratios

The two most common aspect ratios are 4:3 (used in most computer monitors and older televisions) and the “widescreen” 16:9 aspect ratio (used in films and widescreen televisions). These two aspect ratios are known as “native” aspect ratios since they are the two ratios that are currently used in display units such as DLP projectors and LCD televisions.

Currently there is still no fixed aspect ratio as some television channels broadcast in the High Definition 16:9 ratio whereas others continue to use the standard definition 4:3 format. Furthermore, DVDs offer the user the choice which of the two aspect ratios to use. In the future when Blu-Ray takes over DVDs, only a 16:9 ratio will be offered. This is still many years away from happening. 16:9 is also now becoming more common as the resolution of newer laptops with widescreens.

Anamorphic aspect ratios

Certain DVDs offer a feature known as “anamorphic widescreen” or a picture “enhanced for widescreen television” which scales the video to the aspect ratio of the screen. This means that should you play a 4:3 aspect ratio film on a 16:9 widescreen television, the black borders running across the screen will be removed. While this can also be achieved by using a “zoom” button present in many televisions, this will not increase the resolution of the image like a film played in anamorphic widescreen will. This is because during the transfer to DVD the image is stretched by one third, using what would have otherwise been unused space. As a result the full image will appear slightly sharper due the higher resolution it is using.

However, since the majority of DVDs nowadays offer the user the choice to output the film in either 16:9 or 4:3 format, this feature has been rendered somewhat redundant.

Aspect ratio comparison

When considering purchasing a projector, a television, or any other kind of display device it is important to consider the aspect ratio in relation to your needs, as each is suited to particular tasks.

16:9 aspect ratio

The main advantage of a 16:9 aspect ratio is that it is the standard that High Definition content is output at. This makes it vital if you plan on watching High Definition movies or sports, especially as these are now becoming increasingly more available. This is primarily due to the declining cost and growing popularity of Blu-Ray players, as well as the fact that many governments are actively encouraging television companies to make HDTV broadcasts available. The 16:9 aspect ratio is particularly appropriate if you watch many modern films on a home movie theatre since most movies are now produced in 16:9 format.

4:3 aspect ratio

While the 4:3 aspect ratio is viewed as somewhat dated, it is still very common and is still the standard aspect ratio for computer screens. While it is true that High Definition content is becoming more and more prevalent, the majority of broadcasters still output in a 4:3 aspect ratio. While the same cannot be said for films, if you still watch a lot of VHS tapes of older films then a 4:3 television will allow for the image to take up the screen. Displayed on a 16:9 television it would appear stretched, or would have black borders running along the edges.

Advantages of wider aspect ratios

The main advantage of widescreen aspect ratios is that it is the future standard. High Definition broadcasts are becoming more and more popular, meaning that the majority of content produced nowadays is shot in a 16:9 aspect ratio. Should you continue to use a square-like 4:3 display then the majority of content will be shown with black bars running horizontally along the edges of the screen. Furthermore, should you intend to play the latest videogame consoles, a device with 4:3 aspect ratio will not be able to output High Definition graphics, as they necessitate widescreen resolutions.

Importance of matching input aspect ratio with output.

It is important to match the aspect ratio of the display with the aspect ratio of the image source to get the most out of both devices. Many devices such as iPods and mobile phones have their own aspect ratios and may not be able to display videos of a different standard. While 4:3 televisions can display 16:9 broadcasts and vice versa, the compromise is a set of black bars bordering the screen either vertically or horizontally, which, should you own a plasma television, can cause burn in. In the case of High Definition (i.e. 16:9 aspect ratio) videogame graphics and text, when made to display in a 4:3 resolution, can often appear squashed and distorted due to the compression.

We hope this article has been useful to you!


Question: Can I watch 4:3 content on a 16:9 display?

Answer: Sure! However, you will see black bars on the top and bottom or along the sides of your image when viewing material that does not match the native resolution of your projector. (How to convert 4:3 video to 16:9 for tablet/smartphone and leave out black bars?)


Source: http://www.bambooav.com/aspect-ratios-explained.html

Read More:

Friday, October 11, 2013

How to Add Blu-ray ISO files to iPhone 5S & iPhone 5C with iTunes on Mac OS X

In this post we offer an easy way to add your Blu-ray ISO image files from Mac to iPhone 5S/5C with iTunes for watching anywhere and anytime. 

Have you got your new iPhone 5S or iPhone 5C yet? Once Apple unveiled the new generation of iPhone 5S and 5C, Apple fans have started ordering their new iPhone 5S/5C to experience the fresh Apple iOS 7 and much faster A6/A7 64-bit processor. As for movie lovers, they can enjoy better video and audio playback on the new iPhone 5S/5C thanks to Apple’s 4-inch, 1,136 x 640 Retina display with a pixel density of 326 pixels per inch, a brightness rating of 500 nits and an 800:1 contrast ratio. While, like most smartphones on the market, iPhone 5S/5C cannot handle Blu-ray ISO image files as well. To watch Blu-ray ISO file on iPhone 5S/5C, you’d better convert your Blu-ray ISO files to iPhone 5S/5C compatible format with a Top Mac Blu-ray ISO to iPhone 5S/5C Ripper.
iPhone 5S/5C supported format:
  • Video Format: .m4v, .mp4, .mov, MPEG-4, H.264, M-JPEG
  • Audio Format: AAC, Protected AAC, HE-AAC, MP3, AAX, AAX+m, Apple Lossless AIFF, WAV

Part One. How to convert Blu-ray ISO image files to iPhone 5S/5C on Mac OS X?

Step 1. Get Top Blu-ray to iPhone 5S/5C Converter and Load Blu-ray ISO image file.

Download, install and launch the Best Blu-ray ISO to iPhone 5S/5C Converter on your Mac.

              ($39.2)

Click the “Load IFO/ISO” button to import your source Blu-ray ISO image file.


Step 2. Choose audio track and subtitles for output.

On BDMagic for Mac main UI, set your wanted subtitles and audio track from the drop-down box of “Subtitles” and “Audio” tab.

Step 3. Select iPhone 5S/5C suitable profile and adjust profile presets (optional).

Pavtube BDMagic for Mac offers users dozens of profiles under “Format” menu so you would always get an optimized profile for your portable device.


In order to convert Blu-ray ISO to the new iPhone 5S/5C with 1080p image quality, you are suggested to choose iPhone 5 H.264 Full HD 1080P(*.mp4)” format for output.

Tips: If you’d prefer higher quality, click on “Settings” and set video bitrate to 2000kbps or above, this will bring better image quality and also bigger file size.

Step 4. Start ripping Blu-ray ISO to iPhone 5S/5C.

Now you are ready to hit the “Convert” icon to start ripping. After it completes, click the “Open” button on program interface to locate the created MP4 file, and transfer the converted Blu-ray ISO image file to your new iPhone 5S/5C with iTunes.

Part Two. Manually Sync Movies to iPhone 5S/5C via iTunes 11

To put videos, music and photos to iPhone 5c, iTunes 11 is a must. You can download iTunes 11 and follow the steps below to put Video, DVD, Blu-ray movie to iPhone 5c. If you use manual syncing, you can sync items from more than one iTunes library to your iPhone 5c. Follow the instructions below to manually sync movies to iPhone 5c in iTunes 11.

1. Open iTunes 11, and press “File” -> “Add File to Library” to add movies to iTunes Library. Or just switch to Movie library, and drag the file to iTunes.


2. Connect iPhone 5S/5C with your Mac using the cable that came with your device.

3. Click the Summary button and select “Manually manage music and videos” (below Options).


4. Click the On This Device (your iPhone 5S/5C name) button.

5. Click Add To on the right side of the iTunes window.

6. Switch to Movies Drag items from the left side of the iTunes window to the pane on the right.


In this way you can sync Blu-ray ISO image files to iPhone 5S/5C as you like. The Pavtube Blu-ray Ripper for Mac supports latest released Blu-ray movies and rip Blu-ray/Blu-ray ISO to various video formats and codecs (MKV, AVI, MP4, WMV, M2TS, TS, Tivo, VOB, MPG, etc.) for playing, editing, burning, sharing, etc.

Tips: For Windows users, please download and try Blu-ray to iPhone 5S/5C Ripper.

Related Articles:
Good News! Pavtube Release a New Site - multipelife.com with Product Migration and Name Change. Along with the new website, Pavtube has moved its bestselling software products to multipelife.com with brand new names. DVD Ripper has now become DVDAidBlu-ray Ripper has been renamed as BDMagic, which extends the enjoyment on easily restoring, editing, creating and eventually watching BD/DVD copies on almost all multimedia devices without limits.

To thanks for your continued support all along our previous site and the new www.multipelife.com, we are holding a 'New Site Special' with fantastic discounts up to 40% off. Like us to get 20% off BDMagic, 30% off ByteCopy, 40% off DVDAid and 20% off Video Converter Ultimate on Windows/Mac platform: https://www.facebook.com/pavtubefans/app_209569249055691

Read more: http://device-camcorder-tips.blogspot.com/2014/05/pavtube-release-new-site-and-special.html

Expire on Jun 4th.

Read More:

40% OFF Upgrade Free MTS/M2TS Converter for Mac from App Store to official retail version (Only 2 Days!)

Good news on this weekend (2013, Oct 12~13th)! Pavtube now offer 40% OFF to upgrade your Free MTS/M2TS Converter for Mac to Paid MTS/M2TS Converter for Mac, the official retail version, which is just updated several days ago and perfect support more latest cameras from Sony, JVC, Panasonic and Canon. 

The Pavtube Free MTS/M2TS Converter for Mac, a powerful free Mac MTS/M2TS Converter software to help convert your 2D/3D MTS/M2TS/M2T/AVCHD file at 1080i/1080p/720i/720p to MKV/MP4/MPG/WMV/MOV/FLV/F4V for editing in NLEs such as Avid Media Composer, Adobe Premiere Pro, After Effects, Apple Aperture 3, Kdenlive, Keynote, Avid Xpress Pro, Adobe Creative Suite 6, DaVinci Resolve, iPhoto, or playback on iPad 4, iPhone 5S, iPhone 5C, iPhone 5, iPod 3, Samsung Galaxy Tab 3 10.1/8.0, Galaxy Note 3, Google new Nexus 7, Asus Fonepad 7, Motorola Droid Mini, Moto X, Asus Transformer Book T100, Asus Transformer Pad TF701T, Kindle Fire HD, Surface RT/Pro, Surface 2, Surface Pro 2; it well supports Apple TV and other HDTV videos outputting and other devices like XBox 360, PS3, WD TV, Wii, TVs, etc.

As we can see, it has a simple and straightforward interface to enable quick conversion within a few clicks. As long as your camera is recognized by Mac directly, it could detect your MTS/M2TS/M2T/MOD/TOD/AVCHD footage automatically without risky of losing intact file structure.

And the most important thing is your can download it totally Free in App Store with 100% safety.


See this specification:

This Free MTS/M2TS Converter for Mac comes with bellowing features:

Full Support to AVCHD footage
Support interlaced and progressive AVCHD 1920*1080, 1440*1080, 1280*720 videos shot with Sony, Panasonic, Canon, JVC, etc.

Simple gauss blur effect
Simple gauss blur effect is very useful to recorded file formats, since it can eliminate the recorded videos noise. If you like, you can also add other special effects including simple laplacian sharpen, gray, flip color, invert, aged film and deinterlacing. What is worth mentioning is the deinterlacing, which can convert interlaced video into a non-interlaced form so that you can enjoy a better and clearer video effect.

Accurate trim and crop your AVCHD (*.m2ts or *.mts)
The accurate trim and crop function allows you to trim the proper time length for MTS/M2TS videos, as well as cut off any unwanted area. Its original video and output video preview windows will also be convenient for you to edit.

Replace original audio
To replace the original audio is easy to be realized under the Editor sections.

Split selected video file
Using the Split function, you can split the selected video file into required video clips by specifying the clip quantity, duration time and file size.

Audio and video sync technology
The program adopted advanced audio and video sync technology; never let you troubled by the audio and video issues.

Built-in codec
Its built-in codec will not install any codec on your computer, so as to avoid the unexpected codec problem.

Note: Comparing with Pavtube MTS/M2TS Converter for Mac, the Free MTS/M2TS Converter for Mac removed Apple ProRes codec for Final Cut Pro and Apple Intermediate Codec(AIC) codec for iMovie & Final Cut Express.

Learn more Free products from Pavtube:
Wondering how to do the conversion?

Fast convert Panasonic AG-HMC150 AVCHD to Prores HQ for FCP X 
Canon XA20 MTS/MP4 importing workflow in Sony Vegas, Avid, Premiere etc 
Flawlessly Convert Sony HX200V 60p MTS files for using in FCP/iMovie/QuickTime Player 
Editing Canon EOS Rebel T5/EOS 1200D MOV Files in After Effects CS6/CS5

More step-by-step guide of how to start the conversion:
Source: http://mediaconverting.blogspot.com/2013/10/40-off-upgrade-pavtube-free-mts-m2ts-converter-for-mac.html