Showing posts sorted by date for query vlc. Sort by relevance Show all posts

Thursday, July 27, 2017

Compress GoPro Karma 4K videos to 1080p on PC/Mac

From ancient times, people always dream to fly in the sky, airplane came out. But that is not enough, how could we fly in the sky like a freedom bird? GoPro Karma drone came out. Its stabilization package has definitely improved not only the silent running of the drone but the way that it controls in the air. Thanks to its tight controls, you can keep full control on the drone even it's flying in indoor spaces. The most inportant thing is its GoPro Hero5 4K action camera. No one can build a splendid outdoor camera that is as resilient as a GoPro Karma drone with its Hero 5 Black camera's capability of shooting in 4K with an outstanding video quality. You can record videos of nature with amazing 4K quality as well as incredible still images.


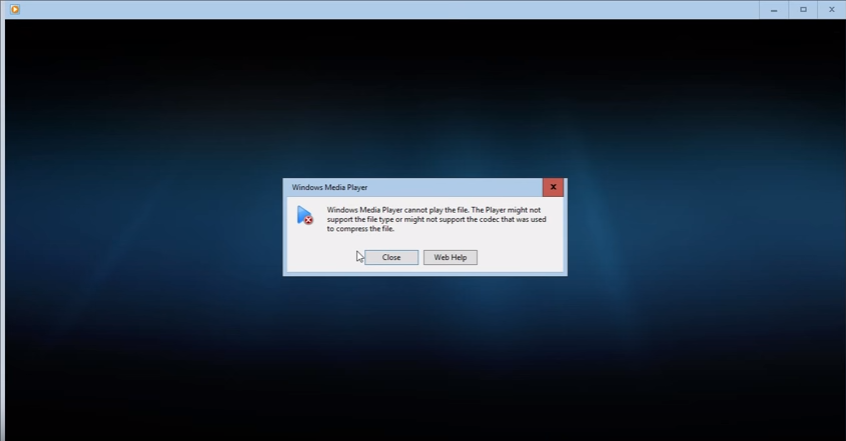
In this Age, 4K is a kind of visual enjoyment. After shooting by your GoPro Karma, you will want to do some post-production editing before you share the footage with billions online audiences, as we all know, if you play 4K video via VLC, QuickTime, or other meida player, it will be CPU consuming. To get massive usage of your 4K video, you can compress 4K MP4 to 1080p MP4 so that the 1080p video can be played on devices like an iPad, PS4 Pro. Furthermore, you can upload to Youtube, Facebook, Twitter, and more.


Here, you can compress GoPro Karma 4K H.264 video at 30fps to 1080p H.264 video with this Compressor - Pavtube Video Converter for Windows/ Mac, which not only support you to downsacle your 4K video to 1080p, but also allows you to adjust other settings such as video codec, audio codec, bitrate, frame rate, resolution, sample rate, channels. Meanwhile, with the additional video functions provided by the program, you can trim the video length by remove unwanted parts, split video into several parts, merge separate videos into one, crop video by adjusting aspect ratio, add your own video watermark, etc. More features are waiting for your exploration.


Step by Step to Compress GoPro Karma 4K video to 1080p video on Windows

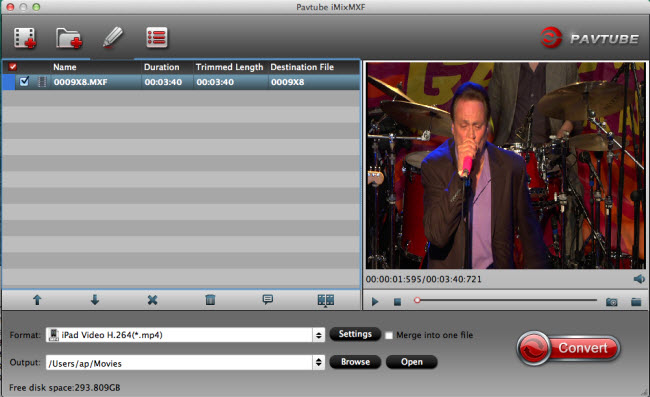
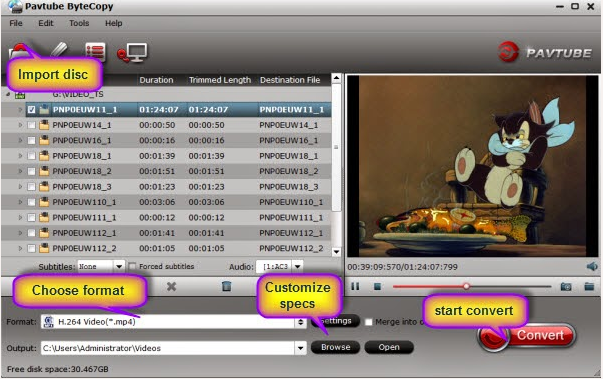
Step 1: Load GoPro Karma 4K video into the program.

Launch this assistant on your Windows, click the “Load file” or “Add Video” icon on the main interface to import 4K files into the program. Or you can directly drag or drop video into this converter.

load 4k


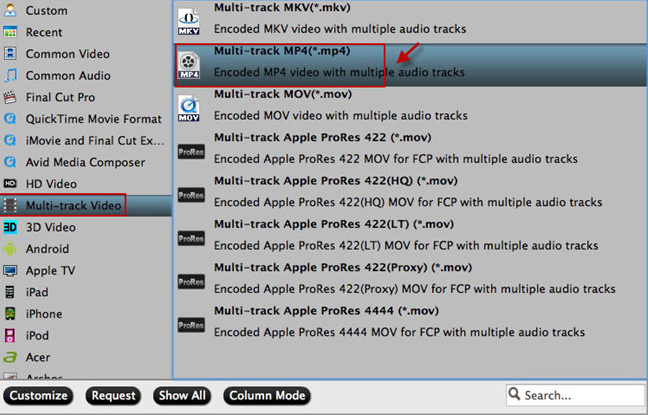
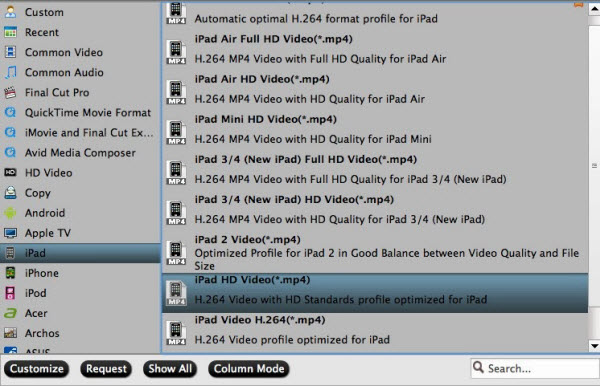
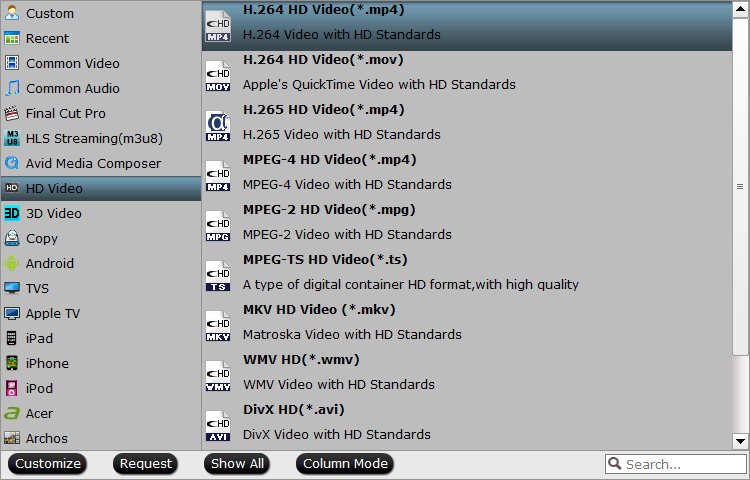
Step 2: Define Output format

Click "Format" bar, from its drop-down options, navigate to "Common Video"-->"H.264 High Profile Video(*.mp4)". You also can select "H.264 HD Video(*.mp4)" from "HD Video".

define h.264


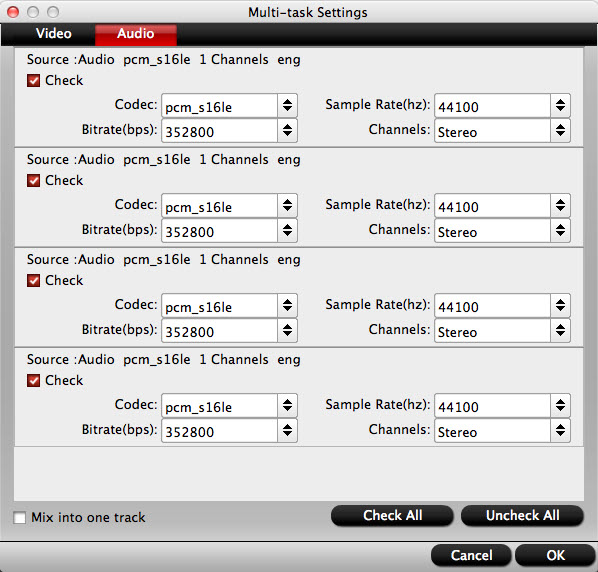
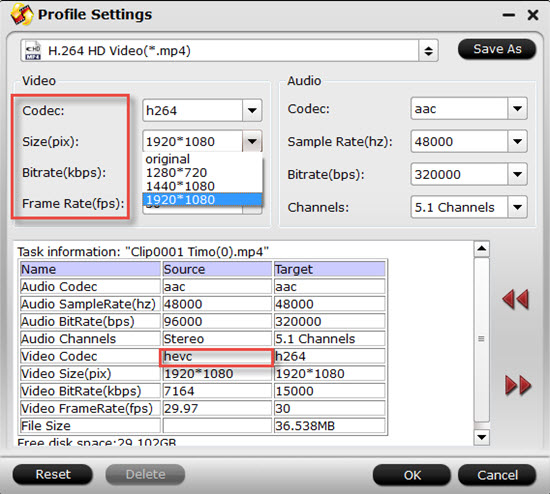
Step 3: Tweak encoding settings

Click "Settings" window on the main interface and pop up the "Profile Settings", here you can adjust the output video codec, resolution, bitrate, frame rate and audio codec, bit rate, sample rate and channels to compress 4K video. For example, you can change video size from 3840*2160 to 1920*1080. To make the video size smaller, you can lower the bitrate to get this goal.

Image result for pavtube video converter settings h.264 mp4


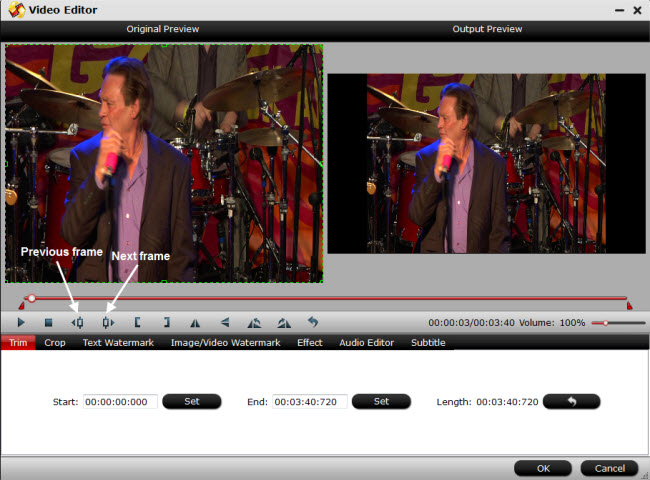
Step 4: Edit video file

Click pen icon on the main interface, here you can drag to trim you video, add effect or watermark. For an instance, you could click "Crop" and switch to "Advanced Mode", here are several aspect ratio selections for you, including 16:10, 16:9, 5:4, 4:3, 3:2, and 2:1.

edit video


Step 5: Start the conversion

Start 4K video to 1080p conversion by hitting the "Convert" button on the main interface.

Ater conversion process, you can click "Open" and pop up the folder with converted file, then you can sync to your iPhone, or upload to Youtube, email to your friends...


trail buy

Friday, July 21, 2017

Play 4K MXF with multi-track on PC/Mac

Material eXchange Format (MXF) is a container format which can bundle together multiple video, audio and program data then makes a lossless file format with large size. As it is widely used in high definiton camcorders such as Panasonic P2 series, Sony XDCAM series or Canon XF series. As we all know, 4K MXF shot by UHD camcorders is CPU heavy when you want to play it on media player on Mac/PC. No matter what kind of media player you are using such as VLC, Quicktime, Windows Media Player, etc, when you play this footage in them,most time those media player can't play them, or they can play but playback will be very very choppy.

To solve this issue, what you need is just a video converter which could help you to convert 4K MXF to massive formats which is supported by VLC, Quicktime, almost any video player. We recommend you Pavtube MXF MultiMixer after step-by-step tests and comparisons about the dozens of video converters. This wonderful transcoder supports you to convert 4K MXF files to H.264/MPEG-4 AVC, H.265/MPEG HEVC, MOV, M4V WMV, MKV files for playback on your media player.

For those people who want to preserve the multi audio tracks, Pavtube MXF MultiMixer has full support for all 4K MXF files generated by Sony XDCAM, Panasonic P2, Canon XF and Avid Media Composer, and so on. MXF MultiMixer supports import multi-track MXF and under "Multi-track video" category, you can output Multi-track MP4/MKV/MOV, and Multi-track Interlaced DV PAL video (.avi) for you to play on your media player smoothly and without lossing any channel. Before exporting multi-track format video, this professional assistant grants you to choose to mix the MXF multi track/channel audio into one or just keep them. Mixing the multi tracks/channel means you can get single audio with all channels, including the audios of background, interviewer, and interviewee.

For your convenience, the Mac version of Pavtube MXF MultiMixer - Pavtube iMixMXF is also available. The program has splendid support for the new Windows OS and Mac OS system, once you have brought this program, Official supplies free permanent update, so you don't need to worry about the problems of version and OS incompatible issue. Furthermore, the version of Mac - Pavtube iMixMXF supports 5 kinds of "Multi-track Apple ProRes (. mov)" formats for your FCP. More features are waiting for your explore...


Step by Step to Play 4K MXF with Multi-track on Mac


Step 1: Load 4K MXF files with multiple audio tracks.

Launch this assistant on your Mac, click the “Load file” or “Add Video” icon on the main interface to import 4K MXF files with multiple audio tracks into the program.

load 4k mxf files


Step 2: Output Multi-track video format.

Click the "Format" bar, swim in its drop-down list, navigate to "Multi-track video" main category, here are 4 types of Multi-track formats including Multi-track MP4/MKV/MOV, and Multi-track Interlaced DV PAL video (.avi) for you to choose.

Tip: The program also offers 5 formats of "Multi-track Apple ProRes" for FCP. And Apple Prores codecs under FCP category cannot keep multi tracks. The only way to output multi-track Apple Prores is to chose them under Multi-track Video category.

multi-track formats


Step 3: Adjust multi-track settings.

Click "Settings" window on the main interface and pop up the "Multi-task Settings", here you can ckeck or unckeck video/audio channels as you like.

Tip: Mix audio tracks: Check “Mix into one track” under the left bottom of “Multi-task Settings” interface, you can then mix the multiple audio tracks into one as we just talk above the article.

adjust multi track settings


Step 4: Convert 4K MXF files with multiple tracks.

Start 4K MXF files with multiple tracks conversion by clicking the right-bottom convert button. Just wait for a second, you can click the "Open" button of the main interface and that will pop up the folder with converted file.

After you have done all these, then you can play the 4K footage on your PC VLC, Windows Media Player, Quicktime following your heart . By the way, this smart converter offers simple and useful editing functionalities at premise not choosing Multi-track video as output files. The door of new world is opening for you.

Thursday, July 13, 2017

Play WMV Files with VLC on Mac

What is a WMV file?

WMV stands for Windows Media Video. A .wmv file is a compressed video format that was developed by Microsoft for Internet streaming applications. Many of the videos and movies that are found online are in .wmv format. The Windows Media video can be opened and viewed with large majority of media player apps such as Windows Media Player, Real Player, MPlayer and also VLC media player. However, a lot of people reflects that they fail to play WMV with VLC on Mac. The following article will show you how to convert WMV files to VLC best compatible file formats for viewing on Mac.

Best tool to convert WMV files for VLC viewing on Mac

Here, you can easily fix VLC not playing WMV files on Mac issue with a powerful media conversion tool called Pavtube iMedia Converter for Mac, the program has full importing support for 4K/2K/HD/SD WMV files encoded with various different compression codec. Thanks to its batch conversion mode, you can load multiple WMV files at one time for conversion. With this powerful Mac conversion application, you can efficiently convert WMV files to VLC media player compatible file formats listed below:

Container formats: 3GP, ASF, AVI, DVR-MS, FLV, Matroska(MKV), MIDI, QuickTime File Format, MP4, Ogg, OGM, WAV, MPEG-2 (ES, PS, TS, PVA, MP3), AIFF, Raw audio, Raw DV, MXF, VOB, RM, DVD-Video, VCD, SVCD, CD Audio, DVB
Video format: Cinepak, Dirac, DV, H.263, H.264/MPEG-4 AVC, HuffYUV, Indeo 3, MJPEG, MPEG-1, MPEG-2, MPEG-4 Part 2, RealVideo 3&4, Sorenson, Theora, VC-1, VP5, VP6, VP8, VP9, DNxHD, Prores and some WMV
Audio formats: AAC, AC3, ALAC, AMR, DTS, DV Audio, XM, FLAC, It, MACE, Mod, Monkey's Audio, MP3, Opus, PLS, QDM2/QDMC, RealAudio, Speex, SCreamtracker 3/S3M, TTA, Vorbis, WavPack, WMA (WMA 1/2, WMA 3 partially).

Related article: Play 4K Video on VLC | Convert VLC Files to MP4 Mac | Play Panasonic Video with VLC 

Tips: To get better output video and audio quality, click "Settings" on the main interface to open "Profile Settings" window, here, you can flexibly choose or specify exactly the profile parameters including video codec, resolution, bit rate, frame rate, audio codec, bit rate, sample rate, channels, etc as you like.

Get Pavtube iMedia Converter for Mac with 20% off discount, coupon codec: 45K2D47GJH

Step by Step to Convert WMV for VLC Playback on Mac

Step 1: Load WMV files into the program.

After the successful installation, click "File" > "Add Video/Audio" or "Add from Folder" to load WMV files into the program.

Load WMV files

Tips: If you want to batch load multiple WMV files, make sure to store all your files in the same folder, then click "File" > "Add from folder" or press the "Add from Folder" button on the top tool bar to batch importing them into the program.

Step 2: Choose output file format.

Here, you can select to output one of VLC more compatible file format such as "H.264 HD Video (*.mp4)" under "HD Video" main category.

Output VLC more compatible file format

Step 3: Adjust output profile settings for VLC playback.

Click "Settings" on the main interface to open "Profile Settings" window to tweak the output profile parameter settings such as video codec, resolution, bit rate, frame rate, audio codec, bit rate, sample rate, channels, etc as you like to get better output video and audio quality for VLC.

Step 4: Start the converting process.

After all setting is completed, hit right-bottom "Convert" button to convert MKV to VLC playable video and audio file formats.

Tuesday, January 24, 2017

3 Ways to Watch MKV on Windows Media Player (12)

Can Windows Media Player Play MKV files?

Since MKV becomes a popular video format, many people have been wondering "Windows Media Player 11 won't play files with mkv extension even when the appropriate codec is installed??"

According to Microsoft support website, Windows Media Player still won't support MKV files. Though we can make WMP play MKV video by install some codec, sometime we still encounter can't play MKV in Windows Media Player issue. MKV is a container format which may contain multiple video and audio streams. And the video and audio stream can be encoded any of several ways. If the MKV video or audio codec is not WMP installed codec supported one, Windows Media Player won't play MKV video of this kind.

Here we recommend you 3 ways to play all MKV on Windows media Player

Method 1: Install Windows Media Player codec package

Just try to install the Combined Community Codec Pack (short for CCCP). The CCCP is a a codec pack specifically developed for playing videos including MKV. When you've installed it, you can smoothly play MKV files with Windows Media Player or Media Classic Player.

Method 2: Try another media player

If you don't like installing codecs for Windows Media Player, or the codec doesn't work for some unknown reasons, you can try to use another media player. You may know of VLC player. Yeah, VLC is a great open-source cross-platform multimedia player. And it can play most multimedia file formats like MKV, AVI, MP4, FLV, WMV, etc, as well as discs.

Method 3: Converting MKV to Windows Media Player playable format for smooth playing

Serving as a high-class MKV to Windows Media Player Converter, Pavtube Video Converter can batch convert MKV to Windows Media Player recognizable formats like WMV, AVI, ASF, etc to solve "Windows Media Player won't play MKV files". Furthermore, Pavtube Video Converter does support converting nearly all video formats like MP4, AVI, H.265, MOV, MTS, WTV, MPEG, FLV, 3GP, WebM, MXF, XAVC, RMVB, etc to WMP compatible formats to play MOV, WTV, MKV, FLV, 3GP, etc in Windows Media Player.

Even more amazing, this MKV to Windows Media Player Converter has the feature of converting almost all video formats to Windows Media Player supported audio formats like WMA, MP3, WAV, AU, and AIFF so that you can only enjoy audio in WMP if you don't like the image of the video.

Besides, it is not only a video to WMP Converter but also an audio to WMP Converter. By using it, you can fast convert various kinds of audio formats like FLAC, APE, 3GA, M4A, VOC, M4R, OGG, DTS, RA, etc to Windows Media Player popular audio formats in order to play these audio in WMP.

Free download the Video Converter for converting MKV to Windows Media Player

Other Download:
- Pavtube old official address: http://www.pavtube.com/video_converter/
- Cnet Download: http://download.cnet.com/Pavtube-Video-Converter/3000-2194_4-75734821.html
- Softonic Download: http://pavtube-video-converter.en.softonic.com/

Transcode MKV to Windows Media Player Compatible format for playing

Step 1. Click the "File" button to import the MKV files to this MKV WMP Converter. Or simply drag and drop the MKV video to the main window of this program.

Step 2. Click the “Format” bar to get the drop-down menu and you can get “Common Video -> WMV3 (WMV9) (*.wmv)” or go to “HD Video” > “HD WMV” as the best output format for playing in Windows Media Player (12).

Step 3. The built-in editing function provided by MKV Video Converter is something worth trying. To trim the video, add artistic effects, adjust audio, add watermark, customize video parameters and so on. You can get the work done splendidly. Of course, if you don’t think it’s a necessary to do, you can skip it and move onto the next step directly.

Step 4. Press the “Convert” button on the bottom-right corner of this MKV Video Converter to start doing video conversion. The larger the MKV files are, the more conversion time should be taken.

Play MKV in Windows Media Player

Playing MKV in Windows Media Player will become a piece of cake with the help of the ideal MKV to Windows Media Player Converter and the above step by step guide. Then never worry about the following Windows Media Player won't play MP4 files troubleshooting:

  • When I try to play MKV in Windows Media Player, it won't play my .mkv files -- no video, just sound, and Media Player will hang trying to exit.
  • I downloaded a video of the MKV format from keepvid and when it went to Windows Media Player it did not work since and could not play and I got a message saying that windows media player cannot play mkv files.
  • My Windows Media Player 11 won't play files with .mkv extension even when the appropriate codec is installed: my windows media player just won't play anything that has an .mp4 extension; it keeps saying "Windows Media Player cannot play the file. The Player might not support the file type or might not support the codec that was used to compress the file."
  • When try to add the MKV to Windows Media Player 12 for playing, the MKV file type isn't recognized by the Media Player and therefore isn't added to the Media Library.
  • Some of my MP4 video can play in WMP, while other of my MP4 won't play in Windows Media Player 12.

Read More:

Source:http://pc-mac-compatibility-issues.blogspot.com/2017/01/play-mkv-on-windows-media-player.html

Monday, January 16, 2017

Play DJI Inspire 2 4K videos on iPad series

DJI has reduced the top speed of its new Inspire 2 drone due to concerns about the quality of the video captured by the aircraft. In a notice posted on its website, DJI said that when the drone was launched, the Inspire 2 drone was expected to accelerate to 50 mph in 4 seconds and reach a top speed of 67 mph. The Inspire 2 takes everything that was good about the Inspire 1 and improves it. An all-new image processing system records at up to 5.2K in CinemaDNG RAW, Apple ProRes and 4K video in H.265 and H.264 codec.

DJI Inspire 2 Recording Video Format

From some forums, we found some users have the troubles playing DJI Inspire 2 4K videos on iPad series like iPad Pro, iPad Mini 4 etc. How to play all DJI Inspire 2 4K Apple ProRes, 4K H.265, 4K H.264 videos on iPad? We suggest you converting DJI Inspire 2 4K video to iPad supported playing-format for better playing due to DJI Inspire 2 4K Apple ProRes, 4K H.265, 4K H.264 videos iPad Incompatibility issues.

Best DJI Inspire 2 4K Video Converter for iPad

Pavtube Video Converter for Mac is the best video converter for iPad to have. In addition, you are able to convert unsupported DJI Inspire 2 4K Apple ProRes, 4K H.265 video to iPad supported formats. It also can convert DJI Inspire 2 4K video to any formats for editor, player, devices, TV, PS3/PS4, Projector etc for editing/playing/sharing. (Read review)

Highlights of Pavtube Video Converter for Mac
  • Support 300+ different video & audio formats to iPad.
  • Do 4K to iPad conversion on the fly to make DJI Inspire 2 4K playable on iPad immediately.
  • Support iPad-Out. This feature lets users convert video & music to iPad without worrying about the correct format settings.
  • Support macOS Sierra, Mac OS X 10.11 El Capitan, 10.10 Yosemite, 10.9 Mavericks, 10.8, 10.7, 10.6, 10.5.

Now it's time to download Pavtube Video Converter for Mac& install it. Keep your iPad and computer in the same network beforehand. (Windows user can get Pavtube Video Converter)

Other Download:

- Pavtube old official address: http://www.pavtube.com/video-converter-mac/
- Cnet Download: http://download.cnet.com/Pavtube-Video-Converter/3000-2194_4-76179460.html
- Top4download.com: http://www.top4download.com/pavtube-video-converter-for-mac/iujpttsg.html

Easy solution to Convert DJI Inspire 2 4K video to a suitable format for iPad

Step 1: Click "File" button to add your DJI Inspire 2 4K video files to the program. Or directly drag the video you want to convert to the left item bar.

Step 2: Choose MP4, MOV, M4V format video from “Common Video” or “HD Video”. Or you can select the optimized preset for iPad Pro/iPad Mini/iPad Air from “iPad” profile. You can choose iPad HD video as the target format which is supported also by iPad all deries.

Tips: The default settings may not satisfy you, and you can click the "Settings" button to change the settings by yourself including video resolution, bit rate, audio sample rate, audio channel etc. for full screen playback smoothly. Or keep no changes, which is also a good choice. You can choose 1920*1080 for better playing, editing....

Step 3. Click the "Convert" button on the main interface and the software will start to convert DJI Inspire 2 4K video to iPad friendly video formats immediately. When the conversion finishes, click "Open" to find the converted video files. Then you can effortless transfer the DJI Inspire 2 4K video files to iPad for playback on the go.

Read More:

Sunday, January 15, 2017

How to Play DVD on Windows Media Player (12)?

Why cannot I open DVD files on Windows Media Player (12)?

I installed a Windows Media Player recently. After inserting his two pieces DVD, right click mouse, choose “Play with Media Player 10”, about DVD A, Media Player just play the DVD A for few seconds or minutes. About DVD B , Media Player that says "compatible DVD decoder not installed on your computer." Many people will meet the same problems with me. The warning means you are missing a decoder.Windows Media Player have been installed successfully, why cannot open DVD files on Windows Media Player? All kinds of reasons can cause this issue. Following will analyze the reasons and provide the relevant methods.
Why Too Short?

Why Nothing?

Reason 1: About the problem DVD cannot open the complete DVD, maybe you inserted DVD to your computer, just play 2 minutes short video, it’s not the result you want. I’ve tried to open Windows Media Player, and then, in the “Player Library” select the disc name in the navigation pane. However I tried again and again, and also search some other ways to do, it doesn’t work. There is some wrong in the DVD files, about this side, best choice is to rip the DVD to WMV which is the best video format that Windows Media Player support.
Reason 2: DVD is Digital Versatile Disc. A DVDs stores its audio and video in MPEG-2 format. Other DVD codecs include: MP3, WMV, DivX, Xvid, etc. Windows Media Player support main video format is WMV/AVI/MP3, so DVD MPEG-2 format doesn’t match with it. You need a decoder to solve their difference between video formats.
Reason 3: DVD is protected or because of its region codes or on Windows without requiring additional DVD codes. You can download a software which can rip DVD. You can read this to know the DVD region codes.
Reason 4: Windows Media Player version doesn’t support to play DVD. Following is the Windows Media Player support video format for your reference. From the list, we can know different Windows Media Player versions support different video formats.

Sine we have find these reasons that caused DVD files cannot open on Windows Media Player, at the same time, we also can find some ways to reply them. I summarize 3 popular ways for your reference and hope to help you.

Option A: Decode DVD online

You can search online to find many online DVD decoder, you just follow its hints and to do step by step, finally, you will get your new DVD format. Before using online DVD decoder, you should know these main points.
Point 1: Do you make sure that your network speed is enough, if the speed is too low or often occur interrupt phenomenon, you will wait for a long time.
Point 2: You want to decode 3 pieces DVD or more than 10 pieces. I’m regretful to tell you that you may spend one day or even more time in waiting the results which are based on the fast and stable network speed.
Point 3: Online DVD decoder cannot provide the reliable after-sale service. If DVD  inside files are damaged during the decode or are attacked by Trojan virus or infected with other problems that cause your DVD cannot open any more. Who will be responsible for that? Answer is nobody.

Option B: Install A Third Media Player

Install a Third Media Player that can play your disks is also a good choice. Such as Media Player Classic/VLC Media Player/K-Lite Codec Pack etc. You can choose any one to installed on your computer and play your DVD. For example, VLC Media Player, when you insert your DVD to your computer, then open VLC Media Player, click ”Playback”, choose ”Chapter”, you can choose the chapter 1 or other chapter you want to watch.

Option C: Install A Decode Software.
If you are reluctant to change your favorite Windows Media Player, nor to take the risk to decode a DVD online, what can you do? a DVD ripping program is your best choice. By a DVD ripper, you can convert a DVD to hard drive and play it back by any multimedia windows player you like. You can download Pavtube ByteCopy software that contains all the Windows Media Player codecs. You can rip DVD to any format that can play on Windows Media Player.
This software can solve any question you can meet when you play DVD on Windows Media Player. Are you worried about the ripping speed? no problem. ByteCopy provide a fast speed, you can watch your DVD at the first time. Are you worried about the video quality? no problem. ByteCopy can rip and decode any protection DVD with 100% audio and video quality. And also you can rip abundant DVD at the same time. Are you worried about after-sale service? no problem. There is any question, you can contact official staff or you can review here to know this software, you can also go to its website to find more information.  
It’s time for you to enjoy the ByteCopy, here I will introduce to rip and convert DVD to WMV for playing on Windows Media Player.
Free download or Buy Pavtube ByteCop
Steps on Playing DVD on Windows Media Player WMV Format
Step 1: Import your DVD files 
Insert DVD to drive. Open the software. Click “File” to load the DVD movies to the program.
Tips: This converter can automatically detect the main title of the DVD. And before the conversion, you can choose desired subtitle and forced subtitle.

Step 2: Choose the output format and location
Click “Format” to choose video format: WMV, then click “Browse” to choose save location.

Tips : the “Setting” button, you can open it and set the video parameters by yourself.
Such as: Bit Rate(bitrate), Frame Rate, Size(pix), Sample Rate etc and if you don’t know how to set them for the beat quality output, following will show you the relationship among them.
No 1: Audio Bit Rate and Video Bit Rate
Audio Bit Rate and Video Bit Rate is inter-limitation, it means if the Audio Bit Rate is too high, the video Bit Rate cannot be too small.
No 2: Audio Bit Rate and Audio Sample Rate
Audio Bit Rate and Audio Sample Rate is inter-limitation, it means if the Audio Bit Rate is too high, the Audio Sample Rate cannot be too small.
No 3: Video Bit Rate and Video Frame Rate
Video Bit Rate and Video Frame Rate is inter-limitation, it means if the Video Bit Rate is too high, the Video Frame Rate cannot be too small.
No 4: Video Bit Rate and Size(pix)
Video Bit Rate and Video Frame Rate is a proportional relation, it means if the Video Bit Rate is high, the Size(pix) is high. If the Video Bit Rate is low, the Size(pix) is low.  
 
Step 3: Start converting
Click the ’Convert’ button to start converting. Just a moment, you will succeed.
Conclusion: There is too many ways to solve the problem that DVD cannot play on Windows Media Player, the best way is to own a complete ByteCopy. You can rip DVD to play on Windows Media Player or convert DVD to any video format : HD AVI, MP4, MKV, H.265 etc that you want to play on any portable device. Popular windows media players, VR, TVs etc.
Further guides about Windows Media Player:
Open Blue-ray on Windows Media Player
Windows Media Player to play H.265 files
Windows Media Player to play TiVo Recording
 

Wednesday, January 4, 2017

Play Canon 5D Mark IV 4K video on QuickTime smoothly

The Canon EOS 5D Mark IV boasts a huge array of high end features, including a 30 megapixel full frame CMOS imaging sensor and Canon's latest AF system, for a significantly lower price than Canon's current 1-Series model. This value and versatility, as with all EOS 5-Series models before it, launched the Canon EOS 5D Mark IV to great fanfare and a strong demand. It can record 4k 30fps video with 8.8 mp still frame grab, Full 1080p HD 60 fps, HD 720p mode at 120 fps.

Canon 5D Mark IV Record Video Formats
 
MOV files

4,096 × 2,160 (Digital Cinema Initiative 4K) at 29.97, 24.00 or 23.976 FPS. These 4,096-wide images are ideal for 'scope (2:40:1) shooting.

1,920 × 1,080 at 59.94, 29.97, 24.00 or 23.976 FPS.

1,280 × 720 at 119.88 FPS.

Motion JPEG (4K) or MPEG-4 AVC/H.264 (HD) video.

Linear PCM audio.

MP4 files

1,920 × 1,080 at 59.94, 29.97, 24.00 or 23.976 FPS.

MPEG-4 AVC/H.264 video.

AAC audio.

If you have a lot of Canon 5D Mark IV 4K MOV files and want to play them on QuickTime, you’d better convert Canon 5D Mark IV 4K to QuickTime compatible format - MOV format. Due to QuickTime does not support all MOV video and 4K resolution is not friendly with it. Natively, it supports only a few video formats: 3G2, 3GP, DV, MOV, and various MPEG options, including MP4. So how to play Canon 5D Mark IV 4K in QuickTime player?

You just need one 4K video converter for QuickTime. There are many kinds of 4K Video Converter software in the market. The output video quality and the converting speed must be the key factors that you should be looking out for. Pavtube Video Converter for Mac provides the easiest and smartest way to convert Canon 5D Mark IV 4K video to QuickTime MOV and play Canon 5D Mark IV 4K files on QuickTime, iPhone (7/7 plus), iPad (Pro), iPad Mini (5), Apple TV (4) as well as other all MOV-compatible applications. (Read Review)

Hot search:

Free download the professional 4K to QuickTime Converter on your Windows, install and run it, the following will show the steps.

How to Convert Canon 5D Mark IV 4K video to QuickTime?

Step 1. Import Canon 5D Mark IV 4K to the program

After launching the program, open the local folder where you’ve saved the Canon 5D Mark IV 4K file, then drag and drop it to the main interface of the program. The file will be imported immediately. Alternatively, you can go to the “File” button to import your Canon 5D Mark IV 4K files.

Step 2: Specify output file format.

Click "Format" bar, from its drop-down list, define "MOV - QuickTime (*.mov)" as the output profile format.

Tips: Before conversion, you can use of the built-in editor to adjust the volume, brightness, contrast, saturation or inserts of subtitle to your Canon 5D Mark IV 4K file.

Step 3. Start the Canon 5D Mark IV 4K conversion

Just perform video conversion by pressing “Convert” button in the bottom right hand corner of the current user interface. When all of these tasks are finished, there will be a note popping up and prompting you.

Quickly find these converted files by pressing the “Open Folder” button at the bottom of the current interface, and then drag the converted Canon 5D Mark IV 4K into QuickTime player to play. You’ll find these files can be played without quality loss.

Read More:

Thursday, December 8, 2016

Import Yuneec Q500 4K video to Edius Pro 8.30 without any problems

The Yuneec Typhoon Q500 4K ($1,449 as tested) is a big drone that tries to set itself apart from others in its price range by doing a bit more. Its camera is removable, and can be used handheld with an included accessory grip. And its remote control incorporates a touch-screen Android device into its design, so you don't have to use your own phone. The Q500 captures steady 4K video when in flight, but the video is noticeably blurry as you move toward the edges of the frame.

Have recorded some 4K video by your Yuneec Q500? Tried Import Yuneec Q500 4K video to Edius Pro 8.30 but failed? Have a look at the Yuneec Q500 4K to Edius Pro 8.30 issue:

“Hi hope somebody can help , before I updated to Pro8.30, I was able to import into Pro8.22 and Pro7 , my Drones (yuneec Q5004k) footage with no problem and Edius pro 8.22 had no iusses. I am able to import my DJI P3 footage into 8.30 no problem. I am able to import the same Yuneec footage in to Adobe PPRoCC2015 I have no problem to play the footage and edit. But why when import Yuneec Q5004k to Edius Pro 8.30 i failed. What’s wrong? Who can help me?”

Do you also have some problems importing Yuneec Q500 4K video to Edius Pro? No worry, here we give you one easy solution.

Working Yuneec Q500 4K videos in EDIUS Pro EDIUS Pro is extremely hardware intensive. We recommend that you use an Intel Xeon-based system, especially if you are working with multiple layers. If you are running on an old computer and don't wanna turn to a new one, you will meet Typhoon Q500 4K video file stuttering problems with EDIUS Pro. And the Yuneec Q500 4K in specially the MP4 video sometimes is not friendly with EDIUS Pro. So if you're planning to use 4K files in , you do need to convert Yuneec Q500 4K video to using MPEG-2 (1080p) as primary delivery format. You can use Pavtube Video Converter to help you done.

Popular search: MKV to Edius Pro ǀ MP4 to Edius Pro ǀ GoPro to Edius Pro ǀ 4K to Edius Pro ǀ MOV to Edius Pro

Key features of the 4K to Edius Pro video converter:

- Compress Yuneec Q500 4K to 1080p, 720p for better usages.
- Convert Yuneec Q500 4K video to any formats like MP4, MKV, AVI, H.265, WMV etc.
- Convert Yuneec Q500 4K to Windows Movie Maker, Premiere Pro, DaVinci Resolve, Cyberlink - PowerDirector etc editors supported video format.
- Edit your Yuneec Q500 4K video with hot video editing functions.
- Convert Yuneec Q500 4K to VLC, TV, PS3, PS4, Projector etc.
- Merge several Yuneec Q500 4K video into one file for batch converting quickly.

How to Convert Yuneec Q500 4K footage for editing in EDIUS Pro 7/8

Step 1. Add Yuneec Q500 4K video source

Run the best 4K Video Converter program you just set up. Drag and drop the Yuneec Q500 4K video files to the converter. You can also hit Add files button to import videos to the app. If you wanna combine several videos into one file, you can click the "Merge into one" box.

Step 2. Select output format for Edius Pro

Click the "Format" bar and select "Adobe Premiere/Sony Vegas > MPEG-2 (*.mpg)" as Edius Pro’s output format on the drop-down menu. It ensures the smooth editing with Edius Pro.

Step 3. Advanced Yuneec Q500 4K video/audio settings

Click "Settings" button if you'd like to customize advanced audio and video parameters like Video Codec, aspect ratio, bit rate, frame rate, Audio codec, sample rate, audio channels. Note: If you want to get original Yuneec Q500 4K resolution, just keep the video size as original. If you want to downscale Yuneec Q500 4K to 1080p, you can choose 1980*1080 from “Size”.

Step 4. Start converting 4K footage

Hit the Convert button of the best 4K file converter. It will start converting Yuneec Q500 4K for importing to EDIUS Pro immediately. Soon after the conversion, just click "Open" button to get the generated files for natively editing in EDIUS Pro 8/7 beautifully.

PS: Mac user can get Pavtube Video Converter for Mac to convert any 4K video, HD video, SD video in any formats to any video/audio format for your usages on Mac (macOS Sierra, El Capitan Yosemite, Mavericks, Lion included)

Read More:

Monday, November 14, 2016

Can’t import DJI Mavic Pro 4K video to Windows Movie Maker?

About DJI Mavic Pro

Though the Mavic Pro is smaller than DJI's other drones, it boasts powerful specs with 4K camera and 27 minutes of flight time. The Mavic Pro’s camera has the same sensor as DJI’s Phantom 4, meaning it can shoot 4K video at 30fps and 1080p HD at 96 fps. That's despite being about half the size of the Phantom. It also has a 12-megapixel camera with support for Adobe DNG RAW, though the field of view is a little smaller, decreasing from 94 degrees down to 78.


Users should be able to get 27 minutes of battery life at a top speed of 40 mph in Sport Mode, only slightly smaller than the 45mph you get on the larger Phantom 4. This shows that though DJI’s new drone is smaller and more compact, its performance is similar to some of the company’s more powerful devices.

Everytime I try to open or edit video from DJI Mavic Pro 4K to Windows Movie Maker, it crashes. I’m hunting for a way to import DJI Mavic Pro 4K videos to WMM flawlessly. Actually, solution is never far behind.After searching widely, I’ve got the issue resolve. Now share the solution with you.

Granted, no matter MP4 or MOV videos recorded from DJI Mavic Pro 4K are both incompatible with Windows Movie Maker, as a compressed output format and they are not ideal for editing in most NLEs including Windows Movie Maker. In addition, currently Windows Movie Maker lacks support for 4K videos. To solve those problems, the quick workaround is to transcode DJI Mavic Pro 4K files to Windows Movie Maker natively supported formats (WMV/AVI are highly recommended) in proper settings. See Windows Movie Maker supported video formats: 

Video formats: WMV, ASF, WM, M2TS, MTS, M2T, MOV, QT, DVR-MS, WTV
Audio formats: ASF, WM, WMA, AIF, AIFF, WAV, M4A, MP3

Get DJI Mavic Pro 4K video to Windows Movie Maker video converter

Pavtube Video Converter- a top 4K Video Converter app, it can be done quickly. Overall, the program is a professional yet easy-to-use 4K MOV/MP4 to Windows Movie Maker Converter. With it, you can convert DJI Mavic Pro 4k MP4/MOV videos to Windows Movie Maker preferred WMV video without any quality loss. What's more, it can also transcode DJI Mavic Pro 4K clips for editing in Pinnacle Studio, Sony Movie Studio, Sony Vegas Pro, Cyberlink PowerDirector etc flawlessly.

Free download the 4K to WMM video converter:


If you want to convert DJI Mavic Pro 4K video to editor like Avid Media Composer/DaVinci Resolve, FCP, iMovie/FCE, Premiere Pro etc on Mac, just get Pavtube HD Video Converter for Mac to help you done.

Convert DJI Mavic Pro 4K video to Windows Movie Maker supported video

Step 1. Load DJI Mavic Pro 4K footage

Launch the 4K to WMM Converter and then click the "Add" button to load .mov or .mp4 videos.


Step 2: Hit the Format box and select HD Video > WMV HD(*.wmv) on the dropdown menu as output format. Besides, you can also choose Divx HD(*.avi) as output if you have not installed the .wmv codec.


Step 3. Start the conversion

When all is OK, just click the “Convert” button to start converting your 4K videos to Windows Movie Maker compatible 1080p WMV files. After the conversion, find your converted video clips in the destination folder and add them to Windows Movie Maker for home movie making.

Read More: 

Tuesday, October 18, 2016

Convert Sony video camera Recordings for Watching on PC

People often use some camcorders like a Sony camcorder to record their happy time. For example, you probably made a video of your randchildren when they were young. To keep these Sony camcorder recordings fine, you sometimes need to transfer them to PC and convert these recordings to MP4 then you can watch these Sony camcorder footage on a computer or a tablet in the future.

Some Sony camcorder recordings would be MXF, AVCHD, XAVC files while some would be MP4/MOV video. Normally, it is difficult to play those raw Sony videos on PC with common media players. So converting all the Sony camcorder recordings to MP4 can make you transfer the footage to SD Card then watching on tablet or just view them on a TV or PC. With Pavtube Video Converter Ultimate, you can easily get the work done.

This video converter can convert any video formats, regardless of high definition 4K recording videos or standard definition footage and make them playable on WMP, VLC, KM Player, etc on PC. At the same time, it can transcode Sony, Canon, GoPro, DJI drone, etc MXF, AVCHD, XAVC, MOV, MP4 to H.264 MP4, H.265 MP4, MKV, WMV, FLV, AVI, 3GP, etc. You can compress 4K video to 1080p while upscale 1080p video to 4K resolution.

You also can add external subtitle to video and replace/mute audio in video. With built-in video editor, you can trim, crop, merge, split video. For Mac users, please use iMedia Converter for Mac.

Free download and install 
  

Other Download: 
- Pavtube old official address: http://www.pavtube.cn/blu-ray-video-converter-ultimate/ 
- Cnet Download: http://download.cnet.com/Pavtube-Video-Converter-Ultimate/3000-2194_4-75938564.html 

How to Convert Sony video camera Recordings for Watching on PC?

Step 1: Add Sony video camera videos.

Open the program, click "File" menu, from its drop-down option, select "Add Video/Audio" to load Sony camcorder video to the program.

Add 4k source video files

Step 2: Choose output file format.

From "Format" bar drop-down list, choose the formats that you want to output for later use. For compatibility consideration, it is idea for you to choose "Common Video" > "H.264 HD Video (*.mp4)" as output file format.

Select output file format

Tip: Open "Profile Settings" window to adjust output video and audio parameter settings according to your own preference. 

Step 3: Convert Sony video camera recording to MP4

After all the settings is completed, hit right-bottom "Convert" button to start to convert Sony video camera recording to MP4.

Once the conversion ends, you can locate the generated MP4 files on output folder and then you can watch them on PC or transfer them to your tablet for watching later.

Related Articles: