Showing posts with label Media Players. Show all posts

Friday, March 13, 2015

Backup 3D Blu-ray on Plex server for Panasonic VT65 playback

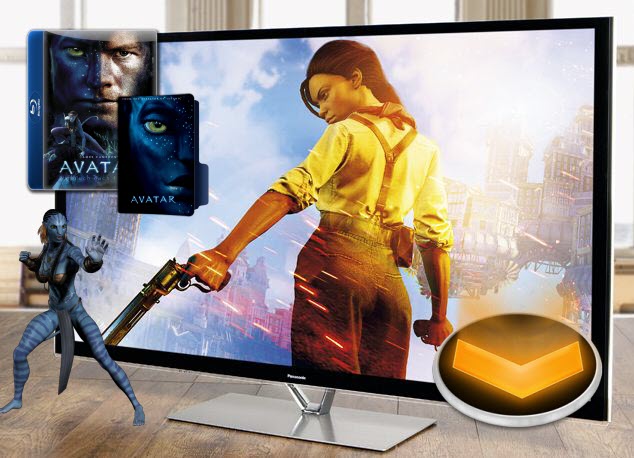
Can Panasonic VT65 play 3D Blu-ray movies from Plex backups? Plex Blu-ray movie playback issue can be easily solved by downloading 3D Blu-ray to Plex Converter to convert Plex unsupported Blu-ray files to Plex compatible MP4/MOV/ASF/WMV etc. 

“ It is the Avatar 3D, North American version, that I own, which I was testing out this ripping. Also, my TV is the Panasonic VT65. It is played back via DLNA, served by Plex server. Now, does it make sense to give you some screenshots, which would be in dual-image interleaved state - I am not sure you can see the ghosting effects?! Please let me know how you can tell from an interleaved screen shot - I cannot take a 3D picture thru my 3D shutter-glasses, nor would it be any good. 

Anyway, perhaps MVC to SBS is just not good enough, even at the original picture size - it is still being encoded and there maybe some artifacts. Am I wrong?

In any case, I also like to find out if I go through your department for a refund or not? Or, you can point me to another department.“  

As we know, the Plex supported media file formats are limited. It can't handle 3D Blu-ray discs or 3D Blu-ray files. So if we want to enable Panasonic VT65 to play 3D Blu-ray movies, we will need to rip and convert 3D Blu-ray discs or files to Plex supported video formats first. 


To watch Blu-ray movies on Panasonic VT65, you will need a Blu-ray ripping tool. Here Pavtube BDMagic is recommended to help you convert 3D Blu-ray to Plex supported video formats with easy operation and high output quality. Besides Blu-ray, you can also use it to rip DVD to playback on Plex. The Windows version is compatible with Windows 8.1/8/7/XP/Vista. If you're using a Mac, please turn toPavtube BDMagic for Mac, which can help you transfer Blu-ray movies to Roku 3 on any Mac OS X (Yosemite and Mavericks included). Download it right now and start enjoying your 3D Blu-ray movies with full HD quality on Panasonic VT65 through your Plex. 

How to Stream 3D Blu-ray Movies on Plex for Panasonic VT65 playback 

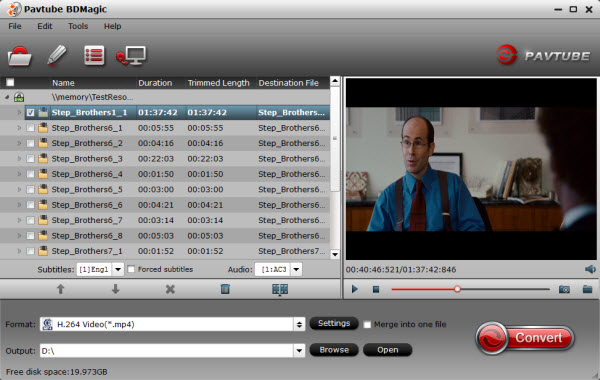
Step 1: Load 3D Blu-ray movies

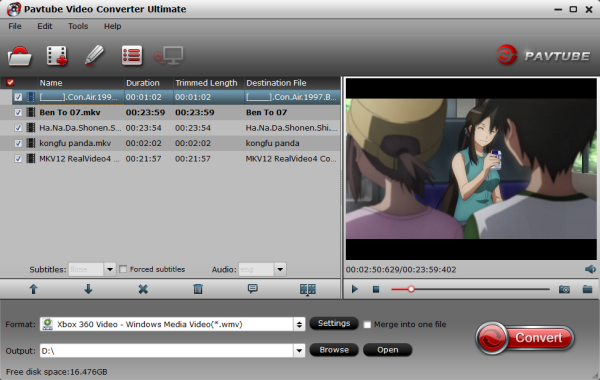
Insert your 3D Blu-ray disc into your BD drive, run the 3D Blu-ray Ripper for Plex and click “BD/DVD disc” icon to load movies. 


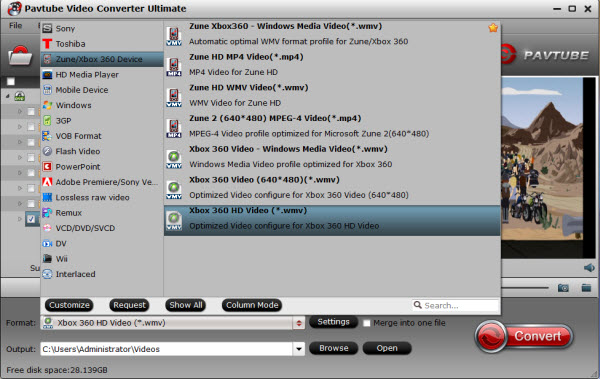
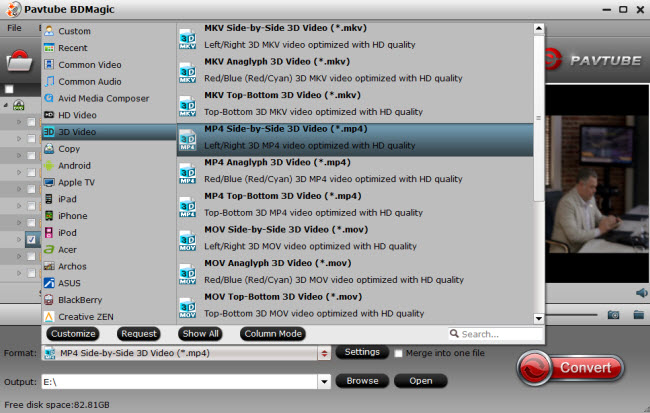
Step 2: Decide output format 

Check Panasonic VT65 supported video formats first and then go to the format list to select the correct 3D output format. Panasonic VT65 supports video formats like AVI, MKV, MP4, MOV, MTS, etc, just click on the format bar to follow "3D Video" under which you can pick the proper 3D format for Panasonic VT65 smart 3D TV. 


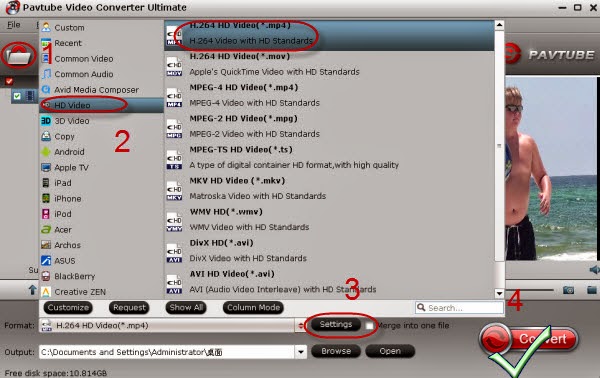
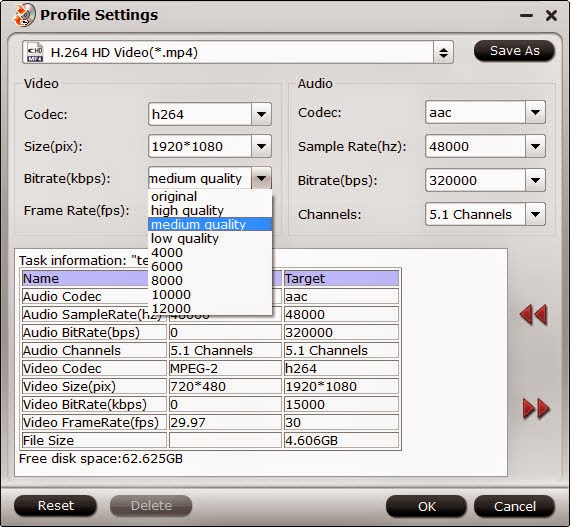
Step 3: Advanced video/audio settings 

If you like, you can click "Settings" to change the video encoder, resolution, frame rate, etc. as you wish. Keep in mind that bitrate higher results in big file size, and lower visible quality loss, and vice versa. 

Step 4: Start Blu-ray to Panasonic VT65 conversion 

Hit the convert button and start ripping Blu-ray to Panasonic VT65. When the conversion ends, you will be able to get the result video via tapping the Open button in the main interface. Afterwards, you can stream or just transfer the converted 3D Blu-ray files to Plex. 

Note:  If you don't have Plex in your PC yet, please download from here. Read this article to learn how to use Plex in PC.
  
Now, you can enjoy the Avatar 3D Blu-ray movies on Panasonic VT65 via Plex for smoothy playback at ease without any incompatible problem. 

See Also:

Monday, March 2, 2015

Solved: Can Xbox One play MP4 files? (From external hard drive)?

Summary: In this article we'll focus on Microsoft Xbox One only and talk about the ability of playing MP4 videos on Xbox One. 
  

“Can Xbox One play MP4 files? (From external hard drive)? If anyone has tried this, or know if it works, can you help? Basically I want to plug my external hard drive in to it so I can watch my family holiday videos on the big screen. I'm asking because I don't have the Xbox One yet, I'm getting it on payday haha. (6 day wait!) Thanks in advance. “ – From Yahoo. 


Xbox One is the latest game console. It has powerful multimedia performance. If you have collected lots of MP4 video files, you can transfer them to your Xbox One for a greater visual experience. However, you'll probably come to find out that not all of the MP4 files are supported on Xbox One. That's because different MP4 files tends to have different video codecs and the codecs might not be compatible with the console. Well, how can you play those incompatible MP4 files on Xbox One then?  

Best Solution:

The perfect solution is that you need to convert the MP4 files to Xbox One's supported formats, and then transfer the converted files via the DLNA server. Now there is a powerful tool to help you on this. That's the Pavtube Video Converter Ultimate. It offers a powerful plugin called "Media Server" which enables you to directly stream any video to Xbox One effortless. Besides, you can also extract Blu-ray/DVD and convert a wide rage of movie files or 4K movies to Xbox One readable format. The Mac version is here. Please follow the steps below to do your task.  

Before taking action, learn more information about this software. Here About this top MP4 to Xbox One Converter

1. Almost all video/audio formats supported 
2. Output playable videos/movies for all popular devices
3. 6x Faster Conversion Speed
4. Backup BD/DVD with high quality or Copy Blu-ray/DVD without extras 
5. Vivid 3D Experience at home
6. Professional yet Friendly Functional Video Toolbox 

Step 1. Run the MP4 Converter for Xbox One, click “Add Video” to load your video files like MP4, MTS/M2TS, MKV, MOV, TOD, TiVo, etc.


Step 2. Choose from "Format" menu for Xbox One playable video. In order to get Xbox One MKV file, you are suggested to follow the path " Zune/Xbox 360 Device” > “Xbox 360 HD Video (*.wmv)" as output format. 


Step 3. Parameters including video codec, video file size, bitrate, frame rate, audio sample rate, audio channels, and more in Settings can be reset to get a satisfying video/audio enjoyment on Xbox One. 

Step 4. Start conversion from MP4 to Xbox One game console by clicking “Convert.” When it finishes, click the “Open Output Folder” icon to quick locate the converted video. Then, transfer the MKV files to your Xbox One. 

Now, you’re able to enjoy your favorite MP4 files to Xbox One, Have fun! 
  
Further Reading: 

Thursday, February 19, 2015

Enjoy downloaded AVI/MKV/TiVo/WMV/MTS/VOB on Amazon Fire TV

This article will guide you how to work around to get Amazon Fire TV to play downloaded AVI, MKV, TiVo, WMV, MTS, VOB video files. The tool you need is Fire TV Video Converter.

Fire TV is Amazon's answer to the Apple TV, and to other options like the Roku 3 and the Google Chromecast. It brings Amazon Instant Video, Showtime Anytime, and tons of games to your big screen TV. Ever thought of trying to turn the Amazon Fire TV to your portable media player for watching your purchased videos, movies or TV shows?

Enjoy downloaded AVI/MKV/TiVo/WMV/MTS/VOB on Amazon Fire TV

However, Amazon Fire TV presents the major obstacle when users want to transfer videos to Fire TV, let's have a look at the video formats for Fire TV.

Amazon Fire TV Content Format Supported

Video: H.263, H.264, MPEG4-SP, VC1
Audio: AAC, AC-3, E-AC-3, HE-A, PCM, MP3
Photo: JPG, PNG

As only restricted ability is provided in Amazon Fire TV as well as all other portable devices to support videos in different formats, you will inevitably get some videos in formats that cannot be played on Amazon Fire TV, such as AVI, MKV, TiVo, WMV, MTS, VOB, etc.

To put those videos on your Fire TV smoothly, Pavtube Video Converter Ultimate may be what you need. It is the best Fire TV Video Converter, with which you can convert videos like AVI, MKV, TiVo, WMV, MTS, VOB to MP4 for Amazon Fire TV without any effort at super fast speed. Plus, this converter also comes with professional video edit function, if necessary, you can freely edit your videos like trim, crop, add water effect and more. Mac version is here. Below is the detailed guide.

Before start the conversion, please make sure you’ve download and installed the best Fire TV Video Converter on your PC (You can free download the trial version).


Guide: Convert/Sync AVI, MKV, TiVo, WMV, MTS, VOB to Amazon Fire TV

Step 1: Import videos

Launch the best Fire TV Video Converter. Click the button "Add Video" to add AVI, MKV, TiVo, WMV, MTS, VOB video files. If it is necessary, you can double click the each file to have a preview.

Tip: If you wanna join your several video files into single one, just check the "Merge into one" box.

Note: To convert TiVo shows to Amazon Fire TV, there is one special step:

After launching Pavtube Video Converter Ultimate, click the option button and you will go into a new interface named "Option". In the interface, click "TiVo" icon, here you need to enter Media Access Key, and click "OK" to confirm.


Step 2: Select an output format for Amazon Fire TV and set the output folder.

According to the tests, MP4 format is of the best compatibility with Amazon Fire TV.

So click on the dropdown menu of "Format" and then move your pointer to "Common Video", under the sublist, "H.264 High Profile Video(*.mp4)", "MPEG-4 Movie(*.mp4)", are compatible with Amazon Fire TV. Or choose "HD Video > H.264 HD Video(*.mp4)" to get 1080p output.

Then you can set the output folder for Amazon Fire TV.


Step 3: Click "Settings" icon to adjust audio and video parameters for Amazon Fire TV.

Click the "Settings" icon and you will go into a new interface named "Profile Settings". You can adjust codec, bit rate, frame rate, sample rate and audio channel in the interface according to your needs and optimize the output file quality.

Step 4: Start converting your videos to MP4 for Amazon Fire TV.

Click the "Convert" button; it will convert AVI/MKV/TiVo/WMV/MTS/VOB to MP4 for Amazon Fire TV immediately. You can find the process in the "Conversion" interface.

After the Video to Fire TV conversion, you will be able to get the output files for Amazon Fire TV via clicking on "Open" button effortlessly. Now you can refer the below methods to transfer converted movies and TV shows to Amazon Fire TV for Playing.

How to Stream Local Video Files to Amazon Fire TV
  • Stream Converted Movies or Other Local Video Files via Amazon Kindle Fire Tablets 
Amazon Fire TV works as a media steaming device, it can also stream all contents stored on Amazon tablets. So to watch the converted movies on Amazon Fire TV more easily, you can transfer the converted movies to Amazon Kindle Fire HD or other tablets at first.
  • Stream and Play Converted Video with Plex Media Server or XBMC
Plex Media Server and XBMC are the most famous home media sharing/managing solutions which helps you connect your clients with all of your local and online media. The combination of centralized library management, streaming of online content, and transcoding functionality provides flexibility and ease of use.

Here are more tips for using Amazon Fire TV.

More related: 

Monday, February 2, 2015

How to Copy and Rip DVD to Plex Media Server for Streaming

This article mainly shows you an easy way to rip and store DVD on Plex Media Sever for free streaming, playing and sharing with your TV and mobile devices freely.

Plex is designed to organize all of your personal media so you can enjoy your movies freely on  TV, iPad, computer or phones both home and away. Have have a diverse library of DVD movies? What if we want to store DVD on Plex Media Server? No worry, the article will focus on how to rip DVD to Plex Media Sever for playing and streaming. 


store DVD on Plex Media Server
  
To get your DVD collection to Plexwhat you need to do is to convert your DVD movie library to Plex Media Server friendly format at first. There’s all kinds of different DVD ripping software out there (some free, some not) with a variety of different options. It seems a bit overwhelming. Well, more than one guys recommend Pavtube DVDAid, which can help us finish DVD conversion bypassing DVD copy protection.

With it, we can convert DVD to Plex Media Server with MP4 format (the most compatible video format for Plex Media Server) without quality loss. Plus, it also allows users to copy DVD to hard drive with original structure or main movie only. Best of all, with its built-in video editor, you can personalize and retouch your videos in clicks. For Mac users, DVDAid for Mac will be a helpful app.


How to Backup and Rip DVD to Plex Media Sever

1. Add DVD movies

Install and launch DVD Ripper program, and then click the disc icon to import your source movies to this program. Set your wanted subtitles and audio track from the drop-down box of “Subtitles” and “Audio” tab.

DVD to Plex Ripper

2. Select an output format

Click the “Format” option, and choose HD Video > MKV HD Video(*.mkv) as output format. You can also select H.264 HD Video (*.mp4) for Plex Media Server.

Or backup DVD with Main Title only and original structure for storage.

Plex Media Server video format

Tip: If you like, you can click “Settings” to change the video encoder, resolution, frame rate, etc. as you wish. Keep in mind the file size and video quality is based more on bitrate than resolution which means bitrate higher results in big file size, and lower visible quality loss, and vice versa.

Plex Media Server video settings

3. Start ripping DVD for Plex Media Sever

Click the "Convert" button under the preview window, and the DVD ripper will start the conversion from DVD movies to MKV or MP4 for Plex Media Sever. After conversion, you can stream DVD movies through Plex Media Server to HDTV or iPad, Galaxy Tab, or other DLNA-compliant devices.

More related:


Wednesday, January 28, 2015

Backup Blu-ray Collection into Synology DiskStation DS215j readable video

Read this article and you will quickly learn how to backup and convert Blu-ray movies to Synology DiskStation DS215j friendly video for streaming.

As a devoted owner of a collection of Blu-ray discs, you would love to share some awesome movies with your friends or family, or watch movies in your smart phone while traveling. And of course you don’t want to break them if you use them many times. So that may be a dream to put all your Blu-ray in a NAS like Synology DiskStation DS215j with 6TB. (Have a 3TB external network drive? The Blu-ray backing up is just a piece of cake!)

Backup Blu-ray Collection to Synology DiskStation DS215j

With a Synology Ds215j, your Blu-ray movies can be accessible from any device from anywhere or displayed on TV at home via network. Then how to realize your dream?

In fact, to backup a Blu-ray disc to Synology DiskStation, a powerful third-party software for backing up Blu-ray is surely needed at first. Here Pavtube BDMagic is the best Blu-ray to NAS Ripper (Read the top Blu-ray Rippers review) that can output Synology DiskStation and multimedia players readable formats such as .mp4, .mov, .m4v, .mkv for storage from Blu-ray with ease. Meanwhile, you can freely select the desired subtitle and audio. And the most important thing is that by using NVIDIA CUDA technology or AMD APP tech, the conversion speed can be even faster than before. Mac version is here. Here are simple 3 steps  for you to do the backup.

3 Steps to Rip and Copy Blu-ray to Synology DiskStation DS215j

Step 1. Import Blu-ray files

Download Pavtube BDMagic and run it. Import a Blu-ray folder or Blu-ray ISO file you have. (Learn how to keep DVD chapter markers when copying)

Blu-ray To Synology DiskStation Converter

Step 2. Choose an output format

Move your mouse cursors down and see “Format” box. Yeah, don’t hesitate, just click it and you  can choose Synology DiskStation DS215j best supported mp4 format which is also playable on your media devices, or you can select the corresponding format for iPad, iPhone, PS3, Apple TV, etc. for easily streaming.

Synology DiskStation Supported Formats

Tip: If you want to output smaller size and save space in your DS215j, you can adjust “Bitrate”in “Settings”by choosing a smaller bitrate.


Step 3. Start to copy Blu-ray to Synology DiskStation

Press “Convert” and now it will start your Blu-ray copying with lossless quality. After you finish ripping your Blu-ray to Synology DiskStation DS215j, click “Open” button down to find your output file.

Now what you need to do is to connect the Synology DiskStation to PC and stream videos from Synology DS215j to iPad, iPhone, Apple TV, PS3, or other media players for enjoying anywhere! Note that you need to make sure the wireless network is accessible between your Synology DiskStation and the media player. So easy! Isn't it?

Wednesday, January 21, 2015

How to Convert and Add Blu-ray/DVD ISO files to iTunes library

iTunes does not support ISO files from as source media. If you want to sync ISO to iTunes for playback on iPhone/iPad/iPod, try to convert ISO to an iTunes video first.

If you’ve already backed up lots of ISO from Blu-ray or DVD discs, you may wanna watch your favorite ISO movies on iDevices, like iPhone, iPad, iPod, etc. in iTunes on Mac. While, it’s a pity for iTunes users-  iTunes won't recognize those ISO files and doesn't allow you to load them.
sync ISO to iTunes

Why that happens? Well, that's because iTunes doesn't support the Blu-ray/DVD ISO files (it only supports MP4, MOV and M4V). In order to add ISO files to iTunes, you need to first convert  ISO to iTunes supported formats. And your primary concern may be how to keep the best compromise between high visual quality and less take-up of storage during conversion.

Here Pavtube BDMagic for Mac can fulfill your needs and provides perfect solutions for all the Mac users. Overall, it is a professional Blu-ray handling tool which convert ISO image to iTunes playable files with fast speed and high quality. Apart from BD/DVD ISO, you can also use it to convert Blu-ray, DVD to iTunes video and other regular video and audio formats like MP4, M4V, MOV, AVI, WMV, FLV, MKV etc.

What's more, if you want to play ISO video on your iPad, iPhone, iPod, you can directly select the device preset as the output format. Here is windows version. Just download it and follow the guide how to convert ISO to iTunes compatible MP4 video.

How to Rip ISO files for playback on Apple devices via iTunes on Mac

Step 1. Download, install and launch the top ISO to iTunes Converter on your Mac.

Step 2. Cick "Load IFO/ISO" icon to import the Blu-ray/DVD ISO on your computer. When the files are loaded, you can select the subtitle and audio track as you like.

ISO to iTunes Converter

Step 3. Select and custom output format. Click "Common Video" > "Common Video - H.264 Video(*.mp4)" to get the optimized output file for ISO to iTunes conversion.

iTunes video format

Tip: If you like, you can click “Settings" to change the video encoder, resolution, frame rate, etc. Remember bitrate higher results in big file size, and lower visible quality loss. If you want to keep 1080p Full HD resolution, set the video size as 1080*1920.

Step 4. When everything is OK, press the big "Convert" button to start ISO to iTunes MP4 conversion on Mac OS X.

After the conversion, get the output files by clicking the Open button and you are ready to import them into iTunes and if necessary, sync with your Apple device without hassle.

Tip: To import videos to iTunes, open iTunes and go to File > Add to Library or directly drag and drop the converted video to iTunes. And then find the video in the Movies category.

Now you are able to organize VOB in iTunes and even transfer to iOS devices like iPhone, iPad, iPod etc. for killing time on the move. In addition, MKV and FLV can be also converted for adding to iTunes.

Friday, January 16, 2015

Backup and Convert DVD/Blu-ray to Camping Car TV for playback

This article centers on the simplest way to rip DVD/Blu-ray to Camping Car TV for Unlimited Playback with crisp and lossless quality using a Blu-ray Ripper.
 
It is super comfortable for watching Blu-ray and DVD on Camping Car TV when you are away from home with a Blu-ray/DVD player. But as we know, discs are subject to scratch and damage easily due to time-to-time putting in and worse yet the Blu-ray/DVD protection prevent you from playing them on Camping Car TV smoothly as you expected. Then for some disc collectors, it is not a thing bringing owls to Athens if you want to rip your Blu-ray and DVD to Camping Car TV for playback.

watching Blu-ray and DVD on Camping Car TV

Do you also have such a demand? Wonderful! Here, this article just shares you the simplest way to convert Blu-ray and DVD to Camping Car TV recognized format like MPEG-4 with the help of a professional Blu-ray Ripper.

With numerous Blu-ray rippers flocking on the market, finding the most suitable one seems like looking for a needle in the hay stack. To save you from the awkward situation, Pavtube BDMagic comes to give you a hand. I heard it on the Web and then tried it to help me backup my purchased Blu-ray/DVD and convert them to use on devices(House TV, iPad, Camping Car TV). Read reviews here.

What's the results? I found this program is an elite Blu-ray to Camping Car TV ripper that can rip Blu-ray and DVD to Camping Car TV with fast speed and high quality. More stunningly, this Blu-ray Ripper has the mighty power to disable any copy protection measure put on Blu-ray and DVDs in a walk, so that you can convert any copy-protected discs, like Despicable Me 2 and Fast and Furious,etc. to Camping Car TV without a hitch.

Rip Blu-ray and DVD to Camping Car TV Fast and Losslessly

1. Install and launch the best Camping Car TV Blu-ray converter. Mac version is BDMagic for Mac.

Note: An external Blu-ray drive is required for ripping Blu-ray disc.

Camping Car TV Blu-ray converter

2. Click Disc icon to load movies from your Blu-ray/DVD and then tap the Format icon to choose the Common Video > MPEG-4 Movie(*.mp4) as the export format.

Camping Car TV playback video format

3. Hit the Settings button to see detail information of the format, and you can change the profile parameters as you need.

Tips: 

a. For Blu-ray movies, you can customize the video size as 1280*720 to get a 720p video.

b. For DVD movies, set the video size as 720*480 is enough due to DVD’s original resolution.


MPEG-4 video settings

4. Click the Convert button to start to convert Blu-ray/DVD to MPEG-4 video for Camping Car TV.

After the conversion, you can copy the resulted .mp4 videos to Camping Car TV effortlessly for freely watching when you are away from home.

Additionally, Pavtube BDMagic not only offers you the easiest solution to rip Blu-ray/DVD to Camping Car TV one but also enables you to rip any Blu-ray and DVD to AVI, MKV, MOV, etc or convert them for playback on Xbox 360, Roku 3 and external network drive with crisp quality and lossless quality.

Wednesday, January 14, 2015

Stream all your Video from PC to Xbox One

How to stream video to Xbox One? This article teaches the way streaming all videos from PC to your game console Xbox One with ease.

If you’ve got a Xbox One, you’re in luck, because that’s our today’s lesson. It must be a huge waste to just play HD games on your Xbox One, you can also regard it as a media player. And in this Video to Xbox One guide, I will teach you how to stream any video from PC to Xbox One.

Stream all your Video from PC to Xbox One

Part 1: Stream Xbox One Supported Video Formats

Xbox One is capable of receiving and displaying video streams from Windows Media Center 7 and Windows 8.1 PCs. So long as the PC and Xbox One reside on the same network, the streaming process is fairly simple.

1. Make sure you have the video application open on your Xbox One.

video application on Xbox

2. Check your PC network settings and ensure that the Xbox One is visible on the network. If it is not, make sure both devices are properly connected and configured to see one another.

preference

3. Check your Xbox One Preferences under Settings and make sure “Play To” support is enabled.

Xbox One play to

4. Select a locally-stored video file on your PC. Most popular video file formats should work.

5. Right click the file or files you wish to play.

6. Select the “Play To” option.

7. A drop down menu should appear listing all compatible decides detected on your home network. You should see your Xbox One listed among them.

8. Select your Xbox One. The stream will load and then begin playing.

The Xbox One’s video controls will then take over, allowing you to pause and play the stream without touching your PC again.
Part 2: Stream all your Video from PC to Xbox One

Note: There is still one important matter we should mention that the copied video files should be compatible with Xbox One or the Xbox cannot read the video files at all. If you don’t have a Xbox One compatible-video file, you should convert the video files to Xbox One playable format first.

To get the work done, Pavtube Video Converter Ultimate is the highly recommended tool for you. (Read review) With the professional Xbox One Video Converter, you can convert your un-compatible video files to Xbox One MP4 video easily and quickly. That is to say all kinds of video formats could be played on Xbox One by converting. Moreover, you can freely edit your videos like trimming, cropping, adding watermark, adjusting the effect. Now just download the free trail and follow the steps below to see how it works.

Step 1: Import video/movie files.

Launch the best Xbox One Video Converter(Mac version is here). Click “Add video” to import videos from PC.

Xbox One Video Converter

Step 2: Select an output format for Xbox One and set the output folder as you need.

Click on the dropdown menu of “Format” and then move your pointer to “Common Video”. From the sublist, the “Xbox 360 Video - Windows Media Video(*.wmv)”, “Xbox 360 Video (640*480)(*.wmv)”, “Xbox 360 HD Video (*.wmv)” are all the friendly formats for you to copy videos/movies to Xbox One for enjoyment. It is also possible to convert your videos to PS3.

Xbox One WMV format

Step 3: Trim the videos/movies for Xbox One.

Click the Edit function and you will go into the “Video Editor” windows. In the interface, click the “Trim” icon, and then trim your videos/movies. Usually, you can trim your videos/movies into two parts.

Step 4: Start converting your videos/movies to Xbox One.

Click the “Convert” button; it will convert videos/movies to Xbox One immediately. You can find the process in the “Conversion” interface. After the conversion, you will be able to get the first movie/video part for Xbox One via clicking on “Open” button effortlessly.

Now you can copy/tranfer videos/movies to Xbox One without any video size restriction. Also learn how to rip Blu-ray, DVD or ISO files for Xbox One.

Monday, January 12, 2015

Stream videos from my DSLR on NAS to PS3 for playback

Is it possible to access my own DSLR files on NAS to PS3? Now follow this article to play high-bitrate DSLR videos on PlayStation 3 smoothly effortlessly!

Question: I mainly store photos and videos from my DSLR on my NAS. I want to review high-bitrate footage on an HDTV (PlayStation 3) and stream it to my iPad when I'm not home. But it is really a huge conflict between DSLR videos on NAS and PS3 Media Player. What should I do? 
 Stream videos from my DSLR on NAS to PS3

PS3 tends to serve as the all-in-on hub for your home entertainment. However, PS3 supported video formats are quite limited as below:
VIDEO: MPEG-1, MPEG-2 (PS,TS), H.264/MEPG-4 AVC, MPEG-4 SP
MUSIC: ATRAC (.oma .msa .aa3), AAC (.3gp .mp4), MP3 (.mp3), WAV (.wav)
IMAGES: JPEG, GIF, PNG, TIFF


To watch DSLR video files on PS3, the movie file needs to be converted to H.264 video, with the file extension like .mp4 or .avi. Therefore, if you want to stream videos from my DSLR on NAS to PS3 for playback, an PS3 Video Converter is needed.

And according to the PS3 users' feedback, Pavtube Video Converter Ultimate/iMedia Converter for Mac is supposed to be the right choice. It's offers a hassle-free solution to seamlessly make any file fully compatible with the PS3. With it, you can fast change MXF, MTS, MOV, MP4 DSLR movie files on NAS to PS3 compatible formats while keeping the orginal video quality. (Take a look at the review to learn more) Just download the program and follow the tips below to easily make PS3 play your DSLR videos.

How to convert videos from my DSLR on NAS to PS3 supported file format

1. Load DSLR vides to the converter

Download and install Video Converter for PS3 on your computer. Run it and directly drag and drop the recordings that you want into the main window of this converter. You can also add your video clips by clicking the “Add Video” button on the left bottom. This Ultimate Converter can also rip your Blu-ray, DVD and YouTube video to play on PS3.

Video Converter for PS3

2. Select format for PS3

After the files are added, click Format > PSP/PS3 and set output video format as PS3 Video(720P) MPEG-4(*.mp4) which the compatible MP4 preset for streaming via PS3 with best video quality.


Note: PS3 just plays the MP4 files with H.264 video codec and AAC audio. Click the Settings icon to set the correct video, audio codecs.


3. Begin the conversion

Hit the Convert button to start converting DSLR video from NAS to PS3 for playback.

4. Import Video To PS3 And Enjoy On Bigger Screen

After conversion, you could find converted video in the output folder. Copy them to your memory card, external drive or even an iPod, and then plug the storage media into your PlayStation 3 through USB.

plug the storage media into your PlayStation 3 through USB

You see, there is flashing indicating USB device (storage device) inserted. Click it and select the video that you want to import. Pressing the triangle button gives you several options -- navigate to "copy"or "move"(find the difference here).

Once your transferring is done, your imported video will end up in your PS3 video playlist. And now, you could enjoy your videos from my DSLR on NAS on PS3 system. It is easy right? And are you ready to try it by yourself?

Friday, January 9, 2015

High Quality Video Compression: Integrating an H.265/HEVC Solution for Android Platforms

This article introduces Strongene's H.265/HEVC solution on Intel Atom processor-based Android tablet. If you have any H.265 playback problem on Android or wanna an alternative, please refer.

For the HD videos are very popular today, most of us must have some HEVC files in Android Platforms. Here offers you some effective H.265/HEVC Solutions, we will provide you with information on products and services that we consider useful and of value to developers.


Abstract

According to the International Data Corporation, the total amount of global data for 2012 reached 2.7 zettabytes, an increase of 48% from 2011. Ninety percent of the global data was videos. Video apps consumed 66% of the total Internet data flow, and that number continues to increase rapidly. End users want to watch high quality videos but, for online video providers, costs of purchasing the network bandwidth and the storage devices grow increasingly expensive every year. How can video content providers meet the challenge of large data sources and their increasing storage requirements? Is it possible to achieve high quality videos with smaller bandwidth? The solution to these challenges is found in utilizing a video core compression technique known as High Efficiency Video Coding (H.265/HEVC).

Some open source communities such as FFmpeg are developing an H.265/HEVC decoder, but the performance has not yet reached commercial use capability. Strongene Ltd., a producer of video codec core technology, has developed advanced H.265/HEVC encoder/decoder solutions, including optimized H.265/HEVC encoder/decoder libraries and demonstration codes for Intel® Atom™ processor-based Android platforms. This article introduces Strongene's H.265/HEVC solution on Intel Atom processor-based Android tablet (condenamed Bay Trail).

Strongene's H.265/HEVC Solution

To evaluate a good video standard, we generally use efficiency and compatibility standards. The video standard evolution over the past 20 years is shown in the following graph:


video standard evolution

Figure1. Video standard history

H.265/HEVC is the successor codec to H.264/AVC (Advanced Video Coding), both were developed jointly by the ISO/IEC Moving Picture Experts Group and ITU-T Video Coding Experts Group (VCEG). The primary goal of the new codec is to provide 50% better compression efficiency than H.264 and support resolutions up to 8192 x 4320.

As shown in Figure 1, it took 9 years to evolve from MPEG-2 to H.264/AVC, so more challenges are expected to be encountered in moving from the H.264/AVC standard to the H.265/HEVC standard. Gaps between the technical concept and the actual quality of the product still exist for H.265/HEVC. However, H.265/HEVC does a good job of balancing the efficiency and compatibility requirements, which make up the next level of video standards.

Strongene's H.265/HEVC solutions were optimized using YASM assembler compiler, Intel® C++ Compiler, Intel® Streaming SIMD Extensions (Intel® SSE), and Intel® Threading Building Blocks (Intel® TBB), with OpenGL* used for rendering. By directly uploading the decoded YUV420 data to the GPU, it finishes the transcoding of YUV data to RGB data and renders the RGB data to LCD. This reduces the CPU's workload and improves performance. The data stream is shown in the following diagram:
CPU's workload

Figure2. Render method comparison

On an Intel Atom processor-based tablet (codenamed Bay Trail), after having been tested by Intel® Graphics Performance Analyzers (Intel® GPA) tool, the optimized H.265/HEVC decoder refresh rate can reach 90 FPS (frames per second) when playing a 1080p HEVC video. If we set the refresh rate to 24 FPS on the Bay Trail tablet when playing the 1080p video, the CPU workload is less than 25%. Thus, Strongene's H.265/HEVC solution achieves commercial use capability.

Analysis of the APIs of Strongene's H.265/HEVC Solution

The APIs of Strongene's H.265/HEVC solution are easily used directly with or integrated into FFmpeg open source. Strongene defined five functions and one structure for the H.265/HEVC decoder, as listed below:

Structure:

lenthevcdec_ctx;

Description: It is the context of decoder for identifying different decoders.

Functions:

1. Unit32_t lenthevcdec_version(void);

Description: For getting API version of current library.

2. lenthevcdec_ctx lenthevcdec_create(int threads, int comoatibility, void* reserved);

Description: Create decoder with specified parameters.

Example: 

int32_t got_frame, width, height, stride[3], ret, i;
uint8_t* pixels[3];
int64_tpts, got_pts;
for ( i = 0; i <au_count; i++ ) {
pts = i * 40;
got_frame = 0;
ret = lenthevcdec_decode_frame(ctx, au_buf + au_pos[i], au_pos[i + 1] -
au_pos[i], pts,&got_frame, &width, &height, stride, (void**)pixels,
&got_pts);
if ( ret < 0 ) {
fprintf(stderr, 
"calllenthevcdec_decode_frame failed! ret=%dn", ret);
exit(1);
}
if ( got_frame> 0 ) {
printf("decode frame, %dx%d, pts is %" PRId64 "n", 
width, height, got_pts);
/* got frame, do something ... */
}


How to Integrate Strongene's H.265/HEVC Solution

Developers can easily integrate these five functions when developing HEVC video players. The documentation and sample code are available from Strongene's download web site.

Developers can directly call the Strongene's H.265/HEVC APIs to develop their video players, or they can merge Strongene's H.265/HEVC patch for FFmpeg, and then use the merged FFmpeg APIs to develop their video players. The following paragraph introduces the two methods separately.

Directly Use Strongene's APIs to Develop Video Players
On Strongene's web site, developers can download the:
  • sample code testdec.c/lenthevcdec.h 
  • decoder: liblenthevcdec.so 
  • documents: lenthevcdec_en.pdf, the Makefile 

Copy the sample code to Ubuntu* build machine into separate folders: 

wangsy@ubuntu:~/Desktop cp testdec.c Makefille ~/hevc/src
wangsy@ubuntu:~/Desktop cp lenthevcdec.h  ~/hevc/include
wangsy@ubuntu:~/Desktop cp liblenthevcdec.so ~/hevc/lib/Android_x86 

Set up ANDROID_NDK_HOME environment with the "export" command:

export ANDROID_NDK_HOME= $ ANDROID_NDK_HOME :/~/android-ndk-r9c 

Then you can run the demo on the Android devices directly.

Use the H.265/HEVC Patch for FFmpeg to Develop the Video Players
In fact, most developers will use the open source FFmpeg to develop their video players. Strongene's web site also provides the patch for FFmpeg, which can be downloaded from:lentoid_ffmpeg2.0_patch_2014_01_23_new_encoder_interface.patch

To merge this patch, you should also download and decompress the FFmpeg 2.0.4 version. Then add the patch:

wangsy@ubuntu:~/ffmpeg-2.0.4
patch &ndash;p1 < ./lentoid_ffmpeg2.0_patch_2014_01_23_new_encoder_interface.patch

Copy the downloaded headfile and the libs code to ~/ffmpeg-2.0.4/thirdparty 

cp lenthevcdec.h lenthevcenc.h liblenthevcdec.so liblenthevcenc.so ~/ffmpeg-2.0.4/thirdparty 

Copy the following configure file to ~/ffmpeg-2.0.4 and add the "run" permissions: 

wangsy@ubuntu: cp build_x86.sh ~/ffmpeg-2.0.4
wangsy@ubuntu: sudo chmod a+x ~/ffmpeg-2.0.4/build_x86.sh 

Download build_x86.txt

Run the configure file "build_x86.sh" (embedded above), then run the "make" and "make install" commands. The merged FFmpeg with Strongene's H.265/HEVC patch should now be built successfully. The output libs will be under ~/FFmpeg2.0.4/android/x86/lib. You can use these output libs in your video players.

Summary

The H.265/HEVC standard is becoming more and more popular in the mobile market. Online video providers, mobile Internet users, and broadcast/TV operators are the beneficiaries of this new video revolution, along with users. To produce the results described in this article, Strongene's H.265/HEVC solutions were fully optimized for Intel® Atom™ processor-based Android platforms, so don't hesitate to adopt their solutions to develop HEVC players. 

via codeproject.com 

Editor's Note:

Didn't understand? Never mind! Due to the complex process, you may meet unexpected problems. Please comment below.

If you need an easy-to-use yet powerful H.265 encoder, decoder and converter, the upgraded Pavtube Video Converter Ultimate will be the perfect solution. It is clean and safe to install and use. With it, you can not only effortlessly transcode Blu-ray, DVD and non-H.265 video to H.265/HEVC MP4 for Android, but also decode H.265 video to any video format for playback on media player, Android devices and game consoles without problems. It works well and converts flawlessly.