Showing posts with label Media Players. Show all posts

Friday, December 26, 2014

Open and play Blu-ray in VLC Media Player

This article mainly shows you how to open and play Blu-ray in VLC Media Player effortlessly in MKV video format.
 
Blu-ray has been around for a long time and thousands of Windows users would try to play Blu-ray with VLC Media Player. While, as a widely used media player, VLC does not support Blu-ray playback, though lots of video and audio codecs can be supported well. Below is my situation:

What I want is to put my Blu-ray collection into MKV for use with VLC Player on notebooks and tablets that my wife and I can watch. Since I thought the VLC playback in the tablet modern interface looked solid - some older MKV files ripped with a BD converting tool in a lower quality (about 5GB per DVD) played well on higher power machines. I have some concerns about the Atom graphics ability to recover HD from MKV, and may try some experiments with other formats when I get a chance.
Put Blu-ray collection to VLC

In the following paragraphs, we are going to talk about how to convert Blu-ray to VLC supported video format by default like MKV for movie enjoyment freely. As I tried Pavtube a few years back - and the reviews I read seemed to indicate that a business capable of supporting it was in place, here I use Pavtube Blu-ray Ripper program- ByteCopy to help me out which is known as the best application for Blu-ray ripping and converting Blu-ray to VLC MKV format on Windows XP/Vista/7/8/8.1/10. (Here is the review)

With it, you can rip Blu-ray to VLC Media Player highly compatible MKV videos bypassing the AACS and BD+ copy protection. Besides, you can extract audio from the Blu-ray movies for enjoying with PonoPlayer. Moreover, you can even use it to edit your source movie by cropping, placing watermarks, trimming and so on. Mac version is here. Once you get the Blu-ray Ripping tool, carefully read the steps below to watch Blu-ray movies on your VLC.

Convert and Add Blu-ray to VLC Media Player for playback
1. Load Blu-ray movies.

Insert the Blu-ray disc to Blu-ray drive. Download, install and open Blu-ray to VLC Ripper. Click “Load File(s)” button on the main interface of program to load your Blu-ray movies. As you can see, you can view the movie on the right viewing window and take snapshots of the movie scenes.

Blu-ray to VLC Ripper

2. Select output format for VLC Media Player.

Click “Format” > “Common Video” and choose MKV as the output format, or click “Format” > “HD Video” and choose “MKV HD Video(*.MKV)” as the output format. And set the output saving folder by clicking “Output” and choose a folder to save the ripped files.

What's more, you can rip Blu-ray for playing with Windows media player and Media Player Classic.

VLC video format

3. Start the Blu-ray to MKV conversion

Finally, click the “Convert” button to start ripping Blu-ray movies to MKV for playing in VLC Media Player. The ripper can help you finish the task soon, to save your time and work.

When the conversion finishes, you can click “Open” button to get the final output files. Open VLC Media Player and then add items to VLC for playback.

Tips for ripping Blu-ray movies to VLC:

1. Select desired subtitles and audio track: Click the drop-down list of “Subtitle”, then all the subtitle info in the Blu-ray will be displayed for you to select. To select your desired audio track, just click the pull down menu of “Audio”, and then the popup drop-down list will give you the detailed information of all audio tracks, including language, audio codec, and stream ID.

2. Maintain 5.1 surround sound: Click “Settings” and select “5.1 channels” in the drop-down list of Audio Channels.

VLC video settings

4. Keep audio and video sync: To get perfect A/ V synchronization, you need pay attention to frame rate when ripping BD/ Blu-ray movies to Windows Media Center. You can click on “Settings” and try with different frame rate, like 30fps, 29.97 fps, 25fps, 24fps, etc. “Original” is not recommended.

5. Set auto shutdown: Once “Convert” button is clicked, ViewLog pops up. You may check “Shut down computer after conversion” in the ViewLog before conversion starts.

Also learn how to copy DVD to VLCFor general information about Blu-ray, DVD disc ripping, read the article here.

What's new in the upgraded ByteCopy:
  • Add H.264 baseline/main/high output profiles
  • Support H.265/HEVC decode
  • Support H.265/HEVC encode
  • Support latest Blu-ray movies 

Tuesday, December 23, 2014

Transfer National Treasures 2 Blu-ray to Android Tablet as well as TV

Looking for a quick way to rip National Treasures 2 Blu-ray to Android Tablet or convert to watching on TV? Read this article to learn how.

I have bought "National Treasures 2" Blu-ray disc movies from Amazon, and I like it so much that I am looking for a software to help me rip Blu-ray to USB and then play Blu-ray on my Android Tablet and TV, which one can convert this Blu-ray with best quality and speed? Please give me some advice, thanks!
Put National Treasures 2 Blu-ray to Android Tablet/TV

Now just rip your National Treasures 2 Blu-ray to your computer or USB, and you've got a digital copy of your Blu-ray that you can watch at any time from anywhere! If you have any device, like Android Tablet or TV, it's super easy to get your Blu-ray movie for HD enjoyment. The process is relatively simple, so even if you are not technically savvy, you should be able to backup any Blu-ray disc without an issue and have a format to be used on Android Tablet/TV.

What You’ll Need- Pavtube BDMagic (Review) which can remove the disc protection and copy source disc to computer hard drive with same structure preserved. Also rips National Treasures 2 Blu-ray to Android/TV friendly format with ease. Test it and works well on all my seven devices: 3 smart mobiles and 4 tablets. The Mac version is Pavtube BDMgic for Mac.

Rip National Treasures 2 Blu-ray to Android Tablet as well as TV

Step 1: Import National Treasures 2 Blu-ray to the best Blu-ray Ripper for Android/TV.

Launch Pavtube BDMagic. Click the button "File", and from the sublist, click "Load from disc" to load your National Treasures 2 Blu-ray movies

Blu-ray Ripper for Android/TV

Tip: Freely select the subtitles for you Blu-ray movies from the "Subtitles" option for watching Blu-ray with your preferred subtitles.

Step 2: Select an output format for Android/TV and set the output folder as you need.

Click on the dropdown menu of “Format” and then move your pointer to “Common Video”. From the sublist, the H.264, MPEG-4, AVI, MKV are all compatible with TV. Or select "Android Tablets 720P Video(*.mp4)" or "Android Tablets 1080P Video(*.mp4)" from "Android" option for watching on Android tablets.

format for watching on Android tablets

Step 3: Click "Settings" icon to adjust audio and video parameters.

Click the "Settings" icon and you will go into a new interface named "Profile Settings". You can adjust codec, bit rate, frame rate, sample rate and audio channel in the interface freely and optimize the output file quality.

PS: Since you will share Blu-ray on Android tablet and TV, you'd better set the video size as 1920*1080 to get the full HD video playback.

Tip:

1. Video Editor available in this converter.

Another reason I like Pavtube is it ships with many video editing features, and usually I use it to cut off black bars of original Blu-rays and play full screen on my HD TV at home. Besides, it does more than that. It trims off unwanted commercial parts, add watermarks as copyright protection to your source file, insert *.srt and *.ass subtitles and more.

2.Other small but essential functions.

Pavtube application takes advantage of the NVIDIA CUDA technology and AMD APP technology, and the conversion speed can be increased up to 6 times faster than ever before.


Step 4: Start removing Blu-ray region codes

Click the “Convert” button; it will convert National Treasures 2 Blu-ray movie to Android tablet as well as TV immediately. You can find the process in the “Conversion” interface.

After the conversion, you will be able to get the output files via clicking on “Open” button effortlessly. Now you can transfer National Treasures 2 Blu-ray movie to Android Tablet/TV via USB to share with your families at ease.

In addition to Blu-ray, DVD, MKV and M4V can also be playable on Android tablets. 

Monday, December 22, 2014

Rip Blu-ray title to AVI format for playing on any modern portable media player

This tutorial is about how to use Pavtube BDMagic to convert Blu-ray title to AVI for playback with specific modern portable media player. Please follow me step by step.
 
In the past, if you want to preserve your hundreds of Blu-ray discs, it may take you the space of a whole shelf. Now to clean up your Blu-ray collection and get them freely playback on any modern portable media player, ripping Blu-ray to AVI format should be the right thing to do. So today I am here to give you guys the one-stop solution to convert Blu-ray to AVI with original video quality.
convert Blu-ray to avi

For those who would like to realize the ripping process, Pavtube BDMagic will be your best option. (Here is review) It enables you to remove Blu-ray protections and then rip Blu ray to AVI format, which is playable on majority of PC media players, with keeping most razor-sharp image. Besides AVI, users may use it to convert their Blu-ray to other formats like MP4/MOV/MKV/WMV/MPEG, and to play on other devices as well.

Now I will show you the full guide on how to convert Blu-ray to AVI with High Quality and Fast Speed. Check out. 

Tutorial: How to Rip Blu-ray to AVI for playing on any modern portable media player

Step 1: Load Blu-ray Movies

Install and run the ideal Blu-ray to AVI Converter(For Mac users, BDMagic for Mac will do a great job). Simply click the "Load BD" button on program toolbar to load Blu-ray movies from disc or computer. All imported Blu-ray movies could be previewed on program right viewing window. 

Blu-ray to AVI Converter

Tip: All titles of the original Blu-ray movies could be seen on program left panel. And in every title, you can see various chapters. Just check the titles or chapters you want to rip.

Step 2: Choose Desired Subtitles for Output 

To convert Blu-ray movies to AVI with subtitles contained, just simply click “Subtitles” and select the one you prefer.

Tip: You can also choose to rip Blu-ray with forced subtitles if you don’t want to have extra subtitles on screen for your native language.

Step 3: Select AVI output format
Select “DivX AVI - Audio Video Interleaved(DivX)(*.avi)” as output format from “Common Video” category under the drop-down list of “Format”. If you want to get better HD video quality, choose “AVI HD Video(*.avi)” from “HD Video” category as the output format for playback on any modern portable media player.

  avi video format

Step 4: Start ripping Blu-ray to AVI

As all settings are done, you can click bottom-right button "Convert" to start converting Blu-ray to AVI. The time that it takes Depends on your source movie quality and Movie Length. And thanks to its built in Nvidia CUDA and ATI stream accelerate technology. Makes the conversion speed at least 6X faster than common conversions. 

When the task is done, click “Open” button to find the result movie file. Then, you can grab a top AVI player and view Blu-ray titles in modern portable media playersOf course, the lossless quality is ensured on output files. In addition to Blu-ray playback, you can also get Blu-ray for editing in your Premiere Pro freely. 

Saturday, December 20, 2014

How to Fast Rip and Stream Blu-ray Movies to Roku 3 on PC and Mac?

Want to stream Blu-ray to Roku 3? This article will show you how to rip and stream Blu-ray movies to Roku supported formats for playing on HD TV.

Roku is another popular streaming player, besides Apple TV and Chromecast. Roku 3 features a USB Media Player Channel to let you stream local video collection to HDTV. How about Blu-ray movies? (Apple TV vs. Roku 3 vs. Boxee Box vs. WD TV Play vs. Google TV)
Stream Blu-ray Movies to Roku

What video formats supported by Roku streaming box are only some common ones of H.264 MPEG-4, such as .mp4. Obviously, all Blu-ray movies do not conform it. In other word, ripping Blu-ray movies to video in .mp4 format should be a priority for streaming it to TV with Roku 3.

Among various Blu-ray ripping tools, Pavtube BDMagic is rating in the first place. (Read the review) It is easy to use and helps you fast rip any 2D/3D Blu-ray to conventional and unprotected video file to let you stream for Roku 3 USB channel. Besides, this Blu-ray converter and rip BD, DVD, ISO to a wide range of formats, like WMV, MOV, MP4, 3GP, FLV, MPG, AVI and the list goes on. So, if you want to play Blu-ray movies like Frozen on HD TV via Roku, it is sensible to learn how to stream Blu-ray to Roku 3 in the following part.

Step-by-step guide to rip and stream Blu-ray to Roku 3 on PC/Mac

Step 1. Load Blu-ray source.

This Blu-ray to Roku 3 ripper (Mac version is BDMagic for Mac) allows you to rip Blu-ray disc, ISO image file and BDMV folder for streaming to Roku 3. After loading successfully, it will select main title for you automatically and popup output profile window for you. 


Step 2. Select output profile.

Click the “Format” option, and choose MP4, MKV from Common Video profile list. If you want to keep 1080p resolution as source movie, you can choose HD Video > H.264 HD Video(*.mp4) for streaming to Roku 3 and play on TV.

Roku 3 video format

Step 3. Advanced video/audio settings

Roku 3 does play MP4 files according to the relevant info in Roku official site. However, Roku just plays the MP4 files with H.264 video codec and AAC audio. Click the Settings icon to set the correct video, audio codecs.

Step 4. Hit Convert to start ripping Blu-ray to Roku 3 acceptable format.

Click the convert button under the preview window, and the Blu-ray ripper will start the conversion from Blu-ray to MP4/MKV for Roku 3 immediately. When the conversion ends, you will be able to get the result video via tapping the Open button in the main interface.


Step 5. Stream Blu-ray movies to Roku 3.

In this step, you are supposed to:

  • Transfer the digital copy in MP4 to a USB file or SD card and attach it to Roku.
  • Make sure Roku USB Media Player Channel has been installed from Roku Channel Store.
  • From the Roku home screen, select the Roku USB Media Player channel, and find the movie in the channel. (FYI: In a folder with both video files and subfolders, the video and movie files are shown at the top of the screen and the subfolders at the bottom of the screen.)
  • Select the movie ripped from Blu-ray to stream to HD TV via Roku. It may take several seconds to buffer or retrieve.

Thursday, December 11, 2014

Top 10+ Android Video Player for Your Android Device

This article shows top Top 10+ Android Video Player with main feature for you to playback videos or movies on Android Device freely.

There are millions of apps in Google Play store ( Android Market Place ). Well if you search internet for an Android app, you will find your desktop filled with countless apps. It is a daunting task to find out the 10 best Android movie player apps among thousands. Terrified? Not exactly? And why should you be?
Android Video Player

Here is a list being prepared to you for your convenient. The list is an updated one. All these apps mentioned here are free-though some have their pro paid versions but their free light versions are quiet good.

Top 10+ Android Video Player for Your Android Device 

1. MVideoPlayer HD

This Android video player has its huge fan base. This player has built-in subtitle search option from OpenSubtitles.org, EngSub.net etc. It has a very beautiful UI. It has a lot of options to tweak.

2. MX Player

This video player for Android is very popular too. This Android Movie player app is technologically advanced. It supports double core processing of the latest Android devices resulting great rendering and no lagging while playing HD movies.

3. Mobo Video Player Pro

Mobo Video Player Pro has support for a wide range video codec. Use it if you have become bored of your mobile handset’s stock video player. This player is a bit choppy while playing HD movies.

4. YouTube

YouTube is for, well, for YouTube. This is the official YouTube player from Google. With this player you can enjoy in-page playback. It has a personalization option to load your own video feed.

But all YouTube videos are not available for this mobile app.

5. VPlayer

VPlayer is a very good android video player app. It has a wide range of supported formats. It uses HW accelerated decoding and rendering of movies and videos. You can play streamed videos here. YouTube is supported. You can also watch videos from Facebook or Dropbox in it. It has DLNA support too.

6. Easy Video Player

Easy Video Player claims to detect and play all the popular video formats. It is HD enabled. The most noteworthy feature of Easy Video Player is that it supports Wi-Fi file transferring.It supports hiding Video files facility. If you play a video on it it can resume it later from the point you have stopped watching.

7. RockPlayer

RockPlayer supports almost all the formats. This media player has a lot of functions. It can transcode videos to save valuable space. Not only the videos from SD card but also online streaming video is also supported.

8. RealPlayer

RealPlayer is the android version of the famous RealPlayer for PC and Mac. RealPlayer can play Music and videos and is also can open photos. It has an intuitive user interface. It has a great playlist editor. It can play folders. The scrolling is fast in this app.

9. Zimly

Zimly is cool video and media player. Zimly’s main problem is that it do not have any sound equalizer and sound produced through is quiet flat.

10. arcMedia

These are the top ten Android Video Player Apps available for free. Try these on your Android mobile and see for yourself.

10+ RockPlayer Lite

RockPlayer is high performance, almost all formats media player with a lot of functions. It saves your time and disk space to transcoding or format converting. Just put your video on sdcard or click the URL in browser to watch.

These are the top ten plus Android Video Player Apps available for free. Try these on your Android Tablet and smartphone and see for yourself.

PS:

1. With a powerful third-party media player you can play more videos on your Android device, however, this does not mean it can play everything you throw at it. You'd better put your Android Tablet/Phone friendly videos to your device.

2. To avoid error messages or file and codec incompatibilities while using these video players, the best recommended solution is convert unsupported Blu-ray, DVD and videos to play on Android devices with a top easy-to-use 4K video converter with powerful function. 3. Remember don't put copy-protected contents (e.g. iTunes movies, Amazon, Blu-ray/DVD Digital Copies) onto your Android device.Otherwise, to have the device play these movie purchases, get yourself a DRM removal tool first.

Tuesday, November 25, 2014

With Plex Movie Trailers- Get Closer to The Cinema Experience

The cross-platform media server Plex supports movie trailers and extras now. Here shows you how to add local clips to your movie library for enjoyment.

Plex, the official app of the popular media server on most platforms, has just been updated with a couple of much-requested features, including movie trailers and extras, which can cover anything you'd usually find on a DVD or Blu-Ray disk, including interviews, deleted scenes and behind-the-scenes content. It brings functionality a lot of users have been waiting for.
Plex

Are you enjoying Plex Movie Trailers yet? Learn tips and tricks below to add and load local Extras to get closer To The Cinema Experience. Plex Pass users (Plex’ premium subscription service) can get more impressive features.

Trailers and Extras

Trailer and extras support is currently found in Plex Home Theater, the web app, Android and iOS applications. Other platforms should follow shortly. Local extras are detected by the media server and will be shown in the movie library by supported client applications.

plex web trailer

Plex Pass users get a very juicy bonus feature. When Plex adds a new movie to the library and is searching for metadata, high quality trailers and extras will automatically be pulled in from a third-party provider. This content remains in the Cloud, so Plex Pass users need not worry about incurring needless downloads.

plex pass extras

For avid cinema fans, Plex has added the ability to queue a number of cinema trailers when you start watching a new movie (it’s called Home Theater for a reason). To do this, Plex can pull trailers for the unwatched movies in the movie library. In addition, Plex Pass users can opt for trailers of upcoming Blu-Ray and theatre releases.

Getting Started

To get your trailer party started, you’ll need to make sure your Plex installations are up to date and properly configured.
Update Your Server & Client Applications

Both your Plex Media Server and Plex Home Theater installations will need to be up to date to process and access extras. Plex Home Theater may update automatically but, depending on your setup, Plex Media Server might not. Make sure you’re up to date in either case.

You can manually update Plex Home Theater by navigating to Preferences > System > Software Update in the application. To update Plex Media Server, just download the most recent installer from Plex Downloads and run the installation file.
Adding Local Extras

You can manually add trailers to your library that you’ve ripped from DVD or Blu-ray, or scraped from the Internet with Media Companion. For Plex Media Server to pick them up, the extras need to be added to the relevant movie’s folder in your library and follow Plex’ naming guidelines.

In a gist, this means that extras need to have a descriptive name suffixed with the type of extra. e.g.

Movie_Folder/Descriptive Name-ExtraType.ext

Currently, you can choose from six different ExtraType specifiers:

-behindthescenes
-deleted
-interview
-sample
-scene
-trailer

An example of a good name might be Avatar-trailer.mp4 or Theatrical Trailer II-trailer.mp4. The descriptive part of the name will determine how the content is shown in your Plex client.

plex extras naming scheme

If you’ve organised your library in a more hierarchical structure, with different subfolders for external subtitle files and metadata, you can also organise extra content with different subdirectories for each type of extra. Refer to the naming guidelines for more information.

plex update library

If you want Plex to spot these new files, make sure to update your library afterwards.
Automatically Load Extras (Plex Pass Feature)

Plex will automatically try to grab extras for Plex Pass users. This usually happens when Plex is processing movies that are newly added to your library. It’s important to note that these extras will not be downloaded to your computer; links to the extras are simply added to the movie metadata. In other words, if you’re a Plex Pass user, there’s really nothing to lose here!

plex settings freebase agent

To verify your media server configuration, open your Plex Media Server settings (you can also access these from the Plex/Web app if you’ve configured Plex for remote access) and browse to Agents > Movies. Make sure the Freebase agent is enabled in both the Freebase and The Movie Database tabs. It doesn’t need to be at the top of the list.


freebase settings

Open the preferences of the Freebase agent and make sure that the Find trailers and extras automatically option is enabled. Here you can also choose whether to download (more explicit) red band trailers and include extras with subtitles.

plex force refresh

You’ll probably also want to grab extras for the movies that are already in your library. To achieve this, you’ll need to do a Force Refresh of your movie library. This forces Plex to run all movies by the metadata agents again to check for new content, so this will take some time to complete.

Are movie trailers something you love, or try to avoid? Share your thoughts in the comments below!

More related news:
Source: makeuseof.com 

Monday, November 24, 2014

How to: DVD and Blu-ray ripping

Learn how to get a Blu-ray/DVD onto your hard drive by ripping them with Handbrake or find its alternative tool.

Blu-ray and DVD offer a handy way to get high-quality video into your lounge room, but discs are less convenient once you want to stream those movies around your home or slip them in your pocket as you walk out the front door.

DVD and Blu-ray ripping

This guide explains how to rip your Blu-ray and DVD and copy them to your computer’s hard drive so you can enjoy them without ever having to get up off your couch to drop a disc in the DVD player.

Unfortunately Australia’s copyright rules don’t permit ripping your DVD and Blu-ray movies to your computer. The recent copyright law review is unlikely to change this, although it’s worth remembering that we were ripping our music CDs for many years before Australian law caught up with the times. You’ll need to draw your own moral line in the sand when it comes to copying content which you’ve legally purchased on disc. These days some discs come with a digital download, but it might not be in a format which suits you.

THE RIGHT TOOLS FOR THE JOB 

There are several applications designed specifically for ripping movies, but let’s stick with the highly-respected HandBrake video transcoder. It’s available for Windows, Mac and Ubuntu, and because it’s open source, it’s completely free.

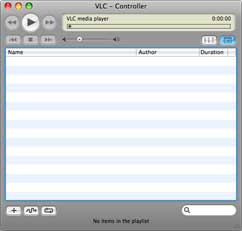
HandBrake removed its DVD decoding features several years ago, but you can get around this by installing the VLC media player.

Together these two free applications should happily convert your DVD library to MP4 video files which will play on a wide range of gadgets. You can also opt for MKV, but HandBrake ditched support for DivX and XviD several years ago.

Nothing separates MP4 and MKV in terms of picture quality, because technically they’re only container files. By default, HandBrake uses the H.264 video format inside both MP4 and MKV files. MKV is a little more flexible but, when in doubt, stick with MP4 because it’s compatible with a much wider range of devices. If you’re catering to Apple gadgets then definitely stick with MP4, ensuring you use the .M4V file extension so files play nicely with iTunes.

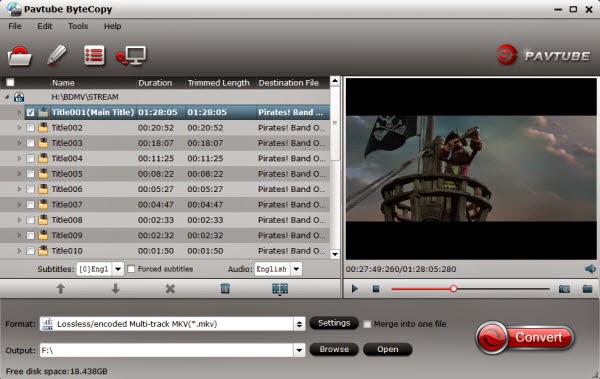
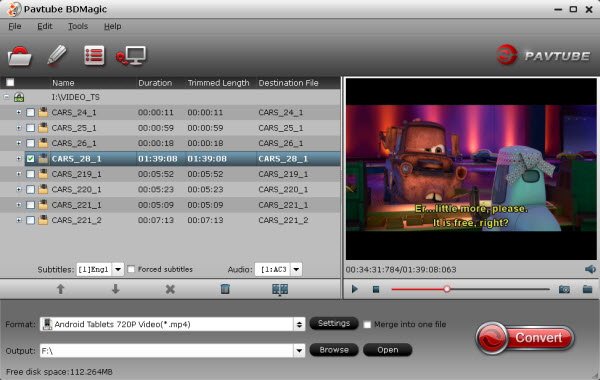
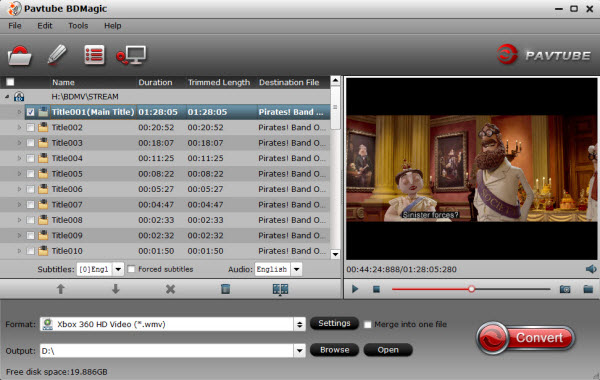
Pavtube ByteCopy can make a bit-perfect copy of your movies and save them on your computer as hefty VOB or M2TS files. Occasionally you’ll run into a particularly stubborn disc which these applications can’t rip due to damage or aggressive copyright protection. However, ByteCopy can deal with all kinds of Blu-ray and DVD discs.

THINK ABOUT THE BIG PICTURE 

Before you rip anything, consider how you’ll watch your movie files.

You need to cater to the fussiest devices in your ecosystem, which will most likely be Apple gadgets, Smart TVs or perhaps games consoles. Also consider how you’ll deliver files – perhaps you’ll copy them to the internal drive or a USB stick, perhaps you’ll stream them over your home network or the internet. Try to keep transcoding to a minimum.

In a perfect world the idea is to rip once, store in a central location and watch everywhere. This means finding resolutions and quality rates which look good on your large screens but don’t create files too large for your portable devices. Create test files before you go on a ripping frenzy.

LET IT RIP 

Ripping DVDs with HandBrake and VLC is very straightforward but it’s best to master the basics of converting DVDs before tackling your Blu-ray collection.

Click HandBrake’s Source button and point it at the DVD in the optical drive. It takes a minute to examine the disc and identify its list of titles. Even if you’ve got VLC installed, HandBrake might ask for the libdvdcss file in order to handle the encryption – although you should be presented a link for downloading it.

HandBrake selects the largest title and assumes it is the main movie. If the disc contains several TV episodes HandBrake will only choose one, but make sure it’s an individual episode rather than the Play All playlist. Sometimes you’ll see more than one title which looks like it could be the main movie. Some movie houses make life difficult by creating 99 titles, most of them dummies.

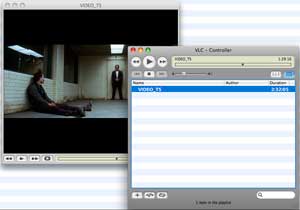
HandBrake has a knack for choosing the right title, but to be sure you can play the DVD in VLC. Go to the disc’s main menu and press Play on the movie or episode you want to rip. Don’t press Play All. Once it’s playing, click the Playback dropdown menu and look under Title to see which title number you’re watching.

HandBrake might take forever or even crash when scanning the disc. Or it might not see the title number you need. Once you know the title number, click Source, Title Specific Scan, Open Folder and then select the VIDEO_TS folder on the disc. Enter the title number and press Open Title. If you’re still stuck, try ripping the disc as an ISO first. Just having AnyDVD HD running in the background might be enough for HandBrake to read the disc correctly.

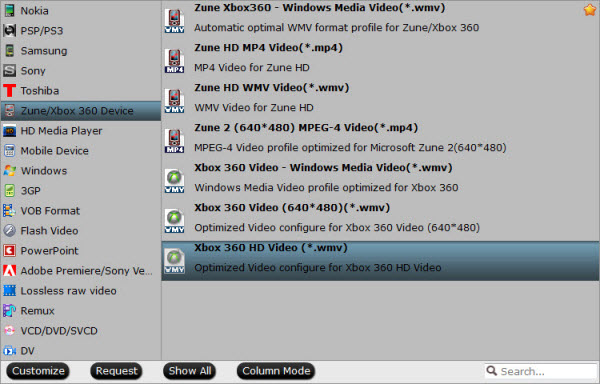
At this point you can keep things simple by choosing a device preset from the list on the right, such as iPhone, Apple TV or Android tablet. Now go to the destination bar, click browse and specify a folder along with a file name. Press Start and go make yourself a coffee. If there’s a string of TV episodes on the disc you should enable the auto-naming option in the preferences. Press Add to Queue and repeat for each title before you click Start and rip them as a batch.

GET CRACKING 

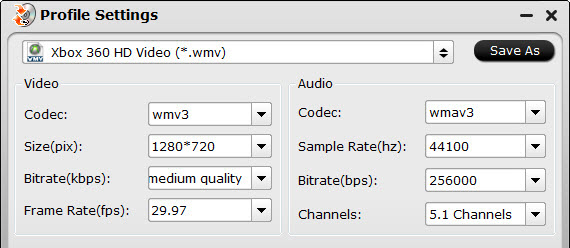
It’s a simple enough process, but you may want to dip into HandBrake’s Video settings to tweak the file size and picture quality. It’s a good idea to rip a few minutes of your movie as a test. Look for a scene with fast-moving action, dark shadows, skin tones and panning shots so you can watch for blur, pixelation and jitter when testing the different video quality settings on your devices.

For a quick settings check use the Preview button to generate a 30-second clip (although it can be flaky at times). When you’re ready to test on your various devices, choose a title but only scan chapters 1 through 1. Play this short test clip on every server and device you’re trying to cater for. Some devices can be very fussy even with files that they’re supposedly compatible with.

If the result looks terribly distorted and blocky then the DVD’s copyright protection probably hasn’t been bypassed. It’s also possible that VLC isn’t supplying the correct version of libdvdcss.dll and you’ll then need to download it.

Go to download.videolan.org/pub/libdvdcss/1.2.12 and grab the 32 or 64-bit version of libdvdcss-2.dll (if you’re running a 64-bit version of Windows then make sure you’re also running a 64-bit version of HandBrake). Now rename it libdvdcss.dll and move it into the HandBrake folder inside the Program Files folder.

EDITOR'S NOTE

But as for encrypted Blu-ray and DVD conversions, HandBrake's ability does not equal to its ambition any more. At Times you need HandBrake Alternative software to achieve better Blu-ray/DVD conversion, and Pavtube ByteCopy is the best recommended HandBrake Alternative. More details can be found on its official website:

http://www.multipelife.com/bytecopy

There are plenty of reasons that make ByteCopy surpass other competitive HandBrake Alternatives, even go beyond HandBrake itself, here lists some main advantages:

  • Do not need to worry about which OS your computer running on
  • Seldom crashes when dealing with encrypted Blu-rays and DVDs
  • Run more stable and convert Blu-ray/DVD movies faster
  • More specified profile setting for Galaxy Note 4, iPhone 6, iPhone 6 Plus
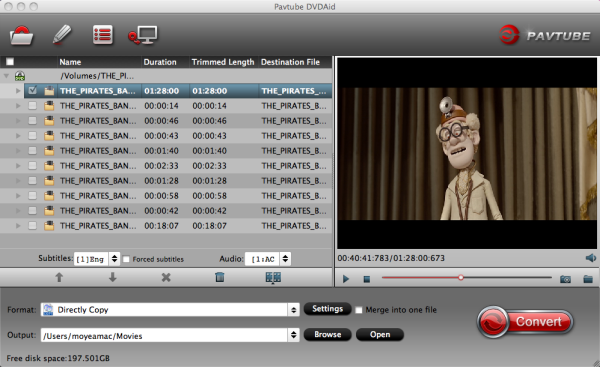
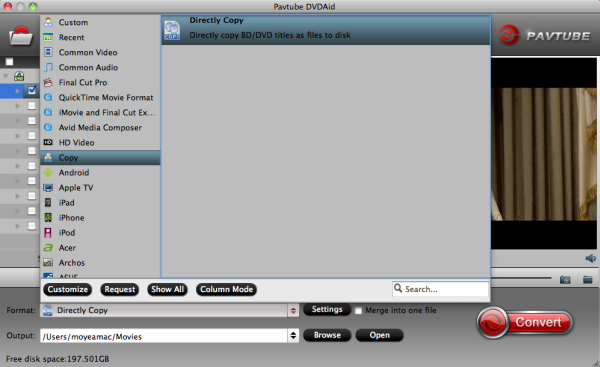
  • Perfect BD/DVD backup solution
  • Lossless Blu-ray/DVD copying
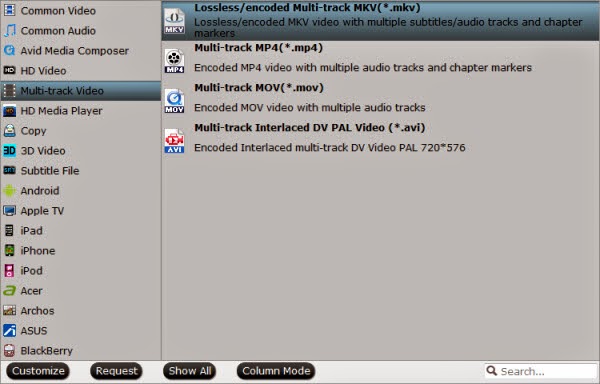
  • Multi-track preservation
  • Various video editing functions
  • 3D video output
  • Export single SRT subtitle file 
More related info:

Wednesday, June 25, 2014

How to keep DVD chapter markers when copying onto QNAP TS-469L NAS

Wondering how to backup your DVD disc to MKV on QNAP TS-469L NAS with keeping chapter markers? You are in the right place. The article will show you an easy and effective way to get it done.

As myself, I own a large collection of DVDs and like to watch them on the subway to work with iPhone, stream DVD movies to my QNAP TS-469L NAS server so kids could watch them on iPad, etc. As languages we use German, English and Spanish, so I have to find out a workflow to backup DVD collections with chapter marker and it's better to include at least three audio tracks in one conversion.

In this case, ripping DVD with chapter markers so as to keep a backup of your original disc on QNAP TS-469L NAS is a wonderful idea for you. Then comes the question: How to copy your DVD with keeping chapter markers? Here an easy and effective way is to convert DVD to lossless mkv format with no recoding and 1:1 quality.  

With such a tough task, I had spent a lot of time searching online, tried several SWs - some ok but always something that does not quite to do what I need. Luckily, I finally got this Pavtube ByteCopy.

Overall, this program is a pro version Blu-ray/DVD ripping program, it can not only rip and convert latest Blu-ray/DVD to various video formats for playback or editing, but also backup Blu-ray/DVD to lossless MKV preserving all the multiple audio and subtitle tracks as well as chapter markers. In this way, you can turn to any chapter marker at will when playing in some players such as VLC Player. 

Tips: 

1. Although this ByteCopy should be able to rip Blu-rays, I have no experience with it as I don't have an external Blu-ray drive. But one of my friends had a test and said it's quite worthy a try.

2. Mac version is also available: Pavtube ByteCopy for Mac.

How to backup DVD to lossless mkv for QNAP TS-469L NAS with keeping DVD chapter markers

1. Import DVD to Pavtube ByteCopy.

Click "Load file" icon on the top left to load the DVD disc.

2. Choose Lossless MKV with chapter markers.

Under "Format" menu, there are lots of video formats. Go to find "Multi-track Video" option and choose "Lossless/encoded multi-track MKV (* mkv)" because it will contain chapter markers in output MKV.


Tips: 
1. If you want to convert DVD to other video formats or portable devices, just choose the video format you need or select portable devices in the dropdown list.

2. You can check the audios you want to keep and uncheck the audios you don't need. It all depends on your own choices.


3. Start conversion.

Click big "Convert" button to start conversion. It won't take much time for conversion and then you will get lossless MKV once completed. Hit "Open" button you will go to location of generated files.

Now transfer the converted files onto QNAP TS-469L NAS for steaming to your mobile devices, and you can fully enjoy your favorite DVD whenever you wanna.

FYI: QuickTime cannot work with all the videos with chapter markers; in case of the problem, you are suggested to download a VLC Player at first.

More option to help you keep DVD chapter markers:
* Full Disc Copy can 1:1 backup the whole DVD disc with original structure including chapter markers.

* Directly Copy will backup 100% intact DVD main movie with all the multiple tracks excluding menu.

Related External Knowledge:

QNAP TS-469L NAS server: an easy to use networked storage center for the ultimate digital home entertainment experience. It is a new approach for sharing digital photos, music, and movies/videos, and keeping home computers backed up and stream them over the network through PS3, Xbox 360, or other network media players. 

Related articles:

Tuesday, June 24, 2014

Directly copy DVD into a vob file to play with VLC Media Player on Mac

This article will show you the fast and easiest way to copy the main  DVD movie to a VOB file for easy playback with VLC on Mac-based Computer without any loss of quality. 

VLC, also known as VLC Media Player or VideoLan Client, is a universal media player to play almost any video file and even DVD movies. However, it still has some drawback when playing DVD video. For example, the supported output format is limited. And sometimes it can’t recognize protected DVD well and failed to convert the DVD successfully. Plus, VLC Media Player is too complicated for a novice who has little knowledge about DVD ripping process.
play dvd vob with VLC Media Player
Though VLC Media Player can help recording the DVD videos, if you prefer make a copy of rip DVD first rather than recording videos, please read this guide to learn how to get it done.  

To play DVD in VLC Media Player, a DVD ripping program is needed to help you backup/convert DVD to VLC playable format at first. Pavtube DVDAid for Mac can fulfill your needs and provides perfect solutions for all the Mac users. It is an easy-to-use yet efficient tool to help you directly copy source main DVD movie and leave out extras, commentary, etc with the same quality on Mac successfully and quickly. If you are Windows users, try DVDAid is highly recommended. 

How to backup DVD movies for playing with VLC Media Player on Mac?

Step 1: Select DVD source.


Launch the best DVD to VOB backup software, click “Load file(s)” button on the top left, you will get three options: 


a. Load the disc: Inserted discs are usually recognized and listed automatically, just select the one you desired. 

b. Load from the folder: When you have copy the content of disc to computer or hard device, use this option to select the folder to import. 

c. Load ISO/IFO: If your DVD source is ISO file, use this option to load. 

Once imported, you will get a list of titles on the source. The main title with longest duration usually has been selected automatically.  

Step 2: Choose Directly Copy for output. 

Firstly, go to select the location of output file. Simply click “Browse” button and choose the destination folder. 

Secondly, click “Format” menu you will find lots of format options in the dropdown list. Here “Directly Copy” is the best choice for you because it will copy the intact main movie without any recoding. In this way, you will get a lossless DVD .VOB file at amazing conversion speed. 


Step 3. Lossless Backup DVD main movie to VOB on Mac. 

Hit “Convert” button to start copying VOB from your DVD Disc to Mac, then click “Open” button you will find a quick way to locate the generated file. Once completed, you can get one lossless vob file with multiple streams from original DVD. 

Step 4: Add converted VOB file to play with VLC Media Player.

1. Open VLC player


2. Click File > Open File on the top side of toolbar

3. Click your .vob file then click OK

4. Now you can enjoy DVD on your Mac with VLC player


With the best Mac DVD Backup and copy tool, you can freely add your favorite DVD movies into VLC for playing. Just try it now!  

Tip:


To transcode DVD discs to MOV/MP4/Apple Prores with multiple audio and subtitle tracks, that is what Pavtube ByteCoy for Mac can do for you which means you can select the audio you want when enjoying DVD movies in VLC player.

Meanwhile, with Pavtube's new site releasing, there are many new Money Saving Software Bundles like: 


Go to find the one you need.

Friday, June 20, 2014

Copy a Blu-ray into BDMV Folder for viewing on KDLinks media player

Want to enjoy all your Blu-ray movies through KDLinks media player in the best possible quality? With Pavtube BDMagic, you can easily backup Blu-ray into BDMV Folder for importing into KDLinks with high quality.


I got a kdlinks hd700 to replace my Apple TV for playing amlost every format including my Blu-Ray Video Files. It also supports Blu-Ray Navigation Menu, Multi Audio Channel Switch, Chapter Selction, Subtitle On/Off. However, this KDLinks media player supports BD-1.0 and 2D movies only. Is there any way to help me backup all my Blu-ray for loading into this KDLinks media player?

Introducing...

If you are looking for a media player which could play almost all formats (i.e. Blu-Ray ISO, Blu-Ray BDMV, DVD VOB, FLAC), KDLinks media player is your best choice. All models are built in WiFi (a/b/g/n) for easily video syncing.

Backup Blu-ray for loading into KDLinks media player
 
If you still prefer to use KDLinks Media Player, you'd better copy your Blu-ray movie to 
hard drive as Blu-ray folder with Pavtube BDMagic at first, and then you can use KDLinks Media Player to play the Blu-ray folder without buying another BD player. The video quality is just as the same as playing on Blu-ray Player.

Follow the steps below and you can to 
make 1:1 perfect-quality backup copies of all your Blu-ray movies onto hard disk and transfer them to KDLinks media player for enjoying.

Features:
  • Play Blu-ray on any player as you like
  • Convert Blu-ray to any media player acceptable format
  • Lets you enjoy Blu-ray movies on all popular devices
  • Supports adding *.srt and *.ass subtitle
  • Improve Blu-ray video visual experience
  • The Mac version is BDMagic for Mac.
Note: Before coping, you need to hook up an external Blu-ray drive with your computer, and insert your Blu-ray Disc into the drive. Keep your networked to insure the software will handle Blu-ray copy-protections.

Step 1.
Run Best Blu-ray Ripper and import disc.

Click “Load files” icon to load disc from BD drive or from “File menu > Load from disc”. I also noticed if you have a ISO file to import, it will recognize the ISO file automatically with no need to run virtual driver and mount ISO files firstly. Good design.


Step 2. Make 1:1 Full Disc Copy

Once loaded, click “Browse” to specify where to send the generated files to. When ready, click “Copy the entire disc” icon to start copying your Blu-ray movie to an intact Blu-ray folder.


Note: With the trial version, you can make full disc copy of your Blu-ray disc 3 times.

When copying process finished, click "Open output folder" to quick locate generated BD folder.

Connect your hard drive to computer and transfer them into it or directly store it on your PC computer. The final output files have the same structure as that on the original Blu-ray disc.

How to play BDMV folder with KDLinks Media Player?

To play Blu-Ray movie in BDMV folder, please click the "Play" button. Please do NOT use "OK" button, it will just let you enter that BDMV folder. 

Now your KDLinks Media Player will start to play the Blu-ray folder on hard drive. Enjoy the Blu-ray movie now!

Tips and Tricks for KDLinks media player:

1. WIFI Setup

Go to Setup -> Network -> Wireless, click ZOOM button on the remote to refresh the WIFI AP list. Select the one for your home/office, input password, that's it; After firmware update, WIFI could become disabled, please go to Setup->MISC and reset media player to factory default, then restart media player.

2. Change Video Output Mode

If you get black screen, that means you have a wrong video output mode. Please double click the "TV Sys" button on the KDLinks remote, wait for 15 seconds; keep doing until you can see main menu. It will loop through all video output modes.

3. How To Set up Bootup Auto-Play

1) Create a folder called "Autoplay" (case sensitive, no capital) at the root of a USB flash drive or USB HDD.
2) Copy media files to this folder.
3) Turn on player, go to Setup -> MISC -> Autoplay to choose which media type would play automatically. Then turn off the player.
4) Insert USB device to player, then turn on player. Player will scan USB device automatically and play the file. It may take one minute or so. You don't need to touch anything.

4. USB 3.0 Support

It supports the latest USB 3.0 hard drives.

5. 4TB Internal Hard Drive Support 

If you tried other 4TB models successfully, please send that model # to us and we will update this list. Thank you!

6. How To Download IMDB Movie Artwork

It works with USB direct connection. Please highlight a movie file, click "MENU" button, select the first "Get More Info" from popup option menu. Then, you will be able to search and save movie cover artwork file to your USB device.

To view your artwork, please put movie and artwork image file to the same folder. Please click "MENU" button and change the view mode to "Thumbnail" Mode.

7. Karaoke Feature

Karaoke files are specially made video files with multiple audio sound tracks.

To use this new Karaoke feature:

1. Create a folder called "karaoke", put your Karaoke files into this folder

2. Turn on player, go to Karaoke in the main menu. The player will automatically pick the first file and play it

3. For Karaoke files, you can give them different names with numbers. i.e. 00313 ABC.vob, 00689 EDF.mkv. Then, you can type in 00313 through HD720 remote and call out this Karaoke file immediately.

4. Click Audio button on the KDLinks remote, then you can select different sound track.

5. Click info button twice, you can build a Karaoke file play list by typing in those file numbers, i.e. 00313, 00689, etc.

If you love Karaoke, this is a very good new feature for you to enjoy.

See also:

Simple Way to Rip Blu-ray/DVD to Microsoft Xbox One Losslessly
Best MP4 Players to Play MP4 Files in Windows/Mac
How to Put DVD onto Zune/ Zune HD for Playback with best A/V quality 

Thursday, June 12, 2014

Simple Way to Rip Blu-ray/DVD to Microsoft Xbox One Losslessly for Unlimited Playback

Is there any way to rip Blu-ray/DVD to Xbox One for unlimited Playback? This tutorial will guide you to convert your BD/DVD disc to Xbox One supported video files.

Sony and Microsoft competed to claim they had the better exclusives, while the developer giants and indies unleashed a flood of computer-generated animations and live gameplay. Nintendo will get its moment in the sun later this week - but for now it was all about titles for the PlayStation 4 and Xbox One. According to E3 2014, Xbox One ad is switching on Microsoft consoles.


As a video game console, Xbox One can also act as a powerful home media center to stream photos, music and videos to HD TV for playing and sharing. If you have large BD/DVD collection and you maybe considering converting your Blu-ray/DVD to Xbox One in order to enjoy them on HD TV, is it possible?

In fact, Xbox One has no Blu-ray drive and it's a common sense that DVD discs are subject to scratch and damage easily due to time-to-time putting in and out Xbox One's DVD drive. That's why the demand of ripping Blu-ray/DVD to Xbox One is on the rise among Disc fans. Here, this article just shares you the simplest way to convert Blu-ray/DVD to Xbox One recognized format like wmv format with the help of a professional BD/DVD to Xbox One ripper.

To save you from the awkward situation, Pavtube BDMagic comes to give you a hand which is capable of ripping Blu-ray and DVD to Xbox One with fast speed and high quality. More stunningly, Pavtube BDMagic has the mighty power to disable any copy protection measure put on BD/DVDs in a walk, so that you can convert any copy-protected discs, like Despicable Me 2 and Frozen, to Xbox One without a hitch. For Mac users, try Pavtube BDMagic for Mac

How to convert Blu-ray and DVD movies to Xbox One supported format?

Step 1: Load Blu-ray, DVD movie to Pavtube BDMagic.

Insert your Blu-ray,DVD movie to disc drive, and click “Load Disc” button to load Blu-ray/DVD discs.


Step 2: Select video format.

Here we select mp4 with H.264 codec for Xbox One. Click the Format drop-down list, and select “Xbox 360 HD Video(*.wmv)” from "Zune/Xbox 360 Device" category. You can select other Xbox360 format for watching.


Tips: If you have special requirements on target video, click “Settings” to customize video size, bitrate, frame rate and sample rate.


Step 4. Ripping Blu-ray/DVD to WMV for Xbox One.

Click the red “Convert” button to start ripping Blu-ray/DVD to WMV for Xbox One. When it finishes, click the “Open Output Folder” icon to quick locate the converted video.

How to Transfer the Converted Video to Xbox One

Theoretically, there's no way to import videos to your Xbox One, unless you purchased it from Xbox Live. However, you can transfer the BD/DVD movies to Xbox One, if you:

1. Connect your Xbox One to a PC using Windows Media Center;
2. Copy the DVD movie media file to a USB flash drive and play it on Xbox One.

Using any one of the methods above, you can play Blu-ray/DVD videos on Xbox One free without buying videos on Xbox Live.

Related Articles