As a parent, have you ever thought backup & convert your children's favorite movies onto Kids Tablets for unlimited playback? Recently, I have a lot of people ask me how to add movies to Android Kids Tablets so we can take them with us everywhere. Below the article I will leave written instructions and links to what I use to make this process work.

First of all, as children's parents, we perhaps need have some basic understanding for kids tablets, such as:
Then I found a lot of questions about "how to move movies to Nabi 2 for my son?", "how to copy children's film to my Tesco Hudl?" by google searching, here is a scenario:
HOW TO COPY DVDs ONTO HUDL?
"Can anybody help please? I have just bought the Tesco Hudl for my young daughter and I wish to copy her DVD films onto the device. I believe it is Android, do I need to buy a DVD converter if so which one is best. Please help!!"
Answer: Yeah, your device is Android. To copy DVD onto Tesco Hudl, you do need a DVD converter. Many of such converters are available. Here are two free ones: Handbrake and Pavtube Free DVDAid.
Handbrake is open source software that provides an excellent quality of transcoded video. The program is also small in size albeit it is packed with great features that further improve synchronization and amazing video output quality.
Pavtube Free DVDAid offers you a fun, easy and fabulous way to rip DVDs, the giveaway version has all the features of regular DVD Ripper except it cannot output as MP4 nor does it have specific output profiles for electronic devices, unless you paired with another free video converter software and convert output video to mp4 format. The free DVDAid can rip DVDs to MOV, MKV, AVI, MPG, VOB, WMV, FLV, etc. with fast speed and help edit DVD, add SRT/ASS/SSA subtitles to output movies.
Then, you have to pay some money to buy a DVD Ripper that can decrypt and convert DVD.
If you are looking for ease of use and fast ripping tool, check out Pavtube's DVDAid, which is easy to use to crack and rip DVD to any Android Kids Tablet playable format. I tried several different rippers and find the Pavtube exports qualitified video with reasonable size. The audio/video synchronization is very good, the size of the subtitles too. And the time it takes to convert in this software is almost half that in other. If you're using a Mac, please turn to Mac DVD to Nabi tablet Converter, which lets you rip DVD movies for Nabi 2 Tablet on Mac (including Lion and Mountain Lion 10.8). Just download the program and follow the guide below to rip videos from DVD discs to Nabi 2 for your children in just a few mouse clicks.
Good News! 2014 Easter Day Is Coming Soon! From April 18 to April 25, 2014 - Pavtube Studio announces a series of preferential policies on Facebook, such as: like our Facebook to get 40% off DVDAid, 30$ off Blu-ray Ripper, 20% off Video Converter Ultimate, Free ByteCopy, etc. Hope to see you soon!
Now I will show a detail guide on how to convert DVD movies to any Android Kids Tablets supported video formats with high quality so that our children can enjoy the favorite movies on any tablets on matter when and where-ever.
Step One: Download, install and run Pavtube Android DVD Ripper on your PC.
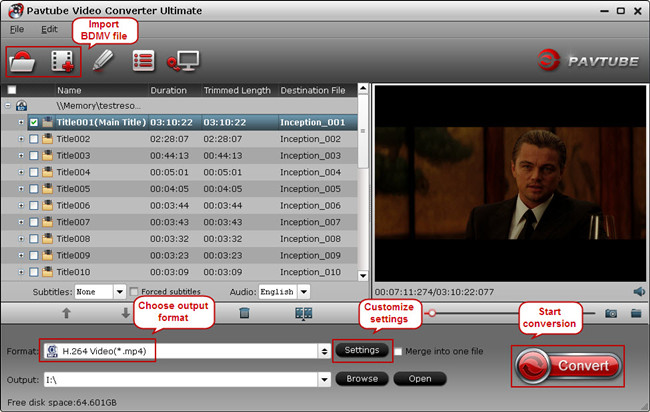
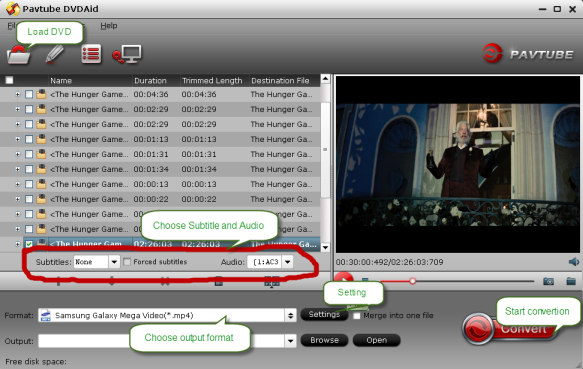
Step Two: Load DVD.
Insert DVD Disc into the DVD Drive of your computer, and then load your DVD movie from the target drive by clicking the "Load file" button. Then you will get an intuitive interface that shows you all the DVD titles and chapters you have loaded.
Tips: Edit output video effect with Pavtube DVDAid's powerful edit function, you can make an own style video for your children. For example, adjust the display brightness, contrast, saturation and volume etc; you can get accurate time length clips according to your preference by setting the start and end time, cut off unwanted playing areas of the video to fit your any Android Kids tablets.
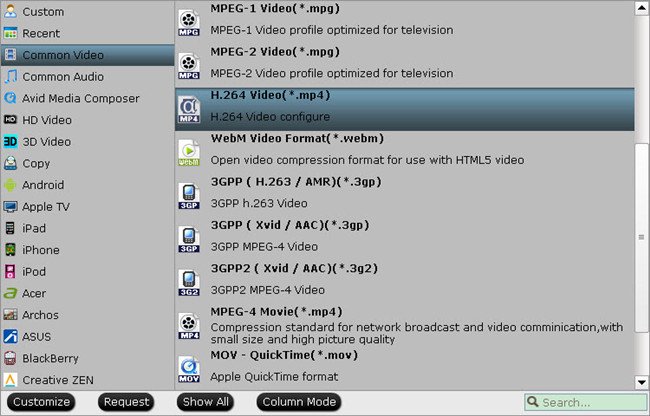
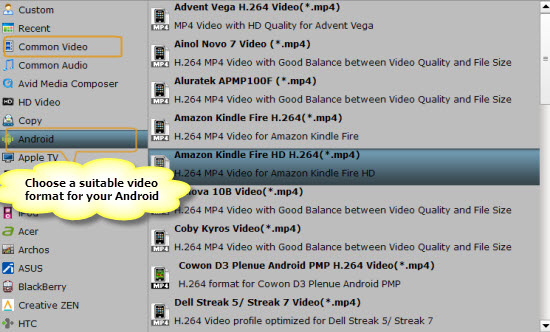
Step Three: Choose suitable video format for any Android Kids Tablet.
Select output format in the "Format" bar. Here you find almost all the Android tablets on market, Nabi, Nook, Samsung, Google, Asus, Acer, Amazon, Toshiba, etc. For Android tablets, you can either find the tablet icon and select it as output format or simply choose "Common Video" > "H.264 MP4 Video".
Note: Click on "Settings" you could easily set bitrate, frame rate, codec, channels, sample rate, etc to adjust parameters that affect video quality and file size for the video you prefer.
Step Four: Start the movie conversion.
Finally, all the settings are satisfied, click "Convert" and let the software do the DVD to to MP4 conversion for Android kids tablets. After the ripping, you can click "Open" to locate the converted MP4 video files and just transfer them to your Kids tablet without limitations!!
Tips:
1. This Pavtube DVDAid could provide you with the 6x faster conversion speed with the AMD APP and NVIDIA® CUDA™ technology.
2. If you have some Blu-ray movies and various 1080p/720 MKV, AVI, VOB, M2TS, MVI, MPG, WMV, FLV, F4V, Tivo shows, etc. videos & movies, you can get the Video Converter Ultimate (or iMedia Converter Mac) which can help you rip Blu-ray/DVD, and convert various formats of 720p/1080p HD videos in MKV, AVI, TiVo, VOB, MPG, MTS, etc. to your Nabi Tablets and other Android. iOS, Windows RT/8 etc. os tablets/phones for smoothly playing.
3. If you have any problem, pls leave a message on our support forum or Fackbook, we will answer your questions as soon as possilble.
First of all, as children's parents, we perhaps need have some basic understanding for kids tablets, such as:
- Samsung: Galaxy Tab 3 Kids Edition
- Fuhu: DreamTab, Nabi Jr, Nabi 2, Nabi XD, Nabi
- Barnes & Noble: Nook HD+, Nook HD, Nook Color
- VTech: InnoTab 3S, InnoTab 3, InnoTab 2S, InnoTab 2, InnoTab
- Kurio: Kurio Touch, Kurio 7S, Kurio 10S, Kurio 4S, Kurio7
- Coby: Kyros MID1065, Kyros MID8065, Kyros MID7065, Kyros MID4331, Kyros MID9742
- Kobo: ARC 10HD, ARC 7HD, ARC 7
- Tesco Hudl, Tabeo e2, Meep! X2, ClickN Kids Tablet, Vivatar Camelio and many more...
Then I found a lot of questions about "how to move movies to Nabi 2 for my son?", "how to copy children's film to my Tesco Hudl?" by google searching, here is a scenario:
HOW TO COPY DVDs ONTO HUDL?
"Can anybody help please? I have just bought the Tesco Hudl for my young daughter and I wish to copy her DVD films onto the device. I believe it is Android, do I need to buy a DVD converter if so which one is best. Please help!!"
Answer: Yeah, your device is Android. To copy DVD onto Tesco Hudl, you do need a DVD converter. Many of such converters are available. Here are two free ones: Handbrake and Pavtube Free DVDAid.
Handbrake is open source software that provides an excellent quality of transcoded video. The program is also small in size albeit it is packed with great features that further improve synchronization and amazing video output quality.
- Pros: excellent video quality output; small in size; support multi-platform
- Cons: transcoding speed is slow; cannot deal with the protected DVD unless paired with another software
- OS: Windows XP, WindowsVista, Windows7
Pavtube Free DVDAid offers you a fun, easy and fabulous way to rip DVDs, the giveaway version has all the features of regular DVD Ripper except it cannot output as MP4 nor does it have specific output profiles for electronic devices, unless you paired with another free video converter software and convert output video to mp4 format. The free DVDAid can rip DVDs to MOV, MKV, AVI, MPG, VOB, WMV, FLV, etc. with fast speed and help edit DVD, add SRT/ASS/SSA subtitles to output movies.
- Pros: Easy to use; Editing features; Support dealing latest DVD disc
- Cons: Can't convert video to mp4 format
- OS: Windows XP/2003/Vista/Windows 7/Windows 8/Windows 8.1
Then, you have to pay some money to buy a DVD Ripper that can decrypt and convert DVD.
If you are looking for ease of use and fast ripping tool, check out Pavtube's DVDAid, which is easy to use to crack and rip DVD to any Android Kids Tablet playable format. I tried several different rippers and find the Pavtube exports qualitified video with reasonable size. The audio/video synchronization is very good, the size of the subtitles too. And the time it takes to convert in this software is almost half that in other. If you're using a Mac, please turn to Mac DVD to Nabi tablet Converter, which lets you rip DVD movies for Nabi 2 Tablet on Mac (including Lion and Mountain Lion 10.8). Just download the program and follow the guide below to rip videos from DVD discs to Nabi 2 for your children in just a few mouse clicks.
Good News! 2014 Easter Day Is Coming Soon! From April 18 to April 25, 2014 - Pavtube Studio announces a series of preferential policies on Facebook, such as: like our Facebook to get 40% off DVDAid, 30$ off Blu-ray Ripper, 20% off Video Converter Ultimate, Free ByteCopy, etc. Hope to see you soon!
Now I will show a detail guide on how to convert DVD movies to any Android Kids Tablets supported video formats with high quality so that our children can enjoy the favorite movies on any tablets on matter when and where-ever.
Step One: Download, install and run Pavtube Android DVD Ripper on your PC.
Step Two: Load DVD.
Insert DVD Disc into the DVD Drive of your computer, and then load your DVD movie from the target drive by clicking the "Load file" button. Then you will get an intuitive interface that shows you all the DVD titles and chapters you have loaded.
Tips: Edit output video effect with Pavtube DVDAid's powerful edit function, you can make an own style video for your children. For example, adjust the display brightness, contrast, saturation and volume etc; you can get accurate time length clips according to your preference by setting the start and end time, cut off unwanted playing areas of the video to fit your any Android Kids tablets.
Step Three: Choose suitable video format for any Android Kids Tablet.
Select output format in the "Format" bar. Here you find almost all the Android tablets on market, Nabi, Nook, Samsung, Google, Asus, Acer, Amazon, Toshiba, etc. For Android tablets, you can either find the tablet icon and select it as output format or simply choose "Common Video" > "H.264 MP4 Video".
Note: Click on "Settings" you could easily set bitrate, frame rate, codec, channels, sample rate, etc to adjust parameters that affect video quality and file size for the video you prefer.
Step Four: Start the movie conversion.
Finally, all the settings are satisfied, click "Convert" and let the software do the DVD to to MP4 conversion for Android kids tablets. After the ripping, you can click "Open" to locate the converted MP4 video files and just transfer them to your Kids tablet without limitations!!
Tips:
1. This Pavtube DVDAid could provide you with the 6x faster conversion speed with the AMD APP and NVIDIA® CUDA™ technology.
2. If you have some Blu-ray movies and various 1080p/720 MKV, AVI, VOB, M2TS, MVI, MPG, WMV, FLV, F4V, Tivo shows, etc. videos & movies, you can get the Video Converter Ultimate (or iMedia Converter Mac) which can help you rip Blu-ray/DVD, and convert various formats of 720p/1080p HD videos in MKV, AVI, TiVo, VOB, MPG, MTS, etc. to your Nabi Tablets and other Android. iOS, Windows RT/8 etc. os tablets/phones for smoothly playing.
3. If you have any problem, pls leave a message on our support forum or Fackbook, we will answer your questions as soon as possilble.