Can Lumix GH4 4K Videos be played on iPhone 6 Plus/6S's 1920 x 1080 screen or iPad Air 2's 2048 x 1536 display? Not really until you convert/compress 4K 2160p content for iPad iPhone into 1080p.
Hot Search: 4K HD Video on Windows 10 | 4K Video on Mac OS X El Captian |
The Panasonic Lumix GH4 is the first system camera offering a solid mix of great 4K image quality, ease-of-use, small form factor, and all at a price that's not out of reach for young pros or upstart video makers. It features a 16.05-megapixel Digital Live MOS sensor and a 4-CPU Venus Engine, capable of capturing high-resolution JPEG and RAW stills, as well as UHD 4K 3840x2160 30p/24p and cinematic DCI 4K 4096x2160 video at 24p.
Many GH4 users have encounter a problem as below:
“I have a 4k camera (Panasonic Lumix GH4) and have only ever been able to play back through my 4K TV, which is a faff. Is there any way to play 4K videos on iPad Air 2 or iPhone 6? I had tried many different video player apps but none of them worked.”
Sadly to him, such iOS 9 gadgets has not supported playing Panasonic Lumix GH4 4K Ultra HD (UHD) videos directly by far, since they only have the screen resolutions of 1920 x 1080 and 2048 x 1536, respectively, which are not match for 2160p 4K videos, although iPhone 6 allows users to shoot a whole 4K video.
Why Lumix GH4 4K UHD Video Cannot Be Played on iPhone iPad?
Before you play 4K videos on iPad or iPhone, you should at first realize the following cruel facts:
iPhone 6 Plus screen resolution: 1920 x 1080
iPad Air 2 screen resolution: 2048 x 1536
4K resolution: 3840×2160 (16:9) or 4096x2160 (17:9)
It is a must to convert 4K UHD videos to iPhone/iPad playable ones. 4K video takes too much space to be stored on the them, say, True 4K film needs more data storage, at least 100 gigabytes. Secondly, image stabilization is an important factor to consider, let alone the high requirement on resolution. Besides, human wouldn't be able to tell 4K apart from 1080p screen due to the pixel density. And the 4K video will have better 1080p or the ability to crop or digitally zoom into a 1080p section. Learn >> How to Compress 4K Video to 1080p.
To solve the iPhone/iPad 4K playback problem, all we need is a third-party 4K Video Converter that can convert any 4K video to iPhone/iPad friendly MP4 format. Then apart from shooting crystal clear Ultra HD footage, you can also play Lumix GH4 4K video on the go.
Here Pavtube 4K Video Converter Ultimate is exactly what you want to convert any video to iPhone/iPad while keeping 100% the original 4K video quality. It converts videos ultra fast and supports batch conversion for saving time. The Mac version is 4K Video Converter for Mac.
Hot Search: Why Choose Pavtube 4k Converter | Blackmagic Camera 4K VS Panasonic Lumix GH4 |
Now follow the guide below to learn how to convert Lumix GH4 4K Video to iPhone/iPad playable videos for watching.
1. Download and install Pavtube Video Converter Ultimate to your PC.
2. Drag and drop Lumix GH4 4K videos to the main interface for converting.
 3. Click “Format” and select “iPhone 6 Plus H.264 Full Screen/Full HD 1080P(*.mp4)” from “iPhone” option for your iPhone 6 Plus. (Good News! The newest Pavtube Ultimate 4.7.2 adds iPhone 6 and iPhone 6 Plus support now)
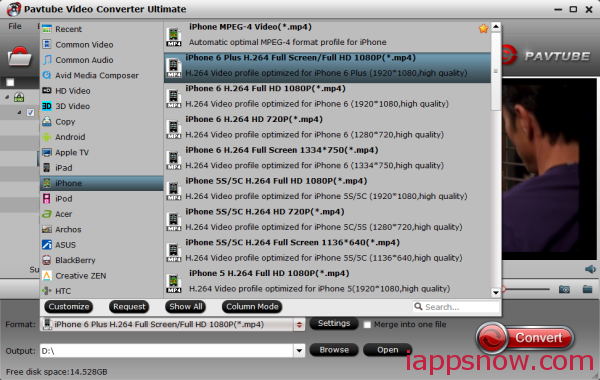 Note: You can also Click format list and hover your mouse to “iPad”, here we got two iPad 3/4 presets: one is “HD Video”, the other is “Full HD Video”; the latter output a video with better quality yet larger file size.
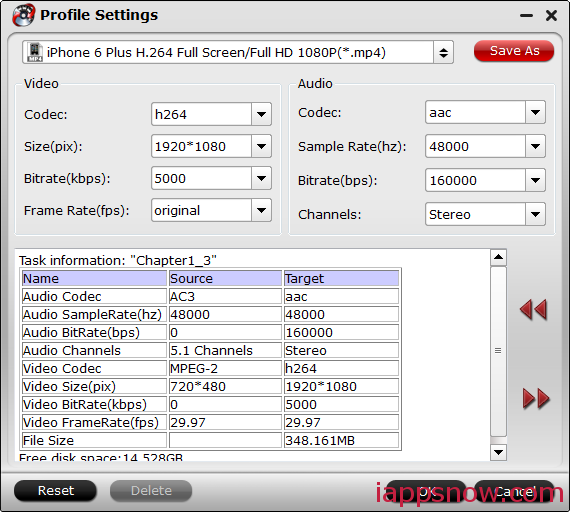
Optimize the settings – The default settings may not satisfy you, and you can click the settings button to change the settings by yourself. Keep in mind that the file size and conversion quality is based more on bitrate than resolution (bitrate higher results in big file size, and lower visible quality loss, and vice versa).
Note: You can also Click format list and hover your mouse to “iPad”, here we got two iPad 3/4 presets: one is “HD Video”, the other is “Full HD Video”; the latter output a video with better quality yet larger file size.
Optimize the settings – The default settings may not satisfy you, and you can click the settings button to change the settings by yourself. Keep in mind that the file size and conversion quality is based more on bitrate than resolution (bitrate higher results in big file size, and lower visible quality loss, and vice versa).
 4. If you’re happy with the output videos, just press the “Convert” button to begin encoding 4K footage to MP4 for iPhone/iPad.
Once the format compatibility problems have been solved, you can transfer the converted videos to your iPads or iPhone for viewing on the move. Have fun!
Related Articles about iPhone 6/6 Plus:
4. If you’re happy with the output videos, just press the “Convert” button to begin encoding 4K footage to MP4 for iPhone/iPad.
Once the format compatibility problems have been solved, you can transfer the converted videos to your iPads or iPhone for viewing on the move. Have fun!
Related Articles about iPhone 6/6 Plus:
Real Customer overview from Pavtube:
“ I prefer the original format (VIDEO_TS for regular DVDs, and I don't know for Blu-rays, as I have not started yet.) I watch on my television screen only. The bigger screen the better, so no phone, no tablet, nothing else. I watch them at leisure. Eventually research on the Science Fiction ones and store them on external hard drives linked to my Macmini media server. I find that Pavtube irritating to the extreme. If my friend had not recommended your product, this saturation advertising strategy would have absolutely turned me AWAY from your company.”
Tips for Mac users: QuickTime Alternative | Blu-ray to H.265 MP4 Mac | Play H.265/HEVC with VLC | Import H.265 to iTunes |
One common question always puzzle you that want to play DVD films on Mac Mini? Here is the answer. If you’re HD movie lover and wish to add DVD movies to the newly built Mac HTPC, Pavtube BDMagic for Mac is a good combination. This top Mac Mini DVD Player copies protected Blu-ray and DVD movie to your Mac HTPC with highly quality. In that way you can play DVD movie on Mac Mini HTPC without quality loss. The following guide tells how to copy/rip DVD movies to Mac Mini HTPC with Pavtube BDMagic for Mac.
Preparations:
1. Mac mini
2. external BD drive
3. source Blu-ray Discs.
4. Pavtube Mac Mini Blu-ray Player (The software is able to back up Blu-ray movies and commercial DVDs for Mac HTPC Media Center without quality loss or compress the BD and DVD movies to MOV, MP4, MKV, M4V, etc. in perfect sync.) Read the review.

 Make 1:1 Copy DVD to Watch Any DVD Movies via Mac Mini
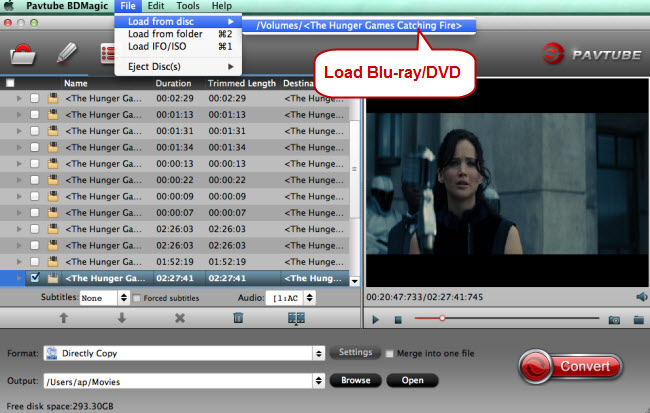
Step 1. Load DVDs, also Blu-rays
Run Mac Mini HTPC converter on Mac, It work on both with Mac OS X 10.9 and Yosemite 10.10 perfectly. and load Blu-ray/DVD movies by clicking “File” > “Load from disc.” For Blu-ray import, an external or internal Blu-ray is required to read your Blu-ray disc.
Make 1:1 Copy DVD to Watch Any DVD Movies via Mac Mini
Step 1. Load DVDs, also Blu-rays
Run Mac Mini HTPC converter on Mac, It work on both with Mac OS X 10.9 and Yosemite 10.10 perfectly. and load Blu-ray/DVD movies by clicking “File” > “Load from disc.” For Blu-ray import, an external or internal Blu-ray is required to read your Blu-ray disc.
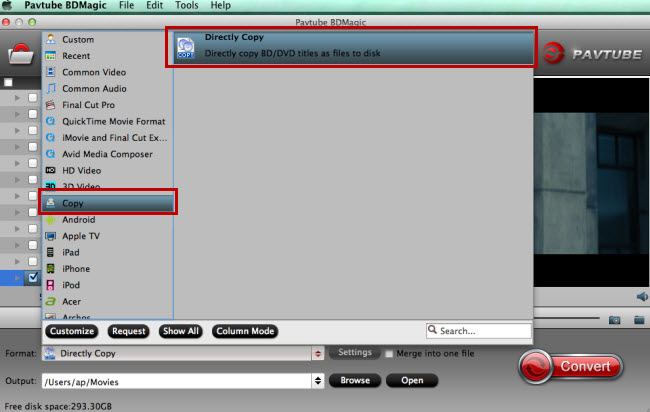
 Step 2. Choose “Directly Copy” to backup the main content.
Under “Format” menu, there are many formats and devices for you to choose. If you just want to backup the main content of the DVD, go to find “Copy” option and choose “Directly Copy” that can meet your demands well.
Step 2. Choose “Directly Copy” to backup the main content.
Under “Format” menu, there are many formats and devices for you to choose. If you just want to backup the main content of the DVD, go to find “Copy” option and choose “Directly Copy” that can meet your demands well.
 Tips: Here, we can recommend you Pavtube ByteCopy for Mac, you can get the container format with multiple audio tracks and subtitles included. Besides retaining multiple audio tracks and multiple subtitles in an video files without transcoding and quality loss. A simple guide about DVD to lossless MKV. For more movie entertainment, read this Pavtube Softwares Comparison review to get more multimedia tools.
Step 3. Start ripping.
Click big “Convert” button to start conversion. It won’t take much time for conversion and then you will get the main content of the DVD. Once completed, hit “Open” button you will go to location of generated files.
After you finished all the tasks, you can transfer the converted DVD files on Mac Mini. Have fun!
Read More:
Tips: Here, we can recommend you Pavtube ByteCopy for Mac, you can get the container format with multiple audio tracks and subtitles included. Besides retaining multiple audio tracks and multiple subtitles in an video files without transcoding and quality loss. A simple guide about DVD to lossless MKV. For more movie entertainment, read this Pavtube Softwares Comparison review to get more multimedia tools.
Step 3. Start ripping.
Click big “Convert” button to start conversion. It won’t take much time for conversion and then you will get the main content of the DVD. Once completed, hit “Open” button you will go to location of generated files.
After you finished all the tasks, you can transfer the converted DVD files on Mac Mini. Have fun!
Read More:
High Efficiency Video Coding (HEVC) or also called H.265 is a new video codec that compresses video files to 50% with the most proficient encoding format today. As seen on Apple’s iPhone tech specs webpage, both the iPhone 6 and its larger iPhone 6 Plus sibling leverage next-generation H.265 technology for encoding and decoding FaceTime video calls over cellular. So, a lot of Apple device users want to convert their DVD Movies to H.265 format since it's the best format for video experience. But How?Just keep on reading...
* Read Apple TV Column | Embrace Extraordinary Experience With iPhone 6 (6 Plus)
 Is it possible to rip a DVD in the new H.265 Codec for better visual effects for iPhone 6/6 Plus via Mac? If you have got lots of DVD Movies and want to rip them to iPhone 6/6 Plus for enjoying at everywhere, converting DVD to H.265 MP4 is a wise choice. Yeah, When talking about DVD to H.265 rippers, the latest version of Pavtube BDMagic for Macis suggested by Mac users - Which is just updated with the H.265 decoder/encoder and rated as the best all-in-one Blu-ray to H.265 converter. (Pavtube Supported OS:Mac OS X 10.10 Yosemite, 10.9 Mavericks, 10.8 Mountain Lion, 10.7 Lion, Snow Leopard10.6, Leopard 10.5). Read the review.
With this software, you can convert Blu-ray and DVD to H.265 MP4 in smaller size as possible and keep the almost same quality. Utilizing the highly efficient HEVC H.265 format in MP4 containers, it results in files with much more manageable sizes than the regular 25GB or 50GB Blu-ray discs we are used to. Besides H.265, it provides more regular video formats like MKV, AVI, WMV, MOV, FLV, WMV, etc. The exported files are playable on your computer as well as iOS devices, tablets & smart phones freely as you want. Now free try the Blu-ray ripper and follow the guide to accomplish the conversion.
Download the best DVD to H.265/HEVC Video Converter on your Mac Yosemite and Windows 10:
Encode DVDs to H.265/HEVC MP4 video for iPhone 6/6 Plus on Mac OS X with ease
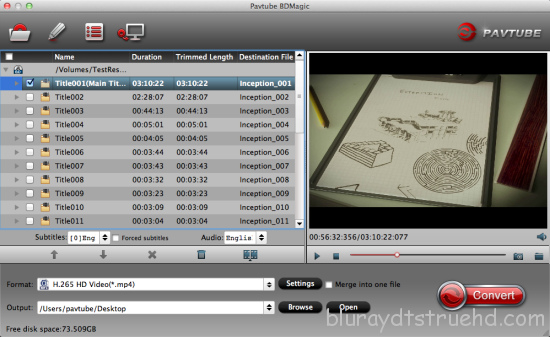
Step 1. Load DVD movies
Install and launch the best Mac DVD to H.265 Converter program. Just click disc icon to load your DVD movies. Beside, you can also load Blu-ray discs and do not miss insert your Blu-ray disc into your BD drive. You can also import movies files from Blu-ray/DVD folder, Blu-ray/DVD ISO/IFO Video files.
Is it possible to rip a DVD in the new H.265 Codec for better visual effects for iPhone 6/6 Plus via Mac? If you have got lots of DVD Movies and want to rip them to iPhone 6/6 Plus for enjoying at everywhere, converting DVD to H.265 MP4 is a wise choice. Yeah, When talking about DVD to H.265 rippers, the latest version of Pavtube BDMagic for Macis suggested by Mac users - Which is just updated with the H.265 decoder/encoder and rated as the best all-in-one Blu-ray to H.265 converter. (Pavtube Supported OS:Mac OS X 10.10 Yosemite, 10.9 Mavericks, 10.8 Mountain Lion, 10.7 Lion, Snow Leopard10.6, Leopard 10.5). Read the review.
With this software, you can convert Blu-ray and DVD to H.265 MP4 in smaller size as possible and keep the almost same quality. Utilizing the highly efficient HEVC H.265 format in MP4 containers, it results in files with much more manageable sizes than the regular 25GB or 50GB Blu-ray discs we are used to. Besides H.265, it provides more regular video formats like MKV, AVI, WMV, MOV, FLV, WMV, etc. The exported files are playable on your computer as well as iOS devices, tablets & smart phones freely as you want. Now free try the Blu-ray ripper and follow the guide to accomplish the conversion.
Download the best DVD to H.265/HEVC Video Converter on your Mac Yosemite and Windows 10:
Encode DVDs to H.265/HEVC MP4 video for iPhone 6/6 Plus on Mac OS X with ease
Step 1. Load DVD movies
Install and launch the best Mac DVD to H.265 Converter program. Just click disc icon to load your DVD movies. Beside, you can also load Blu-ray discs and do not miss insert your Blu-ray disc into your BD drive. You can also import movies files from Blu-ray/DVD folder, Blu-ray/DVD ISO/IFO Video files.
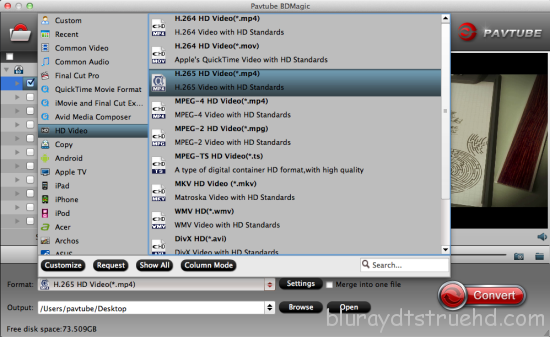
 Step 2. Select H.265 as output format
Hit the “Format” box and select H.265 Video(*.mp4) from Common Video or H.265 HD Video(*.mp4) from HD Video profile. It enables you to rip DVD to H.265 .mp4 with the best quality for iPhone 6/6 Plus.
Step 2. Select H.265 as output format
Hit the “Format” box and select H.265 Video(*.mp4) from Common Video or H.265 HD Video(*.mp4) from HD Video profile. It enables you to rip DVD to H.265 .mp4 with the best quality for iPhone 6/6 Plus.
 Tips:
1. If you wanna some advanced settings, you can click “Settings” icon to adjust the video, audio parameters bitare, frame rate, sample rate, audio channel, etc.
Tips:
1. If you wanna some advanced settings, you can click “Settings” icon to adjust the video, audio parameters bitare, frame rate, sample rate, audio channel, etc.
 2. Plus, you can click “Edit” button to do some editing work cropping, trimming, settings effect, adding subtitles.
Step 3. Start DVD to H.265 conversion on Mac
Click “Convert” button and the program will rip DVD movies to H.265 mp4 video on Mac OS X immediately. You can easily find the output files in the output folders once the conversion is done and watch these wonderful DVD videos cozily on
2. Plus, you can click “Edit” button to do some editing work cropping, trimming, settings effect, adding subtitles.
Step 3. Start DVD to H.265 conversion on Mac
Click “Convert” button and the program will rip DVD movies to H.265 mp4 video on Mac OS X immediately. You can easily find the output files in the output folders once the conversion is done and watch these wonderful DVD videos cozily on H.265 players
as you like.
iTunes media files syncing issue:
Don't know how to add files to iTunes library, you can have a reference at this article: Sync local contents to iTunes on Mac
Have no idea how to transfer iTunes media to iOS devices, find solution in this article: Sync media files from iTunes library to iPhone
Since it can help you to achieve your goal so easily, why not try this upgraded Blu-ray/DVD Ripper software now?
Hot News! Pavtube Studio has launched a user-requested upgrade for full line of Pavtube products to version 4.8.6.2. Existing bugs, improvements and new elements for M3U8 encoding are added and has the capability of encoding or decoding H.265/HEVC files well.
Read More:
Q: “Importing DVD to iMovie? I am completely new to iMovie so forgive me if this is a completely stupid question. Many years ago I had 8 mm home movies transferred to VHS tape. A few years back a friend transferred the tapes to DVD. I am wondering if there is any way to get those "movies" from the DVD into iMovie. All Ican tell you about the DVD is the "format" is listed as Universal Disc Format (UDF). I am working with iMovie 9.0.4. Help will be very appreciated. “
 To answer all DVD-iMovie-importing questions, we need to first get to the bottom of it – what are iMovie compatible formats. iMovie supports MPEG-2 and AVCHD, DV-Standard and HDV (High Definition Video), QuickTime Movie, MEPG-4. So that's why you can not import DVD to iMovie to edit directly. Actually, here is a workaround - Below are the steps and tips on how to convert DVD to iMovie for further editing with this free DVD to iMovie converter.
Pavtube Pavtube BDMagic for Mac as the Top DVD to iMovie Converter with powerful functions can help you convert DVD to iMovie supported formats so that you can put DVD to iMovie on Mac for editing (Yosemite and Mavericks included). Here is the review. Now dwnload this program and follow this guide below to complete your task. If you’re editing DVD clips with iMovie, chances are you already installed this great utility. If not, download it it from here.
Step-by-step: How to Convert DVDs for Editing in iMovie smoothly
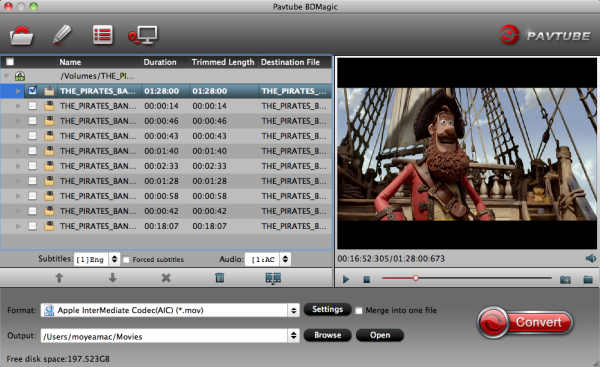
Step 1: Run the DVD to iMovie Converter Mac and click “Load DVD” to import the DVD you want to convert. As you see, Blu-ray and DVD disc, ISO/IFO files are all well supported. You can also use the drag-and-drop method to load the media files to the application UI.
To answer all DVD-iMovie-importing questions, we need to first get to the bottom of it – what are iMovie compatible formats. iMovie supports MPEG-2 and AVCHD, DV-Standard and HDV (High Definition Video), QuickTime Movie, MEPG-4. So that's why you can not import DVD to iMovie to edit directly. Actually, here is a workaround - Below are the steps and tips on how to convert DVD to iMovie for further editing with this free DVD to iMovie converter.
Pavtube Pavtube BDMagic for Mac as the Top DVD to iMovie Converter with powerful functions can help you convert DVD to iMovie supported formats so that you can put DVD to iMovie on Mac for editing (Yosemite and Mavericks included). Here is the review. Now dwnload this program and follow this guide below to complete your task. If you’re editing DVD clips with iMovie, chances are you already installed this great utility. If not, download it it from here.
Step-by-step: How to Convert DVDs for Editing in iMovie smoothly
Step 1: Run the DVD to iMovie Converter Mac and click “Load DVD” to import the DVD you want to convert. As you see, Blu-ray and DVD disc, ISO/IFO files are all well supported. You can also use the drag-and-drop method to load the media files to the application UI.
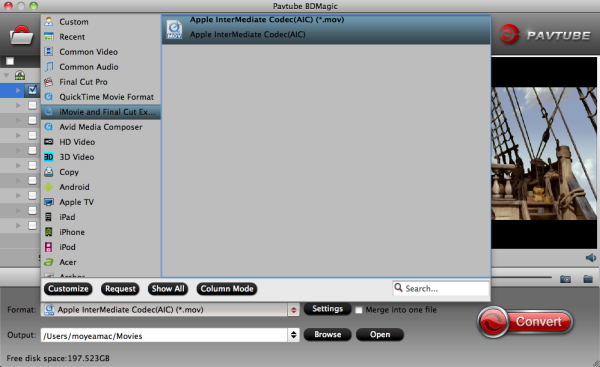
 Step 2: Choose an output format for iMovie. Click the Format icon to open the format list. Then select iMovie and Final Cut Express -> Apple InterMediate Codec (AIC)(*.mov), as the output format to get videos with optimized settings for iMovie.
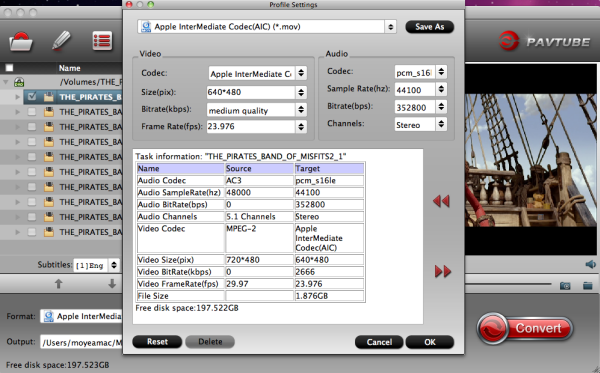
 Tip: If you like, you can click “Settings" to change the video encoder, resolution, frame rate, etc. Remember bitrate higher results in big file size, and lower visible quality loss.
 Step 3: When all the settings are fine, click the “Convert” button to start converting your DVD to optimized AIC .mov video files for iMovie. When then conversion completes, click the Open button to get the ripped video files. Launch iMovie and click File > Import > Movies to import the converted videos to iMovie for further editing. Just create your masterpiece with joy!
Additional Tips:
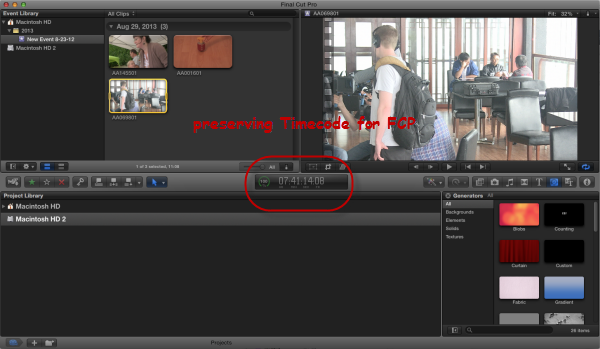
1) If you want to edit DVD clips in Final Cut Pro X or FCP 7/6, you just need to choose the “Final Cut Pro > Apple ProRes 422 (*.mov)” as output format in the second step; For Avid MC, choose “Avid Media Composer->Avid DNxHD(*.mov)” as output; For Adobe Premiere Pro or Vegas Pro, choose Adobe Premiere/Sony Vegas> MPEG-2(*.mpg) as output.
2)If you want to convert Blu-ray, DVD as well as video files like MTS, AVI, WMV, MKV, FLV, VOB, etc. to iMovie/FCE supported video formats, just turn to Pavtube iMedia Converter for Mac, which is an all-in-one toolbox to convert BD/DVD and various video formats to iMovie/FCE video formats. (Now, you can get 50% OFF discount after liked our FaceBook.) More Money Saving Tips, you can Click Special Offer. Just feel free to have a try!
Now, you have owned the top DVD to iMovie Converter for Mac, so you may not have troubles on ripping DVD to iMovie on Mac. Have Fun!
Read More:
Step 3: When all the settings are fine, click the “Convert” button to start converting your DVD to optimized AIC .mov video files for iMovie. When then conversion completes, click the Open button to get the ripped video files. Launch iMovie and click File > Import > Movies to import the converted videos to iMovie for further editing. Just create your masterpiece with joy!
Additional Tips:
1) If you want to edit DVD clips in Final Cut Pro X or FCP 7/6, you just need to choose the “Final Cut Pro > Apple ProRes 422 (*.mov)” as output format in the second step; For Avid MC, choose “Avid Media Composer->Avid DNxHD(*.mov)” as output; For Adobe Premiere Pro or Vegas Pro, choose Adobe Premiere/Sony Vegas> MPEG-2(*.mpg) as output.
2)If you want to convert Blu-ray, DVD as well as video files like MTS, AVI, WMV, MKV, FLV, VOB, etc. to iMovie/FCE supported video formats, just turn to Pavtube iMedia Converter for Mac, which is an all-in-one toolbox to convert BD/DVD and various video formats to iMovie/FCE video formats. (Now, you can get 50% OFF discount after liked our FaceBook.) More Money Saving Tips, you can Click Special Offer. Just feel free to have a try!
Now, you have owned the top DVD to iMovie Converter for Mac, so you may not have troubles on ripping DVD to iMovie on Mac. Have Fun!
Read More:
This article shows you how to convert MKV to iPad Air 2/iPad Mini 3 supported video formats so that you can play MKV files with iPad properly. With the Apple users' explosion, more and more people have a burning desire to play MKV files on their Apple portable devices or player, for example - iPad Air 2/iPad Mini 3. After you got the iPad, you may want to transfer some high-definition movies onto it for watching, such as transfer MKV files to iPad Air 2 and iPad Mini 3, but a lot of users have encountered the problems to play MKV on iPad Air 2/iPad Mini 3, let’s take a look first. In fact, the reason you cannot play MKV videos on iPad is simple: the default and downloaded player on iPad Air 2/iPad Mini 3 cannot find a suitable decoder for the file. Currently iPad Air 2/iPad Mini 3 as the old version only supports limited videos in .m4v, .mp4, and .mov formats. And as far as I know, there’s few video player for iPad can support DTS audio codec well. A fast solution I’ve worked out is to converting MKV to MP4 for iPad Air 2/iPad Mini 3 tablet. How to Convert/Play MKV on iPad mini 3 and iPad Air 2?Pavtube Video Converter Ultimate - Which can help you transfer MKV HD video to iPad compatible video format, sync output video to iPad Air 2/iPad Mini 3 via iTunes, and now watch MKV video on iPad 2/3/4/Mini/Air! Besides MKV video files, this MKV to iPad Air 2/iPad Mini 3 converter supports nearly all the video formats, such as Blu-ray, DVD, AVI, WMV, FLV, MOV, MP4, M4V, MTS, VOB, etc. It is an useful tool for your iPad and other playable devices. One important feature of the video encoding software is to prevent any video/audio sync problem based on its perfect audio and video sync technology. Read the Review. For Mac users, you can turn to iMedia Converter for Mac. Refer to the guide for Play MKV on iPad mini 3/iPad Air 2 on Mac. Now,Just get the right one according to your situation. and follow the step-by-step guide to start the MKV on iPad mini 3 and iPad Air 2 playback conversion. Step 1. Load MKV filesRun the MKV converter for iPad. Click "Add File" to load one or multiple .mkv file(s) into the program. Batch conversion is supported so that you can add multiple files for conversion at a time.
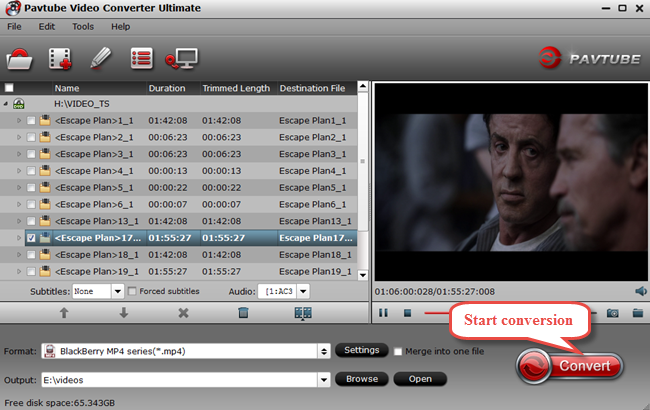 Step 2. Set video format for iPad Air 2/iPad Mini 3Set output video file format for your device. Here you can go to Format > iPad and then select “iPad > iPad Air HD Video (*.mp4)”.Or you can click format bar and choose common video format mp4 supported by iPad Air 2, iPad mini 3, iPhone 6 plus, etc.
  Tip: If the preset video/audio parameters can’t meet your needs, just click Settings icon to adjust the video bitrate, codec, frame rate, audio sample rate, audio channel, etc. Step 3. Start the MKV files conversion You can hit the big red “Convert” to start converting MKV HD Video files to MP4 with best video settings for iPad Air 2 and iPad Mini 3. After the conversion, click “Open output folder” in the conversion window, then transfer them to iPad, then you will be able to play MKV files on iPad Air 2 and iPad Mini 3 with compatible MP4 format.Read More:
Summary: How to transcode MPEG4 files to Final Cut Pro on Mac OS X? In this article, you will learn how to Convert MPEG-4 to Prores 422 for FCP Editing on Mac.
MP4 or MPEG-4 Part 14 is a digital multimedia format most commonly used to store video and audio, but can also be used to store other data such as subtitles and still images. But now maybe you are looking for a program that can convert MP4 to Apple ProRes 422 codec for Final Cut Pro X/7/6 (Just like iMovie)editing, since FCP best supported editing codec is Apple ProRes, a lot of Mac FCP users convert video to Apple ProRes codec for editing.
When trying to import some MPEG-4 file into Final Cut Pro, you may find that the MP4 video is extremely chopping and a green frame pops into the pictures on playbacks every few seconds. In this circumstance, you need a MPEG to ProRes Converter for Mac to convert MP4 to ProRes, more editing-friendly format for Final Cut Pro.
This software will convert MP4 to Apple ProRes 422/4444 with best video and audio quality, video and audio synchronization is perfectly guaranteed, nearly all the video formats are supported, including MKV, AVI, WMV, MOV, M4V, FLV, AVCHD, MTS, M2TS, MXF, Canon camcorder recordings, Sony/Panasonic recordings, etc.
How to convert MPEG-4 to Apple ProRes codec on Mac? Please follow the easy steps below.
Step 1: Free download and install MP4 to FCP Converter for Mac, Install and run this MP4 to Apple ProRes converter, import the MP4 videos that you want to convert on Mac.
 Note: it's best Apple ProRes codec converter on Mac OS. Rich formats are supported to import and output, presetted output formats for FCP X/7/6, iMovie, Avid Media Composer, Final Cut Express, Adobe Premiere, etc.
Step 2: Just click and choose Final Cut Pro -> Apple ProRes 422 (*.mov) as output format, this is best codec for Final Cut Pro X/7/6 editing, once converted MP4 to this codec, you won"t have any importing or editing problems.
Note: it's best Apple ProRes codec converter on Mac OS. Rich formats are supported to import and output, presetted output formats for FCP X/7/6, iMovie, Avid Media Composer, Final Cut Express, Adobe Premiere, etc.
Step 2: Just click and choose Final Cut Pro -> Apple ProRes 422 (*.mov) as output format, this is best codec for Final Cut Pro X/7/6 editing, once converted MP4 to this codec, you won"t have any importing or editing problems.
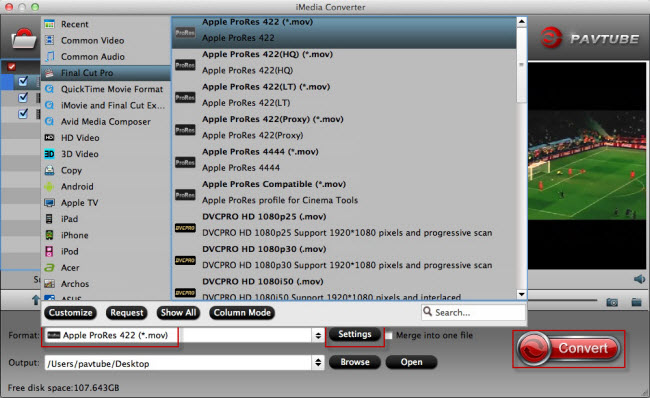 Learn more Apple ProRes, please refer to Types of Apple ProRes Codecs.
Step 3: Finally click the “Convert” button to let the program convert MPEG-4 files to Apple ProRes 422 codec on Mac. when the MP4 to FCP Apple ProRes codec conversion finished, you can load the converted files to Final Cut Pro X and edit natively, just take a free try now!
Learn more Apple ProRes, please refer to Types of Apple ProRes Codecs.
Step 3: Finally click the “Convert” button to let the program convert MPEG-4 files to Apple ProRes 422 codec on Mac. when the MP4 to FCP Apple ProRes codec conversion finished, you can load the converted files to Final Cut Pro X and edit natively, just take a free try now!
 Read More: