Showing posts with label Apple. Show all posts

Wednesday, March 18, 2015

2016 Best DVD to iPad Converter Review – Enjoy DVD on iPad Air 2

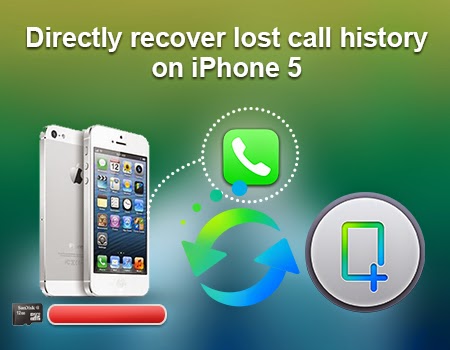
Wanna play your favorite DVD movies onto your iPad Air 2 with HD screen is really exciting. Now, you’re in the right place.


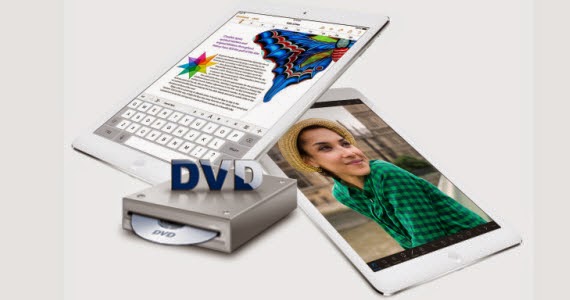
The iPad Air 2 is impossibly thin 6.1 millimeters, making it our thinnest iPad ever. The A8X, that delivers substantially better CPU and graphics performance than its predecessor. With it's 2048*1536 height resolution, you can get better visual experience. Your entertainment, your way ! Put that iPad to good use. Look, we all want to watch our favorite movies on the iPad Air 2, whether they’re home movies to share with family, viral movies to share with friends, or DVD movies to watch on a flight. But how to… 

However, same as the other model of iPad, one of the few drawbacks is that the iPad Air 2 is not designed with a built-in DVD player or DVD-ROM, which means that you cannot play your DVD movies directly on iPad Air 2. If you have tons of DVD disks, you are usually recommended to change your DVDs to a proper format for playing on your iPad Air 2  smoothly. From the hundreds of iPad converters we tested and reviewed, we selected a short-list of the best to recommend to you, organized in below according to category – Pavtube DVDAid. Read the Review. 
 
This top DVD Ripper for iPad Air 2 can enables you to play DVD on iPad Air 2 with No.1 fast ripping speed while removing all copy protection in commercial DVD discs. This means you can rip any hottest DVD to iPad Air 2 with supported formats and other DVD movies you like. Most importe, this program constantly upgrade to support the newest devices like iPhone 6, iPhone 6 Plus and Galaxy Note 4.  

Tip: If you're running on Mac OS X Yosemite/Mavericks/Mountain, Pavtube DVDAid for Mac is best choose, here is a download link. 

Follow the step by step guide to rip and convert DVDs to iPad Air 2 with ease and safe.

Step 1: Import DVD movies

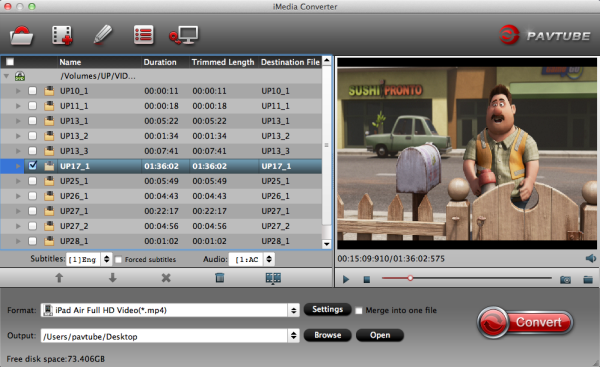
First, you need to download and then launch the DVD to iPad Air 2 converter program. After that, you can load the DVD movies and preview the added movies before converting. You could also take snapshots while previewing. 


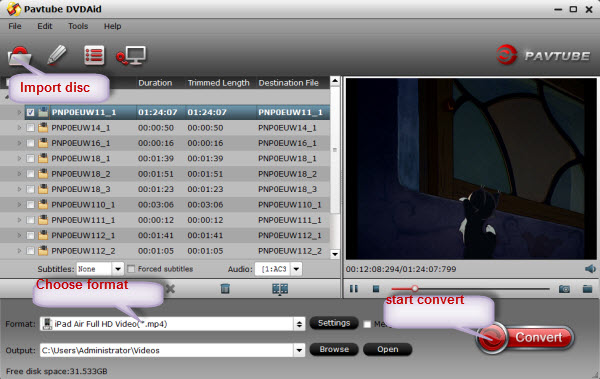
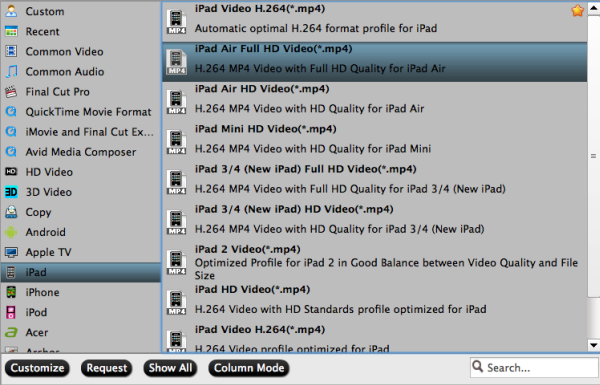
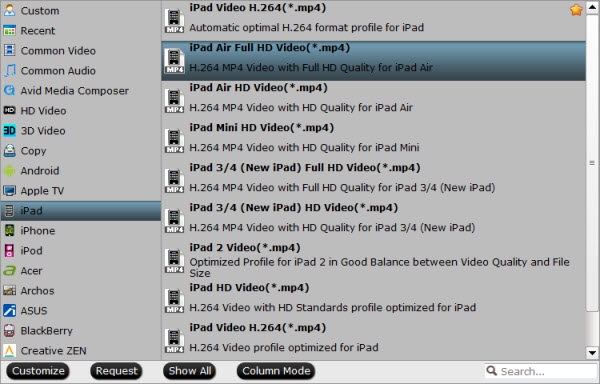
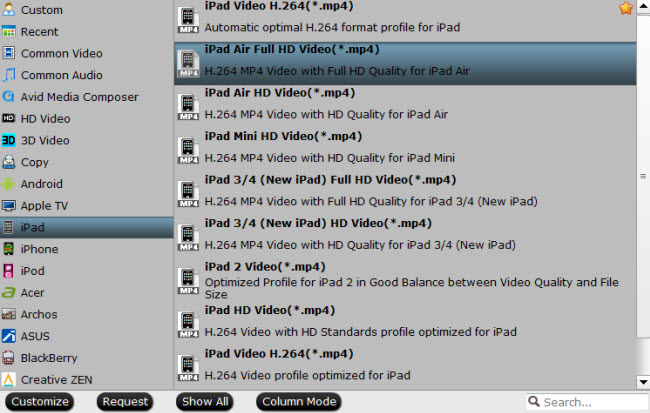
Step 2. Choose iPad Air 2 preset as the output format

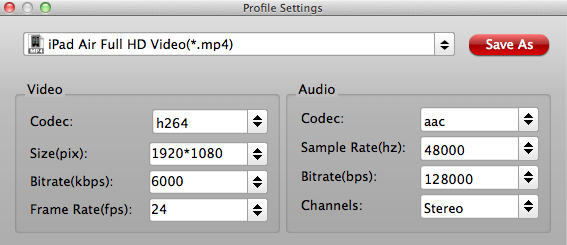
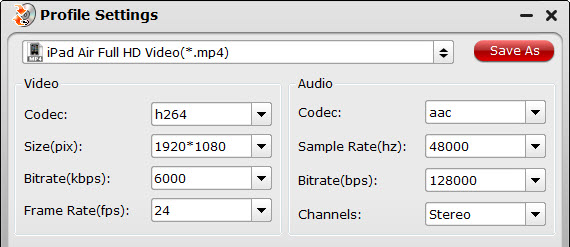
Click ”Format”, you can get optimized videos for iPad Air 2 under “iPad > iPad Air Full HD Video(*.mp4)”Choose your iPad model from the Apple devices output preset as the output format, which will remove all the incompatibility issue for you. Note that you can customize the settings for the output by specifying format and destination folder. 


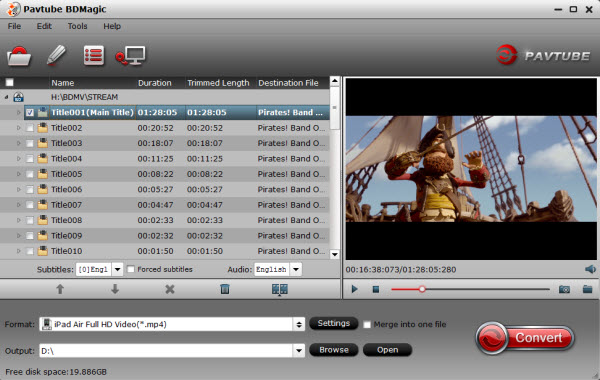
Step 3. Start the DVD to iPad Air 2 conversion

Select an output folder for the converted file and then click the "Start" button to begin the conversion. All the conversion tasks will be done at fast speed and you will get a high output quality. Once the conversion finishes, you can transfer the new file via iTunes to your iPad Air 2. You can now enjoy your DVD movies on iPad Air 2!  

Read More:

Friday, February 27, 2015

Convert and Add AVI movies to iPad Air 2 on Mac

Wanna convert AVI video to iPad Air 2 readable format on Mac for enjoying on its high resolution screen? You can find a good way to watch your AVI on the new iPad Air 2 here.

iPad Air 2 is the latest tablet from Apple. This brand-new Apple tablet is somehow even thinner than the original iPad Air, and the display technology is even better with 9.7-inch Touch ID screen with 1536 x 2048 pixels which makes it possible for you to enjoy videos on iPad Air 2 freely on a commute and travel.

Add AVI movies to iPad Air 2

Can we carry with the iPad Air 2 and enable iPad Air 2 to play AVI videos? 

Anyone knows that iPad Air 2, undoubtedly abides by its family tradition that only supports MP4, MOV, M4V video formats. So if you plan to add and watch AVI video file in Divx/Xvid codec with bigger size on iPad Air 2, you should know to convert AVI video to iPad Air 2 readable format is the priority to all.

How to convert AVI video to iPad Air 2? You can easily accomplish the AVI to iPad Air 2 conversion on Mac with a proper video converter. In this paper, an ideal Mac iPad Air 2 Video Converter software is recommended: Pavtube iMedia Converter for Mac.

With this program, you can convert any AVI video to iPad Air 2, iPad Air, iPad Mini 3 with Retina display, and etc effortlessly at ultra-fast speed with no quality loss. It supports a wide range of formats like AVI, MKV, VOB, MXF, AVCHD (.mts/.m2ts/.m2t), TiVo, MPEG/MPG, WMV, MP4, FLV, 3GP, etc., and includes optimized presets for popular devices like iPad, iPad Air, iPad Mini, iPod, Galaxy Tab 3, Galaxy Note 4, Kindle Fire HD, Google Nexus 7/10, etc.. Windows version is here. (Read its comparison between Wondershare)

How to Convert AVI videos for smoothly playback with iPad Air 2 on Mac

Step 1-> Launch the AVI to iPad Air 2 Converter for Mac, and import your source materials. Batch conversion is supported so that you can add multiple files for conversion at a time.


Step 2: Set output video file format for your device. Here you can go to Format > iPad and then select "iPad > iPad Air Full HD Video(*.mp4)". Or you can click format bar and choose common video format mp4 supported by iPad Air 2, iPad Mini 3, iPhone 6 Plus, etc.


Showing Best Video Formats Supported by iPad Air 2:

  • Video Format: .m4v, .mp4, .mov, MPEG-4, H.264, M-JPEG
  • Audio Format: AAC, Protected AAC, HE-AAC, MP3, AAX, AAX+m, Apple Lossless AIFF, WAV

Tips: Tap the "Settings" icon and you can adjust codec, bit rate, frame rate, sample rate and audio channel in the interface according to your needs and optimize the output file quality. You’d better keep a good balance of the video size and quality.


Step 4: Hit the big Convert bar to start the AVI to iPad Air 2 conversion. The conversion time mainly depends on your source video file size. You may check "Shut down computer after conversion" and leave it be.

After conversion is done, you could click the "Open" button to find the converted files and now sync and play AVI videos on iPad Air 2 for more joy.


More related: 


Sunday, February 22, 2015

Ultimate Solution to Play Big Hero 6 Blu-ray on iPad Air 2 with Ease

In this article you will get brief instruction about how to copy and play newly favourite blu-ray movies like Big Hero 6 on iPad Air 2.


Introducing the Apple iPad Air 2 


Apple has officially taken the covers off the iPad Air 2 which is a feat of engineering that again pushes the limits of what makes a premium slate. By designing with the Retina display, fusing what had been three layers into one, this great device creates the most reflective display in this world, making your viewing better with more vivid colors and greater contrast. 

Watch Blu-ray Movies on iPad Air 2


Watch Blu-ray Movies on iPad Air 2 

Watching films on iPad Air 2 whenever and wherever you want is a superb enjoyment that activates your weekend, holiday or any other leisure time. To watch films on iPad Air 2, you can invest in iTunes to buy movies, use the streaming service, or convert Blu-rays (like Big Hero 6) to create mp4's for iPad Air 2 playback.

Heard about Pavtube BDMagic on Google, which works as advertised. It is an ultimate Blu-ray converting software which can easily rip any Blu-ray to iPad Air 2 supported format, fully resolving the problem that there is no Blu-ray drive on iPad Air 2. Additionally, you can also customize your video by adding subtitles, cropping the edge, trimming unwanted part, toggling the volume to sleekly watch Blu-ray on iPad Air 2 with sharp and bright display.
Step-by-Step Instruction on How to Rip Blu-ray to iPad Air 2 

Part One. How to convert Big Hero 6 Blu-ray movie to iPad Air 2 

Step 1. Get Top Blu-ray to iPad Air 2 Converter and Load Big Hero 6 Blu-ray disc. 

Download, install and launch the Best Blu-ray to iPad Air 2 Converter on your PC. Click the "Load file(s)" button to import your source Big Hero 6 Blu-ray movie. 


Step 2. Choose audio track and subtitles for output. 

On Blu-ray to iPad Air 2 Ripper main UI, set your wanted subtitles and audio track from the drop-down box of "Subtitles" and "Audio" tab. 

Step 3. Select iPad Air 2 suitable profile and adjust profile presets (optional). 

Pavtube BDMagic offers users dozens of profiles under "Format" menu so you would always get an optimized profile for your portable device. In order to convert Big Hero 6 Blu-ray to the iPad Air 2 with 1080p image quality, you are suggested to choose "iPad > iPad Air Full HD Video(*.mp4)" format for output. 


Tips: If you'd prefer higher quality, click on "Settings" and set video bitrate to 2000kbps or above, this will bring better image quality and also bigger file size. 


Step 4. Start ripping Big Hero 6 Blu-ray to iPad Air 2. 

Now you are ready to hit the "Convert" icon to start ripping. After it completes, click the "Open" button on program interface to locate the created MP4 file, and transfer the converted file to your new iPad Air 2 with iTunes. 

Part Two. Manually Sync video/music/movie files to iPad Air 2 via iTunes 

To put videos, music and photos to Apple iPad Air 2, iTunes 12 is a must. You can download iTunes 12 and follow the steps below. 

1. Open iTunes 11, and press "File" -> "Add File to Library" to add movies to iTunes Library. Or just switch to Movie library, and drag the file to iTunes. (How to add local contents on your computer to iTunes

2. Connect iPad Air 2 with your Mac using the cable that came with your device. 

3. Click the Summary button and select "Manually manage music and videos". 

4. Click the On This Device (your iPad Air 2 name) button. 

5. Click Add To on the right side of the iTunes window. 

6. Switch to Movies Drag items from the left side of the iTunes window to the pane on the right. 

In this way you can sync Big Hero 6 Blu-ray movie files to iPad Air 2 as you like. Pavtube Blu-ray Ripper for iPad Air 2 supports latest released Blu-ray movies and rip ISO files to various video formats and codecs (MKV, AVI, MP4, WMV, M2TS, TS, Tivo, VOB, MPG, etc.) for playing, editing, burning, sharing, etc. Tips: For Mac users, please download and try Blu-ray to iPad Air 2 Ripper for Mac

More related:

Monday, January 26, 2015

Stream and Play MKV video on Apple TV 1/2/3 in three ways

Is there a way of playing .mkv files on Apple TV? Actually, there are more ways than you imagined of  bringing .mkv on your Apple TV. Here introduces three effective ways.

MKV is a common file format for videos which means Matroska which is a container format (like .mp4, .m4v, .avi or .mov) that can hold video, audio and subtitle streams, then you may ask does Apple TV support MKV videos?

Stream and Play MKV video on Apple TV 1/2/3

It's a pity that  Apple TV has no sight for providing support for this container format, so if you have some MKV files (for instance on your NAS, USB stick or external Hard drive), you need to find a “workaround” to watch them on your TV. Here offers three ways for you.

Solution 1: Free Convert MKV to MP4 Video for Apple TV

If you get a couple of MKV files and want to watch them on Apple TV, you have to convert them to Apple TV friendly formats first. An open source software for re-encoding is Handbrake. Open the file, select an Apple TV preset and let Handbrake create an new video file.

Note: HandBrake works well at converting MKV to Apple TV, but it is not guaranteed. Worse still, it is slow in conversion, and often has some HandBrake MKV problems, like crashing before MKV to Apple TV conversion finishes.

Solution 2: Stream (AirPlay) MKV to Apple TV
A nice and easy way, if you have a modern Mac, is AirPlay Mirroring. Basically, this means that you play the video with your Mac (for instance with VLC) and just mirror your display to the Apple TV.

The big advantage is that you can instantly start watching your video. But you need to either Jailbreak or video conversion.

Solution 3 - The Best Way: Convert MKV to Apple TV 1/2/3 with Presets

As shown above, Handbrake has its drawbacks, so you need an effective HandBrake Alternative for video conversion, here Pavtube Video Converter Ultimate - a simple and user-friendly tool Video Converter is highly recommended. It features ultra fast speed and 1:1 quality ratio output when handing MKV to Apple TV conversion. Furthermore, it provides an optimized preset to fit Apple TV. Mac version is here. Follow the guide below and complete the MKV to Apple TV conversion in Windows quickly and easily.


Guide: Convert MKV video to Apple TV supported format

Step 1: Import mkv video files to the Video Converter for Apple TV.

Launch the best Video Converter for Apple TV. Click the button “File” to add MKV video files to it. If it is necessary, you can double click the each file to have a preview. Even Blu-ray and DVD are supported.


Tip: If you have several video files and wanna combine/merge several video files for the Apple TV, you just need to tick off the “Merge into one” box.

Step 2: Select an output format for the Apple TV and set the output folder.

Click on the dropdown menu of “Format” and then choose the format from the “Apple TV” sublist, which are all compatible for the Apple TV 1/2/3. Then you can set the output folder by clicking “Browse” icon as you need.


Step 3: Click “Settings” icon to adjust audio and video parameters.

Click the “Settings” icon and you will go into a new interface named “Profile Settings”. You can adjust codec, aspect ratio, bit rate, frame rate, sample rate and audio channel in the interface to optimize the output file quality. Read the solution when you find no 5.1 Surround Sound from Apple TV.


Step 4: Start converting your MKV ideo files to MP4 for Apple TV.

Click the “Convert” button; it will convert video to MP4 for Apple TV immediately with NVIDIA CUDA technology support. You can find the process in the “Conversion” interface.

After the short conversion, you will be able to get the output files for the Apple TV via clicking on “Open” button effortlessly. Now you can sync/copy MKV videos to Apple TV 1/2/3 for playback via iTunes easily. Find more solutions at Apple TV column.

Read More:

Friday, November 14, 2014

Easy solution to convert XviD/DivX videos to iPad Mini 3 on Windows 10/Yosemite

Following is a brief guide on how to convert unrecognized video files AVI(Xvid/DivX) to supported format of iPad Mini 3 on Windows 10/Yosemite.

The iPad Mini 3 is a curious beast. Both the display and battery life are excellent, and the addition of Touch ID takes care of our biggest complaint from last year. Yet the limit to video format still and will always exist for the reason of developer’s benefit. Since Apple users are not all surprising the fact that Apple products only accept videos in MPEG4/H.264/M4V formats.
Convert Xvid/Divx AVI to iPad Mini 3

When you get some Xvid or DivX AVI videos, it's hard to transfer and play these AVI on iPad Mini 3. Thouht there is no official XviD/DivX player for iPad Mini 3 to make our life easier, there is still easy solution to make XviD/DivX AVI playable on iPad Mini 3, no matter on Windows 10 or Mac OS X Yosemite.

To add Xvid/Divx videos to iPad Mini 3 for playback, you requires to encode AVI to iPad Mini 3 supported video format. Then the AVI to iPad Mini 3 Converter for Win/Mac here is recommended which is specially offered for you to achieve your goal of Xvid/Divx AVI to iPad Mini 3 conversion in an easy way. It enables you to encode and convert Xvid/Divx AVI to iPad Mini 3 preferred format with best quality output video. (Read Best Mac Blu-ray Ripper Review for iOS  devices)
Tutorial on encoding Xvid or DivX AVI files to iPad Mini 3 on Windows 10/Yosemite

Step 1. Run the iPad Mini 3 AVI Converter to import your .avi files to it. This program supports batch conversion.

iPad Mini 3 AVI Converter 

Step 2. Click on Format, and from the dropdown menu, select iPad > iPad Mini HD Video(*.mp4) that is the optimal output format for iPad Mini 3.

best video format for iPad Mini 3 

Step 3. To get a full-screen and HD video for iPad Mini 3, tap the Settings button to modify the video resolution, video/audio bitrate for your iPad Mini 3.


a. For your 1080p source video, keep the video size as 1920*1080, set video bitrate as 5000-6000fbps is proper.

b. For 720p HD video, we recommend 1280*720(720p HD) video size and 3000-4000fbps video bitrate.

best video settings for iPad Mini 3 

Step 4. Press the Convert button; it will start to convert Xvid or DivX AVI to iPad Mini 3 on Windows 10/Yosemite immediately.

When the conversion ends, click “Open” button to get the generated h.264 .mp4 movies and then sync the videos to iPad Mini 3 via iTunes. Later, playing Xvid or DivX AVI moives on iPad Mini 3 will be so much easy for you.

Tips:

1. If necessary, tick off the "Merge into one file" box that helps you merge multiple AVI video files into single one file.

2. If you wanna split your large video, it's also an easy task. Just click the "Split" button and it will help you make it.

3. It's worth mentioning that, this tool supports NVIDIA CUDA and ATI Stream (AMD APP) acceleration technologies. If your computer running on a CUDA-enabled Graphics card, or an AMD graphics card with AMD APP technology, the conversion speed will be much faster.

4. If you are disc lovers, you can also watch your Blu-ray, DVD on iPad Mini 3 or put Blu-ray ISO and DVD ISO/IFO to old iPad Mini 2 for enjoying.

Sunday, August 17, 2014

Possible way to Sync deleted Contacts to iPhone 5s

Do you lost some Contacts on your iPhone 5s and want to find a possible way to sync these deleted Contacts back to your iPhone 5s? iFonebox is the best solution to transfer these deleted iPhone 5s Contacts back.  

Contacts in iPhone 5s is the easy way to store phone numbers, e-mails, some related information etc. In dairy use of iPhone 5s, these data in your Contacts are easy to lose due to many accident reasons. When this trouble happen to you, you must very upset about that and want to recover deleted Contacts to your device
sync deleted contacs to iphone 5s

Here we highly recommend the contacts recovery software, iFonebox. This software could recover lost data like photosmessagescall historynotes, etc, as well as sync deleted Contacts to iPhone 5s. 

Win: iFonebox 
Mac: iFonebox for Mac 


Download it to have a try. 

Recover deleted Contacts directly back to iPhone 5s  

Step 1: Choose Recovery Mode 

Install iFonebox on your computer and launch it. Then connect your iPhone 5s with your computer via USB cable and your device could be detected by the software automatically as long as your device could be detected by iTunes. Then choose: “Recover from iOS Device” as recovery mode. 

recover from ios device

Step 2: Start scanning iPhone 

Then iFonebox will automatically start scanning and analysis your iPhone 5s. The scanning time depends on the number of the data in your iPhone 5s. Just wait patiently if there is a large data in your iPhone 5s. 

scanning from ios device 

Step 3: Preview and Transfer deleted Contacts 

When the scanning is finished, all the data in your iPhone 5s will be displayed in the interface of the software in categories. Click “Contacts” to preview all the Contacts in your iPhone 5s. Click the option before the Contacts and choose these contacts you need to transfer to your iPhone 5s. 

transfer contacts to iphone

Friday, August 8, 2014

Sync deleted Contacts to iDevice with the new function of iFonebox

The updated new function of iFonebox allows you to sync deleted contacts to iPhone, iPad and iPod Touch.

“As I was using the phone, the phone went through a 'supernatural' moment - flickering etc. and then the contacts was empty. Even the favorite had numbers and not names.I shut down the phone and restarted it but to no avail. Now, just as suddenly, the contacts are back! But not all of them. How to get my lost contacts back to my iPhone?”
sync iphone contacts
Are you facing the trouble of losing all the contacts in your iOS device? Do you regret to deleted one important contact? Due to its complex data files and data structures, many people and developer think it is almost impossible to recover deleted idevice contacts and even sync them back to device just like they were not deleted.

In fact, while you lost or delete the contacts in your idevice, they will be still in the memory of your device which are just invisible. The only way to get them back is with the help of an ios contacts recovery software.

Thanks to the advanced technique of iFonebox, which could help these contacts lost users to recover their contacts. On Aug 5, the updated version came out and the latest version is suppose to transfer these recovered deleted contacts back to your device. What’s more, before the sync,you could do some edit to your deleted contacts, such as add the related contacts, address,birthday etc.
main interface of new ifonebox

Read this article to get the detailed info about how to recover deleted contacts and transfer them back to device.

Download the latest version here:

Win: iFonebox
Mac: iFonebox for Mac

Friday, August 1, 2014

iPhone 5 Text recovery help to recover deleted text imessages without backup

This article show how to recover deleted text imessage on iPhone 5 when you didn’t have backup file.

I deleted a text from imessage on my iPhone 5 when I check the text conversation; i don't have a backup on itunes or icloud. Is there a way to recover iPhone 5 deleted text without backup?
 
iphone 5 text recovery

Tutorial: how to recover iPhone 5 delete text without backup

To recover deleted text message on iPhone 5 is not difficult, what you need is a professional iPhone 5 text recovery, tool, here we take iFonebox (Windows & Mac) as an example, it is a powerful iPhone text recovery tool which could directly access and scan your iPhone 5 and recover deleted text from imessage with a few clicks.

Fllow the simple steps below to see how this iPhone 5 text recovery tool works to recover deleted text on iPhone 5, Free download: iPhone 5 text recovery (Windows)
Free download: iPhone 5 text recovery (Mac)

Here we take Mac version as an example, if you are windows pc user, please refer to Window version">Window version

Step 1: Choose recovery mode
 
Run this iPhone 5 text recovery on your Mac and connect your iPhone 5 with the Mac by a USB cable. Here choose “Recover from iOS Devices”
 
If you have backup file,you can also choose mode”recover from iTunes backup” to selectively retrieve message from backup file
recover deleted phone number from iphone 

Step 2: Scanning your iPhone 5 for recovering deleted text imessage
This iPhone 5 text recovery tool will automatically scan your iPhone 5 to find out and analyze all the existing and deleted files. The scan time depends on the number of the file on your iPhone 5. So if there are lots of data on your iPhone 5, please wait patiently until the software finish the scanning task.
ifonebox scaning bar 

Step 3: Preview and recover deleted texts selectively
 
After scanning finished, you can easily preview all data found on your iPhone 5 in the scan result. Click the “message” on the top side of the window to preview the content. The data displayed in the scan result contains deleted and existing texts on your iPhone 5. You can check the box “only display the deleted items” to list deleted message only. Then selectively mark what you want before click “Recover” button to save deleted texts on your Mac.

recover messages 

You can also recover other data like photos, contacts, note, call historys, calendars, etc if you need.

Friday, July 25, 2014

Best Way to Backup/Transfer data from iPhone 5s to PC

Except iTunes, iCloud, there is another easy way to backup and transfer the data on your iPhone 5s. This article will share the way with you.

As commonly known, iTunes and iCloud are two ways to backup your data and help your transfer your data between iPhone 5s and computer. But if you sync your iPhone to your iTunes or iCloud, the previous data will be recovered by the latest one. Another limitation is that you could not preview all the data directly in your iTunes on your computer. 

backup data from iphone5s

Then is there an easy way that not only could replace the transfer function of iTunes and iCloud, but also allow me to preview these data? The answer is certainly yes. iFonebox is such an alternative of iTunes and iCloud. 

You can download the free trail version to scan and preview the data in your iPhone 5s, including the deleted one. To restore and transfer these data to your computer, you can purchase the paid version and backup iPhone 5s data to computer.

Step 1: Choose Recovery Mode

Launch iFonebox on your computer, then connect your iPhone 5s with your computer through USB cable. Then the interface on your computer will be showed as follows, choose “Recover from iOS Device” as the recovery mode.

iphone5 main nterface from ios device 

Step 2: Start scanning iPhone 5s

iFonebox will automatically scan your iPhone 5s after clicking the “Recover from iOS Device”. The scan time depends on the number of the database on your iOS devices. Just wait patiently until the software finish the scanning.

scanning from ios device

Step 3: Backup and Transfer iPhone 5s data

When the scanning finished, all the data on your iPhone 5s will be displayed in categories on the interface. Click one by one to preview all the data in your iPhone 5s, including the deleted contacts, messages, call history, calendar, reminders, notes, Safari Bookmark. Click “Recover” button on the top left of the interface to backup them on your computer, just choose the folder locate you want to transfer them.

recover photos from ios device 

Wednesday, July 23, 2014

Recover iPhone Lost Data (Contacts,SMS,Photos,Notes,calls) that was Very Important To You

Important iphone data lost or deleted? Don’t worry, this s article introduce a superb iPhone data recovery tool to help you recover your iPhone Lost Data. 

Nowadays, iPhone data becomes more and more important to some people because it records contacts, photos, notes and so on crucial data. There are people who rely on their iPhone for almost everything, from their daily schedules, business and personal files and what have you.

recover iphone lost data

Sometimes bad things happen to good data. Whether you’ve deleted an important file by careless, forgotten the posscode to your locked iPhone, or lost or damaged your iPhone somewhere, How to Recover iPhone Lost Data that was very important to you?

Actually, you don’t have to let your valuable files, contacts, photos, and other data disappear forever. With iFonebox-iOS data recovery, you can easily recover deleted Contacts, Photos, Notes, Call logs, SMS, Calendars, Reminders etc from iPhone, iPad, or iPod Touch no matter you did or didn’t have backup file.

Click to free download iFonebox for Mac version
Click to free download iFonebox for windows version

How to Recover iPhone Lost Data That Was Very Important To You:directly Recover data From iPhone
If your iPhone takes a tumble down the escalator or falls face down on the pavement, you can still get to its data no matter how badly damaged the screen looks. As long as your iPhone can boot up, you can use iFonebox to access its data. Simply launch iFonebox on your computer, connect the iPhone to computer, and choose”Recover from IOS device”. iFonebox will begin analyzing your iPhone and discover all of its contents, just a few minutes, you can recover your iPhone lost data with ease.

recover iphone lost data 

recover iphone lost contacts

recover iphone lost photo

How to Recover iPhone Lost Data That Was Very Important To you:restore data from iPhone backup
 If your iPhone has been lost or stolen, you’re still in luck. iFonebox can open up the contents of any iTunes backups on your computer, and give you the same level of access that you’d get with an attached device. In fact, the steps for retrieving your data from a backup file are exactly the same. You can then either selectively recover individual files or export all the contents of the lost iPhone to a folder. Recovering data from an iTunes backup is typically much quicker than from iPhone, because the data’s already on your computer.

Monday, July 21, 2014

Have fun with these lost iPhone 5 Safari Bookmark

Do you like surfing online on your iPhone 5? If so, this post will help you solve one problem that recover lost Safari Bookmark directly from iPhone 5.

Surfing online on iPhone 5 would be a good choice to kill time when you are waiting for the bus or on the way for traveling. As it is inconvenient to enter the url each time when you need it, many people choose make Safari Bookmark as a fast way to enter the website they usual use. Some Safari Bookmark are even very important. If the Safari Bookmark on iPhone 5 once lost in accidental deletion, crashed system or any other kinds of unknown reasons, how to get them back?

retrieve lost safari bookmark from iphone 5

With the help of iFonebox, it could help you retrieve and recover all the Safari Bookmarks directly from scanning iPhone 5.

Free download the Windows version or Mac version of iFonebox below and follow below tutorial to recover iPhone 5 lost Safari Bookmarks.

Win: iFonebox
Mac: iFonebox for Mac

Retrieve lost Safari Bookmark directly from iPhone 5

Step 1: Choose “Recover from iOS device” 

Install iFonebox on your computer and then launch it. Connect your iPhone 5 with your computer through USB cable. Then you will see the interface as follows.
recover from ios device  

Step 2: Start the scanning

iFonebox will automatically scan your iOS device after clicking the “Recover from iOS Device”. The scan time depends on the number of the database on your iOS devices. Just wait patiently until the software finish the scanning.
scanning from ios device

Step 3: Preview and Restore Safari Bookmarks

When the scanning finished, all the data on your device will be displayed in categories on the interface. Click “Safari Bookmark” to preview all the history of your Safari Bookmark on your iPhone 5, both deleted and exist. Choose the one you need and click “Recover” button on the top left of the interface to backup them on your computer.

safari bookmark from ios device

Related articles:

Recover deleted/lost calendar events on iPhone 5
Save your iPhone 5’s memory of call history

Friday, July 18, 2014

Save your iPhone 5’s memory of call history

How to avoid the storge limitation of call history on iPhone 5? Read on and you will find the solution.

As an iPhone user, you will find that there is the the storge limitation of call history on iPhone 5. In order words, if you have the amount of your call history up to a certain amount, when you have the new call and the previous ones will be replaced automatically.


If you want to find your previous call numbers, this limitation will bring trouble to allow you preview them. So want to find a solution to recover these lost call history? For those who want to restore their lost call history from iPhone 5, this post can help you to solve the problem. Just with the help of an iPhone 5s call history recovery tool, iFonebox or iFonebox (Mac), it will allow you to preview and recover all the received and missed calling records, either existed or lost. Here is the full review.

Please download the trail version of this iPhone 5s call history below and run it on your computer for free.


How to Directly Scan iPhone 5 to Restore Call History

Step 1. Choose recovery mode

Install and run iFonebox on your computer, plug your iPhone 5 to the computer via USB cable. Click “Recover from iOS Device”.


Step 2. Scan iPhone 5 Call History

Then the iPhone 5 call history recovery tool will automatically scan your iPhone 5.


Step 3. Preview and Recover Notes

When the scanning is finished, you could see scanned call history in the “Call History” category on the top bar of this iPhone 5 data recovery. Select desired ones for recovering. After that, click the top right “Recover” button to start recovering lost call history for iPhone 5.


Besides call history, you can find and restore your lost calendar eventsdeleted contacts from iPhone 5.