Monday, May 15, 2017

2 Ways to Put 3D Blu-ray to PS VR for viewing

PlayStation VR, known by the codename Project Morpheus during development, is a virtual reality headset developed by Sony Interactive Entertainment. It was designed to be fully functional with the PlayStation 4 home video game console. You can import some 3D movies like 3D Blu-ray into it for enjoying the 3D moment. If you feel a little difficult to watch 3D Blu-ray movies with PS VR, you can get two easy methods in this article. Read on.

Method 1 of Watching 3D Blu-ray on PS VR

1. Upgrade PS VR to the System Version 2.5

Watching 3D Blu-Rays with the PlayStation VR only works if you have the latest updates to both the system and the headset. You want the PlayStation 4 to be updated to System Version 4.5, and the PlayStation VR to be updated to System Version 2.5.

2. Make sure PS VR is positioning

It's usually pretty important to make sure your PSVR is correctly positioned on your head, but when watching a 3D Blu-Ray this is critical. If the image is shifted too far in any direction because the lenses are not correctly positioned in fron of your eyes, the 3D effect can quickly become disorienting. Make sure you're seated, and your headset is correctly aligned.

3. Make sure the lenses in your headset is clean

It's also important to make sure the lenses in your headset are as clean as they can possibly be. Make sure you have a microfiber cloth nearby, and remove any smudges from the lenses before you try to watch a 3D Blu-Ray.

As soon as you put the Blu-Ray in your PlayStation 4, Cinematic mode will adjust to show you the movie in 3D. You won't see any 3D features until the movie starts, unless your movie included 3D visuals in the menu system for the disc.

Everything else about Cinematic Mode will remain the same, which means the display size will remain whatever your default setting is. If you've set your Cinematic Mode to Medium, you'll probably want to increase the size to Large when watching 3D Blu-Rays. This will use more of the display, and offer you more of the 3D experience.

Once you have the display size set to your liking, it's important to position the display just slightly higher than you'd normally set it when playing a game. This makes it easier for you to shift a little during the movie, so you aren't trying to reset the view while watching. To make this adjustment, pick your chin up a little higher than usual and hold the Option button until the display recenters.

Once the movie has started, you'll be able to control the movie just like you would any other movie viewed through your PlayStation 4. If you prefer the separate media remote, DualShock 4 controller, or voice commands, you'll find each of these features still exist in the headset. However, since you're going to be sitting stationary for a while, you'll want to ensure you choose a control method before you hit play.

Source: https://www.vrheads.com/get-best-possible-3d-blu-ray-experience-your-playstation-vr

Methos 2 of Watching 3D Blu-ray on PS VR

If you have many 3D Blu-ray discs or want to view 3D Blu-ray on PS VR, you can convert 3D Blu-ray to a 3D video format for easy playback with PS VR. Here, I choose to use Pavtube Video Converter Ultimate, which can rip any 3D Blu-ray movie to PS VR supported 3D format like 3D SBS MP4 format with super fast speed. Besides, it also can rip all the newest even region-locked Blu-ray/DVD and work in 4K/SD/HD video, TV shows and music dramas. It can accept H.265, MP4, AVI, FLV, MKV, ASF, etc and then change them to 3D SBS MP4/MKV/MOV for PS VR and other VR Headsets like Google Cardboard, Oculus Rift DK2, Air VR, HTC Vive, Google DayDream View, 3D TV etc. For me, it is the best choice. You can free download and have a try. (Read its review to learn more)

If you are using Mac, you can get the Mac version - Pavtube iMedia Converter for Mac to convert 3D Blu-ray to PS VR 3D format on Mac easily. You can also reference this guide.

Simple Process of Converting 3D Blu-ray to 3D format for PS VR

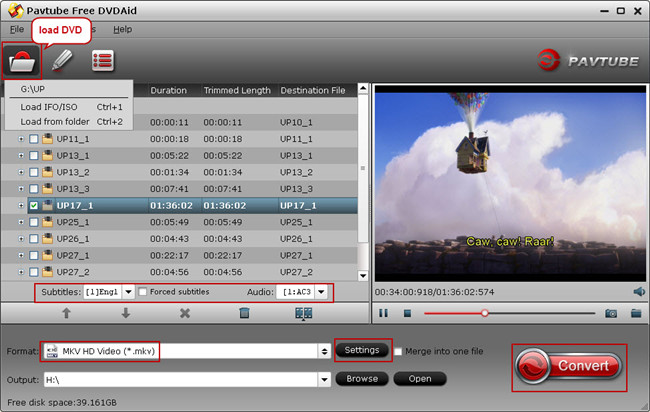
Step 1: Load 3D Blu-ray disc.

Add 3D Blu-ray from disc drive into Pavtube Video Converter Ultimate by clicking "Load Disc" button. Or you can choose to import Blu-ray ISO image or Blu-ray folder from hard drive.

Tips: The program will automatically select the main Blur-ray title for you, you can select your desired subtitle languages or audio tracks from the drop-down list of "Subtitle" and "Audio" under the Blu-ray title displaying list.

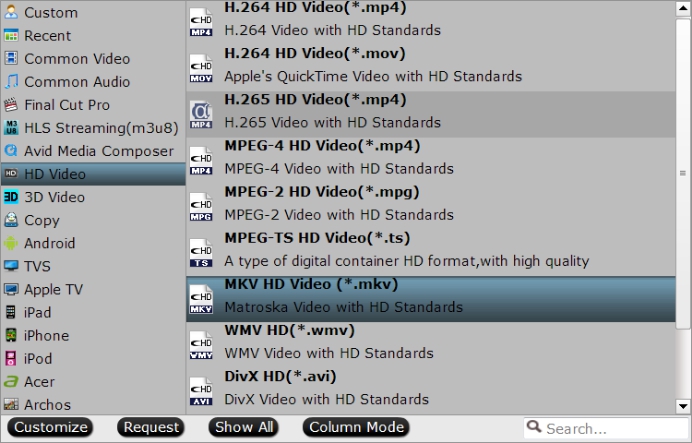
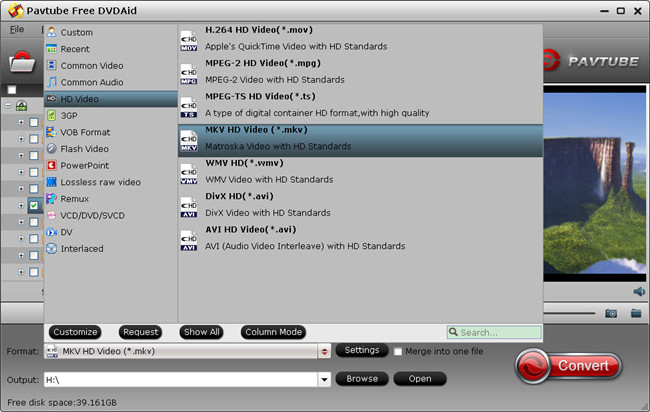
Step 2: Output 3D MP4 or MKV format.

Move to "Format" menu, find "3D Video" category and choose "MP4 Side-by-Side 3D Video(*.mp4)" or "MKV Side-by-Side 3D Video(*.mkv)" as output format, you can also choose 3D TAB MKV or MP4 format according to your own needs.

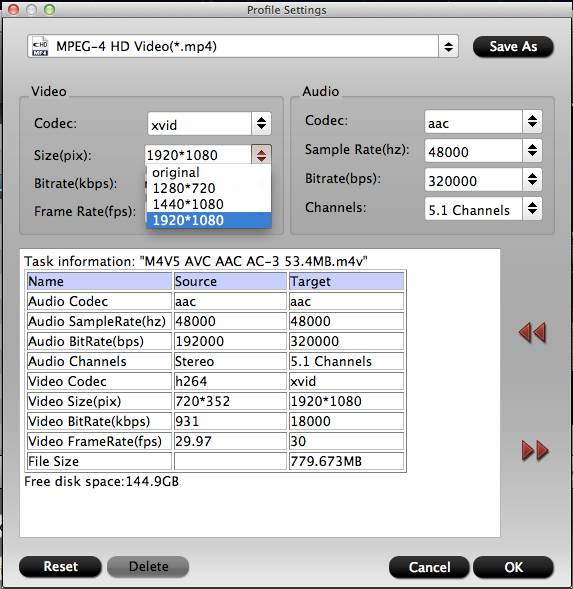
Step 3: Adjust 3D profile settings.

Click settings to open "3D Profile Settings" window, here you can adjust output 3D video depth, select the specific 3D resolution: Side by Side (Half - Width) or Side by Side (Full) or change the image display order for 3D SBS movie.

Step 4: Start the final conversion process.

Go back to the program main interface, hit on the "Convert" button and start to create 3D SBS or TAB MP4/MKV video from 3D Blu-ray disc. When the conversion is done, you can locate the generated 3D SBS MP4 video in output folder to view on VR Headsets with seriously immersive 3D effect.

Thursday, May 11, 2017

Save 50% from Pavtube Video Converter Ultimate During 2017 Mother’s Day Deals

Have ideals celebrating the coming Mother’s Day with your Mum? You can rip your DVD, Blu-ray and convert any videos, movies to any formats for playing on TV, portable devices etc with your mother. That’s great. Pavtube Video Converter Ultimate, the industry leader in the field of DVD, Blu-ray and video backup solutions, today kicks off its Mother’s Day Promotion, offering the bigest 50% discounts. You can also get the Pavtube Video Converter Ultimate 50% OFF on 2017 Mother’s Day from Pavtubes facebook website.

Save 50 percent off on Pavtube Video Converter Ultimate for DVD/Blu-ray/Video Conversions

Part 1. What is Pavtube Video Converter Ultimate?

Pavtube Video Converter Ultimate

Pavtube Video Converter Ultimate is a popular video conveter, DVD ripper, Blu-ray ripper. It can convert videos, rip DVD to formats, rip Blu-ray to formats on Windows. It is a popular product from Pavtube Studio. You can free download it and buy it with only $32.5 on 2017 Mother’s Day promotion.

Part 2. What Pavtube Video Converter Ultimate Can Help Us?

1. Convert to Various Format Files
Input for more than 200+ format videos Converting a variety of media formats including AVI, WMV, MP4, MOV, FLV, MPEG, 3GP, VOB, Xvid to your desired format files.
Convert HD videos and 4K videos Perfectly convert HD Video including Tivo, MXF, MTS, etc and even 4K video and 4K source files to various common video formats.
Perfectly support for H.265 video Encode video with H.265/HEVC codec, then you can stream media files in perfect quality with small file size and less bandwidth.
Convert DVD Blu-ray to any formats Pavtube Video Converter Ultimate also can rip your DVDs, Blu-rays to any formats like MP4, MOV, MKV, MPEG etc.

2. Enjoy Media Files Anywhere Anytime

Output videos for all popular devices: optimized file for all your desired devices including iPad, iPhone, Android, Xbox, PSP, PS3, Nexus, Kindle Fire, etc.

3. Make 3D Movies for Grand Visual Experience

Convert 2D/3D resources to 3D movies in 3D MKV, 3D MP4, 3D MOV, 3D WMV and 3D AVI format to watch on 3D devices with Side by Side, Red/Blue and Top/Bottom 3D effects.

4. Enhance and personalize your media files

Professional editing functions are provided to you: split, merge, trim, crop, add watermark, adjust video effect, edit audio and insert subtitles.

5. Customize video and audio parameters

Change output video codec, size, frame rate, bitrate and audio codec, sample rate, bitrates and channels for better display quality.

6. Super faster conversion speed

Do not want to wait an eternity to convert a single clip? Pavtube Video Converter Ultimate surpasses other tradition video conversion application with 6x faster conversion speed. It is capable of accelerating the video encoding and decoding speed with the advanced NVIDIA CUDA technology and AMD Accelerated Parallel Processing (APP). Now it has Improve H.265, H.264 Encoding Speed With NVIDIA GPU Acceleration. Just save your precious time and energy for most important and amusing things in life.

Note:

For Mac user, please get its Mac version - Pavtube iMedia Converter for Mac to convert video/DVD/Blu-ray on Mac (macOS Sierra, El Capitan Yosemite, Mavericks, Lion included). You can free download it or buy it with only $32.5.

2017 Mother's Day Pavtube Other Products Big Promotion

A. 50% ~ 55% Discount Products

Windows Products Mac products
Pavtube ByteCopy
Pavtube BDMagic
Pavtube DVDAid
Pavtube Media Magician
Pavtube ByteCopy for Mac
Pavtube BDMagic for Mac
Pavtube DVDAid for Mac
Pavtube Media Magician for Mac

B. Only $9.9 Crazy Promotion Products

Windows Products Mac Products
DVD Creator
Video Converter
MXF Converter
MKV Converter
MTS/M2TS Converter
HD Video Converter
MXF MultiMixer
FLV/F4V Converter
DVD Creator for Mac
Video Converter for Mac
MXF Converter for Mac
MKV Converter for Mac
MTS/M2TS Converter for Mac
HD Video Converter for Mac
iMixMXF for Mac
FLV/F4V Converter for Mac

OK, I guess you will master this fast. And get started to give your motherr a big surprise on Mother’s Day 2017. And wish you a happy time!!!

Source: http://i-freepedia.com/pavtube-video-converter-ultimate-mothers-day-deals/

Wednesday, May 10, 2017

Pavtube ByteCopy Gives you 50% OFF Promotion on 2017 Mother's Day

Mother’s Day is approaching soon. Great news for Blu-ray/DVD ripper software users for the upcoming Mother’s Day: Pavtube ByteCopy & Pavtube ByteCopy for Mac launch a big Mother’s Day promotion for all multimedia software users to celebrate Mother’s Day from now. You can get a Pavtube ByteCopy (for Mac) in only the half of the original price.

Everyone is invited to get the gifts and enjoy Pavtube ByteCopy/Pavtube ByteCopy for Mac 50% off discount coupon codes for Blu-ray and DVD enjoyment at: https://www.facebook.com/pavtubefans/app/198826126804423/

Pavtube ByteCopy & Pavtube ByteCopy for Mac 50% OFF Promotion on 2017 Mother's Day

A. Pavtube ByteCopy (Only $21 now)

Main features of Pavtube ByteCopy (Read Review)

*Rip Blu-ray, 4K Blu-ray, 3D Blu-ray, DVD to any video/audio formats.
*2 ways to copy Blu-ray/DVD: Full disc copy, direclt copy.
*Lossless Blu-ray/DVD to MKV backup with multiple audio/subtitle tracks.
*Convert Blu-ray/DVD to Multi-track MP4, MOV, AVI.
*Rip Blu-ray/DVD to iPhone, Android, player, TV, PS3/PS4, Editors, VR etc supported video.
*Improve H.265, H.264 Encoding Speed With NVIDIA GPU Acceleration.
*Allow you to complete the conversion process with three simple clicks.
*Editing tool: trim, crop, merge, insert subtitles, export srt/ass/ssa subtitles, add video effects.
*Compatible with Windows 10, Windows 8.1, Windows 8, Windows 7, Windows XP.

Free download and 50% off buy Pavtube ByteCopy

B. Pavtube ByteCopy for Mac (Only $21 now)

Main features of Pavtube ByteCopy for Mac (Read Review)

*Convert Blu-ray/DVD to 200+ Multimedia Devices and Formats
*Convert 2D Blu-ray/DVD to 3D Video/3D Blu-ray to movies in 3D MKV, 3D MP4, 3D AVI, 3D WMV, etc
*Best Blu-ray/DVD to multi-track MKV, MP4, MOV, Apple ProRes MOV solution.
*Rip Blu-ray/DVD to iPhone, iPad, player, TV, PS3/PS4, Apple TV, QuickTime, NLEs, VR etc supported video.
*Backup Blu-ray/DVD without Quality Loss with two copy ways.
*Personalize Movie With Customized Adjustments.
*Supported OS: macOS Sierra, Mac OS X 10.11 El Capitan, Mac OS X 10.10 Yosemite, 10.9 Mavericks, 10.8 Mountain Lion, 10.7 Lion, 10.6 Snow Leopard.

Free download and 50% off buy Pavtube ByteCopy for Mac

2017 Mother's Day Pavtube Other Products Big Promotion

A. 50% ~ 55% Discount Products

Windows Products

Pavtube Video Converter Ultimate
Pavtube BDMagic
Pavtube DVDAid
Pavtube Media Magician

Mac products

Pavtube iMedia Converter for Mac
Pavtube BDMagic for Mac
Pavtube DVDAid for Mac
Pavtube Media Magician for Mac

B. Only $9.9 Crazy Promotion Products

Windows Products

DVD Creator
Video Converter
MXF Converter
MKV Converter
MTS/M2TS Converter
HD Video Converter
MXF MultiMixer
FLV/F4V Converter

Mac Products

DVD Creator for Mac
Video Converter for Mac
MXF Converter for Mac
MKV Converter for Mac
MTS/M2TS Converter for Mac
HD Video Converter for Mac
iMixMXF for Mac
FLV/F4V Converter for Mac

To get more detailed information about the Pavtube 2017 Mother’s Day Big Promotion, don’t miss the Facebook promotion link: https://www.facebook.com/pavtubefans/app/198826126804423/, Happy 2017 Mother’s Day!!!

Source: http://i-freepedia.com/pavtube-bytecopy-mothers-day-promotion/

Monday, May 8, 2017

Free Ways to Copy DVD to USB Drive With Ease

A USB flash drive has an astonishing ability to store a large number of data with storage capacity varying from 8MB to 1TB. It's easy to to carry around, without worry of scratching. There are some occasions that you want to making a backup of a DVD's contents to a USB flash drive for convenient playback or management. In this article you can get two free ways to copying DVD to USB for better usages easily.

2 Free Ways to Copy DVD to USB Drive

Way 1. Directly Copy DVD to USB

For unprotected DVD content, we could directly copy source DVD content and then paste it to target USB drive, as long as USB drive gets enough space. Copy and paste is the most direct and easiest solution to copy DVD to USB drive. You could check the below steps to learn how to directly copy DVD to USB drive via copy-and-paste.

1. Get source DVD content ready: insert DVD disc into DVD drive of your computer, get DVD folder or ISO image file on you computer well prepared for copy-and-paste. Make sure your DVD content is not copy protected. Otherwise you may not be able to copy and paste source DVD content.

2. Plug USB drive into USB port. Computer would automatically detect it and install USB drive if it’s not installed. Make sure your USB flash drive gets enough space for storing DVD content. You could format your USB drive if there’s not enough space, or remove unneccessary files to save space.

3. Right click DVD disc drive and then select “Open”. Select all files there and copy them for pasting to USB drive. To copy DVD folder or ISO image file, right click the folder or ISO file and then select Copy option, go to USB drive and right click on a blank place to select “Paste”. Or you could select “Send to” option to send DVD content to USB drive.

Way 2. Copy DVD to USB with a Free Software

Another way is ripping DVD to a digital format for USB. People are inevitably in need to rip DVD for storing onto a portable USB disk (16GB, 32GB, 64GB, etc.) from SanDisk, Kingston, Sony, Toshiba, Seagate, or other brands. So how to make it? A DVD ripper is all what we need. We can easily google out tons of such kind of tools, free and paid, clean and ad-supported. Undoubtedly, it's a tough task to pick out a satisfying one. If you want to free rip DVD to USB drive, we have some nice free DVD ripper to recommend, namely Free DVDAid. With it, you can rip DVD to AVI, MKV, WMV, MOV, M4A, WMA and other formats for USB. Free DVDAid allows users to fast rip DVD to USB disk on Windows 10, 8, 7, XP, etc. Mac users can work with its Mac version on macOS Sierra 10.12 and lower.

Plus: If you want to copy Blu-ray to USB, you can also use Pavtube ByteCopy to help that done. It can copy Blu-ray directly and entire full copy Blu-ray. It also can rip Blu-ray to any formats you need.

Free download and install Free DVDAid on your computer

Before Ripping DVD to USB you need to Prepare the below things:

Computer with working USB port and DVD drive;
USB drive (external DVD drive) and USB connection cable;
Source DVD content: DVD disc, folder or ISO image file;
Internet connection.

How to Free Rip DVD to USB with Pavtube Free DVDAid

1. Load DVD movie

Insert DVD into DVD-Rom, launch the Free Mac DVDAid, and load DVD by clicking on the “Load Disc” button. You can also import DVD VIDEO_TS folder, ISO files, and IFO files into this freeware.

load dvd into free dvdaid

Tip: After the files are loaded, you can select the subtitles and audio track you prefer. On the right windows, you can preview your files and take snapshots of your favorite movie scenes.

2. Select the output format

Hit on the “Format” bar and you can choose any video format like MOV, MKV, WMV, AVI, FLV, MP3, M4A, WMA, WAV, etc for USB output for playing on your devices like iPhone, iPad, Samsung, PLEX, PS4, PS3 etc

free dvdaid output format

3. Start Ripping

Click the "Convert" button on the main interface and the software will start to convert DVD to USB friendly video formats immediately. When the conversion finishes, click "Open" to find the converted video files. Then you can effortless transfer the video files to your devices for easy playback on the go.

Monday, May 1, 2017

Impot GoPro Hero5 4K video to iMovie on macOS Sierra

Both of GoPro Hero5 Black and GoPro Hero5 Session have 4K video at 30 fps as their top-end mode. You can record 3840x2160 4K video with MP4 format by them easily for celebrating the special time and sharing with families and friends. After uploading YouTube, Instagram, Vimeo etc, many users like to edit GoPro Hero5 4K videos in NLEs like iMovie. But you may get a poor experience in editing GoPro Hero5 4K video in iMovie. No worry, here we show you how to import GoPro Hero5 4K video to iMovie on macOS Sierra without any problems.

To ensure successfully importing GoPro Hero5 4K to iMovie smoothly, what you need to do is to convert GoPro Hero5 4K video to iMovie friendly video formats. Why converting GoPro Hero5 4K video to iMovie? Because iMovie friendly editing format is Apple Intermediate Codec not MP4 video. So you’d better get a GoPro 4K video converter to convert GoPro Hero 5 4K video for iMovie for perfecting on Mac.

Best GoPro Hero5 4K to iMovie Converter for Mac

Here the award-winning Pavtube Video Converter for Mac cut the buck at this point, letting you convert GoPro Hero5 4K video to iMovie ompatible formats so as to import 4K to iMovie for Mac without any compatibility issue. Besides, it also can convert GoPro Hero5 4K to other NLEs like FCP X, iMovie, Premiere Pro, Avid Media Composer, Davinci resolve etc supported formats. You can also use it to convert GoPro Hero5 4K to some devices like iPhone, iPad, Samsung etc for easy playback at home or on the travel. It also allows you to convert GoPro Hero5 4K video to any formats you need.

Moreover, this 4K video converter also performs great as a 4K video compressor to compress 4K to 1080P/720P with even smaller file size if you wish. Yet a 4K video editor as well to reduce GoPro Hero5 4K video file size, cut GoPro Hero5 4K video files, crop black bar, add SRT subtitles, add watermarks and so on. That’s great.

See also:
GoPro Hero5 4K to Youtube 
GoPro Hero5 4K to Instagram  
GoPro Hero5 4K to Windows Movie Maker
GoPro Hero5 4K to Resolve
GoPro Hero5 4K to Avid Media Composer

Free download this GoPro Hero5 4K to iMovie Video Converter for Mac

How to Convert GoPro Hero5 4K video to iMovie on macOS Sierra

Step 1: Add 4K Video Source

Click "Add" button on the top of the main interface to load original GoPro Hero5 Black or GoPro Hero5 Session 4K videos to the program. Or you can simply drag & drop the videos to the software.

Step 2: Set Output Video Format

Click the Format column to select output format "iMovie and Final Cut Express > Apple Intermediate Codec(AIC) (*.mov)" as the best compatible video format for editing 4K in iMovie.

Tips: 4K Video Settings

Click "Settings" button if you'd like to customize advanced audio and video parameters like Video Codec, aspect ratio, bit rate, frame rate, Audio codec, sample rate, audio channels. Usually 1080p is the optimal setting for using in iMovie. You can downscale GoPro Hero5 4K to 1080p.

video converter mac profile settings

Step 4: Start Conversion

After confirming everything is alright, click the "Convert" button on the bottom right to launch the conversion. Since 4K video file is usually very large, please be more patient for the conversion. Thereafter, import, play and edit the GoPro Hero5 Black or GoPro Hero5 Session 4K files in iMovie. Enjoy.

Monday, April 24, 2017

How to Quickly Upload GoPro Videos to Instagram?

If you are a video recording lover, you must know GoPro. The GoPro (like HERO2, HERO3, HERO3+, HERO4, HERO+LCD, HERO+, HERO5 etc.) is an high performance wearable cameras to record sporting and other activities with professional video up to 4K at 30fps(Hero 4/5). The GoPro HD being an "always-on" type of camera worn on your helmet, attached to your bike, surfboard or other, you usually end up with long sequences of footage you then need to edit down. However, if you're uploading the GoPro HD/4K footage in Instagram, you will find it's a frustrating thing. Fortunately, there is an easy way to fix the issues with GoPro video to Instagram. Let's find it out here.

See also:

4K to Instagram
DJI 4K to Instagram
SD/HD/4K video to Instagram

Gopro records in MP4 files, using H.264 video (AVC) and AAC audio and has many different resolutions. Yes, Instagram does support H.264 MP4 video. But Instagram still have other upload limits:

Instagram video upload limits

Size: maximum width 1080 pixels (any height)
Frame Rate: 29.96 frames per second
Codec: H.264 codec / MP4
Bit rate: 3,500 kbps video bitrate
Audio: AAC audio codec at 44.1 kHz mono
Length: 60 seconds
Filesize: 15MB

So if your GoPro video can’t be uplaoded to Instagram smoothly, maybe your GoPro video is 4K video, or video length > 60 seconds and others. No worry, what you need is to find a good Instagram video converter for converting GoPro video to Instagram supported best video.

GoPro Video Converter for Instagram

This all in one program - Pavtube Video Converter allows you to convert GoPro HD or 4K video to the best video for uploading to Instagram. It also can convert GoPro videos to some popular editors like Windows Movie Maker, Sony Vegas Pro, GoPro Studio, Avid Media Composer etc supported video for nice editing. Plus, you can use this program to edit yout GoPro video with some popualr video editing functions like split, merge, trim, crop, add watermark, adjust video effect, edit audio and insert subtitles.

This is one of the fastest operating program that can easily convert videos 30 times faster than many other programs or software. It can also compress files without losing picture quality. For an all in one versatile video converter Pavtubeis the best option available for beginners and experts alike. Just free download the GoPro to Instagram video converter.

Win version

Mac version

Guide to Convert GoPro Videos to Instagram Supported video for uploading without any problems

Step 1: Install and launch the video converter. Import GoPro video files by dragging to the window or clicking "Add Files" button.

Step 2: Choose the output format from the popped-up window. MP4 format with H.264 codec is recommended for Instagram video uploading.

Tip: Click Profile to adjust the video parameters including bit rate, frame rate, aspect ratio etc. As for those long video clips, you can click “Edit “button to trim the files to fit on Instagram.

Step 3: Click the "Convert" button on the main interface and the software will start to convert  GoPro video to Instagram friendly video formats immediately. When the conversion finishes, click "Open" to find the converted video files. Then you can effortless transfer the video files to Instagram for easy uploading.

Monday, April 17, 2017

Import MP4 to HitFilm Pro 2017 for editing

HitFilm Pro 2017 is a all-in-one video editing and visual effects software. You can get that rough cut looking sharp with HitFilm Pro’s dedicated editing trimmer, customizable workspace and shot-transition features. You can mix different formats, resolutions, framerates all on the same timeline and quickly import and organize your footage. Why HitFilm Pro 2017 can't recognize MP4 files everytime? What can I do if HitFilm Pro 2017 stops working when importing MP4 footage? Here I will give you an easy and fast solution to edit MP4 in HitFilm Pro 2017.

Why HitFilm Pro 2017 wont Accept certain MP4 videos?

In fact some movies in MP4 format like H.265 MP4 is not recognizable by HitFilm Pro 2017, in order to edit all kind of MP4 files in HitFilm Pro 2017 on Windows (Windows 10 included), you need a top MP4 video converter to change MP4 to formats supported by HitFilm Pro 2017 at first.

HitFilm Pro 2017 Supported Formats

Video

• AVCHD (M2T, MTS, M2TS)
• AVI (including 10-bit and 12-bit GoPro Cineform) (Windows only)
• DV & HDV
• MP4 (AVC/H264 & AAC)
• MPEG-1 & MPEG-2 (TS, PS, MPE, MPG, MPEG, M2V)
• MXF (DVCPro HD)
• Quicktime MOV (including 10-bit and 12-bit Pro-Res) (requires that an up to date version of Quicktime is installed on your computer)
• WMV

Audio

• AAC
• MP3
• M4A
• MPA
• WAV
• WMA

Convert MP4 to HitFilm Pro 2017 Supported Format

Don't let that format issue stop you from showing your creativity. To import MP4 to HitFilm Pro 2017, the most obvious and direct solution here is to convert MP4 to a format that's compatible with HitFilm Pro 2017 as mentioned before. The first thing we need is a powerful video converter to convert MP4 to HitFilm Pro 2017 compatible format. I would recommend you Pavtube Video Converter, a powerful and practical video converter for HitFilm Pro 2017 WIndows. It allows you to convert unsupported MP4 video (4K MP4 also included) and other unsupported videos to HitFilm Pro 2017 editable video like AVI, MPEG-2, MOV, MP4 etc for smooth editing.

Hot search:

MP4 to After Effects CC MP4 to Edius Pro 7 MP4 to Powerdirector
MP4 to Davinci Resolve MP4 to iMovie MP4 to Premiere Pro CC

Free download this best MP4 to HitFilm Pro 2017 Video Converter

If you are using HitFilm Pro 2017 Mac version, you can use Pavtube Video Converter for Mac to convert MP4 and other videos to HitFilm Pro 2017 supported video on Mac.

How to Convert MP4 to HitFilm Pro 2017 Editable video?

Step 1. Load MP4 file

Load MP4 video to the MP4 file converter program by clicking “Add” button, or drag the MP4 videos to the software directly.

Step 2. Choose a format for HitFilm Pro 2017

Click “Format” bar and choose "Adobe Premiere/Sony Vegas > MPEG-2 (*.mpg)” as output format on the drop-down menu. You can also choose MP4, AVI, MOV etc from "Common Video" profile as the final format.

Tip: Before conversion, you can click the “Settings” icon to customize the video/audio settings Bitrate of Video and Audio, the Codec of Video and Audio, Video Size, Sample Rate, Frame Rate, Audio Channels, etc. for Sony Movie Studio.

Step 3: Click the Convert icon under the preview window, and the program will start transcode MP4 for HitFilm Pro 2017. When the conversion is finished, you can click "Open" button to get the generated .mpg files effortlessly. Afterwards, you can import converted MP4 clips into HitFilm Pro 2017 for further editing. Have a try.

Read More:


Tuesday, April 11, 2017

Top 5 4K Video Recorder Software to Record HD/4K Videos

With the popularization of 4K, users like to record 4K videos from popular recorders softwares for enjoy. Do you know the top 5 4K video recorder in the world? In this guide you can get the top five recorders. And here we also share some solutions for solving “Can’t play recorder (4K) videos, can’t edit recorder videos, can’t share recorder videos etc” issues. Read on.

2017 Top 5 4K Video Converter Recorder Software

1. XSplit Gamecaster

XSplit Gamecaster is a one-of-a-kind live streaming and recording application designed for both casual and hardcore gamers. It allows every gamer to live stream or record their gameplay without complicated setup and configuration. High quality video recording and streaming can be easily done through XSplit Gamecaster. The 4K videos that you want to stream or record will be saved to your hard drive without any issues. Through this software, you will find it very easy to record and stream 4K videos. All you have to do is to simply press the start button while rest of the things like configuring the settings according to your PC will be accomplished by XSplit itself. This means that even novices would have no trouble in using this software. XSplit has all the basic recording features available like 4K video recording, high quality recording, GPU support and streaming over different sites.

2. ShadowPlay

ShadowPlay provides you the chance to record your gaming moments in the best possible manner. This software is manufactured by NVIDIA GeForce. Your CPU is not going to be used much as the NVIDIA GeForce GPU will take the burden to offload your system’s CPU, thus enhancing its performance. To record your best gaming moments in 4K resolution, there are 2 recording modes available. One is Manual mode and the other one is Shadow mode. Manual mode allows you to record your 4K videos for an unlimited time period. Shadow mode allows you to record the gameplay from last 20 minutes with the older recordings deleted automatically. It is up to you to select the mode according to your needs. You can also save your recordings on your system.

3. Dxtory

Dxtory is another high quality 4K video recording software program which is very popular among gamers who love to record their gaming videos for future references. It has a very simple and intuitive user interface which makes things easier for you. You can easily adjust the settings and can understand them without encountering any problem whatsoever. 4K video recording becomes a breeze through Dxtory software. You can record two different sounds at the same time; one of the game and the other one of your microphone. This means that you can commentate on what is going on in the video. Video settings can be easily adjusted which includes adjusting the frames per second, size, format and video codec. Dxtory allows you to start the recording of your game automatically without any interference and can also balance the load between the GPU and CPU.

4. Action

Action is an amazing 4K video recording software program which will take your recordings to the next level. Many unique and amazing features are available in this software to help you in recording and streaming your 4K videos. You can capture high quality recordings in 4K resolution with Action and also avail the option of live commentary as well. It puts less pressure on your CPU to accelerate the recordings. You can stream your recordings on different popular sites and can easily share your videos on popular social networks too. Another amazing option is that with the help of your android Smartphone, you can control your PC which is a very good addition in the options provided by Action. You can also play your recorded videos on your Smartphone without any interruption as well. There are many editing features available too through which you can easily edit your 4K videos. Time-shift mode is present instead of Shadow mode but the time limit is only 10 minutes.

5. Bandicam

Bandicam is one of the best 4K video recording software designed by Bandisoft Company to tackle the modern IT needs. This software has an easy-to-use and intuitive interface which allows you to record 4K videos in high quality with excellent speeds and great compression rates. To record 4K videos, there is a need for buying expensive tablets, smartphones and HD video recorders but by using this Bandicam, there is no need to buy such expensive devices for recording. Record your UHD videos with the resolution of up to 3840 x 2160 and capture them at up to 120 FPS. Bandicam offers extremely easy settings which give you full control to record 4K videos. The desktop screens and DirectX / OpenGL gameplay are easily recorded with Bandicam and you can also choose YouTube presets for changing the resolution and optimizing the recorded 4K YouTube video.

Recommended Program to Convert 4K Videos from Recorder to Any Formats

When we need to enjoy recorder videos with players Windows or Mac, like Windows Media Player, QuickTime player , we have to convert Recorder to some popular formats like wmv, mov  format for these players and other devices.

Now we’ll use Recorder video converter to convert camtasia video file to whatever file like MP4, MOV, WMV, MPG, FLV, H.265, AVI etc , then we can upload video to share on Youtube, or watch them on HD or other portable devices or edit with NLEs. Pavtube Video Converter Ultimate is one of the helpful video converter tools which can handle almost all video formats, including recorder recordings. (Read Review)

Highlights of the best Recorder (4K) Converter:

  • Convert Recorder 4K/HD videos to MP4, H.265, AVI, WMV, MOV, MKV, OGV, MOV, H.264, MPG and more.
  • Convert Recorder 4K/HD videos for uploading to YouTube, Vimeo, Facebook, Instagram etc.
  • Make Recorder 4K/HD videos compatible with portable devices, like iPad, iPhone, iPod, QuickTime, Apple TV, Windows Media Player, Xbox one, Xbox 360, PS3, PS4, Android phone or tablets, Windows Phone or tablets and more popular devices.
  • Convert Recorder 4K/HD videos file to popular editors like FCP, iMovie, Avid Media Composer, FCE, Premiere Pro, Windows Movie Make, Sony Vegas Pro, DaVinci Resolve etc
  • Fully compatible with both Windows and Mac. (Mac version - Pavtube iMedia Converter for Mac)

Free download the recorder video converter for Windows

Free download the recorder video converter for Mac

Read More:


Tuesday, April 4, 2017

How to Add MP4 to iTunes on macOS Sierra?

Some users try to add MP4 video files to iTunes library and then sync them to iDevices. But when they click "add file to library" or drag the files to iTunes, nothing showed. You may say " iTunes supports MP4 format" "Why iTunes won't accept my MP4 video file? No worry, in this guide you will learn the reasons and the solution.

We all know MP4 is a common video format widely used on many devices, which has a lot of different codecs. Some codecs of MP4 are not friendly with iTunes. So sometimes you can't add MP4 to iTunes library. This not only happened on the latest iTunes 12, but iTunes 11. So if you want to add MP4 video files to iTunes, you can transcode MP4 to iTunes supported MOV, MP4, and M4V format.

Recommnd a Professional MP4 to iTunes Video Converter

In order to perform this conversion task, you'll need the solid and MP4 Video Converter - Pavtube Video Converter for Mac. This program is popular for its simplicity, efficiency and quality. With it, you can do conversion from not only MP4 to iTunes, but also MKV to iTunes, AVI to iTunes, MTS to iTunes, VOB to iTunes, MOV to iTunes highly compatible MOV, MP4, M4V files without quality loss.

With it, you don't need to know what is the audio codec in the MP4 format that'll be best for your iTunes. You just need to choose the mov, mp4, m4v with one click. A while later, the video conversion will be finished and you'll be able to watch the awesome media content on iTunes without having to compromise on the quality. Plus, it offers kinds of preset profiles for media players including iPhone, iPad, QuickTime, Apple TV etc to meet your different needs. The following guide will show you how to convert MP4 to iTunes compatible format for perfect playing.

Highlights of Pavtube Video Converter for Mac

  • Convert MP4, MKV, AVI, MTS, MXF, FLV, WMV, XAVC, MPEG etc to iTunes supported video
  • Convert MP4, MKV, AVI, MTS, MXF, FLV, WMV, XAVC, MPEG etc to iTunes, iPhone, iPad, QuickTime, Apple TV etc supported video
  • Convert MP4, MKV, AVI, MTS, MXF, FLV, WMV, XAVC, MPEG etc to MP3, AAC, WMA etc
  • Convert MP4 to NLEs like FCP, iMovie, Premiere Pro, Avid Media Composer, Resolve etc
  • Basic (MP4) video editing functions: split, merge, trim, crop, add watermark, adjust video effect, edit audio and insert subtitles.
  • Allow you to complete the MP4 to iTunes conversion process with three simple clicks.
  • Compatible with macOS Sierra, El Capitan Yosemite, Mavericks, Lion.

Free download this MP4 to iTunes video converter for Mac

Simple Guide to Convert unsupported MP4 video to iTunes supported video on Mac

Step 1: Import MP4 videos

Drag & drop the MP4 files to the converter, or click the "Add File" button to open the file browser window and locate the MP4 files you want to add.

Step 2: Select iTunes supported files as the output format

Now select a format to which you want to convert the unsupported MP4 video. Click "Format" drop-down menu to open the format list, and then choose a format (mp4, mov, m4v) from "Common Video" or "HD Video"category.

Step 3: Start the MP4 to iTunes conversion

Click the "Convert" button on the main interface and the software will start to convert MP4 to iTunes friendly video formats immediately. When the conversion finishes, click "Open" to find the converted video files. Then you can effortless transfer the video files to iTunes for playback on the go.

Free download this MP4 to iTunes video converter for Windows

Read More:

Monday, March 27, 2017

Play Blu-ray on LG Netcast/WebOS TV with Plex

Great home theater isn’t just about the biggest, smartest TV or the most sophisticated sound system. Maybe you have collected some Blu-ray discs and want to play them on LG Netcast/WebOS TV with Plex? Yes, The Plex app is made available through the Smart TV alliance for LG Netcast/WebOS televisions. But Blu-ray disc is not played direclt on LG Netcast/WebOS TV with Plex. Read on this guide to learn how to play Blu-ray on LG Netcast/WebOS TV with Plex smoothly.

Best Tool to Play Blu-ray on LG Netcast/WebOS TV with Plex

Since LG Netcast/WebOS TV and plex don’t support playing Blu-ray movies, you can rip your Blu-ray. Just choose a Blu-ray ripper to LG Netcast/WebOS TV and Plex supported video for smooth playing. Today, the DVD Ripper we prefer to use to rip Blu-ray to LG Netcast/WebOS TV/Plex is Pavtube ByteCopy. Just like any other powerful Blu-ray ripping too, it can convert Blu-ray to LG Netcast/WebOS TV and Plex supported format with original video quality and high Blu-ray ripping speed. With an intuitive interface, it is easy to use that you can know the next step easily. Mac user just get its Mac version.

Why choose Pavtube ByteCopy ro Rip Blu-ray

  • Rip Blu-ray to LG Netcast/WebOS TV, Plex supported video
  • Rip Blu-ray to LG TV, Samsung TV, Sony TV, Panasonic TV etc supported video
  • 2 ways to copy Blu-ray: Full disc copy, direclt copy
  • Lossless Blu-ray to MKV backup with multiple audio/subtitle tracks
  • Convert Blu-ray to Multi-track MP4, MOV, AVI
  • Export single SRT subtitle file
  • Quick conversion - Brings about conversion at seed of up to 30X.
  • Custom Video: Personalize videos with diversified video editing tools.
  • Allow you to complete the conversion process with three simple clicks.

Free download this Blu-ray ripper for LG Netcast/WebOS TV and Plex

Before ripping Blu-ray, you can learn LG Netcast/WebOS Plex app supported formats including the MKV format. Now follow the detailed guide to learn how to rip Blu-ray to LG Netcast/WebOS Plex app supported format.

How to Convert blu-ray to LG Netcast/WebOS TV and Plex supported video formats?

Step 1. Load Blu-ray

Load Blu-ray disc from optical drive by clicking “File”< “Load File from Disc”.

Step 2. Set output format

Clicking the Format bar, you can choose output format from the format list or customize which formats to be shown on the list. Here you can choose .mp4 from HD Video or Common Video for playing Blu-ray on LG Netcast/WebOS TV with Plex.

Specify output file format

For streaming Blu-ray to LG Netcast/WebOS TV via Plex, directly output LG Netcast/WebOS TV preset profile formats "LG TV(*.mp4)" from "TVs" extended option list.

3. Start Conversion

Clicking the Convert button on main interface, you can go to Conversion window to start this conversion.

Read More: