Wednesday, May 16, 2018

How to Split Large VOB File into Parts

VOB (Video Object) is the container format in DVD-Video media. VOB can contain digital video, digital audio, subtitles, DVD menus and navigation contents multiplexed together into a stream form. Files in VOB format may be encrypted. Besides that normally VOB files are very large, it brings difficulties to VOB transfer and share. Thus, many guys desire one perfect VOB splitter to split the large file into parts for storage and share. And in post, we will sare the best VOB splitter with you.

vob splitter

What we will share with you is a Pavtube Video Converter Ultimate (to get Mac version), with this software, you can not only split encrypted VOB file, digital file formats with verious different file formats but also commercial Blu-ray/DVD disc. The program offers 3 different way for you to split large video files into small equal parts: by file size, file count or time length to satisfy your different video splitting need.

Besides splitting video, this advanced program also offer other beneficial simple video editing function for you. You can flip or rotate video to get it displayed in the right angel, trim or cut video files to remove unwanted parts or segments, crop video to remove the unwanted black bars or area, add image/video/transparent text watermark to video, apply special rendering effect to video, flip or rotate video angel, remove/replace audio in video or merge separate videos into one file.

Tips: To get smaller VOB video file size, you can convert VOB file to MP4, MOV, and other more compressed video formats. And then lower the video bit rate to get smaller video file size. Welcome to download this software, read this tutorial guide and try it.

Hot Guide: 3 Ways to Compress VOB files on Computer

Step by Step to Split Large VOB Video Into Small Parts by File Size, Count or Time Length?

Step 1: Import large VOB video files.

Launch and start the program on your computer, click "File" > "Add Video/Audio" or "Add from Folder" to import VOB source files to the program. For splitting Blu-ray or DVD disc, insert Blu-ray/DVD into DVD optical drive or external Blu-ray drive, then click "File" > "Loadf from Disc" option.

Import large VOB video files.

Step 2: Define output file format.

From "Format" bar drop-down list, select one of your desired file format to output. If you don't want to loss any file quality, just select to output the same video as original file format by select format from "VOB Format" category. You also can convert VOB to MP4, which is the most popular video format in this world.

Define output file format.

Step 3: Split VOB video into small parts.

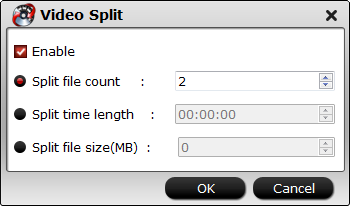
By clicking the "Split" button under the file displaying list, checking "Enable" to enable it, and then you can split the file by file count, time length, or file size according to your own needs.

Split VOB video into small parts

Step 3: Trim/Crop/Watermark video.

Select an item on the main interface to active the "Editor" function, then click the Edit icon on the tool bar of main interface to open the Editor Window, you can play and preview the original video and output effects. Also you can flip video, trim, crop, add effect, add watermark, apply special effect, etc.

Trim/Crop/Watermark video.

Step 4: Start VOB video splitting process.

Press the right-bottom "Convert" button to start the large video into small parts or segments splitting process.

When the video splitting is completed, you can find your converted files by clicking "Open output folder" with all splitted small files for convenient sharing, emailing and distributing.

Hot Search: Different Ways to Split AVI File

Friday, May 11, 2018

Edit Bandicam Recorded Files on Mac

For some people who usually record their game videos or other full Desktop screen record, this Bandicam Recording software totally works well.  Bandicam is the most advanced screen recording software on the planet for screen, game and webcam capture. The install space is small but output quality is very sharp. The recorded videos came from Bandicam usually goes to AVI or MP4. There are some occasions that you may want to edit the recorded video on Mac with Final Cut Pro, iMovie or Final Cut Express before sharing with others. However, when you try to import Bandicam recorded file to FCP/iMovie/FCE,you will find the Mac apps return the error said that file or folder is not suitable for import. Why this happened? Let's start with saving Bandicam recorded file as MP4 file.

edit bandicam on mac

As you know, MP4 is most compatible and widely used format in this world. You fail to import MP4 to FCP/iMovie/FCE due to MP4 is just a container and covers different video and audio codec. So it is common that you can not import some Bandicam MP4 to FCP, iMovie and FCE for further editing. To fix the issues, the easy workaround is to convert Bandicam recorded video to a more editing-friendly format. Here is how to do it.

Before that you have to get a third-part assistant, Pavtube iMedia Converter for Mac is highly recommended. This program features high efficiency and seamless conversion. With it, you can easily convert Bandicam recorded file to iMovie, FCP most compstible video formats with just 3 clicks. You also can do batch conversion from AVCHD, MTS, AVI, WMV, VOB, MP4, MOV, etc to native codecs - Apple Intermediate Codec, ProRes, DNxHD and more - ensuring maximum editing quality and efficiency when working with iMovie, Final Cut Pro, Avid Media Composer or Adobe Premiere and more. 

With it, you can effortlessly convert your DVD/Blu-ray files including DVD/Blu-ray discs,  DVD/BD Folder, DVD IFO File, DVD/BD ISO Image File for smoothly importing and editing in various non-linear editing systems (NLE), including After Effects, Adobe Premiere, Final Cut Pro, iMovie, Avid Media Composer, Davinci Resolve and more.

Quick Guide to convert Bandicam recorded file to FCP, iMovie and FCE editable video on Mac

Step 1. Import Bandicam recorded file

Download the video converter for Mac from the below button. After the download is over, run it and click "File" to add source Bandicam recorded file into this tool for FCP, iMovie and FCE.

free try mac buy

On the main interface, there is a preview window provided for you to preview the Bandicam recorded file to ensure the files are what you want to rip. You can also take snapshots of the Bandicam recorded file when previewing them.

imedia converter

Step 2. Select output format

Click "Formats" bar, in the pop-up window, you will find many optimized presets for iMovie, Final Cut Express and Final Cut Pro. Just select the one you need for your editor. By selecting them, you needn't to adjust the video settings like video format, video resolution, frame rate and more by yourself.

imovie format

Tip: You can click the "Settings" button and customize proper video/audio parameters including Video size, bitrate and fame rate and more.

Step 3. Start conversion

Click on the "Convert" button which is red in right bottom screen to start converting Bandicam recorded file to Final Cut Pro, iMovie, Final Cut Express. Just wait for the process to finish. After that, you can get the converted videos and just open the Final Cut Pro/iMovie/Final Cut Express and import the converted videos for editing.

Thursday, May 3, 2018

Top 10 Instagram Hidden Tips and Tricks & Best Instagram Converter

Instagram has become one of the most popular social network, and not just for teens and Millennials. Fpr those who have ever used the platform before, or those who just want tp take their usage to the next level, Instagram has some lesser-known tricks and settings. That's why we set out to find them and list them all in one place.

Top 10 Instagram Hidden Tips and Tricks

1. Download videos and photos in batches

Unlike Facebook, Instagram is trying to protect its users from copyright violations. However, not being able to download the videos and photos you posted to Instagram can be a problem if you lost the original files or if you just want to create a backup of your Instagram posts.

Insta-downloader.net is a website that enables you to download photos and videos from Instagram, while it also provides the option to download all images featured on an Instagram account. You just have to copy the URL of a photo or Instagram profile and click the Download button.

2. Upload photos and videos from your computer

The Instagram app can't be installed on a computer, while the upload feature is not available on Instagram profiles when viewed from a computer-based web browser. As social media managers and professional photographers know working with large amounts of images is much easier from a computer than it is from a Smartphone. In case you would like to post images to Instagram directly from your computer you can use an emulator like BlueStacks that will allow you to connect your Android device with a computer, and post your photos and videos to Instagram directly from a PC.

3. Check out all your liked posts

If you want to be inspired for your brand, a good way is to check the profiles of people who liked your post? You can actually see the 300 recently liked photos which can be useful to see what captures your audience's attention.

  1. Login to your account
  2. If you're on iOS, click the gear icon or the three dots if you are on Android then select Options
  3. Select Posts You've Liked

4. Delete your search history

As you know, Instagram has a search history and displays recent keywords the next time you do a search. If you want to clear out your search history, follow the steps below:

  1. Login to your profile
  2. Tap the gear icon if you are iOS or the three dots if you are on Android then select Options
  3. Scroll to the bottom, then select Clear Search History

5. Share your photos to Pinterest

Pinterest is not yet available from Instagram's sharing options. However, you can still pin it by following the steps below:

Via mobile:

  1. Select the post you'd like to share on Pinterest
  2. Select the three dots in the upper-right part of the post
  3. Select Copy Link
  4. Go to your Pinterest profile
  5. Click the plus sign located at the upper right part of the page
  6. Select Copied link
  7. Pinterest will then open the link that is saved to your clipboard
  8. Choose the image you'd like to Pin

Via desktop:

  1. Go to Instagram.com and select the post you'd like to Pin
  2. Right-click the photo and choose Open Link in New Window
  3. Choose the image you'd like to Pin using the Pinterest browser button

6. Delete comments

Aside from comments left by other users, you can also delete your own comments by following the steps below:

Deleting your own comment:

  1. Tap the bubble icon below the post you commented on
  2. Swipe to the left over the comment you'd like to delete
  3. Select the trashcan icon

Delete comments of other users:

  1. Tap the post containing the comment you like to delete
  2. Swipe to the left of the comment
  3. Tap the trash can icon or continue swiping to the left to delete the comment

7. Comment controls

Instagram now has the capability to filter comments by keyword or disable it entirely for a particular post.

  1. Visit your profile
  2. Select the gear icon and go to Options
  3. Go to Comments
  4. To hide offensive comments, enable Hide Inappropriate Comments
  5. Create your own list of keywords through Manual Filter

How to disable comments:

  1. When posting a photo, go to the part where you add location, caption, and other tags
  2. Select Advanced Settings
  3. Enable Turn Off Commenting

You can enable it back on by tapping the three dots icon above the photo and select Turn On Commenting. You can also disable comments on older posts by following the same steps.

8. Post multiple photos at the same time

Instead of creating a separate post for each new image you share on Instagram, now you can add up to 10 images in a single post and share them on your Instagram account. This recently added option is best used for images that are closely related because featuring images that have nothing in common in a single post can be quite confusing.

The 'Select Multiple' feature enables you to select photos from your Camera Roll and post them to your Instagram account.

9. Adding line breaks to your bio

To make your bio visually appealing, you can add line breaks to your bio. Here's how to do it.

Via mobile:

  1. Write your bio using a text editor and type it as you'd like it to show on your bio, including line breaks
  2. Select all and Copy
  3. Visit your Instagram profile and click Edit Profile
  4. Paste the text into the bio field
  5. Save changes

Via desktop:

  1. Login to Instagram using a web browser
  2. Select Edit Profile
  3. Type your bio and press enter per line to create line breaks
  4. Save changes by clicking Submit

10. Add multiple accounts

If you are planning to have two or more accounts (i.e. one for business and one personal), you can do so by following the steps below.

  1. On your profile, select the gear/three dots icon to go to Options
  2. At the bottom of the screen, click Add Account
  3. Log in your second account
  4. If you want to switch accounts, click the arrow beside your profile name and select your second account

Best Instagram Converter

No matter Instagram, Twitter or FaceBook, they all have limitations on the videos users upload. So you may ask what are the limitations? Or some people have experienced the failure of uploading video. With all this in mind it’s time to get to grips with video in social media thanks to our handy cheat sheet.

Instagram

  • Preferred Format: MP4 (with H.264 Codec & AAC audio, 3,500 kbps video bitrate)
  • Frame Rate: 30fps or below
  • Maximum Dimensions: 1080px Wide
  • Playback Length: Maximum of 60 seconds
  • Filesize Limit: 15mb

Twitter

  • Preferred Format: MP4 (with H.264 Codec & AAC Low Complexity audio)
  • Frame Rate: 40fps or below
  • Maximum Dimensions: 1280px x 1024px (Between 1:3 & 3:1 aspect ratio, with a 1:1 pixel ratio)
  • Playback Length: Maximum of 140 seconds
  • Filesize Limit: 15mb

Facebook

  • Preferred Format: MOV or MP4 (with H.264 Codec & AAC audio)
  • Frame Rate: 30fps or below
  • Maximum Dimensions: 1280px Wide (with a ratio divisible by 16px)
  • Playback Length: Maximum of 45 minutes
  • Filesize Limit: 1.75GB

Althoug these guidelines do seem a little fussy, but they are really useful. When your uploaded content doesn't meet their requirements, they will refuse. So how to settle all the difficulities? A Instagram video converter is necessary. You can get Pavtube Video Converter Ultimate, it helps you convert and trim any video for Instagram, and other social network.  

This video converter can convert MOV, AVI, MKV,M4V, WVM, MPEG-2 ,etc to Instagram compatible H.264 MP4 video. In the conversion process, you can adjust video size from 2160p to 1080p and 720p, video bit rate to 5,500 kbps or 3,500kbps, video frame to 29.96 frames per second or 30fps and adjust audio codec to AAC, audio bitrate to 128kbps to meet all the specs of Instagram.

To meet Instagram video length limitation, you can trim the MP4 video footage or split your MP4 video to several clips to make the video 50MB for Instagram. You also can crop black bar and adjust the aspect ratio to fit in Instagram. Now, click the right version video converter name to download the software on official page then install it on your PC or Mac. Windows version supports windows 10 and Mac version will work stably on macOS High Sierra.

Step-by-Step to Convert Videos to Instagram

Step 1: Load videos you want to upload

You can simply drag and drop all your video files into the software. Batch conversion is supported here.

Load videos you want to upload

Step 2: Choose MP4 Format

Click "Format" button to open drop-down list and there you can choose MP4 format. You can choose MP4 format for Instagram in "Common Video" and "HD Video" categories.

H.264 MP4

Tip 1. Adjust converted MP4 video audio bitrate, codec, size for Instagram

Now, click "Settings" on the main interface to start to adjust video and audio parameters to fit in Instagram according to the below specs.

Video Size: 1080p

Video Bitrate: 3,500 kbps

Video Frame Rate: 29.96 fps

Audio Codec: AAC

Audio Bitrate: 128kbps

You can choose the right settings in this window. When you can't find the settings you want, you can simply tap it in.

adjust video settings

Tip 2. Trim or split MP4 video length for Instagram

Now, click "Edit" to open video editing window. In "Video Editor" there are seven edit tabs: Trim, Crop, Text Watermark, Image/Video Watermark, Effect, Audio Editor and Subtitle.

The "Trim" feature allows users to decide where to start and where to end when converting the selected clip, so that unwanted segments will be cut out after conversion.

To trim a video, please switch to "Trim" tab in "Video Editor" Interface and follow any of the methods below:

1. Drag the control sliders video converter slide 1video converter slide 2to include the segment you want to remain.

2. Click the left square bracket video converter start pointto set start point, and click the right square bracket video converter end pointto set end point when previewing the video

3. Input specific values to "Start" and "End" box.

trim MP4 video

Trim frame by frame: Pavtube Video Converter Ultimate offers "Previous Frame" and "Next Frame" options for users to select frames and trim accurately.

If you want to remove certain frame in your video, you can use Pavtube Media Magician. It is a video editor by frame which can enable you cut off video frame and also trim video length by frame.

Split video to 50MB for Instagram

By clicking the "Split" button video converter split button on file list, or from "Edit" menu, you can launch the "Video Split" window. Checking "Enable" to enable it, and then you can split the file by file count, time length, or file size. We recommend video size to 50MB for Instagram, so here we would split video in 50MB to several clips for Instagram.

split video

With Pavtube Video Converter Ultimate, you also can add subtitle to video, add watermark to video, mute audio, replace audio, etc in "Edit" windows.

Step 3: Start to convert video to Instagram

After all the settings, clicking the Convert button on main interface, you can go to Conversion window to start video to Instagram conversion. When the conversion ends, you can get perfect 1080p video in MP4 format by H.264 codec with 3,500 kbps video bitrate and 29.96 frames per second with AAC audio codec and 128kbps audio bitrate from your MP4 video to Instagram.

Wednesday, April 25, 2018

Compress Video Smaller for Facebook Uploading

Thanks to Facebook social website, we can connect with our friends and the world closely. Over 4 billion video views happen to Facebook everyday. And users would like to tell rich stories with Facebook video, not only in the timeline, but also in business ads, and covers. During Facebook uploading process, you may meet some unknow factors that stop you uploading the videos to this social website. Nowadays, people prefer capturing videos with iPhone, GoPro, DJI drones, Sony/Panasonic/Canon camcoders you need to compress or convert footage to Facebook supported video format before uploading. This article makes it clear on Facebook video uopload specs and how to compress video smaller for Facebook without video quality loss.

Know Facebook Supported File Formats Well

When sharing video on Facebook, you may be recommended to use the MP4 and MOV format, in fact, you also can use the 3g2, 3gp, 3gpp, asf, avi, dat, divx, dv, f4v, flv, m2ts, m4v, mkv, mod, mov, mp4, mpe, mpeg, mpg, mts, nsv, ogm, ogv, qt, tod, ts, vob, wmv which are all supported by Facebbok, except the video format, Facebook limits the video parameters, like the video codec, video frame, video bitrate, audio channels, vudeo size, video length, etc. You must make sure your video is accepted by Facebook.

Video Profile Settings

Codec

The best format to upload to Facebook is H.264 video with AAC audio in MP4 or MOV format. It currently gives you a great bang for your buck in the file size to relative quality ratio, offering the best video compression available, and due to the file size limitations, this format is the optimal choice for Facebook video. And there's no need to change the parameter during Facebook uploading.

Resolution

Use a file with the larger edge of the video constrained to1280px. If your video is less than 1280px in size on the larger edge, try to keep your dimensions to multiples of 16px for best compression.

Frame Rate

Usually videos have the best quality if the frame rate is between 25-30 fps. So you are recommended to keep the frame rate of your video at or below30fps.

Aspect Ratio

The aspect ratio of the video must be within the range of9x16 to 16x9which most videos should have, and the video exceeding the file size or length that the upload page suggests will be rejected.

Bitrate

There is no recommendation for Bitrate as it highly rests upon codec. So you are suggested to optimize video for resolution, aspect ratio and frame rate rather than bitrate.

Audio Profile Settings
Codec MP3 is preferred
Samping Rate Use stereo audio with a sample rate of 44,100hz.
Channels The number of audio channels will be maintained for stereo and mono streams. 5.1-channel audio will be down-mixed to stereo. All other channel configurations are currently unsupported.

Other tips for Facebook video uploading

  1. Keep in mind that the maximum length for a video is 120 minutes and the maximum file size is 4.0 GB.
  2. Check that you're using the latest version of your browser.
  3. Uploading a video works best when you have a strong network connection.

Normally, many people would like to record their life via camcoders, and some recordings in a format that FaceBook doesn't support, or the video in high definition are too long or too large for Facebook and need to trim and compress. You need a video converter or video editor to help you reach that.

For Windows users, Pavtube Video Converter Ultimate is deserved to try. It is a video converter, as its name shown, but also a video editor with some simple and essential video editing functions. With it, you can easily transcode your life recordings, game play recordings to FaceBook playable video and audio format such as MP4, WebM, MOV, etc encoded with compatible video and audio codec. You can trim the recordings length to meet and FaceBook supported video length and size requirement. You also can compress videos by adjusting video resolution, bitrate to reduce the videos size.

To make your videos different, you also can add some subtitle to narrate the videos and add a text/image/video watermark to your videos. Aspect ratio is also supported to change in this video converter. If needed, you even can remove the audio in the video or replace audio from it. Now, download it and try to convert and compress your videos to Facebook supported one.

Quick Guide to Convert and Compress Videos to FaceBook

Step 1: Import video you want to upload to Facebook

Start the FaceBook video converter program on your computer, click "File" > "Load Video/Audio" or "Load from folder" button to import videos into the program. "Drag-and-Drop" and "Batch Conversion" features are also supported. If you loaded multiple clips, you also can merge the video into a single one file.

load video

Step 2: Output FaceBook best uploading format

Click "Format" bar, from its drop-down options, choose FaceBook compatible uploading format from "Common VIdeo" > "H.264 High Profile Video(*.mp4)". You also can choose other FaceBook supported video formats such as HTML5 WebM.

Output facebook best uploading format

Step 3: Compress videos

Click "Settings" to open the "Profile Settings" window, here you can adjust the output video codec, resolution, bit rate, frame rate and audio codec, bit rate, sample rate and channels to let the videos more fit in FaceBook. To compress videos, the most effective way is to reduce the video bitrate. You can change the bitrate value to see the target video size in the below chart.

compress FB videos

Edit videos/recordings Before Export

Trim videos/recordings: In “Video Editor” there are seven edit tabs: Trim, Crop, Text Watermark, Image/Video Watermark, Effect, Audio Editor and Subtitle.  The "Trim" feature allows users to decide where to start and where to end when converting the clips, so that unwanted segments will be cut out after conversion.

Crop videos/recordings: The "Crop" facility enables users to get rid of the black edges and unwanted area of the image.

Keep original videos/recordings aspect ratio and cropped aspect ratio

To keep original aspect ratio, users need make sure the "Display aspect ratio” and the "Size (pix)" in "Settings" option are all set as "Original". If you want to keep the cropped aspect ratio, Pavtube software offers several aspect ratios for you to choose from, including 16:10, 16:9, 5:4, 4:3, 3:2, and 2:1.

crop videos

Add Watermark to Gameplay recordings: You can add text/video/image watermark to selected videos. You can either set parameters or drag the text on preview screen to set its location.

Audio Editor:You can either replace/remove original audio in the videos/recordings, or set audio fade in/out effects.

Subtitle: In this tab, you can add *.srt or *.ass/*.ssa subtitle-files to the videos/recording video as hard subtitles.

edit video for FB

Step 4: Start to Convert and Compress Videos for FaceBook

Clicking the Convert button on main interface, you can go to Conversion window to start to convert videos/recordings to FaceBook. After the conversion, you can click Open output folder to popup output directory with the converted files.

How to Upload video to FaceBook?

1. Choose Add Photo/Video in the Share box at the top of your Home page or Timeline.

2. Click Upload Photos/Video.

3. Select a video file from your computer.

4. Click Post.

video to facebook

Thursday, April 19, 2018

How to Use Nvidia GeForce Graphic Card to Encode H.265 with 30X Speed

More and more people prefer to encode media to H.265/HEVC codec, why? High Efficiency Video Coding (HEVC), or H.265, is a video compression standard designed to substantially improve coding efficiency when compared to its precedent, the Advanced Video Coding (AVC), or H.264. With an increasing growth of video streaming on the Internet over popular websites such as Netflix and YouTube, and with 4K cameras gaining new ground in the market, a considerable amount of storage and bandwidth is required. HEVC promises a 50% storage reduction as its algorithm uses efficient coding by encoding video at the lowest possible bit rate while maintaining a high image quality level. In the current market, more and more devices add support for playing HEVC videos, like iPhone X, Apple TV 4K and more.

You will find that H.265 codec encoding time is much longer than other codes especially when you are using a old dual-core desktop to do the encoding work. In the current market, there are dozens of video converter programs that support hardware acceleration techs for encoding HEVC, but few of them can really satisfy you. Fortunately, I will share the best one with you which allows you to speed up H.265 encoding speed to 30x. Can't wait? Here we go.

Nvidia Geforce Graphic Card that supports NVENC technology

To enable H.265 encoding with Nvidia NVENC GPU acceleration, your Nvidia Graphic card should support NVENC technology, following part has listed the specific Nvidia GeForce graphic cards with NVENC technology support:

Supported Nvidia GPU


Kepler

Maxwell

Pascal


GeForce GT 705 
GeForce GT 710 
GeForce GT 720 
GeForce GT 730 
GeForce GT 740 
GeForce GTX 760 
GeForce GTX 760 Ti 
GeForce GTX 770 
GeForce GTX 780 
GeForce GTX 780 Ti 
GeForce GTX Titan 
GeForce GTX Titan Z 
GeForce GT 640M LE 
GeForce GT 640M 
GeForce GT 645M 
GeForce GT 650M 
GeForce GTX 660M 
GeForce GTX 670MX 
GeForce GTX 675MX 
GeForce GTX 680M 
GeForce GTX 680MX 
GeForce GT 730M 
GeForce GT 735M 
GeForce GT 740M 
GeForce GT 745M 
GeForce GT 750M 
GeForce GT 755M 
GeForce GTX 760M 
GeForce GTX 765M 
GeForce GTX 770M 
GeForce GTX 780M 
GeForce 825M 
GeForce GTX 860M 
GeForce GTX 870M 
GeForce GTX 880M 
GeForce 920M

GeForce GTX 745 
GeForce GTX 750 
GeForce GTX 750 Ti 
GeForce GT 945A 
GeForce GTX 950 
GeForce GTX 960 
GeForce GTX 970 
GeForce GTX 980 
GeForce GTX 980 Ti 
GeForce GTX Titan X 
GeForce 830M 
GeForce 840M 
GeForce 845M 
GeForce GTX 850M 
GeForce GTX 860M 
GeForce 930M 
GeForce 940M 
GeForce GTX 950M 
GeForce GTX 960M 
GeForce GTX 965M 
GeForce GTX 970M 
GeForce GTX 980M 
GeForce GTX 980

GeForce GTX 1050 
GeForce GTX 1050 Ti 
GeForce GTX 1060 
GeForce GTX 1070 
GeForce GTX 1080 
Nvidia Titan X

Best tool for Encode H.265 on Nvidia GeForce Graphic Card

Pavtube Video Converter Ultimate | for Mac has perfect support for H.265 encoding acceleration on a PC that runs above listed Nvidia GeForce Graphic cards. With the program, you can comprehensively encode H.265 MP4/MKV codec from virtually any digital file formats and also commercial Blu-ray/DVD disc.

Other great features and functions of Pavtube Video Converter

- Encode virtually any digital file formats to H.265 MP4/MKV 
- Encode commercial Blu-ray/DVD disc to H.265 MP4/MKV 
- Adjust output H.265 profile parameters including video codec, resolution, bit rate, frame rate, audio codec, bit rate, sample rate and channels, etc. 
- Edit H.265 files by trimming, cropping, splitting, merging, adding watermark, applying special effect, change video brightness, contrast and saturation, deinterlacing video, etc. 
Decode H.265 to H.264 or other popular file formats, hot devices and programs preset profile formats.

How to Use Pavtube Video Converter Ultimate for fastest H.265 Encoding on Nvidia GeForce Graphic Cards?

Step 1: Import video or load Blu-ray/DVD disc into the program.

Start the program on your computer, click "File" > "Add Video/Audio" to import digital file formats into the program, for load Blu-ray or DVD disc, insert your DVD disc into your computer's optical drive and your Blu-ray disc into an external Blu-ray drive, click "File" > "Load from Disc" to load Blu-ray/DVD disc into the program.

load video/dvd/blu-ray

Step 2: Enable GPU Encode Acceleration.

Click "Tools" > "Options", in the opened "Options" window, click "Acceleration" menu, then check "Enable GPU Encode Acceleration" otpion so that the program will accelerate converion speed when encoding video/Blu-ray/DVD to H.265/HEVC codec.

Enable GPU Encode Acceleration

Step 3: Output H.265 MP4 or MKV format.

Click "Format" drop-down bar, scroll down to select "Common Video" > "H.265 Video(*.MP4)" as the output file format.

Output H.265 MP4 video

For outputting H.265 MKV format, select "HD Video" > "MKV HD Video(*.mp4)" to output, then hit "Settings" on the main interface to open "Profile Settings" window, under Video settings panel, click "Codec" drop-down selection, choose "H.265" as your final output file codec.

Output H.265 MKV

Step 4. Adjust output file parameters (Optional)

You are allowed to adjust video and audio parameters if you are not satisfied with the default settings. Presets like size, bitrate, frame rate, audio channels, etc. can be customized in your own way.

Adjust output profile parameters

Step 5: Begin the H.265/HECV codec encoding process.

After all settings is completed, hit right-bottom "Convert" button to begin the conversion from video/Blu-ray/DVD to H.265/HEVC encoding process. 
When the conversion is completed, you will get a perfect quality H.265/HEVC file with smaller file size for smoothly viewing and streaming on different devices.

Hot Saerch: How to Rip 4K Blu-ray to H.265 MKV Utilizing CUDA on Windows?