Thanks to Facebook social website, we can connect with our friends and the world closely. Over 4 billion video views happen to Facebook everyday. And users would like to tell rich stories with Facebook video, not only in the timeline, but also in business ads, and covers. During Facebook uploading process, you may meet some unknow factors that stop you uploading the videos to this social website. Nowadays, people prefer capturing videos with iPhone, GoPro, DJI drones, Sony/Panasonic/Canon camcoders you need to compress or convert footage to Facebook supported video format before uploading. This article makes it clear on Facebook video uopload specs and how to compress video smaller for Facebook without video quality loss.
Know Facebook Supported File Formats Well
When sharing video on Facebook, you may be recommended to use the MP4 and MOV format, in fact, you also can use the 3g2, 3gp, 3gpp, asf, avi, dat, divx, dv, f4v, flv, m2ts, m4v, mkv, mod, mov, mp4, mpe, mpeg, mpg, mts, nsv, ogm, ogv, qt, tod, ts, vob, wmv which are all supported by Facebbok, except the video format, Facebook limits the video parameters, like the video codec, video frame, video bitrate, audio channels, vudeo size, video length, etc. You must make sure your video is accepted by Facebook.
| Video Profile Settings | |
Codec |
The best format to upload to Facebook is H.264 video with AAC audio in MP4 or MOV format. It currently gives you a great bang for your buck in the file size to relative quality ratio, offering the best video compression available, and due to the file size limitations, this format is the optimal choice for Facebook video. And there's no need to change the parameter during Facebook uploading. |
Resolution |
Use a file with the larger edge of the video constrained to1280px. If your video is less than 1280px in size on the larger edge, try to keep your dimensions to multiples of 16px for best compression. |
Frame Rate |
Usually videos have the best quality if the frame rate is between 25-30 fps. So you are recommended to keep the frame rate of your video at or below30fps. |
Aspect Ratio |
The aspect ratio of the video must be within the range of9x16 to 16x9which most videos should have, and the video exceeding the file size or length that the upload page suggests will be rejected. |
Bitrate |
There is no recommendation for Bitrate as it highly rests upon codec. So you are suggested to optimize video for resolution, aspect ratio and frame rate rather than bitrate. |
| Audio Profile Settings | |
| Codec | MP3 is preferred |
| Samping Rate | Use stereo audio with a sample rate of 44,100hz. |
| Channels | The number of audio channels will be maintained for stereo and mono streams. 5.1-channel audio will be down-mixed to stereo. All other channel configurations are currently unsupported. |
Other tips for Facebook video uploading
- Keep in mind that the maximum length for a video is 120 minutes and the maximum file size is 4.0 GB.
- Check that you're using the latest version of your browser.
- Uploading a video works best when you have a strong network connection.
Normally, many people would like to record their life via camcoders, and some recordings in a format that FaceBook doesn't support, or the video in high definition are too long or too large for Facebook and need to trim and compress. You need a video converter or video editor to help you reach that.
For Windows users, Pavtube Video Converter Ultimate is deserved to try. It is a video converter, as its name shown, but also a video editor with some simple and essential video editing functions. With it, you can easily transcode your life recordings, game play recordings to FaceBook playable video and audio format such as MP4, WebM, MOV, etc encoded with compatible video and audio codec. You can trim the recordings length to meet and FaceBook supported video length and size requirement. You also can compress videos by adjusting video resolution, bitrate to reduce the videos size.
To make your videos different, you also can add some subtitle to narrate the videos and add a text/image/video watermark to your videos. Aspect ratio is also supported to change in this video converter. If needed, you even can remove the audio in the video or replace audio from it. Now, download it and try to convert and compress your videos to Facebook supported one.
Quick Guide to Convert and Compress Videos to FaceBook
Step 1: Import video you want to upload to Facebook
Start the FaceBook video converter program on your computer, click "File" > "Load Video/Audio" or "Load from folder" button to import videos into the program. "Drag-and-Drop" and "Batch Conversion" features are also supported. If you loaded multiple clips, you also can merge the video into a single one file.
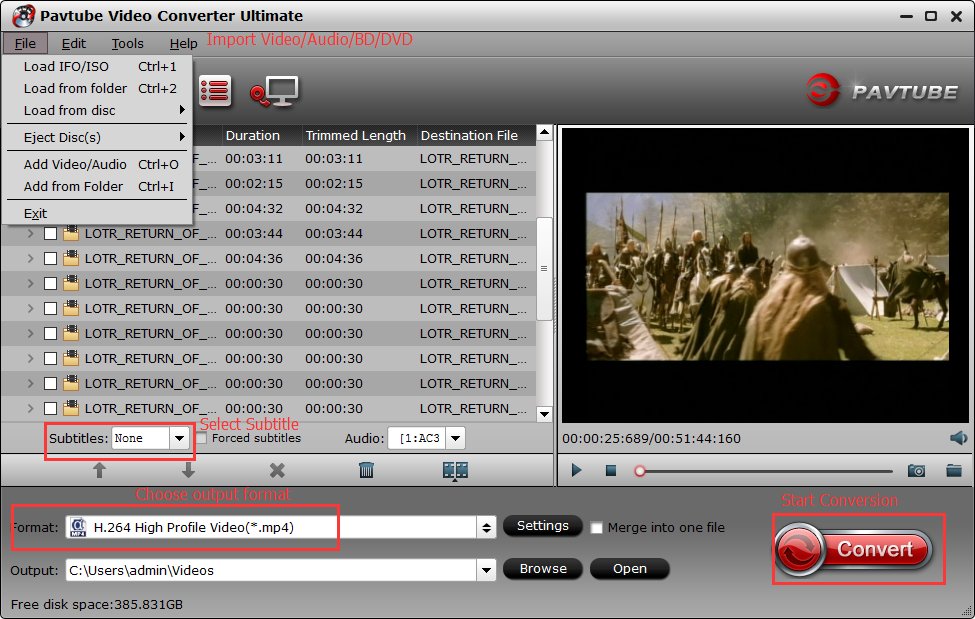
Step 2: Output FaceBook best uploading format
Click "Format" bar, from its drop-down options, choose FaceBook compatible uploading format from "Common VIdeo" > "H.264 High Profile Video(*.mp4)". You also can choose other FaceBook supported video formats such as HTML5 WebM.
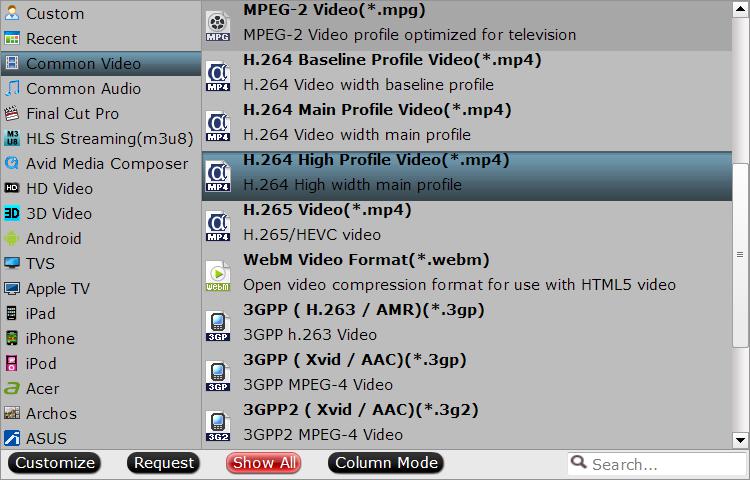
Step 3: Compress videos
Click "Settings" to open the "Profile Settings" window, here you can adjust the output video codec, resolution, bit rate, frame rate and audio codec, bit rate, sample rate and channels to let the videos more fit in FaceBook. To compress videos, the most effective way is to reduce the video bitrate. You can change the bitrate value to see the target video size in the below chart.
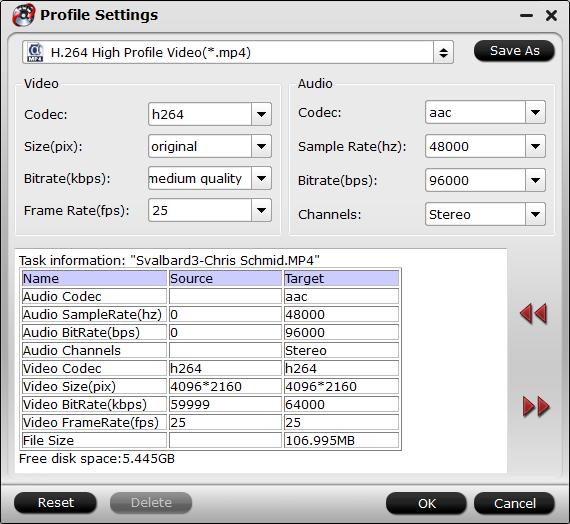
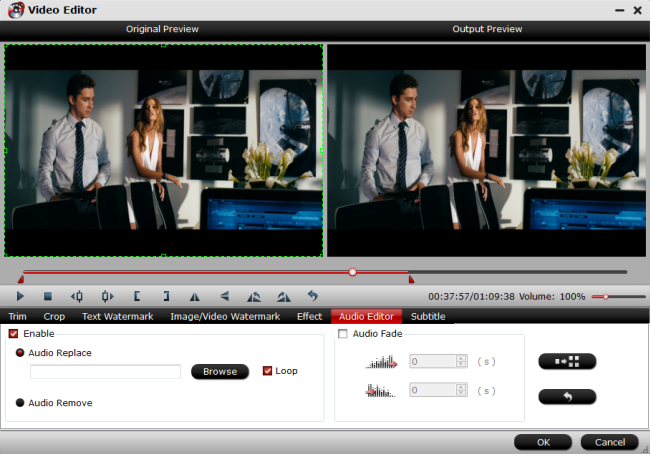
Edit videos/recordings Before Export
Trim videos/recordings: In “Video Editor” there are seven edit tabs: Trim, Crop, Text Watermark, Image/Video Watermark, Effect, Audio Editor and Subtitle. The "Trim" feature allows users to decide where to start and where to end when converting the clips, so that unwanted segments will be cut out after conversion.
Crop videos/recordings: The "Crop" facility enables users to get rid of the black edges and unwanted area of the image.
Keep original videos/recordings aspect ratio and cropped aspect ratio
To keep original aspect ratio, users need make sure the "Display aspect ratio” and the "Size (pix)" in "Settings" option are all set as "Original". If you want to keep the cropped aspect ratio, Pavtube software offers several aspect ratios for you to choose from, including 16:10, 16:9, 5:4, 4:3, 3:2, and 2:1.
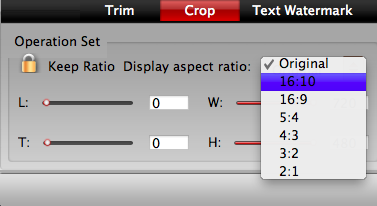
Add Watermark to Gameplay recordings: You can add text/video/image watermark to selected videos. You can either set parameters or drag the text on preview screen to set its location.
Audio Editor:You can either replace/remove original audio in the videos/recordings, or set audio fade in/out effects.
Subtitle: In this tab, you can add *.srt or *.ass/*.ssa subtitle-files to the videos/recording video as hard subtitles.
Step 4: Start to Convert and Compress Videos for FaceBook
Clicking the Convert button on main interface, you can go to Conversion window to start to convert videos/recordings to FaceBook. After the conversion, you can click Open output folder to popup output directory with the converted files.
How to Upload video to FaceBook?
1. Choose Add Photo/Video in the Share box at the top of your Home page or Timeline.
2. Click Upload Photos/Video.
3. Select a video file from your computer.
4. Click Post.

Related Articles
Hot Articles & Reviews
- How to Split, Modify or Compress Phantom 4 4K video for uploading to YouTube/Vimeo/Facebook
- How to convert and upload DVD to Facebook?
- How to share iTunes movie clips on Facebook with Pavtube ChewTune?
- Upload and Share Funny Christmas Video on YouTube/Facebook/Vimeo
- Upload and Share Summer Vacation Video on YouTube/Vimeo/Facebook
Any Product-related questions?support@pavtube.com