Summary: If you are a Blu-ray collector, you won’t regret visiting the page! This guide will show you the best blu-ray software alternative guide and tips.
Want to share your Blu-ray movies on Internet or just simply enjoy your Blu-ray movies on portable devices wherever you go? Here are some instructions on how to rip Blu-ray to all popular video and audio format.
Blu-ray Ripping Tips
Have a bunch of Blu-ray discs and want a more convenient way to manage and organize them? How about ripping your Blu-ray collection to NAS, Cloud Storage, Media Server, External Hard Drive? Or do you would like to play and view your Blu-ray movie on iPhone SE, iPhone 7, iPad Pro 9.7, iPad Air 3, Galaxy S7, Galaxy TabPro S, Galaxy Tab S2 without using Blu-ray discs?
No matter what you want to do on your Blu-ray discs, here gathered around all guides and tips about Blu-ray ripping and copying. If you can’t find the one you need, just leave the message at the comment area to let us know. We will find the solution for you, especially.

Featured Articles:
Related Topics
Blu-ray to Software
Look at this column to learn how to rip Blu-ray to common video formats so you can edit Blu-ray files in editing software like Windows Movie Maker, iMovie, Final Cut Pro and play Blu-ray on VLC, WMP, QuickTime and more.
Blu-ray to Site
Here, you can learn how to rip and upload your Blu-ray movies to some video sharing site like YouTube, Facebook, Vimeo, etc.
Blu-ray to Video
Read this column then you will get the best solution to rip Blu-ray and learn how to convert Blu-ray to any video/audio format like WMV, AVI, MOV, MP4, FLV, VOB and more.
Blu-ray to Device
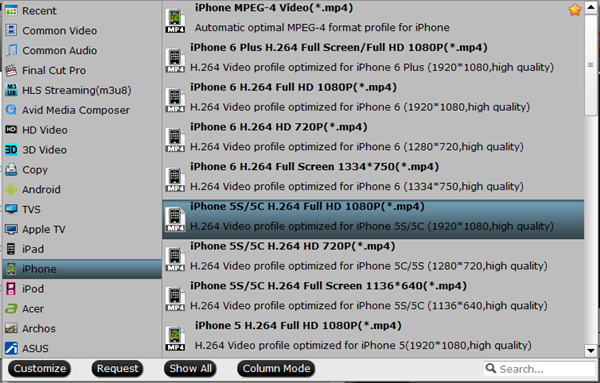
In this column you will learn how to rip Blu-ray to iPad, iPhone, Samsung Galaxy, Google Nexus, Nook HD, Amazon Kindle, TV, etc. mobile devices highly compatible format.
Want to get the best Blu-ray ripper/copying alternatives? These guides introduce the best Blu-ray ripping and Copying tools for ripping, converting and copying Blu-ray are simple as ABC.
How to create Blu-ray collection backups quickly and safely? Here you will get all the tips on how to back up your Blu-rays.
Why we can’t play any Blu-ray on our Blu-ray Player? Which are the decent Blu-ray Ripper/Copier? The answers for questions above can be found on this column.
Sometimes, you can’t play your Blu-ray on your Blu-ray player due to Blu-ray region codes. Region codes are basically DRM (digital rights management) techniques that allow studios to control the release of films in various regions. A Blu-ray player only can play the Blu-ray discs sold at the same region as the Blu-ray player manufactured.
There are 3 separate Blu-Ray region codes. These codes are classified alphabetically as Region A, Region B, and Region C.
Region A: This region covers all of North America, South America and South East Asia.
Region B: This encompasses Europe, Africa, Middle East, French territories and Greenland.
Region C: Region which covers the rest of the world including Russia, Asia, and China.

When you want to play Blu-ray of region A, B and C on your Blu-ray player freely or on your region-locked PS3/PS4/Xbox One/360, you can refer to the following guides:
Top Blu-ray Ripper Recommendations
To fulfill all the tasks above, you need a Blu-ray Ripper or Blu-ray Copier. There are various Blu-ray ripping tool floating on the web but which one is the best? We gathered some top reviews on best Blu-ray ripper for you:


Other Download:
- Pavtube old official address: http://www.pavtube.cn/blu-ray-ripper/
- Cnet Download: http://download.cnet.com/Pavtube-BDMagic/3000-7970_4-75922877.html
Read More:
Want to share your Blu-ray movies on Internet or just simply enjoy your Blu-ray movies on portable devices wherever you go? Here are some instructions on how to rip Blu-ray to all popular video and audio format.
Blu-ray Ripping Tips
Have a bunch of Blu-ray discs and want a more convenient way to manage and organize them? How about ripping your Blu-ray collection to NAS, Cloud Storage, Media Server, External Hard Drive? Or do you would like to play and view your Blu-ray movie on iPhone SE, iPhone 7, iPad Pro 9.7, iPad Air 3, Galaxy S7, Galaxy TabPro S, Galaxy Tab S2 without using Blu-ray discs?
No matter what you want to do on your Blu-ray discs, here gathered around all guides and tips about Blu-ray ripping and copying. If you can’t find the one you need, just leave the message at the comment area to let us know. We will find the solution for you, especially.
Featured Articles:
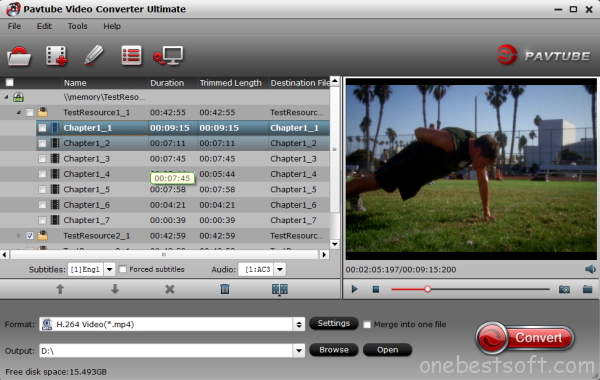
- Free/Paid Rip Blu-ray to H.264 MP4 using Handbrake or Pavtube
- Directly Copy 3D Blu-ray to Plex With 3D Effects
- Copy Blu-ray to iTunes With AAC Stereo and Dolby Digital 5.1
- Make 1:1 Copy the entire Blu-ray discs on Mac
- Copy Blu-ray DVD movies with original structure
- Full disc copy Blu-ray with keeping 7.1 audio
- Fastest Backup Blu-ray to BDMV folder Losslessly on Macbook retina
Related Topics
Blu-ray to Software
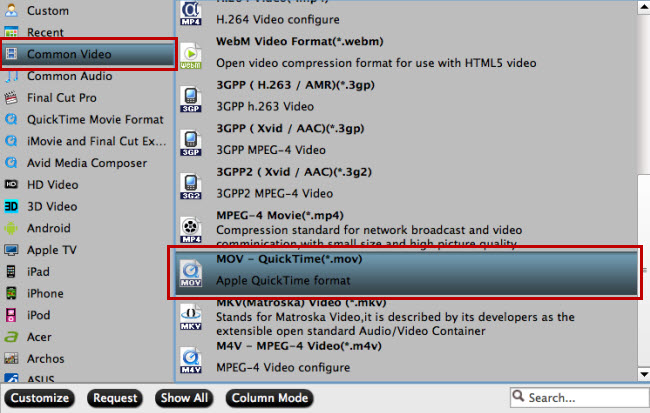
Look at this column to learn how to rip Blu-ray to common video formats so you can edit Blu-ray files in editing software like Windows Movie Maker, iMovie, Final Cut Pro and play Blu-ray on VLC, WMP, QuickTime and more.
- Blu-ray to Windows Movie Maker
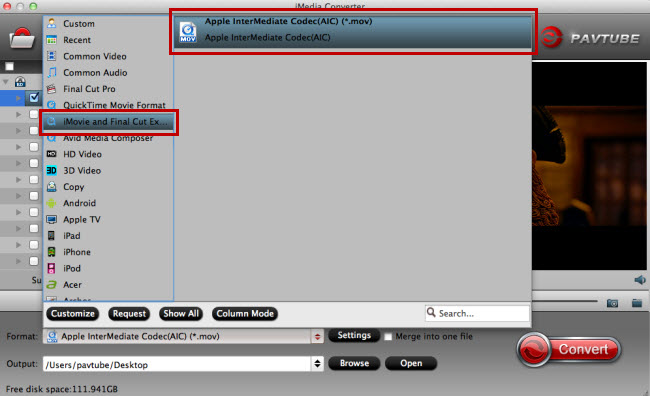
- Blu-ray to iMovie
- Convert Blu-ray Discs to Final Cut Pro X on Mac
- Play Blu-ray on VLC
- Watch Blu-Ray Discs in Windows Media Player
- Rip Blu-ray/DVD to QuickTime MOV
Blu-ray to Site
Here, you can learn how to rip and upload your Blu-ray movies to some video sharing site like YouTube, Facebook, Vimeo, etc.
- Rip Blu-ray and Upload to Vimeo
- Upload Blu-ray Movies to Microsoft OneDrive
- Rip Blu-ray movies to iCloud
- Blu-ray to Facebook
- 2D Blu-ray to YouTube
Blu-ray to Video
Read this column then you will get the best solution to rip Blu-ray and learn how to convert Blu-ray to any video/audio format like WMV, AVI, MOV, MP4, FLV, VOB and more.
- Lossless rip Blu-ray to MKV with Pavtube ByteCopy
- Rip Blu-ray to AVI on PC/Mac
- Backup/Rip Blu-ray movies to WMV HD videos
- Rip 2D/3D Blu-ray to SBS 3D MP4 or MKV for playing on 3D TV
- Enjoy Blu-ray to H.265/HEVC MP4 for Roku 4 on 4KTV
- Blu-ray to MPEG - Encode Blu-ray to MPEG With Best Quality
- Copy Blu-ray to AVI for Seagate Central 3TB drive
- Convert Blu-ray to MP3/AAC/AC3 Audios with Blu-ray Ripper
- The top Blu-ray to MKV Ripper for HD Media Players and HTPCs
- Rip Blu-ray to m3u8 for iPad/iPhone playback
Blu-ray to Device
In this column you will learn how to rip Blu-ray to iPad, iPhone, Samsung Galaxy, Google Nexus, Nook HD, Amazon Kindle, TV, etc. mobile devices highly compatible format.
- Copy 3D Blu-ray on Smart TV without 3D Blu-ray Player
- Convert Blu-ray to SBS 3D MP4 for playback on 3D TV
- Rip 2D Blu-ray to 3D for playback to TV via Media Server (MiniDLNA)
- Rip Blu-ray to Play on Samsung Galaxy A8 for Freely
- Lossless rip Blu-ray to MKV for viewing via Smart TV
- Convert 3D Blu-ray to MKV for Gear VR Playback
Want to get the best Blu-ray ripper/copying alternatives? These guides introduce the best Blu-ray ripping and Copying tools for ripping, converting and copying Blu-ray are simple as ABC.
- Best El Capitan MakeMKV Alternative to Rip Blu-ray/DVD to MKV
- MakeMKV and Handbrake Alternative: Convert/Deinterlace 1080i Blu-ray on Windows/Mac
- Top 3 AnyDVD HD Alternatives for Ripping/Copying Blu-ray
- Top 5 Blu-ray Ripping Programs Review 2016
- DVDFab Blu-ray Copy for Mac Alternative and similar software
- Best 10 bitRipper Alternatives on Windows 10
How to create Blu-ray collection backups quickly and safely? Here you will get all the tips on how to back up your Blu-rays.
- Backup Blu-ray contents through USB Flash Drive
- Rip Blu-ray to LG Smart TV/OLED TV from USB Flash Drive
- Backup Blu-ray/DVD to HDD for iPhone 6S and iPad Air 2 Playback
- Rip Blu-ray to HD WMV for Storage on Portable Hard Drives
- Play Pitch Perfect 2 Blu-rays with Seagate Portable Hard Drive
Why we can’t play any Blu-ray on our Blu-ray Player? Which are the decent Blu-ray Ripper/Copier? The answers for questions above can be found on this column.
Sometimes, you can’t play your Blu-ray on your Blu-ray player due to Blu-ray region codes. Region codes are basically DRM (digital rights management) techniques that allow studios to control the release of films in various regions. A Blu-ray player only can play the Blu-ray discs sold at the same region as the Blu-ray player manufactured.
There are 3 separate Blu-Ray region codes. These codes are classified alphabetically as Region A, Region B, and Region C.
Region A: This region covers all of North America, South America and South East Asia.
Region B: This encompasses Europe, Africa, Middle East, French territories and Greenland.
Region C: Region which covers the rest of the world including Russia, Asia, and China.
When you want to play Blu-ray of region A, B and C on your Blu-ray player freely or on your region-locked PS3/PS4/Xbox One/360, you can refer to the following guides:
- How To Play Blu-Ray Movies Of Region A, Region B And Region C?
- How to Remove Blu-Ray region code for Xbox One?
- Watch Region Locked Blu-ray/DVD to PS3/PS4 - Pavtube ...
- Make an Australia Blu-ray Region-free for PS4 in India
Top Blu-ray Ripper Recommendations
To fulfill all the tasks above, you need a Blu-ray Ripper or Blu-ray Copier. There are various Blu-ray ripping tool floating on the web but which one is the best? We gathered some top reviews on best Blu-ray ripper for you:
- Top 5 Best Blu-ray Ripper for Mac Programs Review
Top 3D Blu-ray Ripper review
Top 3D Blu-ray Ripper review - Pavtube Video, Blu-ray and DVD Products Comparison - Best Disc Backup & Covnerter
- Top 3 Mac 3D Blu-ray Copy & Ripper Review for 3D Devices
Other Download:
- Pavtube old official address: http://www.pavtube.cn/blu-ray-ripper/
- Cnet Download: http://download.cnet.com/Pavtube-BDMagic/3000-7970_4-75922877.html
Read More: