Friday, March 6, 2015

How to Convert DVD ISO Files over Plex Media Server

Summary: Need a professional ISO Converter? Want to play your DVD ISO files using Plex Media Sever by converting ISO to Plex?


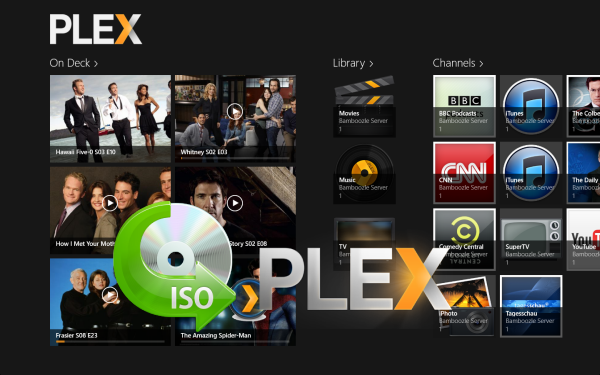
Plex Media Server allows you to store all your movies on a central server and watch them anywhere you want. You can watch them on your TV, iPad, computer or phones both home and away. Besides, you may have some DVD movies with ISO/IFO extension. So, the problem is that Plex doesn't support the use of ISO, IMG, Video_TS, or other "disk image" formats. If you have no idea about this, here is simple tutorial for you, guaranteed to to stream and play ISO files via Plex without problems. 

Actually, it's not as difficult as you imagine. What you need is a just a common ISO converter like Pavtube DVDAid – which is highly recommended to help your convert ISO image file to Plex supported format. Besides, it can also convert ISO/DVD/IFO/Video_TS to almost all regular video formats, including AVI, MOV, M4V, WMV, MPG, 3GP, FLV, F4V, etc. What’s more, this program comes with a built-in video editor that allows you to edit your movie files by trimming, cropping, adjusting video effects, etc. If you are using a Mac, you can go to Mac DVD ripper for Plex. Now download this tool and follow the instructions to convert ISO image files via Plex to Media Players. 

How to convert DVD ISO to Plex compatible video files

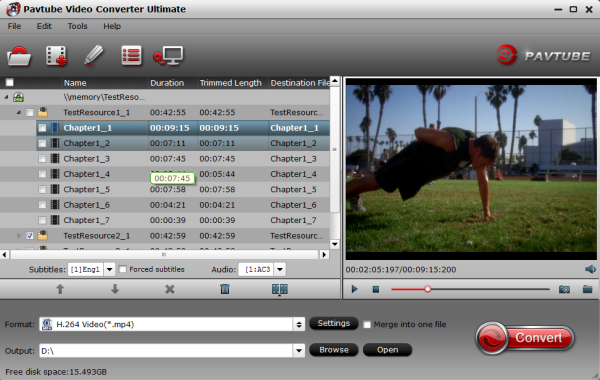
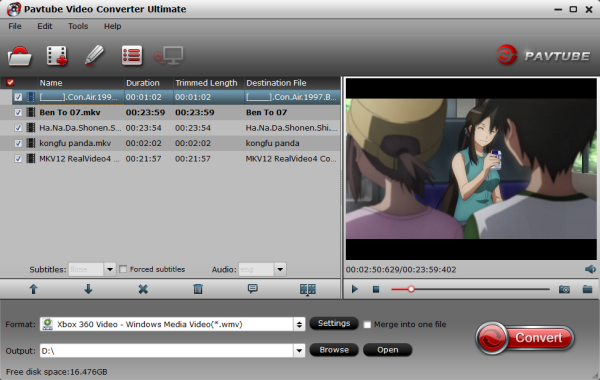
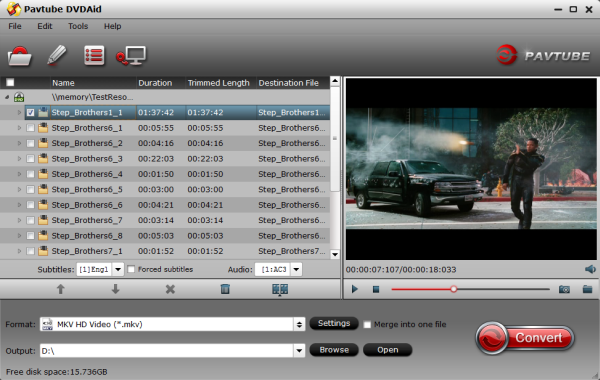
1. Add ISO image files

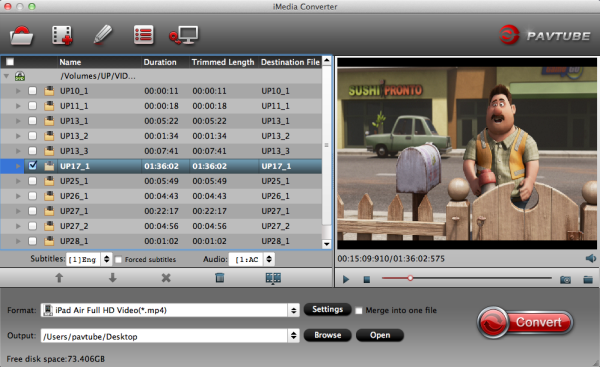
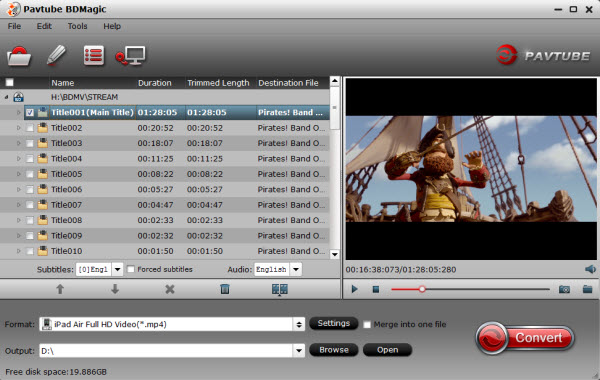
Run the ISO to Plex Converter program and click DVD disc button to add the ISO files. As you can see, you can also load DVD Folders and IFO files to rip. 


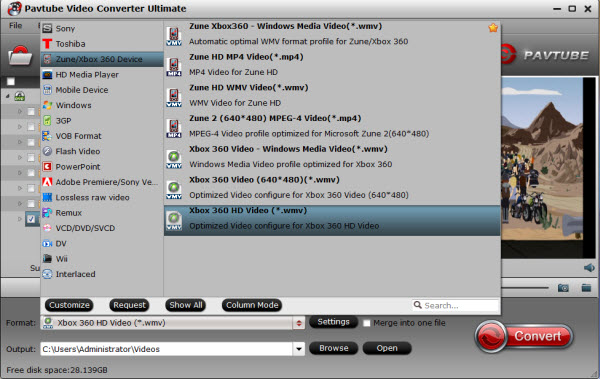
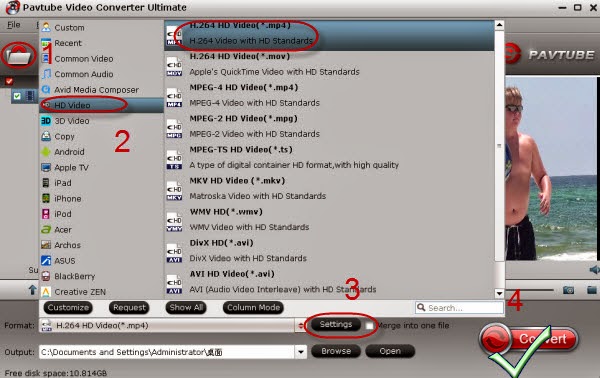
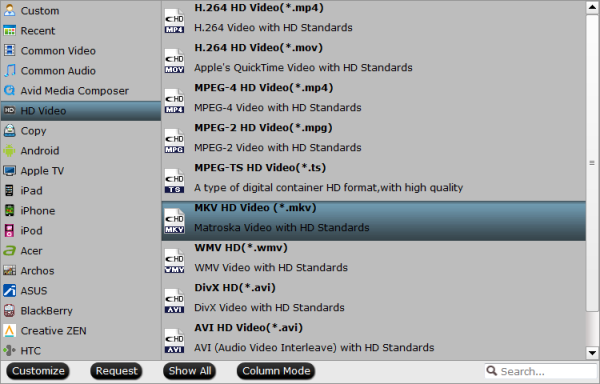
2. Choose output format

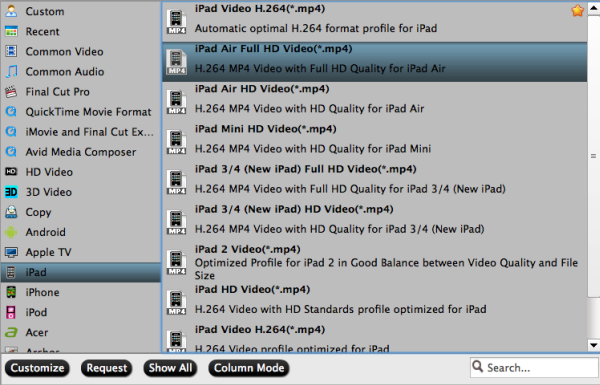
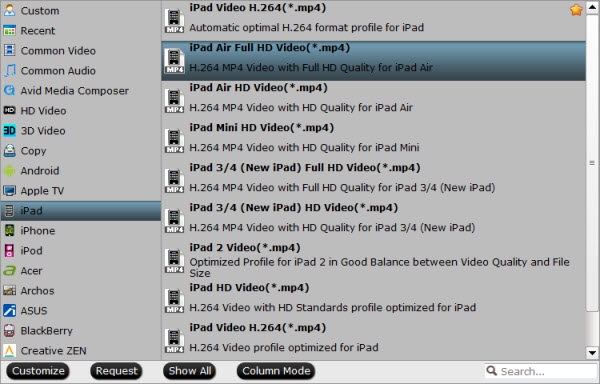
To convert DVD ISO to MP4, MKV for Plex, just click on the dropdown menu of "Format", and then choose MKV, H.264 MP4 from Common Video or HD Video profile list. 


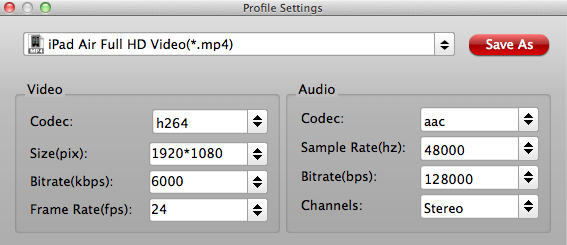
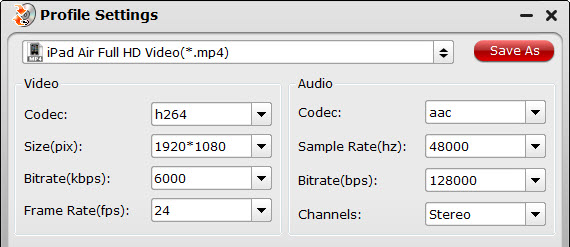
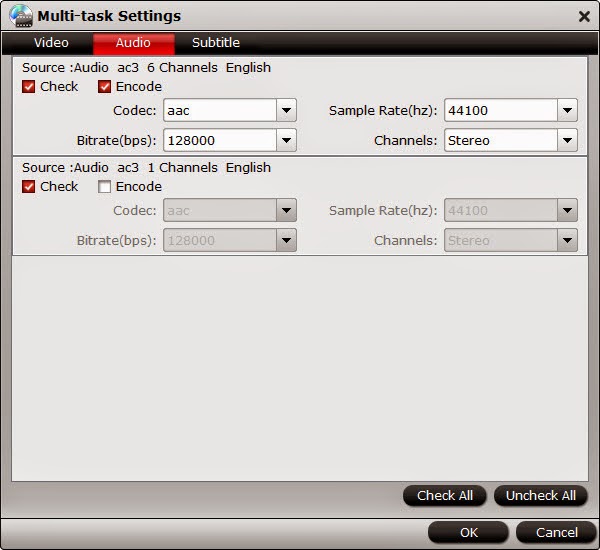
Tip- Advanced settings: With the right settings you can retain the quality of the original DVD while also saving space. This is particularly helpful when streaming over your network. Simply click Settings bar and you can tweak the settings to your satisfaction and even save it as preset. 

3. Start converting ISO files

Finally, hit the “Convert” button at the bottom of the main interface to start the DVD ISO to Plex friendly MP4, MKV conversion. After the conversion, you can hit “Open” button to quick locate the converted videos; now you can stream converted video files to Plex media server as easy as you can image. 

More Guides:

Wednesday, March 4, 2015

Work Around : How to convert 1080p HD MKV on Sony TV?

Summary: How to Play Various 1080P HD MKV files on Sony TV Successfully? Learn how to complete the conversion with the help of top Sony TV MKV Converter from Pavtube. 


Yahoo Answer:  How to play 1080P HD MKV movies on Sony TV?

“ I have a Sony 1080p LED HDTV. I'm trying to watch MKV videos through a Sony external hard drive formatted FAT32. Unfortunately my TV doesn't support MKV videos. So my question is, is there a way to work around this issue? An adapter, device etc...?” 

Work Around: 

I had similar Issues with many sony televisions across my family members. The solution was vivid and simples. Though Sony TV like Bravia enables us to enjoy video files from a USB device, it has video format limitation. It only supports videos in MPEG-1, MPEG-2, MP4, WMV, ASF, DivX HD through USB. If you have a collection of movies in format like 1080P HD MKV naturally, the solution is to convert these videos into the right format Sony TV supports for USB playback first. 

Here, Pavtube Video Converter Ultimate – which can help you convert any HD or SD video format to Sony TV friendly format. It provides optimized preset for playing HD video on Sony TV without scarifying image quality. 3D effect on converted video is also supported by this program. For Mac users, you can try to iMedia Converter for Mac Now, you can watch your MKV or HD MKV on the big screen TV. Just have a try. 

To cater to all the video lover's need, the following will introduce a step by step guide on how to transcode 1080p MKV to Sony TV supported video format effortlessly.

Step 1. Free download this top Sony TV MKV Converter, install and launch the program. 

Once you run it, click "Add Video" button to load the videos you'd like to convert. When all the videos are loaded to the program, you can preview the videos. 


Step 2. Select best supported format by Sony TV. 

Click on "Format", and select output format from the drop-down list. Simply follow "Common Video -> H.264 Video(*.mp4)" which is accepted by Sony TV. 


Tip: If you want to get 3D movies for your 3DTV, choose "3D -> MP4 Side-by-Side 3D Video (*.mp4)".  

Step 3. Settings. 

You can customize the A/V parameters based on your personal requirements. Adjust the resolution, bitrate, frame rate or codec to meet your requirement by clicking "Settings".  

Step 4: Start converting 1080p MKV video to Sony TV. 

After the above steps are done, you can click "Convert" button to convert your MKV Video to Sony TV MP4 format. 

Pavtube Video Converter Ultimate supports batch conversion so you may load multiple videos and convert at one time. You may also merge them into one file by checking the box "Merge into one file" before conversion starts. 

Sony HDTV Video Converter support TVs: 

Sony Bravia HDTV, HBR 4K Ultra HD TV, LED HX850/HX750 serice Internet TV, XBR HX950 Internet TV, LED EX640/340/645 serice Internet TV, LCD BX450/330 serice HDTV etc. 

See Also:

Monday, March 2, 2015

Solved: Can Xbox One play MP4 files? (From external hard drive)?

Summary: In this article we'll focus on Microsoft Xbox One only and talk about the ability of playing MP4 videos on Xbox One. 
  

“Can Xbox One play MP4 files? (From external hard drive)? If anyone has tried this, or know if it works, can you help? Basically I want to plug my external hard drive in to it so I can watch my family holiday videos on the big screen. I'm asking because I don't have the Xbox One yet, I'm getting it on payday haha. (6 day wait!) Thanks in advance. “ – From Yahoo. 


Xbox One is the latest game console. It has powerful multimedia performance. If you have collected lots of MP4 video files, you can transfer them to your Xbox One for a greater visual experience. However, you'll probably come to find out that not all of the MP4 files are supported on Xbox One. That's because different MP4 files tends to have different video codecs and the codecs might not be compatible with the console. Well, how can you play those incompatible MP4 files on Xbox One then?  

Best Solution:

The perfect solution is that you need to convert the MP4 files to Xbox One's supported formats, and then transfer the converted files via the DLNA server. Now there is a powerful tool to help you on this. That's the Pavtube Video Converter Ultimate. It offers a powerful plugin called "Media Server" which enables you to directly stream any video to Xbox One effortless. Besides, you can also extract Blu-ray/DVD and convert a wide rage of movie files or 4K movies to Xbox One readable format. The Mac version is here. Please follow the steps below to do your task.  

Before taking action, learn more information about this software. Here About this top MP4 to Xbox One Converter

1. Almost all video/audio formats supported 
2. Output playable videos/movies for all popular devices
3. 6x Faster Conversion Speed
4. Backup BD/DVD with high quality or Copy Blu-ray/DVD without extras 
5. Vivid 3D Experience at home
6. Professional yet Friendly Functional Video Toolbox 

Step 1. Run the MP4 Converter for Xbox One, click “Add Video” to load your video files like MP4, MTS/M2TS, MKV, MOV, TOD, TiVo, etc.


Step 2. Choose from "Format" menu for Xbox One playable video. In order to get Xbox One MKV file, you are suggested to follow the path " Zune/Xbox 360 Device” > “Xbox 360 HD Video (*.wmv)" as output format. 


Step 3. Parameters including video codec, video file size, bitrate, frame rate, audio sample rate, audio channels, and more in Settings can be reset to get a satisfying video/audio enjoyment on Xbox One. 

Step 4. Start conversion from MP4 to Xbox One game console by clicking “Convert.” When it finishes, click the “Open Output Folder” icon to quick locate the converted video. Then, transfer the MKV files to your Xbox One. 

Now, you’re able to enjoy your favorite MP4 files to Xbox One, Have fun! 
  
Further Reading: 

Friday, February 27, 2015

Convert and Add AVI movies to iPad Air 2 on Mac

Wanna convert AVI video to iPad Air 2 readable format on Mac for enjoying on its high resolution screen? You can find a good way to watch your AVI on the new iPad Air 2 here.

iPad Air 2 is the latest tablet from Apple. This brand-new Apple tablet is somehow even thinner than the original iPad Air, and the display technology is even better with 9.7-inch Touch ID screen with 1536 x 2048 pixels which makes it possible for you to enjoy videos on iPad Air 2 freely on a commute and travel.

Add AVI movies to iPad Air 2

Can we carry with the iPad Air 2 and enable iPad Air 2 to play AVI videos? 

Anyone knows that iPad Air 2, undoubtedly abides by its family tradition that only supports MP4, MOV, M4V video formats. So if you plan to add and watch AVI video file in Divx/Xvid codec with bigger size on iPad Air 2, you should know to convert AVI video to iPad Air 2 readable format is the priority to all.

How to convert AVI video to iPad Air 2? You can easily accomplish the AVI to iPad Air 2 conversion on Mac with a proper video converter. In this paper, an ideal Mac iPad Air 2 Video Converter software is recommended: Pavtube iMedia Converter for Mac.

With this program, you can convert any AVI video to iPad Air 2, iPad Air, iPad Mini 3 with Retina display, and etc effortlessly at ultra-fast speed with no quality loss. It supports a wide range of formats like AVI, MKV, VOB, MXF, AVCHD (.mts/.m2ts/.m2t), TiVo, MPEG/MPG, WMV, MP4, FLV, 3GP, etc., and includes optimized presets for popular devices like iPad, iPad Air, iPad Mini, iPod, Galaxy Tab 3, Galaxy Note 4, Kindle Fire HD, Google Nexus 7/10, etc.. Windows version is here. (Read its comparison between Wondershare)

How to Convert AVI videos for smoothly playback with iPad Air 2 on Mac

Step 1-> Launch the AVI to iPad Air 2 Converter for Mac, and import your source materials. Batch conversion is supported so that you can add multiple files for conversion at a time.


Step 2: Set output video file format for your device. Here you can go to Format > iPad and then select "iPad > iPad Air Full HD Video(*.mp4)". Or you can click format bar and choose common video format mp4 supported by iPad Air 2, iPad Mini 3, iPhone 6 Plus, etc.


Showing Best Video Formats Supported by iPad Air 2:

  • Video Format: .m4v, .mp4, .mov, MPEG-4, H.264, M-JPEG
  • Audio Format: AAC, Protected AAC, HE-AAC, MP3, AAX, AAX+m, Apple Lossless AIFF, WAV

Tips: Tap the "Settings" icon and you can adjust codec, bit rate, frame rate, sample rate and audio channel in the interface according to your needs and optimize the output file quality. You’d better keep a good balance of the video size and quality.


Step 4: Hit the big Convert bar to start the AVI to iPad Air 2 conversion. The conversion time mainly depends on your source video file size. You may check "Shut down computer after conversion" and leave it be.

After conversion is done, you could click the "Open" button to find the converted files and now sync and play AVI videos on iPad Air 2 for more joy.


More related: 


Sunday, February 22, 2015

Ultimate Solution to Play Big Hero 6 Blu-ray on iPad Air 2 with Ease

In this article you will get brief instruction about how to copy and play newly favourite blu-ray movies like Big Hero 6 on iPad Air 2.


Introducing the Apple iPad Air 2 


Apple has officially taken the covers off the iPad Air 2 which is a feat of engineering that again pushes the limits of what makes a premium slate. By designing with the Retina display, fusing what had been three layers into one, this great device creates the most reflective display in this world, making your viewing better with more vivid colors and greater contrast. 

Watch Blu-ray Movies on iPad Air 2


Watch Blu-ray Movies on iPad Air 2 

Watching films on iPad Air 2 whenever and wherever you want is a superb enjoyment that activates your weekend, holiday or any other leisure time. To watch films on iPad Air 2, you can invest in iTunes to buy movies, use the streaming service, or convert Blu-rays (like Big Hero 6) to create mp4's for iPad Air 2 playback.

Heard about Pavtube BDMagic on Google, which works as advertised. It is an ultimate Blu-ray converting software which can easily rip any Blu-ray to iPad Air 2 supported format, fully resolving the problem that there is no Blu-ray drive on iPad Air 2. Additionally, you can also customize your video by adding subtitles, cropping the edge, trimming unwanted part, toggling the volume to sleekly watch Blu-ray on iPad Air 2 with sharp and bright display.
Step-by-Step Instruction on How to Rip Blu-ray to iPad Air 2 

Part One. How to convert Big Hero 6 Blu-ray movie to iPad Air 2 

Step 1. Get Top Blu-ray to iPad Air 2 Converter and Load Big Hero 6 Blu-ray disc. 

Download, install and launch the Best Blu-ray to iPad Air 2 Converter on your PC. Click the "Load file(s)" button to import your source Big Hero 6 Blu-ray movie. 


Step 2. Choose audio track and subtitles for output. 

On Blu-ray to iPad Air 2 Ripper main UI, set your wanted subtitles and audio track from the drop-down box of "Subtitles" and "Audio" tab. 

Step 3. Select iPad Air 2 suitable profile and adjust profile presets (optional). 

Pavtube BDMagic offers users dozens of profiles under "Format" menu so you would always get an optimized profile for your portable device. In order to convert Big Hero 6 Blu-ray to the iPad Air 2 with 1080p image quality, you are suggested to choose "iPad > iPad Air Full HD Video(*.mp4)" format for output. 


Tips: If you'd prefer higher quality, click on "Settings" and set video bitrate to 2000kbps or above, this will bring better image quality and also bigger file size. 


Step 4. Start ripping Big Hero 6 Blu-ray to iPad Air 2. 

Now you are ready to hit the "Convert" icon to start ripping. After it completes, click the "Open" button on program interface to locate the created MP4 file, and transfer the converted file to your new iPad Air 2 with iTunes. 

Part Two. Manually Sync video/music/movie files to iPad Air 2 via iTunes 

To put videos, music and photos to Apple iPad Air 2, iTunes 12 is a must. You can download iTunes 12 and follow the steps below. 

1. Open iTunes 11, and press "File" -> "Add File to Library" to add movies to iTunes Library. Or just switch to Movie library, and drag the file to iTunes. (How to add local contents on your computer to iTunes

2. Connect iPad Air 2 with your Mac using the cable that came with your device. 

3. Click the Summary button and select "Manually manage music and videos". 

4. Click the On This Device (your iPad Air 2 name) button. 

5. Click Add To on the right side of the iTunes window. 

6. Switch to Movies Drag items from the left side of the iTunes window to the pane on the right. 

In this way you can sync Big Hero 6 Blu-ray movie files to iPad Air 2 as you like. Pavtube Blu-ray Ripper for iPad Air 2 supports latest released Blu-ray movies and rip ISO files to various video formats and codecs (MKV, AVI, MP4, WMV, M2TS, TS, Tivo, VOB, MPG, etc.) for playing, editing, burning, sharing, etc. Tips: For Mac users, please download and try Blu-ray to iPad Air 2 Ripper for Mac

More related:

Thursday, February 19, 2015

Enjoy downloaded AVI/MKV/TiVo/WMV/MTS/VOB on Amazon Fire TV

This article will guide you how to work around to get Amazon Fire TV to play downloaded AVI, MKV, TiVo, WMV, MTS, VOB video files. The tool you need is Fire TV Video Converter.

Fire TV is Amazon's answer to the Apple TV, and to other options like the Roku 3 and the Google Chromecast. It brings Amazon Instant Video, Showtime Anytime, and tons of games to your big screen TV. Ever thought of trying to turn the Amazon Fire TV to your portable media player for watching your purchased videos, movies or TV shows?

Enjoy downloaded AVI/MKV/TiVo/WMV/MTS/VOB on Amazon Fire TV

However, Amazon Fire TV presents the major obstacle when users want to transfer videos to Fire TV, let's have a look at the video formats for Fire TV.

Amazon Fire TV Content Format Supported

Video: H.263, H.264, MPEG4-SP, VC1
Audio: AAC, AC-3, E-AC-3, HE-A, PCM, MP3
Photo: JPG, PNG

As only restricted ability is provided in Amazon Fire TV as well as all other portable devices to support videos in different formats, you will inevitably get some videos in formats that cannot be played on Amazon Fire TV, such as AVI, MKV, TiVo, WMV, MTS, VOB, etc.

To put those videos on your Fire TV smoothly, Pavtube Video Converter Ultimate may be what you need. It is the best Fire TV Video Converter, with which you can convert videos like AVI, MKV, TiVo, WMV, MTS, VOB to MP4 for Amazon Fire TV without any effort at super fast speed. Plus, this converter also comes with professional video edit function, if necessary, you can freely edit your videos like trim, crop, add water effect and more. Mac version is here. Below is the detailed guide.

Before start the conversion, please make sure you’ve download and installed the best Fire TV Video Converter on your PC (You can free download the trial version).


Guide: Convert/Sync AVI, MKV, TiVo, WMV, MTS, VOB to Amazon Fire TV

Step 1: Import videos

Launch the best Fire TV Video Converter. Click the button "Add Video" to add AVI, MKV, TiVo, WMV, MTS, VOB video files. If it is necessary, you can double click the each file to have a preview.

Tip: If you wanna join your several video files into single one, just check the "Merge into one" box.

Note: To convert TiVo shows to Amazon Fire TV, there is one special step:

After launching Pavtube Video Converter Ultimate, click the option button and you will go into a new interface named "Option". In the interface, click "TiVo" icon, here you need to enter Media Access Key, and click "OK" to confirm.


Step 2: Select an output format for Amazon Fire TV and set the output folder.

According to the tests, MP4 format is of the best compatibility with Amazon Fire TV.

So click on the dropdown menu of "Format" and then move your pointer to "Common Video", under the sublist, "H.264 High Profile Video(*.mp4)", "MPEG-4 Movie(*.mp4)", are compatible with Amazon Fire TV. Or choose "HD Video > H.264 HD Video(*.mp4)" to get 1080p output.

Then you can set the output folder for Amazon Fire TV.


Step 3: Click "Settings" icon to adjust audio and video parameters for Amazon Fire TV.

Click the "Settings" icon and you will go into a new interface named "Profile Settings". You can adjust codec, bit rate, frame rate, sample rate and audio channel in the interface according to your needs and optimize the output file quality.

Step 4: Start converting your videos to MP4 for Amazon Fire TV.

Click the "Convert" button; it will convert AVI/MKV/TiVo/WMV/MTS/VOB to MP4 for Amazon Fire TV immediately. You can find the process in the "Conversion" interface.

After the Video to Fire TV conversion, you will be able to get the output files for Amazon Fire TV via clicking on "Open" button effortlessly. Now you can refer the below methods to transfer converted movies and TV shows to Amazon Fire TV for Playing.

How to Stream Local Video Files to Amazon Fire TV
  • Stream Converted Movies or Other Local Video Files via Amazon Kindle Fire Tablets 
Amazon Fire TV works as a media steaming device, it can also stream all contents stored on Amazon tablets. So to watch the converted movies on Amazon Fire TV more easily, you can transfer the converted movies to Amazon Kindle Fire HD or other tablets at first.
  • Stream and Play Converted Video with Plex Media Server or XBMC
Plex Media Server and XBMC are the most famous home media sharing/managing solutions which helps you connect your clients with all of your local and online media. The combination of centralized library management, streaming of online content, and transcoding functionality provides flexibility and ease of use.

Here are more tips for using Amazon Fire TV.

More related: 

Saturday, February 14, 2015

Backup BD/DVD to lossless mkv for Samsung Smart TV via usb-hard drive

Do you want to backup Blu-ray/DVD to lossless MKV to play on a Samsung Smart TV via usb-hard drive? How to keep multiple audio tracks and subtitles? Here you will find an easy way to do it.

What I want to do is convert my BlueRay/DVD into MKV with the intention to show movie via usb-hard drive on my Samsung Smart TV instead of a Blu-ray player. How to do the conversion with multiple audio tracks and subtitles? I went through a lot of the Internet searching to look for something decent. Tried some free ones that were crap for what I wanted to acceive.
Backup BD/DVD to lossless mkv for Samsung Smart TV via usb-hard drive

Luckily I hit on to Pavtube ByteCopy by coincidence, which is a powerful and easy-to-use Blu-ray to MKV Converter. It can convert Blu-ray and DVD to MKV retaining all multiple audio and subtitle tracks in MKV files and you are free to select audio codec for every audio tracks in MKV. Seemed the most reliable & easy to use & the site looked safe enough to use credit card on. Easy of use & good format choices. The BD/DVD to lossless mkv conversion is fast, intended to be used via usb-hard drive on Samsung Smart TV. And the MP4 format can be used to save space and remain quality and to be able to run on basically all hardware. Mac version is here. Free download and install it and follow the steps below:
Convert BD/DVD to lossless MKV for playing on Samsung Smart TV via usb-hard drive

1. Load Blu-ray source.

First of all, insert your Blu-ray to Blu-ray drive and keep networked. Now it's time to import Blu-ray into the software after launching it. Click "Load files" icon to choose Blu-ray source for importing.

Best Blu-ray/DVD Copying & Ripping tool

2. Choose output MKV.

In the dropdown list of Format menu, you can find several MKV options for output. Here we recommend "Lossless/encoded Multi-track MKV (* mkv)" under "Multi-track Video" catalogue. Because it will save multiple video, audio and subtitle tracks form original Blu-ray in output MKV and you won't suffer any quality loss.

lossless mkv format

3. Select audio codec for output.

Click "Settings" button on the main interface; you are brought to Multi-task Settings. Here detailed parameters of multiple audio and subtitle tracks are listed and you can change any of them at will.

multi-track settings

In default system setting, every track is checked for lossless MKV output. If you want to remove one of them, just uncheck it from the list. Check "Encode" option, you can change audio parameters like codec, channels according to your needs. In this way, if you don't like DTS audio, you can choose to remove it or convert to AC3 here.

Note: If you change audio parameters under "Encode" option, you will get a encoded multi-track MKV file, not lossless multi-track MKV. Recoding Blu-ray to MKV will take a little more time for conversion than lossless output.

4. Backup Blu-ray to lossless MKV for Samsung Smart TV.

When everything is ready, you can click "Convert" button to start converting Blu-ray to lossless MKV with multiple audio tracks and subtitles keeping.

Once finished, go to "Open" the generated MKV files. Now it is time to transfer converted mkv onto usb-hard drive and enjoy your favorite Blu-ray movies with Samsung Smart TV.

More related:

Wednesday, February 11, 2015

Format Factory Mac Alternative to Convert DVD and Video on Mac easily

No Format Factory Mac version? Never mind! Free download the Format Factory for Mac alternative to convert DVD and Video on Mac OS X.(Yosemite supported)

Format Factory is free multimedia converter that can convert video, audio, and picture files. Just as we know, it only works on Windows and there is no Format Factory Mac version. In this case, Mac users have to look for an alternative of Format Factory Mac. Here we will introduce a Format Factory Mac alternative to you to easily convert DVD and Video on Mac.

Format Factory Mac Alternative


Anyway, to download Format Factory for Mac for DVD/Video Conversion can be a Walkover as long as you own a video converter designed for Mac OS specifically. It is not so easy to find a free yet effective video converting toolsPavtube iMedia Converter for Mac can be the ultimately professional yet effortless-to-use Mac Format Factory alternative that lets you convert all videos like AVCHD, MTS, M2TS, MKV, WMV, MP4, MOV, FLV, AVI, etc to your Mac system and even Blu-ray, DVD videos with optimal outputs: Apple ProRes, DNxHD, Apple InterMediate Codec, iPhone, iPad, iPod, Android, etc. Plus, with this video app adds more features like editing, adjust video/audio settings and more.

Comparison between Format Factory and Alternative to Format Factory for Mac

Alternative to Format Factory for Mac

Pros:

  • Mac version (Yosemite included) and Windows version (Windows 10 included) are available;
  • Convert nearly all kinds of video and audio formats, even 2D/3D Blu-ray and DVD ;
  • Professional yet easy-to-use, fast conversion speed, 100% original quality, totally clean and safe;
  • Freely take a snapshot of your favorite movie to share with your family and friends; or preview the videos and audios in various formats;
  • Create 3D video out of original Blu-ray and DVD;
  • Edit video and audio in the following aspects: trim, crop, merge files into one, add subtitle/effect/watermark, etc;
  • Extract audios from almost all kinds of video files;
  • Output devices: all iDevice including iPad/iPhone/iPod, Apple TV, PS3, Xbox, Wii, PS vita, Samsung, HTC, BlackBerry, Google, Sony, etc.

Cons:

The trial version of Pavtube includes a watermark on the converted file.

Format Factory

Pros:

  • Format Factory is totally free;
  • Support converting between all popular video/audio/picture formats;
  • Support ripping DVD movies to video files;
  • Support basic editing functions like: rotate, add watermark, scale, merge, split, etc;
  • Support iPhone/iPad/iPod/PSP as the output device.

Cons:


  • Only has Windows version so that Mac users can't use it;
  • Is not stable and crashes suddenly and constantly;
  • Install adware in order to generate revenue for its author;
  • Sometimes the app fails to convert a media file to your desired format;
  • Does not support selecting multiple files from your media directory;
  • Does not support converting some YouTube MP4 files;
  • Can't show the thumbnail of the converted video;
  • There is no resume or pause button to control your file conversions.

Use Format Factory Alternative for Mac to Convert DVD and Video

Step 1. Import your video files to this Format Factory Alternative for Mac

After running this app, click Add button to import the local video files you want to convert.


Step 2. Select output format

Click the "Format" bar, you can get the optimal presets for Final Cut Pro, iMovie, Adobe Premiere Pro, Avid Studio, etc. Besides, some common videos like MP4, MOV, MKV, FLV, WMV, AVI, etc. are also provided.


Step 3. Start DVD and Video Conversion on Mac

Finally click on the Convert button to transcode your video files to the preferred output format without least quality loss.

Some more helpful features of the Best Alternative to Format Factory Mac:

1. Edit your video files (Optional)

If necessary, you can perhaps try to edit your video files with the video converter Mac. You can easily trim, crop, add effects, subtitles to your source files.

2. Advanced video, audio parameter settings

If you need to change your video's resolution, frame rate, bit rate or audio sample rate, audio channel, just click on Settings.

When the conversion finished, click Open button to get the resulted files easily. You can convert and play kinds of videos on Mac OS X (Yosemite included) freely.

More related: 


Monday, February 9, 2015

Copy/Convert DreamWorks DVD movies for watching effortlessly

Are you searching high and low for a way to rip, convert and copy your DreamWorks DVD collection for easier store or playback? If so, get the quick fix from this article.

For most movies fans, DreamWorks Animation may be quite familiar since it is a world-famous animation studio that creating a bunch of animated feature films, television programs, and online virtual worlds.

However, when it comes to watching latest DreamWorks movies in theater, you may inevitably miss some of your favorite ones. Then you will choose to buy some DreamWorks DVDs like How to Train Your Dragon 2, Rise of the Guardians, Shrek Forever After, etc. for watching to make up for this pity.

Copy/Convert Disney DVD movies for watching

In this case, most people are troubled by finding out the needed DreamWorks DVD in time from a pile of DVDs. On one hand, DreamWorks DVD collection takes so much space that it is difficult store. On the other hand, it needs DVD drive or DVD player to play DVD videos. If you want to enjoy recent DVDs on tablet, you have to backup these DVDs to hard drive first.

Try some freeware to do this job but get disappointed? Since as you know, DreamWorks DVDs is copy protected, which most DVD ripping tools can't deal with. For example, the freeware like Handbrake and Freemake Video Converter can only deal with the non-protected DVDs and DVD Decrypter, like DVD Shrink, although can decrypt protected DVDs, but they upgrade very slowly and can do nothing about the latest released DVDs. Also even some paid DVD ripping programs can't successfully finish this task.

What you need is a more professional DVD ripping tool. Unlike the free DVD transcoder software, Pavtube DVDAid is an intelligent DVD copy and ripping tool that is very easy to use. It has already successfully ripped several new released DreamWorks DVD movies to decent format MP4 I need and other formats like MKV, AVI, WMV, MOV, M4V, FLV, etc. Also the converted DVD quality is quite satisfactory; you even cannot notice the difference between the original DVD and the ripped version. If you are Mac users, please turn to DVDAid for Mac. Now download the right version and start the conversion.

How to convert DreamWorks DVD movies to video/audio files

Step 1> Import DreamWorks DVD movie

Insert the DreamWorks DVD disc into your computer's hard drive and run the DreamWorks DVD Ripper. Then click "Load DVD" and import your DVD movies. You can also add DVD folders, ISO image files or IFO files to rip.


DVD to Plex Ripper

Step 2> Choose output format

Click "Format" bar and select the output video/audio format you like. You can either choose MP4, MOV, AVI, WMV, etc. as the output format.


Plex Media Server video format

Tip: If you can also select the icon of a device/software to get videos with optimized settings for a certain device/software like iPhone, iPad, iPod, Samsung, PS3, etc.

Step 3> Start ripping DreamWorks DVD

Click "Convert" button to start the DreamWorks DVD ripping process. After the conversion completes, you can click "Open" to get the ripped media files. After that, you can enjoy DreamWorks movies anywhere you want them.

Tips: If you want to 1:1 copy DreamWorks DVD to hard drive without anything loss, please go to the way backing up DVD in Video_ts folder.

More related:  

Friday, February 6, 2015

Backup 2015 Oscar Video from YouTube for watching on mobile devices

Here is a guide of how to backup movies performed by 2015 Oscar film Winners and Nominees from YouTube for watching on mobile devices for watching at free will.

The nominees of the 87th Academy Awards were announced on Jan,15th, one month earlier than the final ceremony which will be launched on February 22, 2015 at the Dolby Theatre in Hollywood, Los Angeles. Although the final ceremony of the 87th Oscars is still a while to go, audiences are able to enjoy those nominees they've missed from various online channels, like YouTube.

Backup 2015 Oscar Video from YouTube

All the 2015 Oscar awarded and nominated films from YouTube are worth collecting, if you have downloaded some of the YouTube movies onto computer with a YouTube Downloaders, it is a great way to copy them onto mobile devices, then you can watch them anytime anywhere you like on the go.

Obviously to backup 2015 Oscar YouTube Movie to mobile devices for future watching with your family, you need a third-party software at first. Well, masses of tools like Xilisoft Video Converter Ultimate, Handbrake can be found on the Internet that makes it reasonably easy to convert 2015 Oscar Video from YouTube for storage. But you know, not all the tools are good enough and with no quality loss.

Here the best one I tried is Pavtube Video Converter Ultimate which can do us such a favor in converting 2015 Oscar YouTube Video to AVI, MP4, MPEG(2), MOV, WMV, FLV, ISO image, or other digital video files for watching 86th Academy Awards Best Pictures on Apple TV, iPhone 6/6 Plus, iPad Air 2/mini 3, Android, iPod Touch, Samsung Galaxy S3/S4/S5, Note 4/Edge/3, Kindle Fire HD, Xbox, PSP, and so on. Plus, you can edit video to get clips of your favorite scenes from a movie before conversion. Mac vesion is here. In this article, I'll show the best way to backup 2015 Oscar Video from YouTube for watching on mobile within four simple steps.

How to convert downloaded 2015 Oscar YouTube Video to mobile devices with Ease

Step 1: Import FLV files from YouTube.

Launch the best mobile YouTube Converter. Click the button “Add Video” to add YouTube video files. If it is necessary, you can double click the each file to have a preview.

Tip:
If you have several video files, and wanna combine video files for mobile devices, you just need to tick off the “Merge into one” box.

Step 2: Select an output format and set the output folder.

Click on the dropdown menu of “Format” and then move your pointer to “Common Video” and choose “H.264 HD Video(*.mp4)”, “MPEG-4 HD Video(*.mp4)” are compatible format. And then you can set the output folder.


Step 3: Click “Settings” icon to adjust audio and video parameters for mobile devices.

Click the “Settings” icon and you will go into a new interface named “Profile Settings”. You can adjust codec, bit rate, frame rate, sample rate and audio channel in the interface according to your needs and optimize the output file quality.

Step 4: Start converting your 2015 Oscar YouTube flv videos to mobile MP4.

Click the “Convert” button; it will convert 2015 Oscar videos from YouTube to MP4 for mobile devices immediately. Once the conversion is done, you will be able to get the output files via clicking on “Open” button effortlessly.

Tips:

If you wanna convert 2015 Oscar Video from YouTub to audio files, iTunes, Windows Media Player, Video Converter Ultimate is also of great help. Why do you still hesitate? Download and begin the enjoyment now! As you see, watching YouTube video on mobile devices without limitation is quite a piece of cake!

More related: