Wednesday, November 12, 2014

Natively View DVD ISO/IFO Files on Nexus 9

From this article you will get best solutions on how to view DVD ISO/IFO files on Nexus 9 with ease? Do you want to have a look?


How much do you know about Google Nexus 9?
Brief introduction you can read here. The Nexus 9 was available for pre-order starting October 17th, and it will be available in the Play Store as of November 3rd. Of course it comes with Android 5.0 Lollipop which was just announced as well, next to the Nexus 6. Nexus 9 comes boasting an 8.9 inch IPS LCD display. It will arrive with a magnetic keyboard case which turns into a make-shift laptop in a cinch. Google is really pushing this tablet as a tablet for work, breaking into a new market in my opinion. 

Something Nexus 9 cannot handle well:
However, as I know, for almost all tablets on market, you won’t successfully work ISO/IFO files with them, fight? Also, Nexus 9 is included. With the traditional MP4 format as the best maybe you need a DVD ripper as the assistant. Let me introduce you one here: Pavtube DVD to Nexus 9 Ripper, such a professional converting tool specially for ISO or IFO files.

Supported OS: NT/2000/XP/Vista/Win7/Win8/Win8.1/Win10

According to the instructions, you can download the program and let your DVD ISO/IFO files in with the button ‘File’ on left corner. Then on the output list you can easily find the ‘Android’>>’Google Nexus 10 H.264 Video (*.mp4)’ as the best. The following screen can show you the correct way.


Next, it you need, you can go to the ‘Settings’ item for advanced adjustments to change the video encoder, frame rate, resolution, etc. Remember the file size and video quality is based more on bitrate than resolution which means bitrate higher results in big file size, and lower visible quality loss. 


Tips: If you want to watch Blu-ray files on Nexus 9, maybe this program won’t work well. Pavtube MDMagic is another choice.

Any questions or comments you can leave them below, or you can click the ‘Convert’ button to start your work after preparation.

More:

Monday, November 10, 2014

Load YouYube Videos to iTunes (M4V,MP4, MOV) on Mac?

As YouTube fans, you must want to know how to download your YouTube Videos to iTunes as M4V, MP4 or MOV, let’s together see how-to.


Why we all love YouTube so much? Mainly we get the fun or significant information from YouTube and it is so hot! Sometimes, we would download YouTube videos for a enjoyment on our handle tablets or phones, right? But the only disappointing point is that we can't enjoy these YouTube videos offline. And as Mac users, we used to use iTunes to manage our media files including video and audio files.

For those Mac users, it would not be easier to load videos or music to iTunes and import them to iPhone or iPad, etc. Today, what I want to tell you is how to make YouTube videos compatible with these devices. The professional easy-to-use YouTube to iTunes Video Converter for Mac can do you a big favor with a hassle free experience. It offers you ultra-fast conversion speed, loss-less video quality, extremely easy conversion steps. Let’s see how it works:

Firstly, load your YouTube video files to this program. When you downloaded the YouTube videos on your computer, just directly drag or drop your YouTube videos to the Mac application. Or you can tap the ‘Add Video’ and ‘Add from folder’ to the successfully put your files in.


Next, let’s select the compatible output formats for iTunes. For example, go to the ‘Common Video’ to select ’M4V MPEG-4 Video (*.m4v)’ as the best. In other ways, you can search ‘MP4’ or ‘MOV’ in searching box there, any output formats there for Apple devices id okay!


Note: Have several FLV movie clips and want to combine all of them so that you can enjoy a long movie without interruption? Just check ‘Merge into one’. The smart YouTube to iTunes Mac software additionally offers some useful edit functions to enhance your video


Finally, when we have all the preparation done, we can tap the ending item ‘Convert’ to finish our work. If you have any other opinions or suggestions, you leave them below and we will give you response as soon as possible.

For more?

Thursday, November 6, 2014

Download YouTube Videos to Windows Media Player for Enjoyment

You said you got a hobby of watching YouTube videos? Read the article below and know how to watch them on Windows Media Player.


Surely if you indeed have the hobby of watching YouTube videos on Windows Media Player, it is possible after installing some basic packages. It will bring some incompatibility issues if not sorted out in advance. For smoothly watching YouTube videos on Windows, all you need to do is turn to a good YouTube to Windows Media Player Converter.

This article has all the information you need to know about that and will be a proper guideline to use. If you already have some YouTube videos in your hard drive and want to watch them in Windows Media Player. There is theYouTube Video Converter will do all that right from the browser. It will convert to popular formats like 3GP, MOV, MP4, AVI, RM, WMV, M2TS, MPEG, TS and ASF in a quick and easy way. Now click the Download button below to get the program.

Some Steps you may know for watching YouTube videos in Windows Media Player.

The first thing will be adding all the files to the converter and you will have to browse them from the right folder. You can achieve the goal by clicking the ‘Add from folder’ on the bottom left corner. Alternatively, you can also drag and drop the files to the program. The added files will be listed in the video library as thumbnails. Next, just go to the output list to get the ‘HD Video’>>’H.264 HD Video (*.mp4) as the best output one.


For some advanced users, ‘Settings’ or ‘Editor’ will be a better place before you planed to click the ‘Convert’ button to start your work. Make some personal adjustments for a nice enjoyment on Windows Media Player, so we also called the program as ‘tiny editor’, is that awesome?

Expires on November 10th, in last several days, all you guys can enjoy a 50% off discount on this ‘Promotion Page’. The first one is what you need! Hurry up!

Tips: Also five common problems you may get when working Windows Media Player. Take them for a reference?
1) Poor internet connection is one of the problems encountered with Windows Media Player. It is always smart but can fail to connect automatically in a few cases and will send a notification to that effect.
2) The second problem is corrupt Windows Media Player library. If this happens, you will be unable to access your stored files or even add new ones.
3) Thirdly, you are likely to experience interrupted playback especially when you are streaming videos with Windows Media Player. The performance of the media player will be greatly affected leading to slowed video buffering.
4) The fourth problem that you need to know about is CD ripping error which makes it impossible to extract audio files from the disc. Generally, it is a trouble-free mission when ripping CDs using the Windows Media Player and this problem occurs in selected instances.
5) Lastly, you can have the Windows Media Player freeze out when playing on a full screen mode. This will be nagging to those people who like enjoying their videos on full screen mode. The problem is majorly caused by incompatibility between the video format and the player which can be prevented by converting the files in advance.

More:

Wednesday, November 5, 2014

Again Celebration of Halloween Converters Promotion by Pavtube Studio!

This paper mainly tells us the introduction of several popular video converters on Pavtube studio which also has the Halloween discount!


Searched online, you guys may know so many popular videos converters that can especially meet most photographers or video editor’s requirements. With different functions or prices, it is hesitating for us to make some decisions, right? Follow the 2014 Halloween which past only several days, here we introduce some Pavtube Video Converters with special Halloween discounts. More details on Halloween Topic Page?

Pavtube MTS/M2TS Converter for Windows/Mac, especially for converting MTS/M2TS/M2T/TS/AVCHD/MOD/TOD footage to almost all video formats. What’s more, so many popular editing tools or media devices you can find listed on output items in this program. What else we also call it as a simple editor because you can adjust your files in ‘Editor’, like trim, crop, subtitles, etc. Let’s just make our MTS/M2TS compatible with everything.

Pavtube Video Converter for Windows/Mac, which is a functional assistant that can handle almost all HD/SD audio/video formats. For another way, it’s the best one for Tivo/DVR recordings. So other items you can have a try on main interface such as ‘Settings’, ‘Editor’, ‘Merge into one’, etc. All Windows operation it can work well. Also, GPU acceleration technology is available. For example,  iPad Air 2, iPad Mini 3, iPhone 6 plus, iPhone 6, Galaxy Note 4, Galaxy Note Edge, Nexus 6, Nexus 9, Kindle Fire HDX, Surface Pro 3, etc are offered there.


Pavtube HD Video Converter for Windows/Mac, the biggest highlight this one can handle HD digital camcorder footages such as AVCHD (MTS, M2TS), MXF, MOV, etc. Others? Deinterlace to get the better video, advanced adjustments for some professional video editors, wide range of outputs and supported devices, etc.

Pavtube MXF Converter for Windows/Mac, especially designed for MXF footages which shot by MXF cameras. For example, it can convert MXF files for free playback on iDevices, Android devices and media players. Furthermore, MXF files batch conversion can be also supported. Is that cool?

Pavtube MXF MultiMixer/iMixMXF, do you know the biggest characteristic of this program? Keep multiple audio tracks/channels in multi-track MKV/MP4/MOV formats, surely with rich editing functions. On the output list, you can find the item ‘Multi-track Video’ that other products don’t have. Others for example, batch conversion, merging and splitting. 
For Blu-ray or DVD rippers, you can also see here. Pavtube DVDAid for Windows/Mac or BDMagic for Windows/Mac. I’m sure it can meet your needs such as ‘Copy’ files, rip DVDs or Blu-rays, etc.


Whatever video formats shot by cameras you wanna edit for a nice enjoyment or upload on websites, the programs we mentioned above can do you a big favor. For now, I have to mention here is to celebrate the 2014 Halloween, such a big discount on this paper! 50% OFF on all BD/DVD or Video tools! Only 5 days left! What are you waiting for?

Monday, November 3, 2014

What Are 10 Easy Steps for Editing Sony F3 XDCAM Videos in FCP 7?

This guide can generally tell you 10 easy steps for editing Sony F3 XDCAM videos in FCP 7 and the introduction of another converter.


‘XDCAM Transfer’---an efficient and simple tool provided by Sony.
Cause XDCAM footage recorded to SxS cards which shot by Sony PMW-F3 camera can’t work well with these files natively. Sony has provided an efficient and simple tool called ‘XDCAM Transfer’ that addresses this exact problem. Now let’s see together how to get XDCAM videos accepted by FCP 7 with this transfer.


1. Install required software (listed below) and reboot as needed.
2. Open XDCAM Transfer.  
3. From the XDCAM Transfer menu, select “Preferences”.
4. On the Import tab, set the folder that the transferred material will be saved to, and close the Preferences menu.
5. In the main XDCAM Transfer interface, click the Add button in the bottom-left corner.  
6. Browse to either a mounted SxS card in a card reader, or a copy of the “BPAV” folder that was saved to a hard drive on-location.
7. Click on the new item in the left “Source” pane, then select “Import All Clips” from the File menu.
8. Open Final Cut Pro 7.
9. From the File menu, select “Import”.
10. Select the clips from the import folder you specified in your XDCAM Transfer Preferences menu.  Now you’re ready to edit!


Tips: This workflow is only for Intel based Macs (MacBook Pro Laptops and MacPro Towers) with OS X v10.5 or later and Final Cut Pro 7 installed.  This procedure will not work for PowerMac systems or Final Cut Pro 6 users.

Due to the disadvantages we saw above, any other methods we can easily import Sony XDCAM files in FCP 7? Fortunately, here we introduce you the Sony XDCAM to FCP Converter for Mac to do you a big favor. To celebrate the 2014 Halloween , you may now get the big discount on Halloween Topic page. Buy one Get one Free? You can get another DVD Creator for Mac free if you buy this product with one offer only expires on November 10.

Convenient steps are followed here with the screenshots, download the program and load your files in with two items called ‘Add video ‘or ‘Add from folder’. Especially for FCP, there are several types on the format list like ‘Final Cut Pro’>>’Apple ProRes Codec 422’, etc. If you get the preparation done, you can click the ‘Convert; button to start the conversion. Otherwise, ‘Settings’ or Editor’ items you can walk in for a further exploration. 


Additionally, this program has been already tested for the new operation Mac OS X 10.10 and it works well. Any opinions or suggestions you can leave the comments below.

Related:

Saturday, November 1, 2014

Five Alternatives---Just Say Goodbye to the Optical Disc

With more storage tools nowadays, it’s time to say goodbye to the traditional optical discs.

With computers growing smaller and lifestyles going mobile, less and less devices offer sufficient space for internal optical drives. Presently, the market is kept afloat by Blu-ray consumer home video sales, but in terms of data storage, optical discs are slowly becoming obsolete.

How much do you know about optical disc?
Optical discs have a storage capacity of up to 50GB (Blu-ray) and at around $0.08 per GB they remain one of the cheapest ways to store data. Under optimal conditions in terms of temperature, humidity, and handling, Blu-ray discs can last over 50 years, an impressive number. The question is whether those drives will still be available in a decade or two from now and at what point it is smart to switch to another storage medium.

Five options to say goodbye with optical discs?

No.1 USB Stick
Since lifetime depends less on climate and storage conditions, but primarily on the amount of times data are written to or erased from the drive, flash drives theoretically could have a longer lifetime than DVDs or Blu-ray discs.  However, flash drives are significantly more expensive per GB.


No.2 SD(HC) Card
This is the most portable alternative to optical discs. With regular storage sizes between 16 and 64GB, SD cards are also comparable in size. Moreover, SD / SDHC cards require an SD / SDHC card reader or an adapter.


No.3 (HDD) External Hard Drive
They cost less, offer a much higher storage capacity, and are essentially compatible with any device that sports a USB port so external hard drives are the cheapest alternative to optical discs. The biggest issue, however, is the vulnerability of HDDs. They are easily damaged by physical shock, which makes them suboptimal for transporting data. Moreover, their operation relies on moving parts, meaning each use increases the likelihood of hardware failure.


No.4 External Solid State Drive (SSD)
In terms of price and durability, SSDs are similar to thumb drives or SD cards: expensive, but potentially long lifetime. SSDs are available with larger storage capacities than other flash-based storage devices, however, this also comes at a higher price.


No.5 Cloud Storage
Storing your data in the cloud is the most convenient way to backup, share, and keep your data with you, provided you have access to the internet. However, this is only practical for small amounts of data. If you have more than a few GB, it can get very expensive as fees are due monthly or yearly, for as long as the storage space is needed.


However, how could we rip our DVD or Blu-rays to common videos if we have already got some discs which cannot be store with convenience? Here, we may also provide you a professional DVD or Blu-ray ripper called Pavtueb ByteCopy for Windows/Mac for you.

Advantages: Such as copy Blu-ray/DVD with 1:1 quality, directly copy the main movies to save the storage, rip compressed movies without limited, with multi-track converted, etc. It’s just a functional BD/DVD ripper that can meet almost each user’s needs. Additional surprise here! To celebrate the 2014 Halloween expires on November 10, Pavtube studio held the promotion discount called ‘Buy one Get one Free’, you can get more details on Halloween Topic page. 

What are you waiting for? Just enjoy your discs in some different ways, is that awesome?

More?

Friday, October 31, 2014

How to Install OS X Yosemite & Save the Installer

With the hot wave of Apple’s release of iOS 8 and the latest release of OS X Yosemite, here we may teach you how to correctly install it on your Mac.

With the latest iPhone and iPad released by Apple company, all the Apple fans are fond of the new devices. Hot on the heels if iOS 8 and a couple of new iPhones comes Apple’s latest release of OS X 10.10, codename “Yosemite”. However, how much do you know about the OS X Yosemite?

According to the announcement by Apple, this new system is free, comes with a brand new look, and is packed with features and security improvements over its predecessor, Mavericks. Here’s how to install it right now, as well as a look at the latest changes in Cupertino’s hardware line-up. Here maybe you can know more.

What noticeable changes you can see in the OS X Yosemite?
Comparing to the Apple’s iOS 7, it contains a brand new look that more closely resembles the bleeding transparency seen in former. Continuity, which allows you to seamlessly switch from mobile to desktop use; and iCloud Drive, which is a long overdue way of managing the cloud data you have stored with Apple.


OS X Yosemite is compatible with the following ones:
  •  iMac (mid-2007 or later)
  •  MacBook (13-inch aluminium, late 2008; 13-inch, early 2009 or later)
  •  MacBook Pro (13-inch, mid 2009 or later; 15-inch, mid 2007 or later; 17-inch, late 2007 or later)
  •  MacBook Air (late 2008 or later)
  •  Mac Mini (early 2009 or later)
  •  Mac Pro (early 2008 or later)

How to download it & save the installer?
The free update can be found in the Mac App Store, simply launch it on your Mac and head to the Updates tab. Hit Free Upgrade, enter your Apple ID password, and Yosemite will download its installer to your Applications folder. When the download is complete, the installer will automatically launch, but you can close (or ignore) it.


Tip: If you have multiple Mac computers in your household, you will probably want to make a copy of the installer. You can do this by holding the option (also known as alt) key and dragging “Install Yosemite” from the Applications folder to another location so you can install it on your other computers without having to download it all over again.

Installing Yosemite?
You should back up your Mac with Time Machine before you perform any major upgrades, just in case. Once downloaded, you can install OS X Yosemite by running the “Install Yosemite” application, which will delete itself on completion. The whole process takes somewhere around 20 minutes, and when your Mac restarts, you’ll be able to start setting up Yosemite.

Something you should do next:
When you are be able to agree to some updated terms and conditions and begin using OS X Yosemite. Check out the new look and feel and the just follow the options.


Additionally, If you have an iPhone running iOS 8, you’ll now be able to take phone calls on your Mac or respond to text messages from any of your contacts using your keyboard.Don’t forget to check out the full list of changes in OS X Yosemite, and catch the full iOS 8 low-down too if you’re iPhone- or iPad-inclined.

How to transfer files from iTunes to iPhone? You may check it out here! So what are you waiting for? Just upgrade the OS X Yosemite and enjoy the fun!

Wednesday, October 29, 2014

How to Install Spooky Halloween Windows Themes & Sound Effects

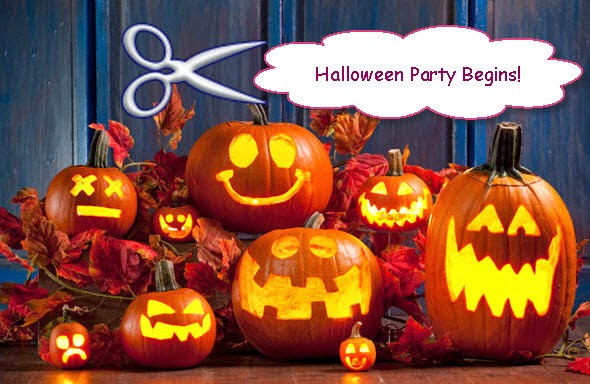
You must have got the idea well on how to celebrate the coming Halloween, here we have another interesting idea, Do you want to know?


On November 10, Halloween will upon us once again! Are you ready? In order to enjoy ourselves and have fun in Halloween, many tricks we have played at that time, such as the typical game ‘Trick or Treat’? Pumpkin mask or Halloween candies? By the way, form the Halloween Topic here, you may know more about it!

Today here we can teach you another creative idea of celebrating Halloween. Install Spooky Halloween Windows Theme & Sound Effects!(only for Windows users) Is that awesome? Day of the Dead celebrations and hordes of children attacking your homestead. Windows is surprisingly customisable. We show you how it’s done, including themes you can use.

1.Choosing a Windows Theme Pack
You need to locate a Windows theme pack before turning your desktop into the nightmarish experience you require. Tips: Most theme packs are currently only developed for Windows 8.1/8, Windows RT8.1/8, Windows 7 Home Premium/Professional/Enterprise/Ultimate.

If you think the theme is too mild for your viewing pleasure, we have selected other themes from the Windows download center, which has a great selection of Windows verified themes waiting for you. For example here:

Ticket to Fear---is a little darker than our selection and the previous entry, but this is perfect for the real horror fans amongst us:


Halloween Theme---comes from an external source and, to be honest, offers the weakest visual package. However, it does redeem itself with a version of the ‘Halloween’ theme music and some wolf howls, so it could be worth a look:
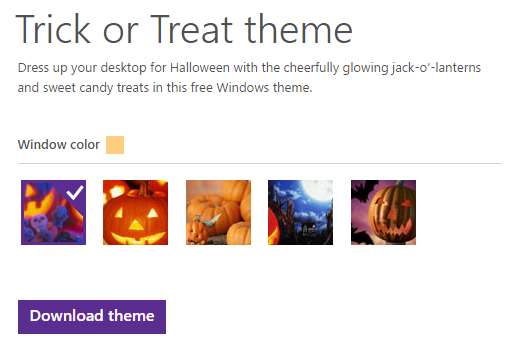

2.Select and Download
Luckily, for changing your Windows theme, Microsoft don’t want us rooting around in the depths of our operating systems and as such have made it extremely easy for us to change themes on the go.

We need to download our theme for a first step:


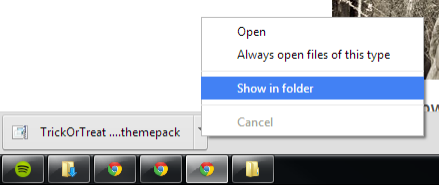
Click the ‘Download’ button and wait a moment we need to locate our Windwos theme pack file.  right-click the notification bar to bring up a context menu, like so
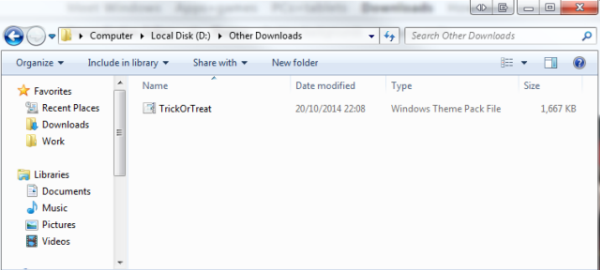

3.Install your Theme
Selecting ‘Open’ will immediately execute the file. If you have the correct version of Windows installed (See Choosing a Windows theme pack) it will instantly install the theme and update your desktop. Selecting ‘Show in folder’ will open your download folder where you can access your file. Once in your download folder, you can double click the Trick or Treat theme pack.


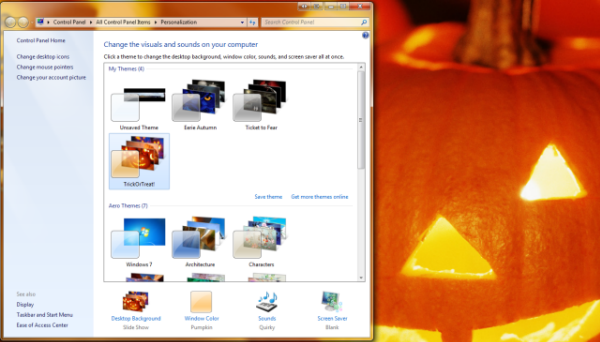
Which will install your theme, turning your desktop into a delightful Halloween themed affair with pumpkins and owls, or zombies and ethereal theatre attendants, depending on your theme choice. If you have followed the tutorial your desktop should now look like this:


The theme has automatically changed your personalisation settings for Desktop Background, Window Colour and Sounds. If you install any other Windows theme packs you can access them through the Personalisation window, found in the Control Panel or by right-clicking the desktop to access the context menu.

4.Non-Windows verified installations
Now, we mentioned earlier that you should be careful when accessing downloads outside the verified Windows offerings. You should, but it doesn’t mean you shouldn’t go looking for additional Halloween themes.

This Halloween Skin Pack is a total skin conversion – that is, on installation, the theme completely changes the entire Windows ecosystem: your Taskbar, Start menu, window color, sounds, pointers and more. There a couple of major differences here for you to consider:

1.Theme packs change your theme – window colour, sounds etc. The Skin Pack modifies lots of different aspects of Windows. Consider if you want your entire system to be terrifying.
2.Skin Packs usually require additional software for optimisation and as such, instead of a single click installation usually require an installer containing the different pieces of software for the theme to run. 3.This can contain additional docks, start-menu replacements, boot screen modifications and more.
4.Always read the comments section of any site before you download!
Make sure to set a system restore point before installing any non-verified theme pack.

If at any point you wish to uninstall just head to:
Control Panel\All Control Panel Items\Programs and Features
And find ‘SkinPack Halloween’ with your corresponding version, select all options and hit uninstall:

5.All the Spooky Sounds
Perhaps the best part of modifying your Windows theme is the sounds. Our example theme pack, Trick or Treat, comes with 12 new sounds that you can access through the personalization panel you can see in the following screenshot:


The sounds installed for the Trick or Treat themes are called ‘Eerie Autumn’ and you can cycle through the complete range in the drop-down menu located at the bottom of the sound properties window. Personal favorite in this collection:

Play around with the other themes we have linked, as they all come with a custom sound set designed to change several of the core Windows sounds we are accustomed to. The same can be said of the non-verified Windows theme packs.

Now, are you all ready for the next Halloween with a distinctive celebration? Come on guys! Let’s enjoy a big party now!

More guides:

Monday, October 27, 2014

Recommendation of 10 Creepy Halloween Wallpaper Images For Your Desktop

We here have recommended top ten creepy wallpaper images for your desktop or start screen, would you like to have a sharing?

After several days the biggest festival---Halloween is coming! So are you ready to how to celebrate it in a special way? Today here, we will show you the most popular creepy Halloween wallpaper images for your desktop, I’m sure you will be shocked by these amazing pictures!

NO.1 GoodFon
Here you can search wallpapers by keyword in a specific category, sort by relevance, downloads or rating, etc. For example, the following picks are coming from GoodFon. All are available in a number of different resolutions. The one best matching your screen is selected automatically. To download another resolution, pick from the ‘Select Resolution’ drop-down menu or manually change the size; both options are available in the bottom right corner.

Girl with Crows:

Burning Scare Crow:


Castle and Night Owl:


No.2 Zastavki:
With rich contents on this website, you can search by  keyword, then sort by date, downloads, rating, or randomly. The results page is relatively plain, but the selection makes up for that. All images come in various resolutions, which are listed in the bottom right of the wallpaper page. As the following examples:

Halloween Celebration:


Ghost Bride:


No.3 Desktop Nexus
It is still one of the better resources for wallpapers. Pick a wallpaper you fancy, then either click Enlarge Wallpaper (bottom right of image) or Download Now! (right-hand sidebar). If the automatically detected resolution isn’t right, click Options (top of new windows) to select the right size. I’m sure it won’t let you down.

However, some images are automatically blown up in size, even though the original resolution is much smaller. To avoid a blurry wallpaper, make sure the original resolution isn’t smaller than what you’d like to download. Since the site doesn’t offer great sort options, I went out and looked for the best and most recent Halloween-related downloads to share with you. Just as follows:


No.4 Wallpapers Wide:
This one has a vast  selection of high resolution wallpapers. You can browse by categories, latest, top rated, or keyword. To hover over the thumbnail, click the title area (red frame in screenshot below), and pick a resolution from the list. It’s the best method of selecting wallpapers. It’s so horrible that do not be scared of them.


No.5 Wallpapr
This is a wallpaper search engine using wallpaper groups on Flickr. Results are limited to 100, which is plenty. Wallpapr’s best feature is the lack of annoying ads. This one looks great on the Windows 8 and 10 Start Screen, if you only have apps listed on the left-hand side. Just like this;


Tips on how to change your wallpaper in Windows:
Method one: The lazy way is to open the folder it downloaded to, right-click it, and choose Set as desktop background from the menu.


Method two: If you would like to rotate between different wallpapers, I recommend another route. Search fordesktop background (Windows 7 & 10: Click Windows key and type away; Windows 8: Click Windows key + S, make sure to search everywhere or Settings, and type your query), then open Change desktop background from results. Here you can switch the picture location of your wallpaper to a dedicated folder, filled with your favorite Halloween or other desktop backgrounds


Then you can set your the picture position and choose how often your desktop background should change.


Hey, guys! All of you are getting ready for the coming of Halloween? If you wanna record some Halloween videos, here also we can recommend you the Pavtube HD Video Converter to convert your videos in order to share or upload on website also with another for free! Let’s just have revelry Halloween Topic!

More:

Friday, October 24, 2014

How to Rip Blu-ray/DVD/ISO to Sony Xperia Z3/Z2

The article guides you how to rip and convert Blu-ray/DVD movies to Sony Xperia Z3/Z2 supported video formats on both Mac and windows easily.


Nice enjoyment of Sony Xperia Z smart ohones
As one of the best Android smart phones, the Sony Xperia Z comes with a 1080p “Reality” high resolution 5-inch widescreen, which gives users a good movie experience. There are many choices to enjoy movies with Xperia Z. However do you know the best video formats exactly for Sony Xperia series? MPEG4, H.263 or H.264, several video codec that it supports for the best.

Can Sony Xperia play Bly-ray DVD or ISO moives?
To be honest, sometimes, we can’t avoid to enjoy the some good movies that released recently or Blu-rays and DVD movies, right? If you want to get your movies off of DVD, Blu-ray discs and onto the Sony Xperia Z3/Z2 for playback, you may have to do some work in advance. I mean you’ll need to rip and convert Blu-ray/DVD to Sony Xperia Z compatible video formats first since there is no BD/DVD drive on gadget. So a Blu-ray to Sony Xperia Ripper for Mac/Windows may do you a big favor.

Some main step-by-steps so necessary for you to know here:
Download the program for the Windows version or Mac version, insert your Blu-ray disc into your BD drive on your computer and run the Blu-ray to Sony Xperia Ripper. On the man interface, click the ‘Load disc’ icon to load Blu-ray files, also, such like ‘Load from folder’ and ‘Load ISO/IFO’ are available. 


Click the output format dropdown list; you’ll get a lot of choices. For converting Blu-ray to Xperia Z3 Tablet Compact, you can select “Android > Android Phones 720P Video (*.mp4)” as output format. If you want to play 1080P movies on Xperia Z3 Tablet Compact, “Android 1080P Video (*.mp4)” is a better choice.


Highlight here, if you get some 3D Blu-rays movies for conversion, you can also find the item here ‘3D Video’ on the format list.

Tip: Click “Settings” to change the video encoder, resolution, frame rate, etc. as you wish. According to video testing result, for watching videos on the Android tablet, 720p with 1500~2500kbps is just all right. 


For watching on the go if you have finished you conversion work, welcome to leave some other comments or suggestions below.

More:

Wednesday, October 22, 2014

Watch Videos on Kindle Fire HD Kids Edition in MKV, AVI, MPG, VOB, FLV, Divx

This guide can tell you how to watch various videos on Kindle Fire HD Kids Edition such as MKV, AVI, MPG, VOB, FLV, Divx.


As long as more intelligent tablets appeared on market, so many adults or even children are fond of watching movies on handle tablets, such like the special one for kids, Kindle Fire HD Kids Edition. Sometimes, when downloading the videos from website or shot from cameras, they can’t be play smoothly on this device, right? Frankly speaking, with the limitation of the formats that Kindle Fire HD tablet decides, a video converter is necessary.

Another question: Do you know exactly the compatible formats for Kindle Fire HD Kinds Edition? For a further recognization, it is listed below:

Documents: AZW, TXT, PDF, MOBI, PRC, DOC, DOCX
Audio supported within Music: MP3, Non-DRM AAC (.m4a), MIDI, OGG, WAV
Images: JPEG, GIF, PNG, BMP
Video: MP4, VP8

It doesn’t matter you have a large amount of videos encoded by MKV, AVI, MPG, VOB, FLV or Divx, etc. We here recommend you the Pavtube Video Converter for Windows/Mac, two different versions both for Windows or Mac users.

Load your source files from ‘Add video’ in this program when you have launched it on your computer. Follow my steps, on the ‘Format’ list, click the ‘Android’>>Amazon Kindle Fire HD (*.mp4) for the best. Or you can search the ‘MP4’ in the searching box.


Especially for Windows version here, we have the acceleration item in the ‘Opinions’.  Get it if there is an NVIDIA/AMD graphics card that supports CPU en-decoding acceleration installed on your computer, as the picture shows here:


Before you click the ‘Convert’ to start your work, why not make your output videos more suitable with Kindle Fire HD tablet, in ‘Settings’ button, for a reference, make the video size as 1280*720, frame rate as 29.97 and bitrates as 3000? Finally, open here to know the main methods of transferring files in Kindle Fire HD tablet.


Related articles: