Monday, February 9, 2015

Copy/Convert DreamWorks DVD movies for watching effortlessly

Are you searching high and low for a way to rip, convert and copy your DreamWorks DVD collection for easier store or playback? If so, get the quick fix from this article.

For most movies fans, DreamWorks Animation may be quite familiar since it is a world-famous animation studio that creating a bunch of animated feature films, television programs, and online virtual worlds.

However, when it comes to watching latest DreamWorks movies in theater, you may inevitably miss some of your favorite ones. Then you will choose to buy some DreamWorks DVDs like How to Train Your Dragon 2, Rise of the Guardians, Shrek Forever After, etc. for watching to make up for this pity.

Copy/Convert Disney DVD movies for watching

In this case, most people are troubled by finding out the needed DreamWorks DVD in time from a pile of DVDs. On one hand, DreamWorks DVD collection takes so much space that it is difficult store. On the other hand, it needs DVD drive or DVD player to play DVD videos. If you want to enjoy recent DVDs on tablet, you have to backup these DVDs to hard drive first.

Try some freeware to do this job but get disappointed? Since as you know, DreamWorks DVDs is copy protected, which most DVD ripping tools can't deal with. For example, the freeware like Handbrake and Freemake Video Converter can only deal with the non-protected DVDs and DVD Decrypter, like DVD Shrink, although can decrypt protected DVDs, but they upgrade very slowly and can do nothing about the latest released DVDs. Also even some paid DVD ripping programs can't successfully finish this task.

What you need is a more professional DVD ripping tool. Unlike the free DVD transcoder software, Pavtube DVDAid is an intelligent DVD copy and ripping tool that is very easy to use. It has already successfully ripped several new released DreamWorks DVD movies to decent format MP4 I need and other formats like MKV, AVI, WMV, MOV, M4V, FLV, etc. Also the converted DVD quality is quite satisfactory; you even cannot notice the difference between the original DVD and the ripped version. If you are Mac users, please turn to DVDAid for Mac. Now download the right version and start the conversion.

How to convert DreamWorks DVD movies to video/audio files

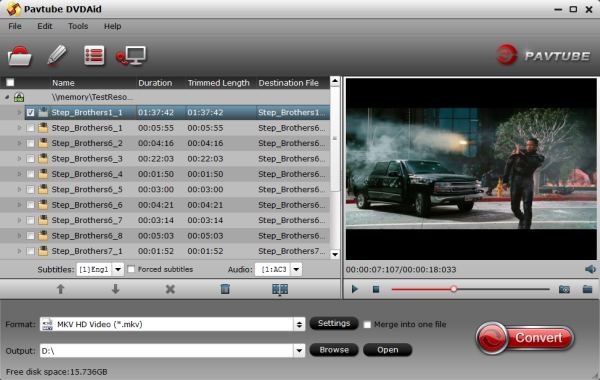
Step 1> Import DreamWorks DVD movie

Insert the DreamWorks DVD disc into your computer's hard drive and run the DreamWorks DVD Ripper. Then click "Load DVD" and import your DVD movies. You can also add DVD folders, ISO image files or IFO files to rip.


DVD to Plex Ripper

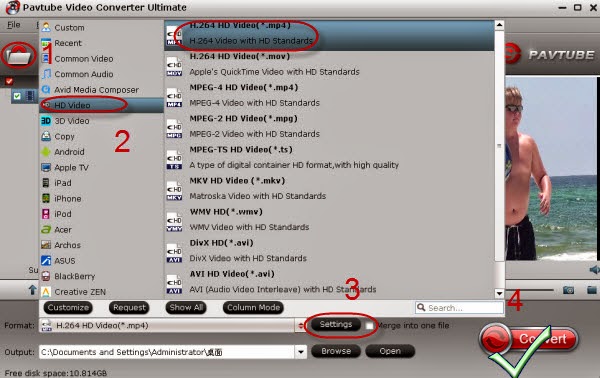
Step 2> Choose output format

Click "Format" bar and select the output video/audio format you like. You can either choose MP4, MOV, AVI, WMV, etc. as the output format.


Plex Media Server video format

Tip: If you can also select the icon of a device/software to get videos with optimized settings for a certain device/software like iPhone, iPad, iPod, Samsung, PS3, etc.

Step 3> Start ripping DreamWorks DVD

Click "Convert" button to start the DreamWorks DVD ripping process. After the conversion completes, you can click "Open" to get the ripped media files. After that, you can enjoy DreamWorks movies anywhere you want them.

Tips: If you want to 1:1 copy DreamWorks DVD to hard drive without anything loss, please go to the way backing up DVD in Video_ts folder.

More related:  

Friday, February 6, 2015

Backup 2015 Oscar Video from YouTube for watching on mobile devices

Here is a guide of how to backup movies performed by 2015 Oscar film Winners and Nominees from YouTube for watching on mobile devices for watching at free will.

The nominees of the 87th Academy Awards were announced on Jan,15th, one month earlier than the final ceremony which will be launched on February 22, 2015 at the Dolby Theatre in Hollywood, Los Angeles. Although the final ceremony of the 87th Oscars is still a while to go, audiences are able to enjoy those nominees they've missed from various online channels, like YouTube.

Backup 2015 Oscar Video from YouTube

All the 2015 Oscar awarded and nominated films from YouTube are worth collecting, if you have downloaded some of the YouTube movies onto computer with a YouTube Downloaders, it is a great way to copy them onto mobile devices, then you can watch them anytime anywhere you like on the go.

Obviously to backup 2015 Oscar YouTube Movie to mobile devices for future watching with your family, you need a third-party software at first. Well, masses of tools like Xilisoft Video Converter Ultimate, Handbrake can be found on the Internet that makes it reasonably easy to convert 2015 Oscar Video from YouTube for storage. But you know, not all the tools are good enough and with no quality loss.

Here the best one I tried is Pavtube Video Converter Ultimate which can do us such a favor in converting 2015 Oscar YouTube Video to AVI, MP4, MPEG(2), MOV, WMV, FLV, ISO image, or other digital video files for watching 86th Academy Awards Best Pictures on Apple TV, iPhone 6/6 Plus, iPad Air 2/mini 3, Android, iPod Touch, Samsung Galaxy S3/S4/S5, Note 4/Edge/3, Kindle Fire HD, Xbox, PSP, and so on. Plus, you can edit video to get clips of your favorite scenes from a movie before conversion. Mac vesion is here. In this article, I'll show the best way to backup 2015 Oscar Video from YouTube for watching on mobile within four simple steps.

How to convert downloaded 2015 Oscar YouTube Video to mobile devices with Ease

Step 1: Import FLV files from YouTube.

Launch the best mobile YouTube Converter. Click the button “Add Video” to add YouTube video files. If it is necessary, you can double click the each file to have a preview.

Tip:
If you have several video files, and wanna combine video files for mobile devices, you just need to tick off the “Merge into one” box.

Step 2: Select an output format and set the output folder.

Click on the dropdown menu of “Format” and then move your pointer to “Common Video” and choose “H.264 HD Video(*.mp4)”, “MPEG-4 HD Video(*.mp4)” are compatible format. And then you can set the output folder.


Step 3: Click “Settings” icon to adjust audio and video parameters for mobile devices.

Click the “Settings” icon and you will go into a new interface named “Profile Settings”. You can adjust codec, bit rate, frame rate, sample rate and audio channel in the interface according to your needs and optimize the output file quality.

Step 4: Start converting your 2015 Oscar YouTube flv videos to mobile MP4.

Click the “Convert” button; it will convert 2015 Oscar videos from YouTube to MP4 for mobile devices immediately. Once the conversion is done, you will be able to get the output files via clicking on “Open” button effortlessly.

Tips:

If you wanna convert 2015 Oscar Video from YouTub to audio files, iTunes, Windows Media Player, Video Converter Ultimate is also of great help. Why do you still hesitate? Download and begin the enjoyment now! As you see, watching YouTube video on mobile devices without limitation is quite a piece of cake!

More related: 


Wednesday, February 4, 2015

Copy Blu-ray/DVD movies to Seagate Wireless Plus for widely sharing wirelessly

This article shows you an easy way rip and convert Blu-ray/DVD to Seagate Wireless Plus supported video for widely sharing wirelessly on a trip.

Forget about having to choose which files to load onto your tablet or smartphone before a trip. Bring a Seagate Wireless Plus all with you! Wireless Plus has enough built-in storage like the 2TB one can load up to 500 movies or thousands of songs, photos and documents. Wanna adding your large Blu-ray/DVD collection to Seagate Wireless Plus for enjoying on trip with your family? Now learn the step-by-step guide on the way to realize.


adding Blu-ray/DVD collection to Seagate Wireless Plus

Since Seagate Wireless Plus can not meet the demands of put Blu-ray/DVD discs online, to save Blu-ray and DVD on Wireless Plus for convenient access, you need to convert and rip Blu-ray/DVD to Seagate Wireless Plus supported video files at first.

Software Requirement:

Pavtube ByteCopy or ByteCopy for Mac is such a wise choice for you. With it, you can not only rip and convert Blu-ray/DVD to Seagate Wireless Plus with super fast conversion speed and excellent image and sound quality, but also easily backup your Blu-ray and DVD disc with whole content copy or backup main movie. Best of all, you can lossless copy your discs in mkv for storage with multiple audio tracks keeping. (Read comparison review: ByteCopy & MakeMKV) Let's have a closer look at the basic steps.

How to rip and copy Blu-ray/DVDs to Seagate Wireless Plus friendly video

Step 1: Load Blu-ray/DVD movies

Run the Blu-ray/DVD to Wireless Plus Ripping program and click “BD/DVD disc” icon to load Blu-ray/DVD movies for converting. You can also import movies files from Blu-ray/DVD folder or ISO image files.

Blu-ray/DVD to Wireless Plus Ripping program

Tip: Highlight the movie title you want to rip, and then you can click the dropdown menu after “Subtitles” and “Audio” respectively to select your wanted subs and audio track to be preserved in the resulted files.

Step 2: Choose output format

As Seagate Wireless Plus is powerful enough to almost all kinds of formats, you can choose the format according to your own needs like MP4, MOV, AVI, MKV, etc. If you would like to enjoy movies from physical discs to your mobile phone and tablet, you can select a decent format like "iPad > iPad HD Video(*.mp4)" from the profile list comes with the software.

Seagate Wireless Plus supported format

Tip: Click Settings bar, you can adjust the level of compression to suit the quality you want.


Note: If you prefer a much better video quality and don’t mind the output file size, you can rise the video bit rate higher. Generally speaking, the higher video bit rate will result in the larger output file size, and vice versa.

Step 3: Rip Blu-ray/DVD to Seagate Wireless Plus

Finally, click "Convert" button to rip/convert Blu-ray/DVDs to optimized format for Seagate Wireless Plus. When the conversion finishes, click Open button to find the output files and you can do the online movie sharing via your Seagate Wireless Plus on iPad with family members and friends. Also you can stream your video onto any smart TV or devices in the house using Seagate.

More related:

Monday, February 2, 2015

How to Copy and Rip DVD to Plex Media Server for Streaming

This article mainly shows you an easy way to rip and store DVD on Plex Media Sever for free streaming, playing and sharing with your TV and mobile devices freely.

Plex is designed to organize all of your personal media so you can enjoy your movies freely on  TV, iPad, computer or phones both home and away. Have have a diverse library of DVD movies? What if we want to store DVD on Plex Media Server? No worry, the article will focus on how to rip DVD to Plex Media Sever for playing and streaming. 


store DVD on Plex Media Server
  
To get your DVD collection to Plexwhat you need to do is to convert your DVD movie library to Plex Media Server friendly format at first. There’s all kinds of different DVD ripping software out there (some free, some not) with a variety of different options. It seems a bit overwhelming. Well, more than one guys recommend Pavtube DVDAid, which can help us finish DVD conversion bypassing DVD copy protection.

With it, we can convert DVD to Plex Media Server with MP4 format (the most compatible video format for Plex Media Server) without quality loss. Plus, it also allows users to copy DVD to hard drive with original structure or main movie only. Best of all, with its built-in video editor, you can personalize and retouch your videos in clicks. For Mac users, DVDAid for Mac will be a helpful app.


How to Backup and Rip DVD to Plex Media Sever

1. Add DVD movies

Install and launch DVD Ripper program, and then click the disc icon to import your source movies to this program. Set your wanted subtitles and audio track from the drop-down box of “Subtitles” and “Audio” tab.

DVD to Plex Ripper

2. Select an output format

Click the “Format” option, and choose HD Video > MKV HD Video(*.mkv) as output format. You can also select H.264 HD Video (*.mp4) for Plex Media Server.

Or backup DVD with Main Title only and original structure for storage.

Plex Media Server video format

Tip: If you like, you can click “Settings” to change the video encoder, resolution, frame rate, etc. as you wish. Keep in mind the file size and video quality is based more on bitrate than resolution which means bitrate higher results in big file size, and lower visible quality loss, and vice versa.

Plex Media Server video settings

3. Start ripping DVD for Plex Media Sever

Click the "Convert" button under the preview window, and the DVD ripper will start the conversion from DVD movies to MKV or MP4 for Plex Media Sever. After conversion, you can stream DVD movies through Plex Media Server to HDTV or iPad, Galaxy Tab, or other DLNA-compliant devices.

More related:


Friday, January 30, 2015

Import Nikon D750 MPEG-4/H.264 videos to FCP 6/7 effortlessly

Final Cut Pro 6/7 won't import MP4 from Nikon D750 smoothly. The easy workaround is to transcode D750 MPEG-4/H.264 video to FCP "edit" friendly codec ProRes at first.

Nikon D750 is a full frame DSLR in 2014 which is possible to shoot at up to 6.5 frames per second (fps) and record Full HD video at up to 60p. It can bring outstanding videos to photographers, however it is a headache for filmmakers to edit D750 MPEG-4/H.264 video in Final Cut Pro 6/7 if they consider to splice all the material from the mov recordings to make a nice demo reel for sharing with others.

Import Nikon D750 MPEG-4/H.264 videos to FCP 6/7

Why it is a headache thing? Since H.264 codec is not a FCP native codec, you will find that you are in the rendering process forever when loading Nikon D750 mov files in FCP 6/7? Well, is there an easy way to help your out? In fact, it will not be a tricky process if you convert D750 H.264 video to FCP 6/7 editable Apple Prores Codec beforehand.

Then an easy-to-use yet efficient tool- Pavtube iMedia Converter for Mac will be a great help. With it, you can easily encode Nikon D750 MPEG-4/H.264 footage to ProRes 422, ProRes 422 HQ or 4444 for using in Final Cut Pro 7/6 and FCP X as fast and seamless as possible. Plus, the Mac video converter can also convert Nikon D750 mov to a more editing-friendly format so that iMovie, FCE, Premiere Pro, Avid Media Composer, etc can accept and afford well. What's more, it also provides simple video editing functions for you. Just download it and follow the tutorial below to convert Nikon D750 video files to Apple ProRes for FCP 6/7.

Convert and import Nikon D750 MPEG-4/H.264 video to Final Cut Pro 6/7 

Step 1: Launch the Nikon Video Converter; click "Add Video" button from main menu to browse your computer hard drive and select the Nikon D750 mov shottings you want to convert. Or you can easily drag-and-drop files into this application for converting.

Tip: If necessary, join videos clips via checking the "Merge into one" box.

Nikon Video Converter

Step 2: Click the Format bar, and move mouse cursor to "Final Cut Pro > Apple ProRes 422 (*.mov)" as output format or choose other Apple Prores options.

video codec for editing in FCP

Step 3: Click “Convert” button to start encoding Nikon D750 MPEG-4/H.264 files to ProRes MOV for Final Cut Pro X or FCP 6/7 under Mac OS X(Yosemite included).

Some more helpful features of the Nikon D750 MOV to FCP Converter:

1. Settings- click to set video resolution(1920×1080/1440×1080/1280×720/720×480), bitrate(from 1Mbps to 20Mbps), frame rate (24p/30p)

2. Editor (next to “Add Video” icon)- click to set deinterlace, trim, crop, watermark, subtitles, etc.

3. More Inputs/Outputs- this Mac video converter can also let you to convert Blu-ray, DVD and other video clips like 4K videos to FCP for editing.

Once the D750 MPEG-4/H.264 to ProRes 422 conversion is done, you can transfer your Nikon D750 footage into Final Cut Pro6/7  for editing smoothly on Mac with ease.

Read More: