Here we will get the new solution that we can’t import OBS FLV into Adobe Premiere Pro CS4/CS5/CS6/CC for editing and how to solve it successfully.As we all know, Open Broadcaster Software is a great platform to broadcast live streams, so a lot of people have an idea of recording some game or match footages to their Mac as FLV files. After that they can do some changes to make them perfect through some professional editing software, such as Adobe Premiere pro. But it seems that Adobe Premiere Pro and FLV files are not friendly to each other, this situation generally brings us bad emotion, Right?
Surely, you can do a Google search for “OBS files to Premiere Pro”, some guys have offered their solutions, for example some plugins. But in the following page, I’ll show you the first choice Pavtube HD Converter for Mac to transform OBS FLV files to Premiere Pro natively supported formats: MPG, MOV and WMV, these formats are highly recommended to you.With this convert tool, we can easily import OBS FLV files to Adobe Premiere Pro, which can also preserve the original quality. Besides, you will find some other functions about it. Just download it and follow the tutorial below to get the work done. For more specific steps, you can open here.Step-by-step guide on converting OBS FLV to Premiere ProStep 1. Load video files to the software and ensure the files in preview window.
Step 2. Clicking the Format bar, you can choose output format from the format list or customize which formats to be shown on the list.
Step 3. In the Profile Settings window, you can choose or specify exactly the parameters you like. And in the Task information section, you can compare the detailed information of the source video and the target video.
Step 4. Just click the ‘Convert’ button, the work can be done.For more details about importing medias into Premiere Pro, you can click here,How to Import Media Files to Adobe Premiere Pro on Windows/MacIf you have tried the related methods online, you’ll find this converter has a great advantage of concise operation and multiple choices. Come on! Let’s do it now!Other related guides:Free FLV to MPEG ConverterHow To Play Flash (FLV/F4V) Videos on Surface 2
If you are confused in playing 2K/4K XAVC files on Win/Mac, no worries about it now. Here we can get the way of converting XAVC to ASF/SWF freely.
‘I am looking for a converter to make my Sony PMW-F55 XAVC footages work on Win/Mac. However, Windows or Mac does not recognize the files from my camcorder. Should I convert XAVC to ASF or something else to fix the problem?’ – asked by Steven.
Do you know the XAVC is actually initially used by Sony 4K camcorders: the PMW-F5 and PMW-F55? It supports superb 4K resolution at up to 60 frames per second. Although this file format gains great popularity since its release, there is not much software capable of supporting it, such as Final Cut Pro X, Windows Movie Maker, Adobe After Effects and more. Most users know the disadvantages of 2K/4K XAVC, so they wanna transform XAVC files and preserve them on Win/Mac for further operation. What a wise idea! Right?
In order to handle the XAVC incompatibility issues, we can convert XAVC to ASF or some other common video formats, so you can use the recorded footage without limitations.Here Pavtube Video Converter Ultimate or iMedia Converter for Mac are designed for both Windows or Mac fans. It can help us make 2k/4k XAVC work on Win/Mac through several simple steps.
Here are just the way start using iMedia Converter for Mac(Windows users can take it for a reference):
1.Click “Load file(s)” button or “Add video" button to import source files.
2. After importing, all video files will be listed in the program. You can preview the imported movie file by double clicking or checking one of them and click the play button under preview window.
3. Clicking the Format bar, you can choose output format from the format list or customize which formats to be shown on the list. ‘Common Video>>ASF(VC-1)(*.ASF).
 4. Click the ’Convert’button and you will get the ASF files you want.
There also some other tips about Pavtube iMedia Converter for Mac, such as Merge, Split and Select Subtitles and Audio Track, just click here for more details. So whatever you want to convert XAVC files for, Pavtube Video Converter Ultermate/iMedia Converter for Mac can do you a great favor.
More guides suggested:
4. Click the ’Convert’button and you will get the ASF files you want.
There also some other tips about Pavtube iMedia Converter for Mac, such as Merge, Split and Select Subtitles and Audio Track, just click here for more details. So whatever you want to convert XAVC files for, Pavtube Video Converter Ultermate/iMedia Converter for Mac can do you a great favor.
More guides suggested:
Do you lost some Contacts on your iPhone 5s and want to find a possible way to sync these deleted Contacts back to your iPhone 5s? iFonebox is the best solution to transfer these deleted iPhone 5s Contacts back. Contacts in iPhone 5s is the easy way to store phone numbers, e-mails, some related information etc. In dairy use of iPhone 5s, these data in your Contacts are easy to lose due to many accident reasons. When this trouble happen to you, you must very upset about that and want to recover deleted Contacts to your device.
Here we highly recommend the contacts recovery software, iFonebox. This software could recover lost data like photos, messages, call history, notes, etc, as well as sync deleted Contacts to iPhone 5s. Win: iFonebox
Mac: iFonebox for Mac Download it to have a try. Recover deleted Contacts directly back to iPhone 5s
Step 1: Choose Recovery Mode Install iFonebox on your computer and launch it. Then connect your iPhone 5s with your computer via USB cable and your device could be detected by the software automatically as long as your device could be detected by iTunes. Then choose: “Recover from iOS Device” as recovery mode.  Step 2: Start scanning iPhone Then iFonebox will automatically start scanning and analysis your iPhone 5s. The scanning time depends on the number of the data in your iPhone 5s. Just wait patiently if there is a large data in your iPhone 5s.
  Step 3: Preview and Transfer deleted Contacts When the scanning is finished, all the data in your iPhone 5s will be displayed in the interface of the software in categories. Click “Contacts” to preview all the Contacts in your iPhone 5s. Click the option before the Contacts and choose these contacts you need to transfer to your iPhone 5s.
Now it's almost time to back to school, have enjoyed a color and meaningful Summer break? Let's get ready and be excited for another great term! Meanwhile, after a long summer holiday, are you looking forwared to see everyone and prepare some cool gifts for your classmates or teachers?
Welcome to the Pavtube 2014 Back to School Promotion Center where Up to AMAZING 35% OFF Back to School Specials are waiting for you. You be surely be entertained at your free time.
The giveaway includes Blu-rays, DVDs and HD Videos related software which will give you great experience when enjoying these videos and movies on Android/Apple/Windows devices. Besides that, you will have no worry about any compatibility issues when editing the MTS/MOV/MXF files in Mac editors(FCP, FCE, iMovie, Avid Media Composer, Adobe Premiere, etc.), and Windows editing programs (Sony Vegas, Premiere Pro, Movie Maker, etc.)!
Here is the promotion items at Pavtube 2014 Back to School Special Offer
1. Free Gifts:
Pavtube Free DVDAid (Win/Mac)
100% free and easy-to-use conversion tool to rip and edit DVD sources.
Free Video DVD Converter Ultimate (Win Only)
A free and comprehensive solution to converting and editing DVDs and videos for better entertainment.
2. 30% OFF Deals
Pavtube BDMagic (Win/Mac)
Copy BD/DVD with original structure, and convert 2D/3D Blu-rays and standard DVD for watching with fast speed and wonderful quality.
Pavtube DVDAid (Win/Mac)
Powerful abilities to remove DVD protection, convert DVD to any video and audio format, and edit DVD to create personal movie.
3. 20% OFF Specials
Pavtube Video Converter Ultimate (Win/Mac)
An extremely all-in-one powerful app to convert, edit, enhance, capture any Blu-ray, DVD and Video files for playing anywhere and anytime you like.
Pavtube Video Converter (Win/Mac)
Best video converter and editor to handle SD and HD videos, Tivo and DVR recordings for free enjoyment and free importing to professional editing programs.
Pavtube MXF MultiMixer / Pavtube iMixMXF
Everything you need to preserve and mix multiple audio tracks, convert and edit for free playback and free process in professional editing programs.
4. What's more
By sharing this Back to School Promotion Page at your facebook, you can get 35% off discount on any of the charged products from Pavtube above.
TERMS & CONDITIONS APPLIED:
The deal is valid from 15th Aug to 15th Sep, 2014
More details are here:
http://www.multipelife.com/back-to-school-specials-2014
This guide provides a simple way to complete converting Divergent and Need for Speed Blu-ray Disc to MP4/MKV keeping multiple audio tracks and subtitle streams on Windows 8.1.
"I have bought two Blu-ray discs (Divergent and Need for Speed) one week ago, I want to play them on my Popcorn A400, WDTV Live Hub and my VLC Player. Then how can I copy my Blu-ray with multiple audio and subtitle tracks so my family members from different countries can enjoy movies with our own native languages? Can you recommend a software that can convert Blu-ray with multi-track mp4 or mkv format? I'm working on Windows 8.1. Thanks!"

If you’re running into playback issues or insufficient storage, here comes a solution for this situation--- ripping the Blu-ray movies into MKV/MP4. But how to keep multiple audio and subtitle streams when converting? Here, Pavtube ByteCopy can do it for you, which supports to preserve multiple audio and subtitle streams and leave out unwanted ones, retain chapter information, allow editing videos, etc. If you choose to rip Divergent and Need for Speed Blu-ray to multi-track MP4/MKV, you can easily switch audio and subtitle tracks with freely chapter switching when playing your Blu-ray on Media Player. Here we present you a brief instruction.
2014 Best Blu-ray/DVD Multi-track Movie Converter Review
Convert Divergent and Need for Speed Blu-ray to multi-track MP4/MKV on Windows 8.1
Step 1. Load source Blu-ray Disc
After successful installation of ByteCopy (The mac version is ByteCopy for Mac), launch it, click "Add Disc" icon to add source Blu-ray Disc from BD driver. Or load from BD folder or IFO file.
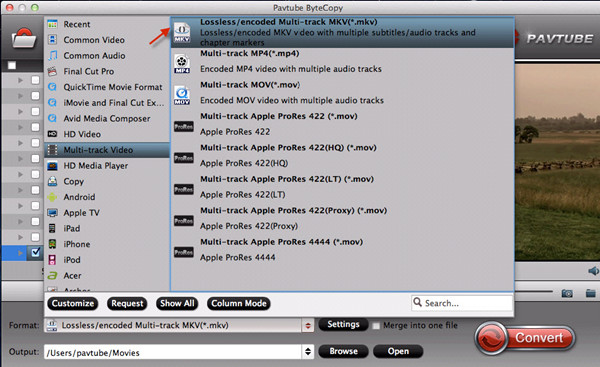
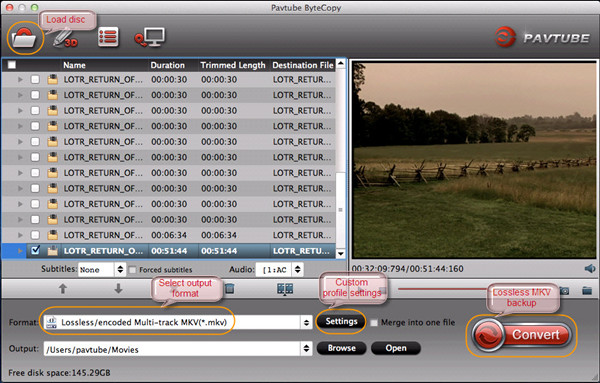 Step 2. Choose output format.
Click the Format button, and you would see lots of profiles listed. To keep multiple audio and subtitle tracks from Blu-ray Disc, you are recommended to choose "Multi-track Video" > "Lossless/encoded Multi-track MKV (*.mkv)" for output.
Step 2. Choose output format.
Click the Format button, and you would see lots of profiles listed. To keep multiple audio and subtitle tracks from Blu-ray Disc, you are recommended to choose "Multi-track Video" > "Lossless/encoded Multi-track MKV (*.mkv)" for output.
 P.S. If you choose "Multi-track MP4", you can get encoded MP4 video with preserving multiple audio streams from original Blu-ray.
Tip: If you want to remove unwanted audio or subtitle stream from original BD/DVD for output, just unselect the box in front of it.
Step 3. Convert Blu-ray Disc with multi-track MP4/MKV.
Click the Convert button to start converting Blu-ray to MP4/MKV with original subtitles, audios and chapters you choose. Find generated MP4/MKV files by clicking "Open" icon and you can transfer and play Blu-ray Disc with multiple audio and subtitle streams on your HD media player. Just enjoy!
Read more:
P.S. If you choose "Multi-track MP4", you can get encoded MP4 video with preserving multiple audio streams from original Blu-ray.
Tip: If you want to remove unwanted audio or subtitle stream from original BD/DVD for output, just unselect the box in front of it.
Step 3. Convert Blu-ray Disc with multi-track MP4/MKV.
Click the Convert button to start converting Blu-ray to MP4/MKV with original subtitles, audios and chapters you choose. Find generated MP4/MKV files by clicking "Open" icon and you can transfer and play Blu-ray Disc with multiple audio and subtitle streams on your HD media player. Just enjoy!
Read more: