With the video to Galaxy NotePro 12.2 converter, play videos in the format of MVI, MKV, AVI, Tivo, VOB, MTS, MPG, etc on SamSung Galaxy NotePro 12.2 would be a piece of cake.
Samsung Galaxy NotePro 12.2 is one of the biggest gadgets of 2014. The Galaxy NotePro 12.2 has won a lot of fans. Equipped with powerful processor, 12.2-inch screen size bundled with an S Pen. Enjoying a stunning viewing experience with SamSung’s design legacy will be impressive enough. Have you been of the fans of it like me?
 Before purchasing it, I want to make sure if it is strong enough to play all my Tivo recordings and other format videos. Then searched the best video formats supported by Galaxy NotePro 12.2, I found it only support video format MP4, DivX, Xvid, WMV, H.264, H.263; audio format MP3, WAV, eAAC+, FLAC. It seems a little pity to give up such wonderful tablet due to it can not play videos in the format like MVI, MKV, AVI, TiVo, VOB, MTS, MPG, etc. My friend told me that there are some third-party software could achieve this.
After searched online and tested some conversion software, I finally chose Pavtube Video Converter Ultimate. This app offer an easy way to transcode virtually all video and audio types, Tivo recording, etc to desired video/audio format for portable devices. Below are the specific steps when I use it to complete the conversion. It is so easy.
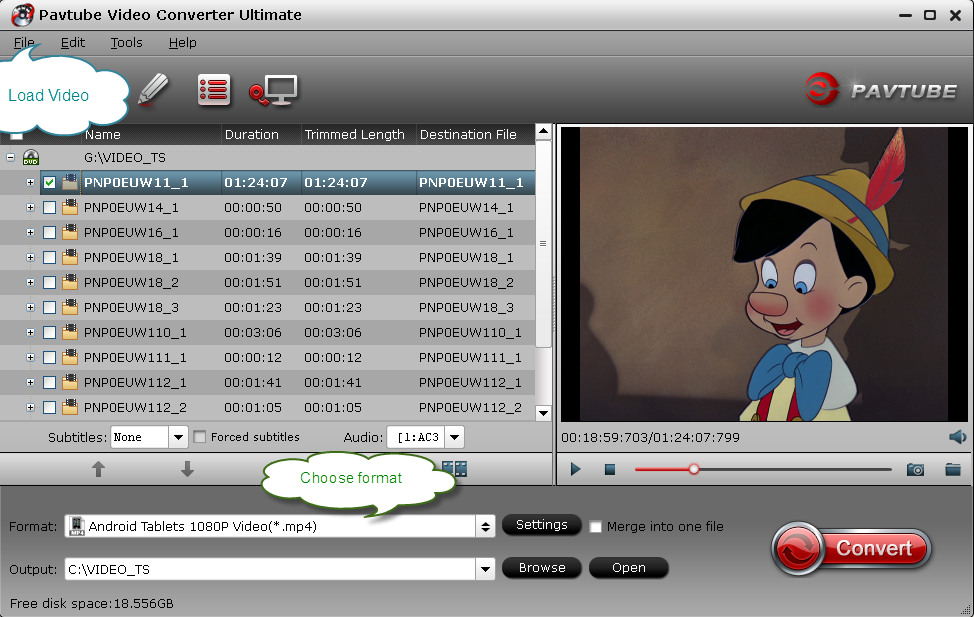
Step 1: Install this Video to Galaxy NotePro 12.2 converter; add the videos to it.
Click the “Add Video” icon to import videos to the program and you could view it in the preview window if you load them successfully.
Before purchasing it, I want to make sure if it is strong enough to play all my Tivo recordings and other format videos. Then searched the best video formats supported by Galaxy NotePro 12.2, I found it only support video format MP4, DivX, Xvid, WMV, H.264, H.263; audio format MP3, WAV, eAAC+, FLAC. It seems a little pity to give up such wonderful tablet due to it can not play videos in the format like MVI, MKV, AVI, TiVo, VOB, MTS, MPG, etc. My friend told me that there are some third-party software could achieve this.
After searched online and tested some conversion software, I finally chose Pavtube Video Converter Ultimate. This app offer an easy way to transcode virtually all video and audio types, Tivo recording, etc to desired video/audio format for portable devices. Below are the specific steps when I use it to complete the conversion. It is so easy.
Step 1: Install this Video to Galaxy NotePro 12.2 converter; add the videos to it.
Click the “Add Video” icon to import videos to the program and you could view it in the preview window if you load them successfully.
Step 2: Choose the output format.
Click the “Format” bar and there are many device and format choice for you. For Galaxy NotePro 12.2, the “SamSung Galaxy Note (*.mp4)” profile under “SamSung” is the most suitable one.
 Step 3: Start Conversion.
The last thing you need to do is click the “Convert” button to start the conversion and just wait patiently for it to complete the conversion automatically.
Some important tips forget to tell you:
1. This videos to Galaxy NotePro converter has Mac version as well.
2. When first loading Tivo video to the program, remember to enter put the Media Access Key.
3. If you want to crop the commercial advertisements or black bar in your videos, the “Edit” function could help you. It also supports to add subtitles.
Step 3: Start Conversion.
The last thing you need to do is click the “Convert” button to start the conversion and just wait patiently for it to complete the conversion automatically.
Some important tips forget to tell you:
1. This videos to Galaxy NotePro converter has Mac version as well.
2. When first loading Tivo video to the program, remember to enter put the Media Access Key.
3. If you want to crop the commercial advertisements or black bar in your videos, the “Edit” function could help you. It also supports to add subtitles.
 Read more:
Want to rip DVD/Blu-ray discs movies to iTunes supported formats for Apple TV 3, iPad Air, iPhone 5S/5C on Mac OS X 10.9 Mavericks? Some of you may have not figured out a proper way to convert DVD/Blu-ray to iTunes on Mavericks. Simply follow this article to import DVD/Blu-ray movies to iTunes
“I want to put my library of disks in iTunes. I searched “best BD Ripper Mac Review” on google and choose Pavtube for its better reviews. When I used it for a while, I really appreciate its much more intuitive interface than CloneDVD2 which I used before. Until now, it always works well to rip my discs for my Apple TV 3.”
This is one of the customers that tell us how he uses Pavtube to rip his library discs. However, to some whom not familiar with Pavtube, do you want to rip DVD/Blu-ray discs movies to iTunes supported formats for Apple TV, iPad, iPhone? Do you want to figure out a proper way to convert DVD/Blu-ray to iTunes on Mac as well? If so, please read on and it will be an easy to make it possible with the help of Pavtube.
- Backup Blu-ray and DVD movies on Mac.
- Make 1:1 copy of Blu-ray/DVD movies.
- Convert discs to MP4, M4V, MOV, AVI, MKV files for Apple TV, iPad, iPhone, iTunes, QuickTime player, Samsumg Galaxy Tab/Note, etc.
- Editing videos with simply usage.
PS. Pavtube BDMagic for Mac also has windows version: Pavtube BDMagic (Guide). To save more money, you can view our Special Offer page, save up to $35.1.
How to Convert DVD and Blu-ray discs to iTunes for Apple TV 3, iPad Air, iPhone 5S?
Step 1. Load Blu-ray/DVD movies.
Download the program, and then click “Load file” icon to load the Blu-ray and DVD movies to your program. (If the files are blu-ray, you need a Blu-ray drive first.)
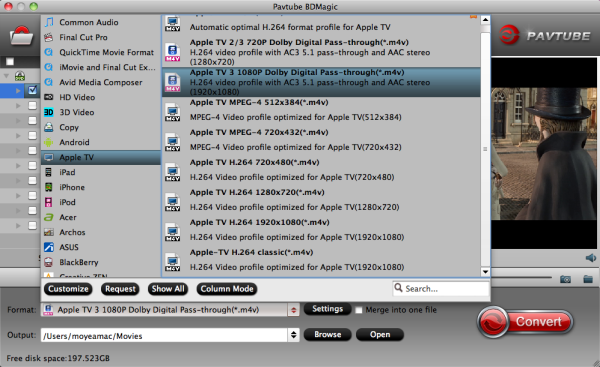
Step 2. Select output format.
Pavtube BDMagic for Mac has a number of presets for Apple TV, iPad and iPhone. Just choose the suitable format.
For Apple TV 3:
 For iPad Air:
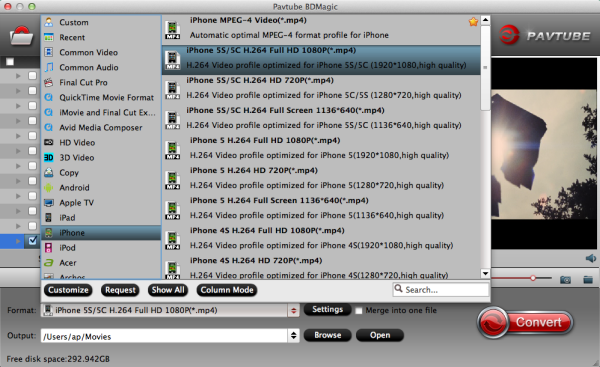
 For iPhone 5S:
 Tip:
If you need, you can also click “Setting” to modify parameters of your output profile to meet your professional needs: video bitrate, frame rate, audio channel, etc. Remember the file size and video quality is based more on bitrate than resolution which means bitrate higher results in big file size, and lower visible quality loss, and vice versa.
Step 3. Start conversion.
The final step is to tap “Convert” button and commence ripping Blu-ray/DVD movies to iTunes highly compatible videos.
After the conversion, click on “Open” button to access to the videos you ripped. Open your iTunes and import the output files to its Movie library by clicking File > Add File to Library.
Then you could transfer and watch Blu-ray and DVD movies on iTunes or your Apple TV, iPad Air, iPhone 5S. Learn more:
PS: If you want to backup Blu-ray and DVD movies persevering all the audio tracks and subtitles, Pavtube ByteCopy (ByteCopy for Mac) could help you with good effect.
See More Related articles:
Tip:
If you need, you can also click “Setting” to modify parameters of your output profile to meet your professional needs: video bitrate, frame rate, audio channel, etc. Remember the file size and video quality is based more on bitrate than resolution which means bitrate higher results in big file size, and lower visible quality loss, and vice versa.
Step 3. Start conversion.
The final step is to tap “Convert” button and commence ripping Blu-ray/DVD movies to iTunes highly compatible videos.
After the conversion, click on “Open” button to access to the videos you ripped. Open your iTunes and import the output files to its Movie library by clicking File > Add File to Library.
Then you could transfer and watch Blu-ray and DVD movies on iTunes or your Apple TV, iPad Air, iPhone 5S. Learn more:
PS: If you want to backup Blu-ray and DVD movies persevering all the audio tracks and subtitles, Pavtube ByteCopy (ByteCopy for Mac) could help you with good effect.
See More Related articles:
Have stored a lot of home videos and want to convert to another format? This article will give you detail demonstration on how to convert these videos recorded by cameras massively to the format you need for store on hard disc or play on TV.
“I retired at home and have a lot of home videos. These videos are created by various cameras over the years. I was searching for a conversion software to help me make many short videos into a few longer ones and convert to another format so that I could store videos on my hard disc and play them back on TV or put them back on DVD. If possible, the converter could convert videos massively to save time for me.”
Many people, same as above one, are eager to find the video converter to handle and convert home videos to any format for devices, but have trouble locating the right and suitable one to meet their specific needs. Besides, there are so many options of video converter are available on the market. Don’t worry about it anymore; Pavtube Video Converter Ultimate (Pavtube Video Converter Ultimate for Mac) is your best choice. This app offers an easy way to transcode virtually all video and audio types, camcorder HD footages and Tivo recordings to desired video/audio format. Besides it could allow merge file into one and convert videos massively.
How to easily convert home videos massively to another format?
Free download the best Video Converter Ultimate, and you would experience its user-friendly UI.
Step 1. Import home videos to the Video Converter Ultimate
Launch the video computer on your computer, either hit on the button “Add video” or directly drag and drop your source videos from computer to the app. You could add more than one videos into this Video Converter Ultimate at the same time.
Step 2. Choose the output format
Click on the “Format” pane, and choose the optimized format for output. Under profile list, almost all video and audio formats are included. Just select the particular one for your devices as output format.
 Tip:
1. If you want many short videos into a few longer ones, the “Merge into one file” function besides the “Settings” could help you do this.
Tip:
1. If you want many short videos into a few longer ones, the “Merge into one file” function besides the “Settings” could help you do this.
 2. If you want to convert some of your videos at the same time, you could set the “Convert” under “Option” and set the number of running processes. The program supports to convert 4 videos together at once. Just remember, the more procedures you set to run at the same, the slower conversion speed it will be.
 Step 3. Start video conversion
On the main interface of this Video Converter Ultimate, hit the “Convert” icon to start converting your home videos.
With the help of its in-built video converting ability assisted with GPU acceleration, this great Video Converter Ultimate can finish all of the video converting tasks in a minute. When the conversion is done, get the converted video in output folder location, and then you could store them on your hard disk or play back on your TV or other devices.
Some posts you may interest:
Step 3. Start video conversion
On the main interface of this Video Converter Ultimate, hit the “Convert” icon to start converting your home videos.
With the help of its in-built video converting ability assisted with GPU acceleration, this great Video Converter Ultimate can finish all of the video converting tasks in a minute. When the conversion is done, get the converted video in output folder location, and then you could store them on your hard disk or play back on your TV or other devices.
Some posts you may interest:
From this article, you can learn how to keep 1080p Blu-ray movies to 720p MKV on hard drive for playback on media player with lossless audio.
I used to think that I could play my Blu-ray movies on my media player. But when I have a try by myself, it shows that I was wrong. After did some research and I found something. Take Windows media player as an example, Windows media player is capable of playing all types of media. However, many video formats, such as Blu-ray, are proprietary and typically require a royalty payment in the form of a license to its owner. In order for Microsoft to include support for Blu-ray discs, it would have to pay Sony a royalty, which would likely mean passing on that cost to consumers. Instead, Microsoft chooses to let the consumer decide on whether to pay to use Blu-ray technology.
Due to this, I searched online for a blu-ray ripping software to convert 1080p Blu-ray movies to 720p MKV while keeping all lossless audio for playback on my Windows Media player. I searched for “was capable of ripping Disney blu-rays” and many blu-ray ripping software came up. I’ve tried some such as MakeMKV, Handbrake and son on. However, although MakeMKV helps me to get MKV files, it suffers a little quality loss, while Handbrake only help me convert normally 30GB file down to 3-6GB. My problem wasn’t completely solved until I tried Pavtube ByteCopy (Mac user: ByteCopy for Mac). I really appreciate its profile of backing up blu-ray movies to MKV without quality loss. Beside, it could have worked on all my movies.
Below is the method how I convert 1080p Blu-ray movies to 720p MKV keeping all lossless audio for playback on my Media player.
1. Install and run the converter. Click load disc button to import the Blu-ray movies to the program.
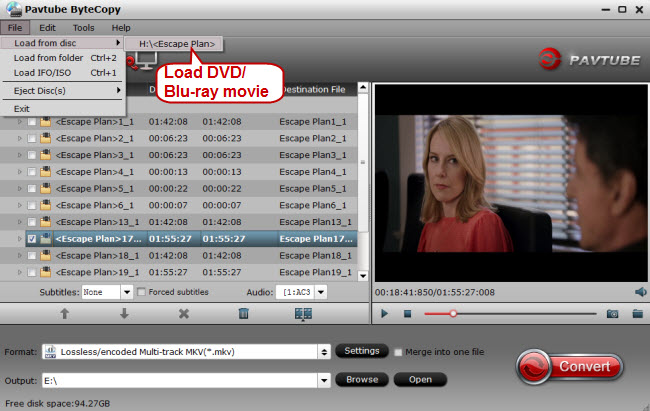 2. Click the Format menu, select “Lossless/encoded Multi-track MKV(*.mkv) as the output video format.
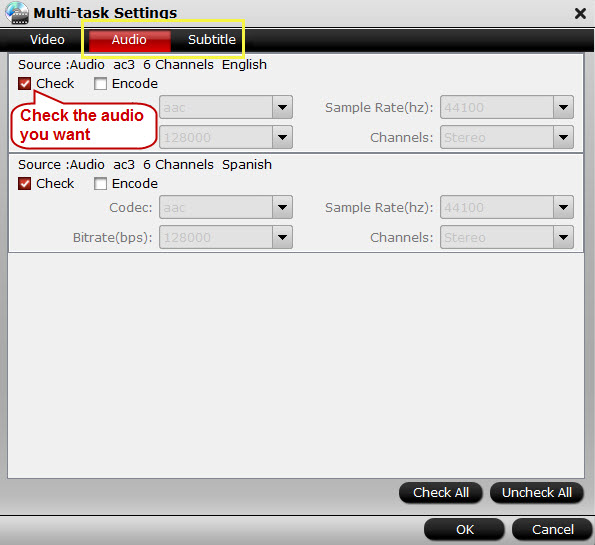
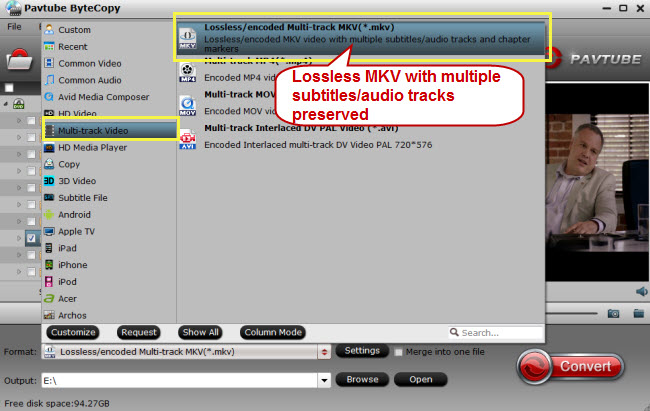 3. This specific profile could allow you to choose the audios you want as well as encode them.
 4. Finally click the Convert button to begin ripping blu-ray to 720p MKV keeping all lossless audio.
After encoding process has finished successfully, go into the destination directory and backup the converted files to my hard drive, then I could playback on a media player I like.
4. Finally click the Convert button to begin ripping blu-ray to 720p MKV keeping all lossless audio.
After encoding process has finished successfully, go into the destination directory and backup the converted files to my hard drive, then I could playback on a media player I like.
Some articles about ripping blu-ray movies:
If you are a teacher, to make your class more vivid, you need the help of muti-media. Video is one of the representatives of media teaching. If you comes up with the problem of converting school DVD/Blu-rays to the format you need, please read on.
“As an IT manager in school, my job is to help teacher to make the videos for classroom computers and delivering lessons. Some of the source videos are school dvd/blu-ray, while some are various school films or clips. Due to the variety of format, I need some useful software to help me finishing the format conversion”
With the population of media teaching and with the help of Blu-ray/dvd videos, the class will become more vivid and attractive to children. However, with the limitation of media player in class, you are not allowed to play these Blu-ray/DVD source files directly in class. If you have the same problem and was searching for useful software as the guy above, after reading this article, you could stop you step.
Software recommended: Pavtube Video Converter Ultimate
Pavtube Video Converter Ultimate is an all-in-one solution to backup Blu-ray/DVD movies, convert disc content and transcode common videos. It supports to convert Blu-ray/DVD and videos to friendly format for your either your media player or classroom computer. If you are a Mac user, it also has the Mac version Pavtube iMedia Converter for Mac.
How to convert school DVD/Blu-ray to WMV on Windows?
Step 1. After install and launch the program, load school DVD/Blu-ray to the program by clicking “Load file” icon.
 Step 2. Choose the friendly format for your computer in class. Here we take “HD Video > WMV HD (*.wmv)” as example.
 Step 3. When these steps are done, hit the big “Convert” button to start the conversion of School DVD/Blu-ray to WMV.
After the conversion is over, just located the output WMV format and transfer it to the player you want need via USB cable. With the help of these videos, you could give a vivid class to your children.
Step 3. When these steps are done, hit the big “Convert” button to start the conversion of School DVD/Blu-ray to WMV.
After the conversion is over, just located the output WMV format and transfer it to the player you want need via USB cable. With the help of these videos, you could give a vivid class to your children.