Thursday, January 9, 2014

Convert Sony HDR PJ790V MTS to ProRes 422, ProRes 422 LT for editing in FCP

Description: This article aims to lead you to resurrect corrupted MTS videos from camera SD card, and transcode Sony HDR PJ790V MTS footage to edit in FCP on Mac easily and efficiently.

Q: “I shot some videos of my friend’s wedding but the SD card was corrupted, so I could not download videos from the card. I’ve tried many ways to copy the video to FCP but still could not get it to work. The files shout be in MTS together with many garbage which I can found in card but cannot log and transfer. Can someone help?”

Many of us may encounter many issues when downloading footages from cameras: like this camera is not supported by Windows/Mac; like the SD card may not be formatted correctly although it works as it’s good when shooting, in any case we just can’t move the videos to computer. Usually if we lose the original file structure, the footages cannot be downloaded smoothly.

So what can we do to resurrect the MTS footages if the SD card corrupted?
Don’t worry, according to my experience, the footages should be save in a PRIVATE folder inside your card; so use a card reader and plug it to your computer, run this Pavtube MTS/M2TS Converter for Mac to extract the real videos.

Pavtube MTS/M2TC Converter for Mac is a tool which works on Mac; it’s capable of rolling off MTS video clips from your camera and SD card directly, and converting to various video formats including Apple ProRes for editing in Final Cut Pro. You can download a free trial version before purchase.

How to convert Sony HDR PJ790V MTS clips to Prores for FCP?

Step 1. Install and launch this Mac MTS/M2TS Converter; add MTS files

First, plug your card reader or camera to Mac. Click the top left “Add video” and browser source video path, find the MTS files inside your card PRIVATE folder and import.


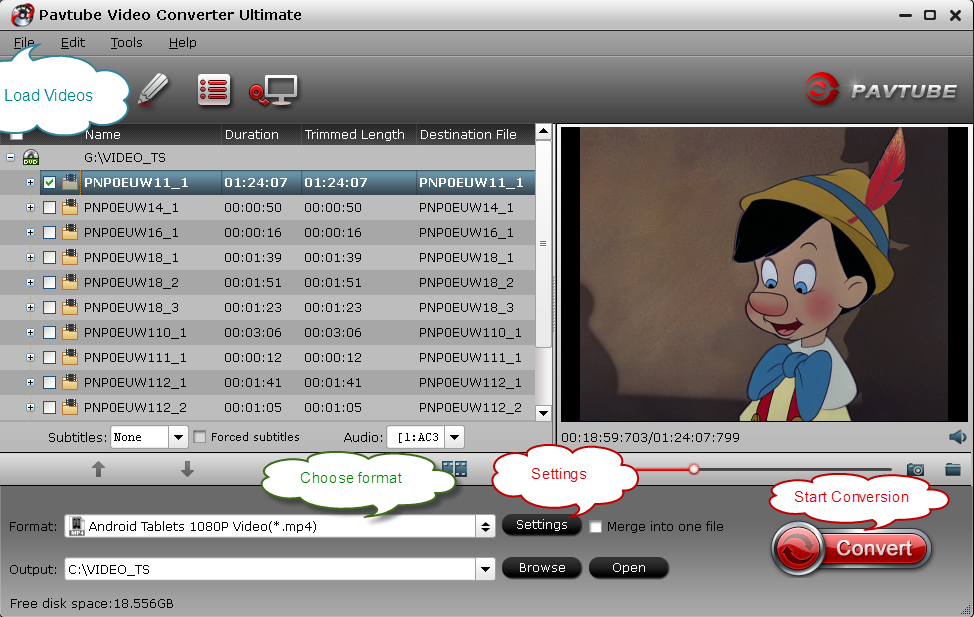
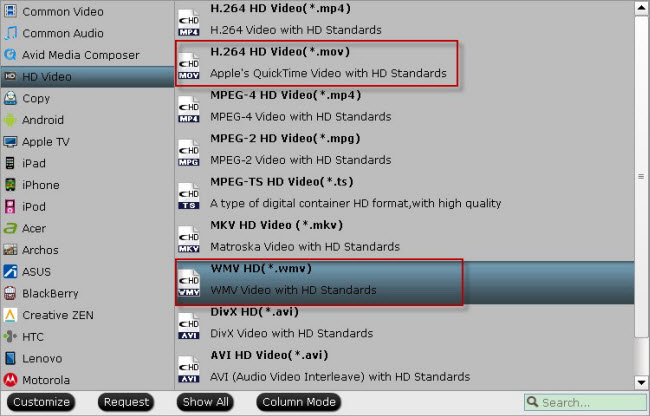
Step 2. Choose format.

Click the drop-down list besides “Format” and choose Final Cut Pro>Apple ProRes 422 as the preferred video codec for FCP on Mac.

Step 3. Adjust target video settings.

If you are not satisfied with the default video size, bitrate, frame rate and audio specs, click “Settings” to adjust them according to your needs.

Step 4. Start conversion.

Now just click the big red “Convert” to start converting Sony HDR PJ790V MTS to ProRes for FCP. This program will stat to do batch conversion automatically. After it completed, click “Open” or “Open output folder” to locate the converted videos.

You may want to read:

How to load the converted ProRes MOV to FCP for further editing?

How to work with other Sony footageMTS video and Final Cut Pro on Mac?

Wednesday, January 8, 2014

Pavtube iOS Data Recovery 1.0.0 Released: 2014 Best iPod/iPad/iPhone Data Recovery Software

Pavtube iOS Data Recovery 1.0.0 (Windows Version) is newly released for iOS Device users to recover lost data from iPhone, iPad, iPod Touch and iTunes Backup files.
      Price: $59.95

Accidently deleted contacts or other crucial data on your iPhone, iPad or iPod touch? iPhone is lost, smashed or broken? Failed iOS updates or jailbreak or factory settings restore wipes your data? Or want to read already deleted messages? Would like to browse pictures and videos have been deleted from iPhone,iPad or iPod? Whatever the problem, iOS Data Recovery can help you quickly regain the lost files.

Pavtube released a powerful ios data recovery which is a easy-to-use data recovery software helps users to recover lost files from iPhone, iPad and iPod touch, and also retrieve 11 kind of files from iTunes backup. This powerful software makes the data recovery and backup issues easy to be done, and all iOS Device users will benefit from this software.

See: Quick Start Guide for Beginner


The key features of Pavtube iOS Data Recovery are listed as follows:
  1. Recover files from iTunes backups; recover files from iOS devices.
  2. Support all kinds of iOS devices including iPhone 5C/5S/5/4S/4,iPad Air, iPad mini2, iPad 4, iPad 3, & iPod touch 5 etc.
  3. Directly recover deleted or lost Contacts, Message, Call History, Notes, Calendar, Reminders, & Safari Bookmark from iOS devices.
  4. Retrieve 11 kinds of files from iTunes Backups including Camera Roll, Photo Library, Contacts, Messages (SMS, MMS, iMessages), Message Attachments, Call History, Calendar, Notes, Reminders, Voice Memos and Safari Bookmarks.
  5. Regain lost data from your iTunes backup for any iOS device due to device loss, jailbreak, iOS upgrade or factory settings restore.
  6. Selectively recover rather than all data from iOS device or iTunes backup files. This is not supported by iTunes.
  7. You can preview both deleted and existing data in the scan result before recovery; like photos in camera roll, detail of the contacts, the contents of the message, View the call history and so on.

Only a few steps, you can easily and quickly get back your lost data on your iPhone/iPad/iPod, see also:

To learn more about Pavtube iOS Data Recovery Release, please visit http://open-media-community.com/2014/01/02/pavtube-ios-data-recovery-is-released/

Safe Free Download Pavtube iOS Data Recovery for Windows or Mac 1.0.0:


"Pavtube iOS Data Recovery will be a wonderful saving for iOS device users to recover or backup data. And we are preparing for future updates to make it be able to recover more data." concluded Anda.

Two Ways to Play VIDEO_TS Files on PC/iMac: VLC Player or VIDEO_TS Converter

This article explains what the VIDEO_TS files are in detail and patiently guides you on how to play VIDEO_TS files on your computer smoothly.

If you like to download movies or videos from torrents, you should be familiar with these three formats of DVD movies:
  • VIDEO_TS.BUP
  • VIDEO_TS.IFO
  • VIDEO_TS.VOB
Maybe you just know it is a kind of form but don't know what kind of format it is and your media player is unable to play it. Do you want to play the movies in this format on your PC/iMac? This article is specifically for you. It will give you a detailed introduction of what the VIDEO_TS files are and solutions to play VIDEO_TS files on your computer smoothly.

What's VIDEO_TS? 


A VIDEO_TS file is a DVD folder file, mainly containing all data for the DVD movies. It totally contains three kinds of files inside: VIDEO_TS.IFO, VIDEO_TS.BUP, and VIDEO_TS.VOB.
  1. VIDEO_TS.IFO - the configuration files with information like menus, subtitles, aspect ratio, languages etc.
  2. VIDEO_TS.BUP - the backup copies of configuration files
  3. VIDEO_TS.VOB - actual video and audio data for DVD content
After figuring out the definition of VIDEO_TS, it's time to solve the problem of play VIDEO_TS files on PC/iMac. I can still recall of the questions asked by the user in a forum: "I got the DVD file on my PC which I want play on my TV with DVD Player. When I try to Copy/Burn on DVD it got copied but unable to play on my TV thru DVD Player. I want to convert this file to the normal format which can easily play on TV using any CD/DVD Player. Can any one help me to rectify this problem? I got windows 8 install on my Desktop PC."

Solution 1: Use VIDEO_TS Player: VLC Player 


You can easily playback your VIDEO_TS files if you have a VIDEO_TS player installed. VideoLAN (VLC Player) will be one of your alternatives. Download this player and follow the below steps to player your VIDEO_TS files.

Step 1: Install the  VideoLAN (VLC Player)


Step 2: Start VideoLAN (click Start -> Programs -> VideoLAN -> VLC Media Player) 

Step 3: Click File -> Open Directory. Find the VIDEO_TS folder, select it and click OK.

Solution 2: Convert VIDEO_TS to other formats 


Similar to this user's query; if you also want to convert your VIDEO_TS file to a compatible format for playback on your current player, you can try Pavtube Video Converter Ultimate (iMedia Converter for Mac). 

Get it now and enjoy more discounts on Pavtube Weekend Special!

Being a professional video converter, Pavtube Video Converter Ultimate can not only convert Blu-ray/DVD discs, VIDEO_TS files, but also supports converting video to almost all popular video and audio formats like AVI, MP4, WMV, FLV, RMVB, MPEG, 3GP, MKV, MP3, AAC, etc.

Step 1: Load VIDEO_TS files to the converter.


Step 2: Choose output format.

For Windows Media Player, just convert the VIDEO_TS to WMV. As for Quicktime, the MOV file type is recommended.


Step 3: Hit the "Convert" button to convert VIDEO_TS files in the lower-right corner of the interface.

After the conversion, you can play your VIDEO_TS files in your native player.

OK, now you can choose one of the solutions to play VIDEO_TS files on your PC/iMac. Just enjoy it!

Related Articles:


  • Ripping encrypted DVDs with HandBrake and libdvdcss on macOS Sierra/El Capitan
  • What Should You Do When Can't Rip DVD With DVD Decrypter?
  • How To Backup DVD Collection To Buffalo LinkStation 210NAS?
  • Video_TS iTunes solution: how to transfer Video_TS to iTunes
  • Two Ways to Play DVD VIDEO_TS Files on PC/Mac
  • How to Convert Video_TS Folder to MP4 with Subtitles?
  • Tuesday, January 7, 2014

    Watch “Now You See Me (2013)” WMV movie on iPad Mini 2

    Description: Many people want to convert WMV to IOS device supported files format so they can enjoy the WMV movies with iPad Mini 2 anywhere and anytime. This article gives you the fastest and easiest way to convert your “Now You See Me (2013)” WMV movie to iPad Mini 2 for playing on Windows 8.1/8.

    When it comes to summer movies, this is about as good as it gets. Now You See Me is a fun movie that deconstructs the acts of modern magicians. The story follows Vegas magicians, know as the Four Horsemen, who rob a bank in the middle of one of their shows. What follows is a cat-and-mouse thriller where the FBI chases after these magicians, always on step behind, trying to figure out how they did it. If you want a film with twists and turns, this one will not disappoint.

    The movie simply keeps repeating to the viewers “The closer you look, the less you see”. It also constantly repeats that magicians always do something to distract the audience while the real magic happens elsewhere.

    The film is worth seeing for the actors, the visuals, the locations, and the misdirection and plot twists.


    I was given free advanced screening tickets to see this film and my friend planned to go together with me originally. However, he had to be in hospital for a month. How pity! So I downloaded online and put it on the iPad Mini 2 for him to spend his boring time and enjoy this wonderful movie. Thanks to the professional Pavtube iPad Mini 2 Video Converter that I can convert WMV movie to iPad Mini 2  easily.

    Review: Top 5 Best iOS Video Converter Review for iPad, iPad Mini, iPhone, iPod

    Convert “Now You See Me (2013)” WMV movies playback on iPad Mini 2 on Windows 8.1/8


    Step 1. Load WMV movie to the WMV to iPad Mini 2 converter program.

    Click the “Add Video” button on the top left to load your videos, you can also “load from folder”. It will only take few seconds for importing videos and you will be kept informed of timely state with a progress dialogue box.


    Step 2. Choose iPad Mini 2 friendly format.

    Click “Format” menu to find “iPad” option in the dropdown list, choose “iPad Mini HD Video (*.mp4)” for output. This is the most compatible format for iPad Mini 


    Tip:
    If you are not pleased with the default effect, just use the Trim, Crop, Watermark, Effect, Subtitle functions in the “Edit” which you can adjust the video with your own request.


    Step 3. Start the WMV movie to iPad Mini 2 Conversion.

    Click the “Convert” button and leave the WMV to iPad Mini 2 Converter to finish the rest automatically with its superb fast conversion speed. After that, “Open” button will show you the location of output files. 

    Step 4. Sync movies to iPad Mini 2 via iTunes
    1. Open iTunes and connect iPad Mini 2 to your computer.
    2. Click “File” tab in iTunes to add local file to iTunes library.
    3. Click on iPad Mini 2 icon, follow the path “On This iPad-> Movie ->Add To” to stream videos from local computer to iPad Mini 2 for enjoying this wonderful film anytime and anywhere.
    Hope this post will help you.

    Related Posts:

    WinFF Alternative for Mac Review: Convert Video/Audio Files on Mac OS X 10.9 Mavericks

    Can't find a program like WinFF for Mac. Now get this WinFF Converter for Mac Alternative to batch convert any video or audio on Mac OS X. WinFF Alternative for Windows also available.

    WinFF is a cross platform batch GUI for FFmpeg. It will convert most any audio or video file that FFmpeg will convert. Software includes presets for most common file conversions with the option to add advanced conversion options supported by FFmpeg to one or more files in a batch. WinFF converts multiple files in a batch, with support for multiple formats output in the same batch. For example, you can convert FLV, WMV, AVI and WAV simultaneously.

    Though WinFF is one of the well known video converter apps, it only has Windows and Linux version, there is still no WinFF for Mac version.Ever dream to get a WinFF for Mac to convert any video or audio on Mac OS X (Mavericks included)? This article just aims to introduce an ideal WinFF Alternative for Mac or Windows as well as describe an easy guide on how to use this WinFF Mac version.

    WinFF

    Here, we highly recommend you to try Pavtube iMedia Converter for Mac, which works as the best WinFF Alternative for Mac. With this best Video Converter and Editor for Mac, users can finish DVD/Blu-ray, SD/HD video converting and editing process with fast speed and high video qualtiy.

    This app offers an easy way to convert DVD/Blu-rays, virtually all video and audio types, camcorder HD footages and TiVo recordings to desired video/audio format for portable multimedia devices, HD media players or video editing software, such as:

    Devices: iPad Air, iPad Mini 2, iPhone 5S, iPhone 5C, iPhone 5, iPad 4, iPad 3, iPad Mini, iPod 5, etc.

    Players: Apple TV 3, WD TV, PS3, Xbox 360, Popcorn Hour, Xtreamer Ultra, Dune HD Base 3D, Iomega ScreenPlay MX HD Media Player, NETGEAR NeoTV Max Streaming Player(NTV300SL), Asus O!Play Mini Plus, etc.

    Video Editing Softwares: FCP, iMovie, Avid Media Composer, Premiere Pro, etc. Plus, you are allowed to freely customize and personalize the conversion files through its settings and options in order to get an individual output in your own way.

    Not all video tools like Pavtube iMedia Converter for Mac offer so many video editing options in this full-features and powerful video/movie converter. It edits videos by trimming, cropping, splitting videos, add text/image/video watermark as copyright protection, and attach external *.srt, *.ass, or *.ssa subtitles into source media for entertainment. Support perfect audio and video synchronization.

    The conversion speed is very fast and it supports batch conversion. It converts multiple video clips at the same time, moreover it can shut down computer after the process is complete, so run the app overnight and you could enjoy the created videos next morning when you are up.

    Windows Version: Video Converter Ultimate

    Tutorial: How to use WinFF Alternative for Mac to Convert Media file on Mac Mavericks/Mountain Lion with ease? 

    Step 1: Load video files to this WinFF Converter for Mac Alternative

    Download the Pavtube iMedia Converter for Mac on your computer, install and run the program, add videos.You can choose to import videos or the entire folder by clicking the top left two icons.


    Step 2. Choose a proper format.

    Click "Format" drop-down list and choose the best preset for you portable device with best video quality. Plenty of presets that can be customized as necessary.

    For iPad 3, iPad 4, iPad Mini, iPad Air or iPad Mini 2, the video formats from "iPad" option will meets your demand;

    For iPhone, iPhone 4, iPhone 4S, iPhone 5, iPhone 5C, iPhone 5S, the preset from "iPad" option is able to work well.

    For those who in demands of playing videos on Android devices, you can always find the one you want in Android preset.

    Step 3. Customize video specs(Optional).

    You could also click the "Settings" to adjust the video and audio parameters of output files.

    In the Video Settings, you can select Encoder, Frame Rate, Resolution (you could define it yourself according to your device) and Bitrate for your movie.

    In the Audio Settings, you can select Encoder, Channels, Bitrate and Sample Rate for your movie.

    Step 4. Start the Videos and Audio Conversion on Mac.

    You can hit the big red "Convert" to start converting MKV, AVI, VOB, WMV, MPG, Tivo, M4V, FLV, F4V, MTS to MP4 with best video settings on Mac. After the conversion, click "Open output folder" in the conversion window, or "Open" in main interface to quick locate the converted video.

    Now, you can transfer these videos to your portable Android OS, Window 8.1/8 RT/Pro and Apple iOS device on Mac for smooth playback without any problem. Enjoy your digital life!

    See Also: