Wednesday, November 12, 2014

Natively View DVD ISO/IFO Files on Nexus 9

From this article you will get best solutions on how to view DVD ISO/IFO files on Nexus 9 with ease? Do you want to have a look?


How much do you know about Google Nexus 9?
Brief introduction you can read here. The Nexus 9 was available for pre-order starting October 17th, and it will be available in the Play Store as of November 3rd. Of course it comes with Android 5.0 Lollipop which was just announced as well, next to the Nexus 6. Nexus 9 comes boasting an 8.9 inch IPS LCD display. It will arrive with a magnetic keyboard case which turns into a make-shift laptop in a cinch. Google is really pushing this tablet as a tablet for work, breaking into a new market in my opinion. 

Something Nexus 9 cannot handle well:
However, as I know, for almost all tablets on market, you won’t successfully work ISO/IFO files with them, fight? Also, Nexus 9 is included. With the traditional MP4 format as the best maybe you need a DVD ripper as the assistant. Let me introduce you one here: Pavtube DVD to Nexus 9 Ripper, such a professional converting tool specially for ISO or IFO files.

Supported OS: NT/2000/XP/Vista/Win7/Win8/Win8.1/Win10

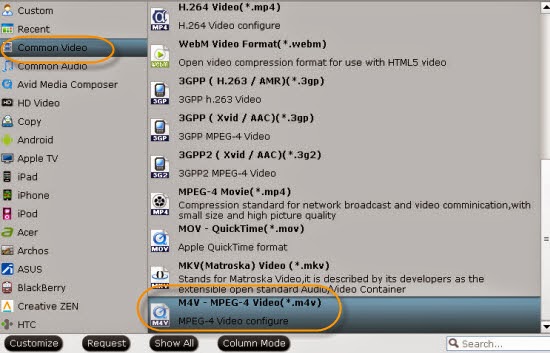
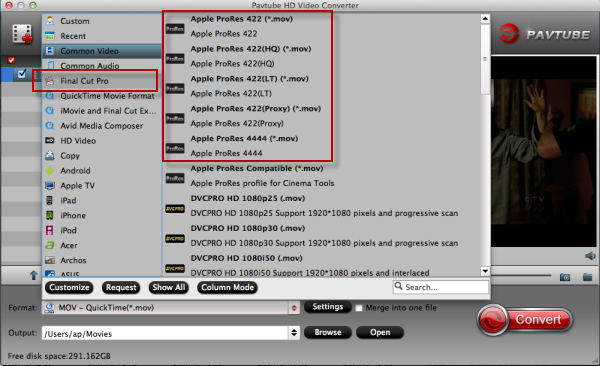
According to the instructions, you can download the program and let your DVD ISO/IFO files in with the button ‘File’ on left corner. Then on the output list you can easily find the ‘Android’>>’Google Nexus 10 H.264 Video (*.mp4)’ as the best. The following screen can show you the correct way.


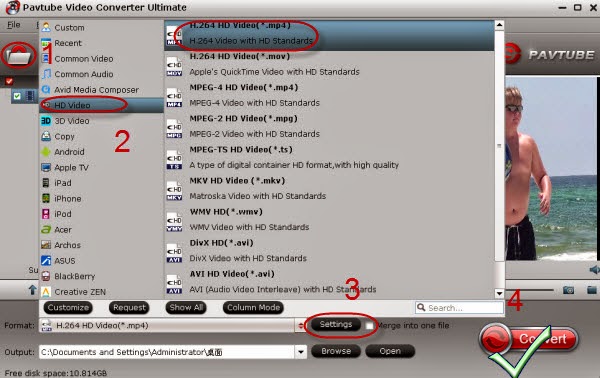
Next, it you need, you can go to the ‘Settings’ item for advanced adjustments to change the video encoder, frame rate, resolution, etc. Remember the file size and video quality is based more on bitrate than resolution which means bitrate higher results in big file size, and lower visible quality loss. 


Tips: If you want to watch Blu-ray files on Nexus 9, maybe this program won’t work well. Pavtube MDMagic is another choice.

Any questions or comments you can leave them below, or you can click the ‘Convert’ button to start your work after preparation.

More:

Monday, November 10, 2014

Load YouYube Videos to iTunes (M4V,MP4, MOV) on Mac?

As YouTube fans, you must want to know how to download your YouTube Videos to iTunes as M4V, MP4 or MOV, let’s together see how-to.


Why we all love YouTube so much? Mainly we get the fun or significant information from YouTube and it is so hot! Sometimes, we would download YouTube videos for a enjoyment on our handle tablets or phones, right? But the only disappointing point is that we can't enjoy these YouTube videos offline. And as Mac users, we used to use iTunes to manage our media files including video and audio files.

For those Mac users, it would not be easier to load videos or music to iTunes and import them to iPhone or iPad, etc. Today, what I want to tell you is how to make YouTube videos compatible with these devices. The professional easy-to-use YouTube to iTunes Video Converter for Mac can do you a big favor with a hassle free experience. It offers you ultra-fast conversion speed, loss-less video quality, extremely easy conversion steps. Let’s see how it works:

Firstly, load your YouTube video files to this program. When you downloaded the YouTube videos on your computer, just directly drag or drop your YouTube videos to the Mac application. Or you can tap the ‘Add Video’ and ‘Add from folder’ to the successfully put your files in.


Next, let’s select the compatible output formats for iTunes. For example, go to the ‘Common Video’ to select ’M4V MPEG-4 Video (*.m4v)’ as the best. In other ways, you can search ‘MP4’ or ‘MOV’ in searching box there, any output formats there for Apple devices id okay!


Note: Have several FLV movie clips and want to combine all of them so that you can enjoy a long movie without interruption? Just check ‘Merge into one’. The smart YouTube to iTunes Mac software additionally offers some useful edit functions to enhance your video


Finally, when we have all the preparation done, we can tap the ending item ‘Convert’ to finish our work. If you have any other opinions or suggestions, you leave them below and we will give you response as soon as possible.

For more?

Thursday, November 6, 2014

Download YouTube Videos to Windows Media Player for Enjoyment

You said you got a hobby of watching YouTube videos? Read the article below and know how to watch them on Windows Media Player.


Surely if you indeed have the hobby of watching YouTube videos on Windows Media Player, it is possible after installing some basic packages. It will bring some incompatibility issues if not sorted out in advance. For smoothly watching YouTube videos on Windows, all you need to do is turn to a good YouTube to Windows Media Player Converter.

This article has all the information you need to know about that and will be a proper guideline to use. If you already have some YouTube videos in your hard drive and want to watch them in Windows Media Player. There is theYouTube Video Converter will do all that right from the browser. It will convert to popular formats like 3GP, MOV, MP4, AVI, RM, WMV, M2TS, MPEG, TS and ASF in a quick and easy way. Now click the Download button below to get the program.

Some Steps you may know for watching YouTube videos in Windows Media Player.

The first thing will be adding all the files to the converter and you will have to browse them from the right folder. You can achieve the goal by clicking the ‘Add from folder’ on the bottom left corner. Alternatively, you can also drag and drop the files to the program. The added files will be listed in the video library as thumbnails. Next, just go to the output list to get the ‘HD Video’>>’H.264 HD Video (*.mp4) as the best output one.


For some advanced users, ‘Settings’ or ‘Editor’ will be a better place before you planed to click the ‘Convert’ button to start your work. Make some personal adjustments for a nice enjoyment on Windows Media Player, so we also called the program as ‘tiny editor’, is that awesome?

Expires on November 10th, in last several days, all you guys can enjoy a 50% off discount on this ‘Promotion Page’. The first one is what you need! Hurry up!

Tips: Also five common problems you may get when working Windows Media Player. Take them for a reference?
1) Poor internet connection is one of the problems encountered with Windows Media Player. It is always smart but can fail to connect automatically in a few cases and will send a notification to that effect.
2) The second problem is corrupt Windows Media Player library. If this happens, you will be unable to access your stored files or even add new ones.
3) Thirdly, you are likely to experience interrupted playback especially when you are streaming videos with Windows Media Player. The performance of the media player will be greatly affected leading to slowed video buffering.
4) The fourth problem that you need to know about is CD ripping error which makes it impossible to extract audio files from the disc. Generally, it is a trouble-free mission when ripping CDs using the Windows Media Player and this problem occurs in selected instances.
5) Lastly, you can have the Windows Media Player freeze out when playing on a full screen mode. This will be nagging to those people who like enjoying their videos on full screen mode. The problem is majorly caused by incompatibility between the video format and the player which can be prevented by converting the files in advance.

More:

Wednesday, November 5, 2014

Again Celebration of Halloween Converters Promotion by Pavtube Studio!

This paper mainly tells us the introduction of several popular video converters on Pavtube studio which also has the Halloween discount!


Searched online, you guys may know so many popular videos converters that can especially meet most photographers or video editor’s requirements. With different functions or prices, it is hesitating for us to make some decisions, right? Follow the 2014 Halloween which past only several days, here we introduce some Pavtube Video Converters with special Halloween discounts. More details on Halloween Topic Page?

Pavtube MTS/M2TS Converter for Windows/Mac, especially for converting MTS/M2TS/M2T/TS/AVCHD/MOD/TOD footage to almost all video formats. What’s more, so many popular editing tools or media devices you can find listed on output items in this program. What else we also call it as a simple editor because you can adjust your files in ‘Editor’, like trim, crop, subtitles, etc. Let’s just make our MTS/M2TS compatible with everything.

Pavtube Video Converter for Windows/Mac, which is a functional assistant that can handle almost all HD/SD audio/video formats. For another way, it’s the best one for Tivo/DVR recordings. So other items you can have a try on main interface such as ‘Settings’, ‘Editor’, ‘Merge into one’, etc. All Windows operation it can work well. Also, GPU acceleration technology is available. For example,  iPad Air 2, iPad Mini 3, iPhone 6 plus, iPhone 6, Galaxy Note 4, Galaxy Note Edge, Nexus 6, Nexus 9, Kindle Fire HDX, Surface Pro 3, etc are offered there.


Pavtube HD Video Converter for Windows/Mac, the biggest highlight this one can handle HD digital camcorder footages such as AVCHD (MTS, M2TS), MXF, MOV, etc. Others? Deinterlace to get the better video, advanced adjustments for some professional video editors, wide range of outputs and supported devices, etc.

Pavtube MXF Converter for Windows/Mac, especially designed for MXF footages which shot by MXF cameras. For example, it can convert MXF files for free playback on iDevices, Android devices and media players. Furthermore, MXF files batch conversion can be also supported. Is that cool?

Pavtube MXF MultiMixer/iMixMXF, do you know the biggest characteristic of this program? Keep multiple audio tracks/channels in multi-track MKV/MP4/MOV formats, surely with rich editing functions. On the output list, you can find the item ‘Multi-track Video’ that other products don’t have. Others for example, batch conversion, merging and splitting. 
For Blu-ray or DVD rippers, you can also see here. Pavtube DVDAid for Windows/Mac or BDMagic for Windows/Mac. I’m sure it can meet your needs such as ‘Copy’ files, rip DVDs or Blu-rays, etc.


Whatever video formats shot by cameras you wanna edit for a nice enjoyment or upload on websites, the programs we mentioned above can do you a big favor. For now, I have to mention here is to celebrate the 2014 Halloween, such a big discount on this paper! 50% OFF on all BD/DVD or Video tools! Only 5 days left! What are you waiting for?

Monday, November 3, 2014

What Are 10 Easy Steps for Editing Sony F3 XDCAM Videos in FCP 7?

This guide can generally tell you 10 easy steps for editing Sony F3 XDCAM videos in FCP 7 and the introduction of another converter.


‘XDCAM Transfer’---an efficient and simple tool provided by Sony.
Cause XDCAM footage recorded to SxS cards which shot by Sony PMW-F3 camera can’t work well with these files natively. Sony has provided an efficient and simple tool called ‘XDCAM Transfer’ that addresses this exact problem. Now let’s see together how to get XDCAM videos accepted by FCP 7 with this transfer.


1. Install required software (listed below) and reboot as needed.
2. Open XDCAM Transfer.  
3. From the XDCAM Transfer menu, select “Preferences”.
4. On the Import tab, set the folder that the transferred material will be saved to, and close the Preferences menu.
5. In the main XDCAM Transfer interface, click the Add button in the bottom-left corner.  
6. Browse to either a mounted SxS card in a card reader, or a copy of the “BPAV” folder that was saved to a hard drive on-location.
7. Click on the new item in the left “Source” pane, then select “Import All Clips” from the File menu.
8. Open Final Cut Pro 7.
9. From the File menu, select “Import”.
10. Select the clips from the import folder you specified in your XDCAM Transfer Preferences menu.  Now you’re ready to edit!


Tips: This workflow is only for Intel based Macs (MacBook Pro Laptops and MacPro Towers) with OS X v10.5 or later and Final Cut Pro 7 installed.  This procedure will not work for PowerMac systems or Final Cut Pro 6 users.

Due to the disadvantages we saw above, any other methods we can easily import Sony XDCAM files in FCP 7? Fortunately, here we introduce you the Sony XDCAM to FCP Converter for Mac to do you a big favor. To celebrate the 2014 Halloween , you may now get the big discount on Halloween Topic page. Buy one Get one Free? You can get another DVD Creator for Mac free if you buy this product with one offer only expires on November 10.

Convenient steps are followed here with the screenshots, download the program and load your files in with two items called ‘Add video ‘or ‘Add from folder’. Especially for FCP, there are several types on the format list like ‘Final Cut Pro’>>’Apple ProRes Codec 422’, etc. If you get the preparation done, you can click the ‘Convert; button to start the conversion. Otherwise, ‘Settings’ or Editor’ items you can walk in for a further exploration. 


Additionally, this program has been already tested for the new operation Mac OS X 10.10 and it works well. Any opinions or suggestions you can leave the comments below.

Related: