Friday, January 3, 2014

Best Blu-ray to H.264 MP4 Converter Review: Handbrake vs Pavtube Blu-ray Ripper

A comparison the better way of ripping protected commercial Blu-ray to H.264 MP4 format with Handbrake or Pavtube Blu-ray Ripper, so that you can playback Blu-ray on computer, smartphones, tablets or other devices.
Handbrake is a popular free software to help convert various video formats; many of us may have used it to backup DVD to H.264 for preserving or playback. In this article, we will test out the best solutions of ripping Blu-ray to H.264 MP4 using Handbrake or a top Blu-ray ripping tool like Pavtube BDMagic.


How to use Handbrake to rip Blu-ray to H.264 MP4 Video? 
   
Part 1. Handbrake workflow:

Step 1. Before starting the transcoding process with Handbrake, you need to use an unlocking software to break the Blu-ray's protection. In this case we chose AnyDVD, but no Mac version available atm. Besides just running AnyDVD and decrypt the whole disc to the hard drive first.

Step 2. Open up Handbrake. Make sure the High Profile is selected and then select Source -> Video File.

Step 3. Browse to the BDMV folder of your Blu-ray disc and inside the STREAM folder select the biggest m2ts file and click Open. 

Step 4. With the movie loaded it is time to set the output file by clicking Browse. The MP4 container should be already selected. Now in the picture tab you can set the output size. In this example we are keeping the full resolution so we selected Strict anamorphic. Open the Video tab and move to the next step.

Step 5. The codec we will use is of course H.264. Now a few words about the settings here. In this example I will use constant quality (1) with a 20 value. Constant quality is a faster encoding method than the traditional 2-pass option and tries to keep a constant quality on all your files, regardless of the movie length or content. That however means that you cannot know how big the file will be as it depends on the movie length, the CQ setting and the actual content. Usual values range from 18 to 26, with 18 being the "best" and 26 the "worse" quality. I am using this option for my mkv backups as I prefer to base my encoding on video quality and not file size.
Of course, you can always select the 2-pass option by setting a Target Size and enable 2-Pass Encoding. The Turbo first pass option will help you save some time without a slight decrease on quality so if you want to encode faster, select it as well. I suggest you give at least 4GB to your file if you are using 1080p and at least 2GB for 720p. If you go over 4GB select Large file size next to the MP4 container option. Now click the Audio tab.

Step 6. Here you have to select the audio track you want to add in the MP4 file. Selecting AC3 Passthru will actually make an AC3 track off your DTS audio as DTS is not supported by the MP4 format. You can also downmix to stereo AAC using Dolby Pro Logic II. 

Make sure you click Add track after selecting the right track and settings and that it appears in the list below. Then click Subtitles.

Step 7. Here you can add subtitle streams in your MP4 file. Unfortunately Handbrake does not support processing Blu-ray subs, so you keep to have them in SRT format. If you do, import them and then after setting the language and if you want them to appear by default, click add to add them to the list below.

Step 8. That's all. Just click the Start button at the top and a few hours later you will have a HD MP4 file.


It's somehow complex but acceptable as the best free solutions; now let's try with Pavtube Blu-ray Ripper to see how it works.

Part 2. How to use Pavtube BDMagic to rip Blu-ray to H.264 MP4 Video? 


This Blu-ray Ripper is developed by Pavtube studio; more info can be found in http://www.multipelife.com/bdmagic

First, this program has two version: BDMagic and BDMagic for Mac.
Good News! Pavtube Release a New Site - multipelife.com with Product Migration and Name Change. Pavtube Blu-ray Ripper has been renamed as BDMagic. Like us to get 20% off BDMagic on Windows/Mac platform: https://www.facebook.com/pavtubefans/app_209569249055691 
Expire on Jun 4th.
Before purchase, you are able to download a free trial version to have a try. Now get it installed anyway and let's move on.

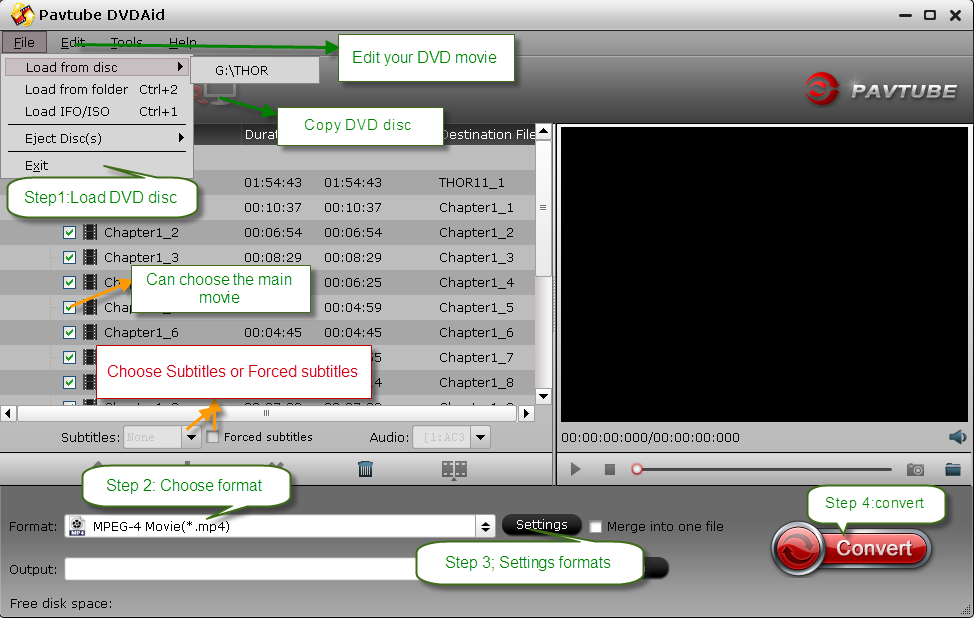
Step 1. Run Pavtube BDMagic; load Blu-rays.

It dose not only support loading both Blu-ray and DVD disc, but also support Blu-ray folder, Blu-ray ISO, DVD folder and DVD IFO/ISO files.

It seems during the importing, the disc would be decrypted already.
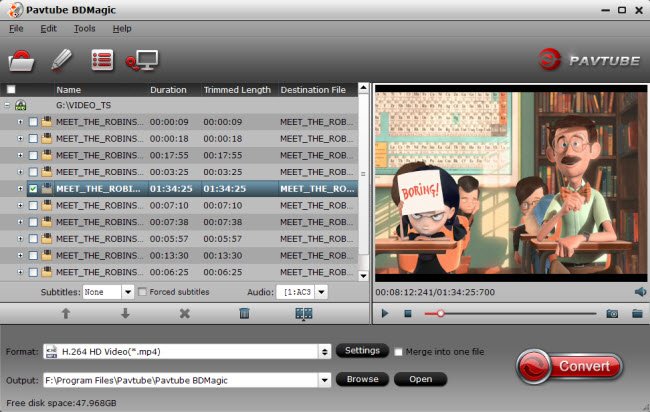
pavtube bdmagic 

Step 2. Choose H.264 MP4 format.

Click the "Format" drop-down list and choose HD Video>H.264 HD Video(*.mp4). Or we can enter "H.264 MP4" in the small search box to quick locate matched presets. We can also choose presets like iPhone, iPad, iPod, Android and Windows 8 RT/Pro phoneS/tabletS, etc. for particularly using.
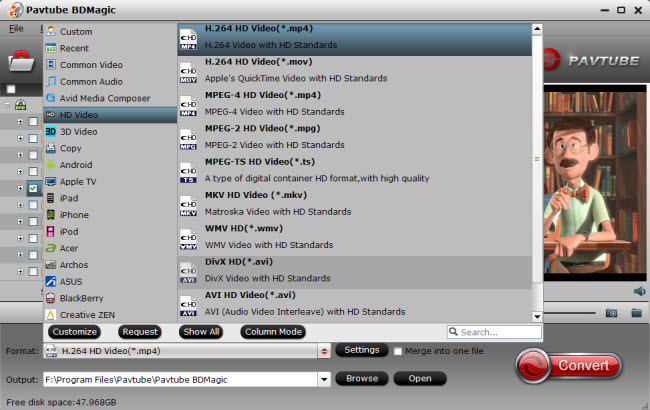
rip blu-ray to h.264 mp4  

Step 3. Adjust target video specs (Optional)

Click "Settings" as bellow to check the source/target video size, bitrate, frame rate and other settings in one go; you will be able to know the target video size with different bitrate settings immediately.

Step 4. Start converting Blu-ray to H.264 MP4.

Now hit the big red "convert" to start the conversion. Wait for moments, we can hit "Open" or "Open output folder" to quick locate the converted video.

Conclusion:
Handbrake is a good free software; but it seems to be not easy-of-use especially for people who are not tech-savvy; also no Mac solution available. While Pavtuve Blu-ray Ripper works beautifully with easy-to-use interface and all-in-one workflow; it' should be a great choice and well worth the payment.

More details Blu-ray ripping guides can all the found here: http://www.multipelife.com/bdmagic/how-to-use-bdmagic

Thursday, January 2, 2014

2016 Top 5 Best HD Video Converter for Mac Review

"The best HD Video Converter for Mac software can help you show and tell your family and friends about all your favorite moments, whenever and wherever." - Anna Said

Nowadays, most high-end cameras and camcorders can record full HD 1080P video, that's wonderful. But these HD video formats are not easy to use on Mac, with the popularity of HD videos, you will have more and more issues with the incompatibily. So this comes with many HD Video Converters for Mac on the market.

HD video converter for Mac is used to decode and encode High-Definition HD video files. So which is an outstanding video conversion tool for Mac OS X users? In this article, we will give you the reference for choosing the right HD Video Converter for Mac. Before judging, we has been tested and compared nearly a hundred HD Video Converters on the market, and finally we confirmed six best products for your reference. Just keep on reading!

Read more:

Here is the comparison chart, if you want to know more, please go on reading:

Top 1. Pavtube HD Video Converter for Mac

Price: $35


A professional video converting tool that can handle almost all video formats on the digital market. It was designed to convert high-definition videos from camcorders, digital video recorders and the like into popular video formats on Mac, including MKV, MP4, VOB, MPG, MOV, Tivo, WMV, 3GP, AVI, DV, TS, FLV, 3GP, 3G2, MP3, FLAC, MKA, OGG, WAV, etc. so that you can enjoy the HD videos on Android Devices, Windows 8 Devices, iPad 3, iPhone 5, iPod 5, Apple TV 3, PS3, Xbox, WD TV player, Video-DVD player, PSP and edit in Final Cut Pro (X), FCE, iMovie, Adobe Premiere, Avid Media Composer, etc.

Main Features:
  • Various output video formats that supported for popular editing tools and media players
  • Turn 1080p/720p MKV, MOV, MXF, MTS, AVI, MPG, VOB to compatible format for free playback, editing, uploading and burning.
  • Powerful editing functions (e.g. trimming, cropping, adding watermarks, add video effect, etc), we also called it ‘Tiny Editor’
  • Audio and video sync technology that can handle your original files smoothly

Unique Advantages:
  • With a 6X conversion speed, you can save a lot of time
  • Both SD and HD videos you can handle well
  • Good settings you can adjust on your own
  • Perfect customer service you can enjoy all the time

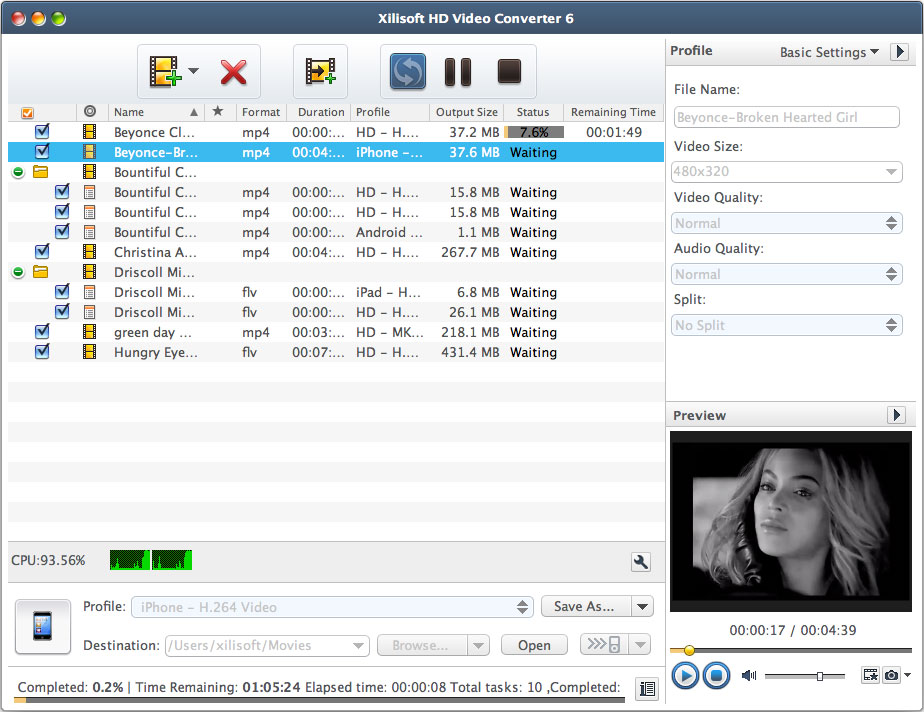
Top 2. Xilisoft HD Video Converter for Mac

Price: $39.95

Xilisoft HD Video Converter is a professional HDTV converter tool designed to transform your video to various high definition video formats like HD ASF Video, HD AVI Video, HD H.264 Video, HD Quick Time Video, and HD MPEG4 Video. It can convert TS to WMV HD, AVI to TS HD, WMV HD to TS HD. Xilisoft HD Video Converter can also convert audio to audio, video to audio and picture. The HD Video Converter also supports the H.264 video format, offering much higher efficiency than MPEG2 standard used in DVD videos.


Key Feature
  • Support HD videos such as AVCHD (mts, m2ts), TS, H.264/AVC, MKV.
  • Convert popular formats like AVI, MPEG, WMV, MP4, DivX, RM, MOV, and FLV.
  • Convert HD to SD videos and audios; supports CD decoding.
  • Transfer output files to iPad/iPad2/iPhone 4/iPod/PSP/iTunes directly after conversion.

Pros
  • Very ease to use
  • Good compression and fast process
Cons
  • Takes a lot of CPU
  • Output can be a big file

Top 3. Aiseesoft HD Converter for Mac

Price: $35

Aiseesoft HD Video Converter is best HD Converter to convert HD video to general video, convert general video to HD video, and among HD videos. Furthermore, this HD Converter can convert HD video, general video and almost all audios to AAC, AC3, AIFF, AMR, AU, FLAC, MP3, M4A, MP2, OGG, WAV, WMA.


Key Feature:
  • Convert HD videos and general videos.
  • Convert audio files.
  • Edit output video effect.
Pros
  • Powerful video convert function
  • Product works decent
  • It allows you to add a video watermark
  • Fast conversion speed.
Cons
  • Worst Customer Service. Aiseesoft doesn't care about their customers, want to make a buck at our expense!

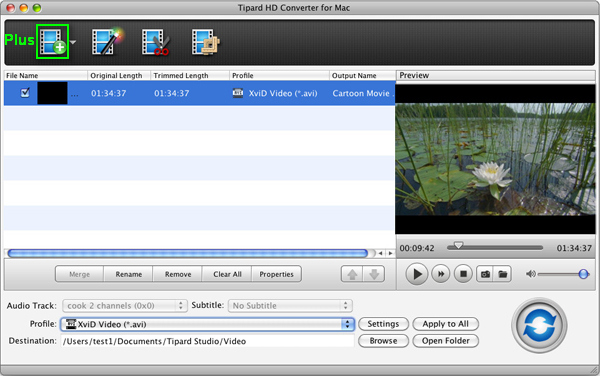
Top 4. Tipard HD Video Converter for Mac

Price: $39.00

Fully support most HD(High-Definition) video encoder and HD decoder, Tipard HD Video Converter can convert 1080P, 720P and other HD video to general video, convert general video to HD video, convert among HD videos, such as HD TS, HD MTS, HD WMV, HD MPG, HD MPEG4, H.264/AVC, HD AVI, HD ASF, etc. Moreover, this HD Converter has audio conversion and audio extraction functions. Using Tipard HD Video Converter, you can easily get any segment of the videos, adjust video frame size, set video effect, add watermark, and merge videos.


Key Feature:
  • Convert among HD videos.
  • Convert HD video to general video.
  • Convert general video to HD video.
  • Edit your video.
Pros
  • It has a friendly, simple and very intuitive interface
  • It captures video from multiple devices in real-time
  • It eases the selection of video fragments and their composition
  • It includes numerous image effects and predetermined transitions
Cons
  • No "keep original resolution" option
  • The output profiles for specific electronic devices are not always up-to-date
  • Developer claims you can trim input files with this program but it isn't very clear how to trim
  • The trial is only available for Windows.
  • It's only available in English.
  • High system requirements to fully use the application.

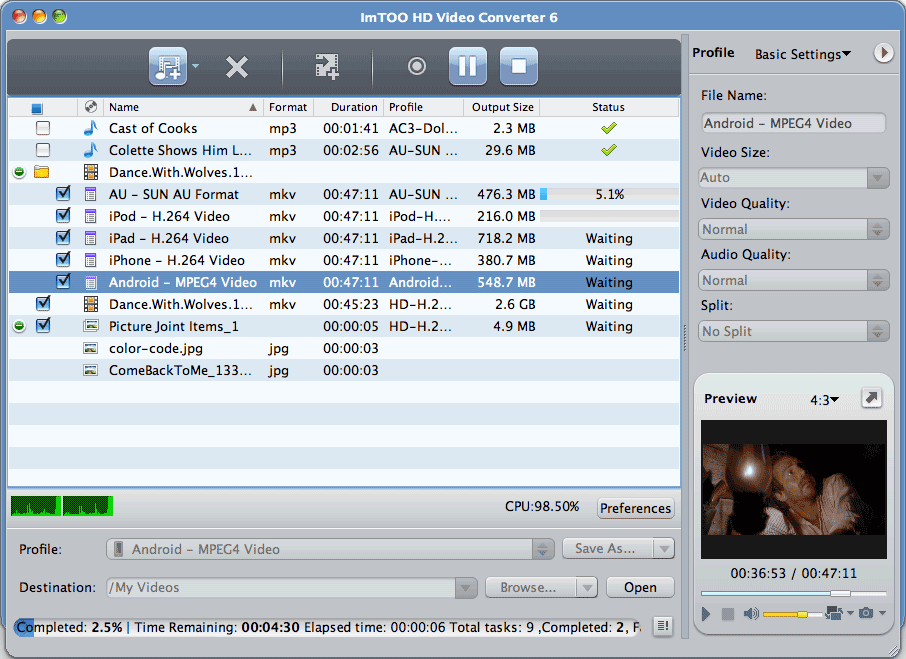
Top 5. ImTOO HD Video Converter for Mac

Price: $39.95

ImTOO HD Video Converter is a HD converter and HD encoder software designed to transform your videos to diverse high definition video formats like HD ASF Video, HD AVI Video, HD H.264/AVC Video, AVCHD video, HD Quick Time Video, HD MPEG4 Video, etc. e.g. convert AVI to HD, convert MKV files to HD. On top of this, it can also convert audio to audio, video to audio and picture, as well as create videos from pictures.


Key Feature:
  • Convert HD videos in Full-HD 1080p.
  • Convert HD videos to different video formats.
  • Extract music/pictures from videos & convert music to different formats.
  • Makes different videos playable on devices such as iPod, iPhone, Apple TV, PSP, PS3, Xbox & many others.
Pros
  • Great interface
  • Great format support
  • Lots of new profiles
  • Up-to-date with the most recent devices
  • Video editor
Cons
  • No video editor
  • Some features are hard to find

After reading the review above, do you have your option now? Just choose the Best HD Video Converter for Mac to solve all your issues with the HD Video incompatibily with Mac applications!

Read More:


Permanent Play Rental DVDs on Transformer Book T100 Windows 8.1 Tablet

The Asus Transformer Book T100 is a windows 8.1 tablet. It houses a 10.1-inch IPS display with a resolution of 1,366 x 768 pixels, it will happily play 1080p video. It can also be a 'proper' laptop, running basic Windows desktop applications for multimedia and productivity. Plus, with a scaled-down version of the integrated graphics chip from Intel's Ivy Bridge processors, it should also play your favourite 3D games or movies as well.

Here this post is mainly talking about how to put and play (rental/bought) DVD movies on Transformer Book T100. For users who gather lots of DVD discs in their home, it's really good idea to stream DVDs to Book T100, after that, we can enjoy movies anywhere anytime as long as we take the Book T100.

Required Software:
Read Also: 2014 Top 5 Best DVD Ripper Program Review | Which One Will You Choose?

The Reason why we choose Pavtube DVD Ripper? 

The Windows 8 DVD Ripper that designed by Pavtube, is good at dealing with kinds of DVD movies, such as DVD disc, DVD ISO or DVD IFO image files. It supports 1:1 DVD archiving. You are allowed to quickly backup DVDs with no quality loss to your hard drive as well as backup the main movie files with selected chapters you like. Above all, it could import movie from DVD disc and encode DVD movies to all popular media formats, including WMV, MPEG, AVI, MOV, Xvid, Divx, MP4, FLV, 3GP, QuickTime, DV, MPEG-4, AVC MP4, MP3, AC3, WAV, AAC, OGG, FLAC, etc. Moreover, it take full advantage of NVIDIA's CUDA technology and ATI Stream (AMD APP) technology to accelerate conversion speed greatly. The GPU acceleration saves users lots of time when using H.264 codec to do format conversion.
How to convert DVD movies to Asus VivoTab Smart?

Step 1. Download and install this DVD to Transformer Book T100 converter on your computer.

PS: This application can work on Windows XP/2003/Vista/Windows 7/Windows 8 or Mac OS X 10.5 or 10.5 above(including Mac OS X Leopard, Snow Leopard, Mac OS X Mountain Lion) with 1G Hz or above Intel processor


Step 2. Import your source DVD movies.

Step 3. Choose H.264 Video (*.mp4) as output for your win8 tablet.

Step 4. Click on "Settings" to modify video codec, resolution, frame rate, sample rate etc. Of course, different settings will have different results. And you should Know, the higher video quality with bigger video size, please pay attention to your storage. According to my own experience, the following settings are recommended for you. Which is the most suitable for Transformer Book T100.

Video
  • Codec: h.264
  • Size: 1280*720
  • Bitrate: 2000
  • Frame rate: 24

Audio
  • Codec: aac
  • Sample rate: 48000
  • Bitrate: 128000
  • Channels: Stereo

Step 5. Start ripping DVD movies to Transformer Book T100 by clicking on the "Convert" button.

Once the conversion completed, transfer the result MP4 video file to Book. Hope this Transformer Book T100 DVD Ripper also works well for you. That's all.

Related:

Edit JVC GY-HM650U ProHD MXF files with iMovie on Mac 10.9 Mavericks

Summary: This guide will show you how to easily convert and import JVC GY-HM650U ProHD MXF footage into iMovie for further editing on Mac (OS X 10.9 Mavericks included).

"I have a JVC GY-HM650U ProHD camcorder that records .MXF video format, now I would like to import these projects to iMovie for editing. What I want is to edit MXF files smoothly without codec problems, what video codec should I use? Can you recommend some software which can help me import and convert JVC MXF to iMovie smoothly?"

Everything goes perfect until you try to edit JVC GY-HM650U .mxf file in iMovie. Fail in import the MXF file into iMovie as iMovie can't recognize this file. Why does it happen? The answer is MXF file format incompatibility with iMovie (even iMovie'11).

As far as I know, in order to edit JVC GY-HM650U ProHD MXF files in iMovie flawlessly, the best method is to convert JVC MXF to Apple InterMediate Codec (AIC) which is a best editing codec for iMovie.

At first, you need 3rd-party tool - Pavtube MXF Converter for Mac

It is a professional MXF to iMovie Converter which can not only convert JVC GY-HM650U ProHD recorded MXF files to AIC for iMovie editing on Mac OS X Mavericks, but also provide simple video editing functions for you. This Mac MXF Converteris especially designed for converting Panasonic P2 MXF, Sony XDCAM MXF, http://www.pavtube.com/canon-camera-file-transcode.html]Canon XF MXF files for editing in Final Cut Pro, Final Cut Pro X, Final Cut Express, iMovie, Avid, Adobe Premiere etc. Below is how. (Learn more about MXF: MXF Column)

Guide - Encode JVC GY-HM650U ProHD MXF to AIC for iMovie editing on Mavericks

Step 1. Import MXF files from JVC GY-HM650U to the top MXF to iMovie Converter for Mac.

(Note: Before conversion, you need to transfer MXF files from your JVC GY-HM650U to Mac Hard Drive, then click the "add" button to browse to import MXF videos. This MXF Converter for Mac support batch conversion)


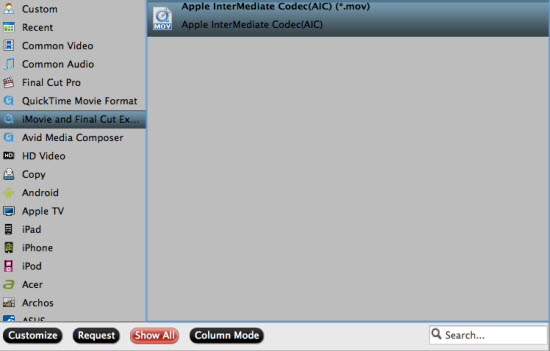
Step 2. Click the Format bar, and move mouse cursor to "iMovie and Final Cut Express -> Apple InterMediate Codec (AIC) (*.mov)", it's the best format for editing in iMovie.

convert mxf to aic mov for imovie

Step 3. Click "Convert" button to start transcoding JVC GY-HM650U ProHD MXF files to AIC Codec for iMovie under Mac OS X 10.9 Mavericks.

iMovie Importing: How to import video files or projects to iMovie?

Some more helpful features of the app:

1. Settings- click to set video resolution(1920×1080/1440×1080/1280×720/720×480), bitrate(from 1Mbps to 20Mbps), frame rate (24p/30p)

2. Editor (next to "Add" icon)- click to set deinterlace, denoise, mute, volume up, trim, crop, etc.

So there you have it. Pretty simple. After the workflow, you can go to the output folder to find the converted video files. Now you are free to start importing/editing JVC GY-HM650U ProHD MXF files in iMovie under Maveircks without problems.

Wednesday, January 1, 2014

Decrypt and remove commercials from Tivo recording for playback on Windows/Mac

A Tivo Converter Customer Review From Pavtube:
I have recorded an entire season of favorite TV plays via Tivo box and it have the commercials on it with Tivo. How can I skip them? TiVo DVRs do not offer a commercial skip feature. It’s totally understandable as the commercial is a part of the source signal; but it troubles me a lot when playback the recorded TV plays: I have to pause and skip the ads manually. I used to be fine with that but now my daughter grows up and she’s fond of this: every time when it comes to ads she will cry. I’m totally not computer-savvy but have to look for a good solution.
It’s widely accepted that TV recordings from Tivo box are protected; we cannot edit or change it nor remove the ads within that context. After spending several days browsing the websites, finally I get this Pavtube Video Converter Ultimate to work. It’s very easy to convert tivo files and you don’t need to change any specs; also the ads trimming is quite simple. Moreover, I also convert and copy many Disney Blu-ray movies to my Nabi 2 android tablet, my daughter can watch these movie on Nabi 2 when I'm busying in my yard.
Note: If you only have a Mac, the Mac version is more suitable
My workflow: Decrypt and remove commercials from Tivo recordings for different purposes on my computer
1. Install and launch this Tivo Converter; drag and drop Tivo recordings to it. Or you can click the small “plus” icon to load Tivo recordings. Pls note the first disc-like icon is to load discs – yes this tool also support converting Blu-rays and DVDs. 
2. Submit Tivo Key. 
This Tivo Converter requires your Tivo key to play the recordings. (Tips: How To Find Tivo Media Access Key) 
Right after you drag the media files to this program, it will pop up a window asking for the key; see this screenshot: 
Enter it and import the media files again; it will remember your key automatically so that we don’t need to set it any more. 
3. Remove commercials from Tivo recordings. 
Now back to the main interface; hit the pencil-like icon on the top to enter the video editor. It’s on “Trim” mode by default. Drag the two small triangles on the progress bar, you can customize the start/end point. 
Or you can submit the start and end timing on the below.
Hit “OK”. 
4. Choose format and convert. 
Find the “Format” drop-down list, there’re many presets for different using. As my only need is to watch on computer and Nabi 2 tablet, the MP4 format is most common so I chose it. Then hit the big “Convert” to start converting Tivo recording or Disney Blu-ray movie to MP4 on computer. After it completed, click “Open output folder” to get converted videos and save it to my drive for playback.
Here is some Related articles about Pavtube softwares: