XMedia Recode is a Freeware video and audio transcoding program for Microsoft Windows developed by Sebastian Dörfler. It can import and export many types of files such as WMV, MP4, MP3, 3GP, Matroska and more. XMedia Recode can convert unprotected DVDs or DVD files to any supported output file. XMedia Recode features a drag-and-drop style interface and uses job queuing and batch processing to automate the task of transcoding multiple files.
If you just switched to Mac, you will find there is no Mac version of XMedia Recode. Being so used to XMedia Recode, how you can finish your task without it? Don’t worry, without XMedia Recode for Mac, you can use alternative to XMedia Recode for file conversion. This article introduces a smart free Pavtube iMedia Converter for Mac replacement and a professional XMedia Recode Mac alternative to manage file conversion for you.


Other Download:
- Pavtube old official address: http://www.pavtube.cn/imedia-converter-mac/
- Cnet Download: http://download.cnet.com/Pavtube-iMedia-Converter/3000-2194_4-76177788.html
Alternative to XMedia Recode for OS X El Capitan
Step 1: Add files.
Click the "Load file(s)" or "Add video" button to import files

Step 2. Set output format
Clicking the Format bar, you can choose output format from the format list or customize which formats to be shown on the list.
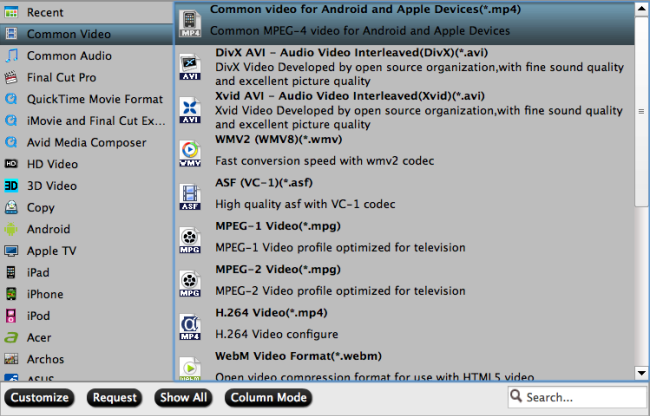
All formats here are set with optimized video/audio codecs, bitrates, frame rates, etc. But you can still specify as you like by clicking Settings button.
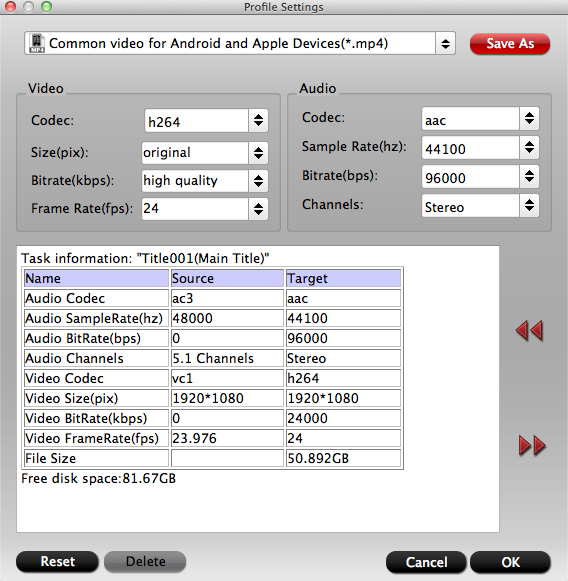
Step 3. Edit Video.
In the Profile Settings window, you can choose or specify exactly the parameters you like. And in the Task information section, you can compare the detailed information of the source video and the target video.
In the Profile Settings window, you can choose or specify exactly the parameters you like. And in the Task information section, you can compare the detailed information of the source video and the target video.
In “Video Editor” there are seven edit tabs: Trim, Crop, Text Watermark, Image/Video Watermark, Effect, Audio Editor and Subtitle.

Play/Pause: Click to start playing the current video or pause the playing.
Stop: Click to quit playback.
Previous Frame: Click and go back to the previous frame.
Next Frame: Click and go to the next frame.
Left square bracket: Click to set the start time for trimming.
Right square bracket: Click to set the end time for trimming.
Flip Horizontal: Click to flip the image horizontally.
Flip Vertical: Click to flip the image vertically.
Flip 90°towards left: Click to flip the image 90°towards left.
Flip 90°towards right: Click to flip the image 90°towards right.
Rotate counter-clockwise: Click to flip the image 90°towards left.
Rotate clockwise: Click to flip the image 90°towards right.
Reset: Click to restore default value.
Step 4. Start Conversion
Clicking the Convert button on main interface, you can go to Conversion window to start conversion.
Clicking the Convert button on main interface, you can go to Conversion window to start conversion.
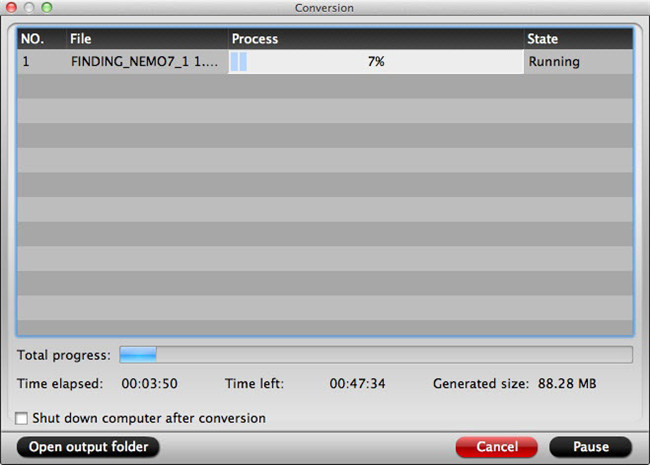
You can find conversion information on the window, such as Time elapsed, Time left, Generated size, and Estimated size.
Ticking off Shut down computer after conversion option, you can leave the program running and do other things instead of waiting around for the conversion.
After the conversion, you can click Open output folder to popup output directory with the converted files.
Read More:
- Top 10 bitRipper Alternatives on Windows 10
- Best Alternative to Handbrake 1.0.0 on Windows 10
- Rip DVD to Xvid with VirtualDubMod Alternative
- DVDFab Passkey Lite Replacement
- AnyDVD Alternative: Pavtube ByteCopy
- MPEG Streamclip Alternatives for Windows 10/8.1
- SUPER Alternatives on Windows 10
- Top 10 iMovie Alternatives for Mac/Windows PC
- Top 15 MediaInfo Alternative and Similar Softwares